Python, cmake and dlib on macOS

There is a very easy possibility to use dlib on macOS. Additional packages and package manager (for example brew) are not needed. Here are the instructions which you can follow independently in a few minutes.

Requirements

Steps

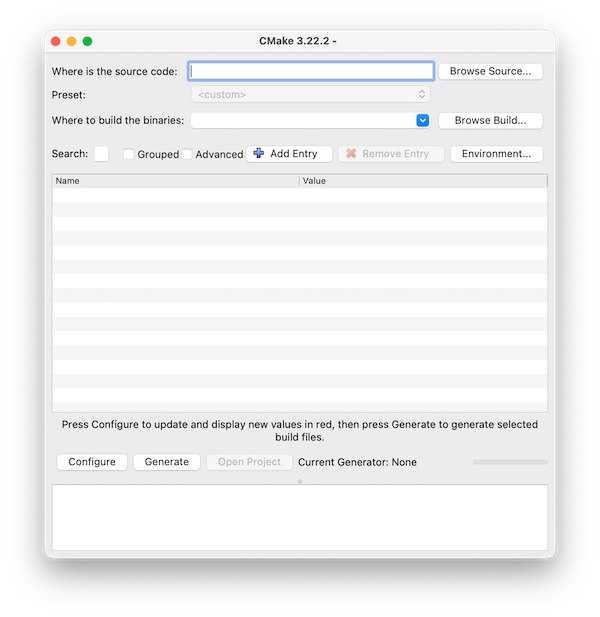
Download latest cmake version as *.dmg or *.tar.gz from cmake.org. After the app has been successfully installed, you can start it (but it is not necessary).

CMake.app on macOS

Inside the CMake application you will find the needed binary. All you have to do now is create a symlink and optionally check the version.

# create symlink
$ sudo ln -s /Applications/CMake.app/Contents/bin/cmake /usr/local/bin/cmake

# check version (optional)
$ cmake --version

Note: Close the terminal and restart if cmake is not found.

If you now want to install dlib in your Python project (in the virtual environment), there will no longer be an error message. Note that the installation may take some time.

# install dlib
(venv) $ pip3 install dlib

# verify dlib installation (optional)
(venv) $ pip3 freeze

That’s it. Made super easy and super fast without bloating the entire system with unnecessary ballast.

RPLidar A1 with ROS Melodic on Ubuntu 18.04

If you are (for example) an owner of NVIDIA Jetson Nano Developer Kit and RPLidar, you can use ROS Melodic to realize obstacle avoidance or simultaneous localization and mapping (SLAM). Here is a beginner’s tutorial for installing the necessary software.

Requirements

Objective

Installing ROS Melodic on Ubuntu 18.04 with Catkin Workspace and use of Python 2.7 for RPLIDAR A1.

Preparation

If you already have the necessary packages installed, you can skip this step.

# update & upgrade
$ sudo apt update && sudo apt upgrade -y

# install needed packages
$ sudo apt install -y git build-essential
Install package

If you run Ubuntu in VirtualBox it is recommended to install the Extension Pack and the VirtualBox Guest Additions.

# install needed packages
$ sudo apt install -y dkms linux-headers-$(uname -r)

# Menu -> Devices -> Insert Guest Additions Image

# reboot system
$ sudo reboot

Install ROS Melodic

For Ubuntu 18.04 you need the latest version ROS 1 (Robot Operating System) Melodic. The packages are not included in the standard sources.

Hint: If you still want to use a newer version of Ubuntu (like 20.04) you need ROS 2 Noetic!

Note: By default the ROS Melodic is using Python 2.7. For higher Python version the following description is not working! But it would also be possible to use Python 3.x, only the steps for installation are little different.

Add ROS repository

The ROS Melodic installation is relatively easy but can take a while depending on the internet connection, as there are many packages to be installed.

# update and install packages
$ sudo apt update && sudo apt install -y ros-melodic-desktop-full python-rosdep python-rosinstall python-rosinstall-generator python-wstool

# verify installation (optional)
$ ls -la /opt/ros/melodic/
add bashrc source
# initialize & update
$ sudo rosdep init && rosdep update

# show ros environment variables (optional)
$ printenv | grep ROS

Create a Catkin workspace

You now need the Catkin Workspace with the necessary RPLIDAR packages/binaries (RPLIDAR SDK from Slamtec).

# create and change into directory
$ mkdir -p $HOME/catkin_ws/src && cd $HOME/catkin_ws/src

# clone Git repository
$ git clone https://github.com/Slamtec/rplidar_ros.git

# change directory
$ cd $HOME/catkin_ws/

# build workspace
$ catkin_make

# verify directory content (optional)
$ ls -la devel/

# refresh environment variables
$ source devel/setup.bash

# verify path variable (optional)
$ echo $ROS_PACKAGE_PATH

# build node
$ catkin_make rplidarNode

Okay, that’s it… Wasn’t very difficult, but a lot of steps.

Start ROS Melodic

Now connect the RPLIDAR device. If you use VirtualBox, pass through the USB from host to guest.

# list USB device and verify permissions
$ ls -la /dev | grep ttyUSB

# change permissions
$ sudo chmod 0666 /dev/ttyUSB0

From now on you need two terminals! Once you have successfully gotartet roscore in the first terminal, switch to the second terminal.

# change directory
$ cd $HOME/catkin_ws/

# launch roscore
$ roscore

Note: Don’t close the first terminal though or don’t stop the running process!

# change directory
$ cd $HOME/catkin_ws

# refresh environment variables
$ source $HOME/catkin_ws/devel/setup.bash

# run UI
$ roslaunch rplidar_ros view_rplidar.launch

Sorry for using screenshots but my provider doesn’t allow the use of certain words or characters. 🙁

OpenCV & SSD-Mobilenet-v2

The first steps with OpenCV and haarcascades are done and now it should really start. With other models you can detect easily more objects. In this tutorial I will show you therefore a different possibility with your Jetson Nano device. I recommend switching to desktop mode for performance reasons.

Requirements

  • Jetson Nano Developer Kit (2GB / 4GB)
  • 5V Fan installed (NF-A4x20 5V PWM)
  • CSI camera connected (Raspberry Pi Camera Module V2)

Note: You can also use any other compatible fan and camera.

Objective

The goal is to recognize objects as well to mark and label them directly in the live stream from CSI camera. OpenCV and SSD-Mobilenet-v2 with Python3.6 are used for in this tutorial.

Preparation

As always, it takes a few steps to prepare. This is very easy but can take a while.

# update (optional)
$ sudo apt update

# install needed packages
$ sudo apt install cmake libpython3-dev python3-numpy

# clone repository
$ git clone --recursive https://github.com/dusty-nv/jetson-inference.git

# change into cloned directory
$ cd jetson-inference/

# create and change into directory
$ mkdir build && cd build/

# configure build
$ cmake ../

# download only SSD-Mobilenet-v2
# all other you can download later
# PyTorch is also not needed yet

# build with specified job and install
$ make -j$(nproc)
$ sudo make install

# configure dynamic linker run-time bindings
$ sudo ldconfig

CSI Camera Object detection

When the preparation is successfully completed, you can create the first simple Python script.

# create file and edit
$ vim CSICamObjectDetection.py

Here is the content of the script. The important points are commented.

#!/usr/bin/env python3

import jetson.inference
import jetson.utils
import cv2

# set interference
net = jetson.inference.detectNet("ssd-mobilenet-v2", threshold=0.5)


def gstreamer_pipeline(cap_width=1280,
                       cap_height=720,
                       disp_width=800,
                       disp_height=600,
                       framerate=21,
                       flip_method=2):
    return (
        "nvarguscamerasrc ! "
        "video/x-raw(memory:NVMM), "
        "width=(int)%d, height=(int)%d, "
        "format=(string)NV12, framerate=(fraction)%d/1 ! "
        "nvvidconv flip-method=%d ! "
        "video/x-raw, width=(int)%d, height=(int)%d, format=(string)BGRx ! "
        "videoconvert ! "
        "video/x-raw, format=(string)BGR ! appsink" % (cap_width,
                                                       cap_height,
                                                       framerate,
                                                       flip_method,
                                                       disp_width,
                                                       disp_height)
    )


# process csi camera
video_file = cv2.VideoCapture(gstreamer_pipeline(), cv2.CAP_GSTREAMER)

if video_file.isOpened():
    cv2.namedWindow("Detection result", cv2.WINDOW_AUTOSIZE)

    print('CSI stream opened. Press ESC or Ctrl + c to stop application')

    while cv2.getWindowProperty("Detection result", 0) >= 0:
        ret, frame = video_file.read()

        # convert and detect
        imgCuda = jetson.utils.cudaFromNumpy(frame)
        detections = net.Detect(imgCuda)

        # draw rectangle and description
        for d in detections:
            x1, y1, x2, y2 = int(d.Left), int(d.Top), int(d.Right), int(d.Bottom)
            className = net.GetClassDesc(d.ClassID)
            cv2.rectangle(frame, (x1,y1), (x2, y2), (0, 0, 0), 2)
            cv2.putText(frame, className, (x1+5, y1+15), cv2.FONT_HERSHEY_DUPLEX, 0.75, (0, 0, 0), 2)

        # show frame
        cv2.imshow("Detection result", frame)

        # stop via ESC key
        keyCode = cv2.waitKey(30) & 0xFF
        if keyCode == 27 or not ret:
            break

    # close
    video_file.release()
    cv2.destroyAllWindows()
else:
    print('unable to open csi stream')

Now you can run the script. It will take a while the first time, so please be patient.

# execute
$ python3 CSICamObjectDetection.py

# or with executable permissions
$ ./CSICamObjectDetection.py

I was fascinated by the results! I hope you feel the same way.

First steps with Jetson Nano 2GB Developer Kit (Part 3)

In the two previous steps you installed the Jetson nano operating system and installed the necessary hardware pereferie. In this part you will learn how to recognize faces in pictures. In addition, it is shown how to use this remote via SSH/X11 Forward (headless).

Note: If you like to use the GUI, you can jump directly to section “Python & OpenCV” and adapt necessary steps.

Preparation

Since I use macOS myself, this tutorial will also be based on this. If you are a user of another operating system, search the Internet for the relevant solution for the “Preparation” section. However, the other sections are independent of the operating system.

If you haven’t done it, install XQuartz on your macOS now. To do this, download the latest version (as DMG) from the official site and run the installation. Of course, if you prefer to use a package manager like Homebrew, that’s also possible! If you do not have to log in again automatically after the installation, carry out this step yourself! That’s pretty much it. It shouldn’t need anything other than starting XQuarts.

Now start the SSH connection to the Jetson Nano (while XQuarts is running in the background).

# connect via SSH
$ ssh -C4Y <user>@<nano ip>

X11 Forwarding

You might want to check your SSH configuration for X11 on the Jetson Nano first.

# verify current SSH configuration
$ sshd -T | grep -i 'x11\|forward'

Important are following setings x11forwarding yes, x11uselocalhost yes and allowtcpforwarding yes. If these values ​​are not set, you must configure them and restart the SSHD service. Normally, however, these are already preconfigured on latest Jetson Nano OS versions.

# edit configuration
$ sudo vim / etc /ssh/sshd_config

# restart service after changes
$ sudo systemctl restart sshd

# check sshd status (optional)
$ sudo systemctl status sshd

Note: The spaces between slashes and etc is wrong! But my provider does not allow the correct information for security reasons.

You may have noticed that you established the SSH connection with “-Y”. You can check that with the environment variable $DISPLAY.

# show value of $DISPLAY (optional)
$ echo $DISPLAY
localhost:10.0

Attention: If the output is empty, check all previous steps carefully again!

Python & OpenCV

Normally Python3.x and OpenCV already exist. If you also want to check this first, proceed as follows.

# verify python OpenCV version (optional)
$ python3
>>> import cv2
>>> cv2.__version__
>>> exit()

Then it finally starts. Now we develop the Python script and test with pictures whether we recognize the faces of people. If you don’t have any pictures of people yet, check this page. The easiest way is to downnload the images into the HOME directory. But you can also create your own pictures with the USB or CSI camera.

# change into home directory
$ cd ~

# create python script file
$ touch face_detection.py

# start file edit
$ vim face_detection.py

Here the content of the Python Script.

#!/usr/bin/env python3

import argparse
from pathlib import Path
import sys
import cv2

# define argparse description/epilog
description = 'Image Face detection'
epilog = 'The author assumes no liability for any damage caused by use.'

# create argparse Object
parser = argparse.ArgumentParser(prog='./face_detection.py', description=description, epilog=epilog)

# set mandatory arguments
parser.add_argument('image', help="Image path", type=str)

# read arguments by user
args = parser.parse_args()

# set all variables
IMG_SRC = args.image
FRONTAL_FACE_XML_SRC = '/usr/share/opencv4/haarcascades/haarcascade_frontalface_default.xml'

# verify files existing
image = Path(IMG_SRC)
if not image.is_file():
    sys.exit('image not found')

haarcascade = Path(FRONTAL_FACE_XML_SRC)
if not haarcascade.is_file():
    sys.exit('haarcascade not found')

# process image
face_cascade = cv2.CascadeClassifier(FRONTAL_FACE_XML_SRC)
img = cv2.imread(cv2.samples.findFile(IMG_SRC))
gray_scale = cv2.cvtColor(img, cv2.COLOR_BGR2GRAY)
detect_face = face_cascade.detectMultiScale(gray_scale, 1.3, 5)

for (x_pos, y_pos, width, height) in detect_face:
    cv2.rectangle(img, (x_pos, y_pos), (x_pos + width, y_pos + height), (10, 10, 255), 2)

# show result
cv2.imshow("Detection result", img)

# close
cv2.waitKey(0)
cv2.destroyAllWindows()

Hint: You may have noticed that we use existing XML files in the script. Have a look under the path, there are more resources.

# list all haarcascade XML files
$ ls -lh /usr/share/opencv4/haarcascades/

When everything is done, start the script include specifying the image arguments.

# run script
$ python3 face_detection.py <image>

# or with executable permissions
$ ./face_detection.py <image>

You should now see the respective results. With this we end the 3rd part. Customize or extend the script as you wish.
This Blog is not death

What’s new? I have received various inquiries as to whether this blog is still being maintained. Yes he still will! Currently, however, a lot has changed in my life and through various security settings of my provider I have created a few tutorials directly on GitHub. So here are 2 categories which I would like to introduce to you.

Raspberry PI Tutorial

GitHub Tutorial: Lupin3000/Raspberry-PI-Tutorials

In this GitHub repository you will find instructions on how to use the small development board as a security analysis device. These instructions are simply intended to show which options the Raspberry PI offers and to provide an introduction to the topic of cyber security.

Adafruit Matrix LED

GitHub Tutorial: Lupin3000/AdafruitMatrixLED

I love the Adafruit Matrix LED! With a little python you can achieve everything your heart desires super quickly and easily. To make the start a little easier for you, I’ve created a few examples with Python. You are welcome to use these or (even better) develop them further.

More???

I also started to post some pictures and videos of my work on Instagram … Yes, I have to go with time too. 😉

So if you find the time and feel like it, just drop by these platforms and let yourself be inspired for your projects.

PyCharm CE remote execution

Since I’m back to develop more in Python and need to execute my Python scripts also on remote machines – I asked my self: “How can I do with PyCharm CE and without any Plugin?” The solution was very easy and this tutorial is about.

Requirements

  • VirtualBox VM (e.g. Linux Debian incl. user and ssh server configured)
  • PyCharm CE installed

Note: Of course you could also use any other option then a Debian vm. Just adapt the tutorial steps for your specific needs.

Objective

Use terminal and external tools of PyCharm CE to execute Python scripts on remote machines.

Introduction

For this tutorial I’m using a VirtualBox VM (Debian Linux) which do have only a NAT interface configured. So I need to enable Port-forwarding for SSH. If this is not the case for you – you can jump over to the section where I explain the important steps in PyCharm.

Analysis of stopped VM’s

As a first step I check my VM settings (just to verify).

# list all vm's (optional)
$ VBoxManage list vms

# list all vm's and grep for name & nic rules
$ VBoxManage list -l vms | grep -i "Name:\|NIC 1 Rule"

Analysis of running VM’s

I don’t know the IP – so I do start the VM and check their all settings.

# start specific vm
$ VBoxManage startvm "Debian" --type headless

# list all running vm's (optional)
$ VBoxManage list runningvms

# list all running vm's and grep for name & nic rules (optional)
$ VBoxManage list runningvms -l | grep -i "Name:\|NIC Rule"

# list specific vm Nic informations (optional)
$ VBoxManage showvminfo "Debian" | grep -i "NIC"

# get IPv4 information of specific vm
$ VBoxManage guestproperty get "Debian" "/VirtualBox/GuestInfo/Net/0/V4/IP"

Add Port-forwarding

Now I know the IP (which in my case will not change) and can enable the Port-forwarding for SSH easily.

# shutdown specific vm
$ VBoxManage controlvm "Debian" poweroff

# add port-forwarding rule to specific vm
$ VBoxManage modifyvm "Debian" --natpf1 "SSH-PW,tcp,127.0.0.1,2222,10.0.2.15,22"

# list specific vm Nic informations (optional)
$ VBoxManage showvminfo "Debian" | grep -i "NIC 1 Rule"

# start specific vm
$ VBoxManage startvm "Debian" --type headless

# test ssh connection (optional)
$ ssh -p 2222 lupin@127.0.0.1 -v -C 'whoami && exit'

Note: On my VM (Debian) the user is named “lupin” this will be different for you! Also Openssh-server is enabled and I added my public ssh key on VM (authorized_keys).

PyCharm remote execution

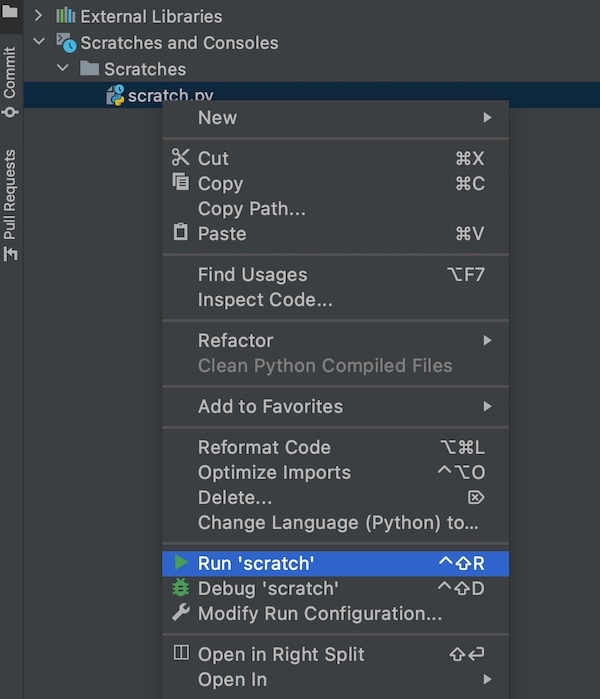
As I also like and use the feature “scratches” of PyCharm, I will show first the remote execution of these files.

Prepare a scratch

I prepare a simple Python script scratch, which just prints out environment variables (same code I use later inside project example).

import os

print('hello world', os.environ)

To find the absolute path for my scratch.py – I run it. On terminal the path will be visible.

PyCharm run scratches

After I know the path I run some simple commands in PyCharm Terminal.

# execute local script via SSH on remote system
$ ssh -p 2222 user@127.0.0.1 -C "/usr/bin/python" < "path/to/scratches/scratch.py"

# same as above but with unbuffered binary stdout and stderr
$ ssh -p 2222 user@localhost -C "/usr/bin/python" -u - < "./test_remote.py"

It works perfectly fine.

Note: Please replace the value “user” in all ssh examples!

PyCharm CE remote scratch execution

Project files

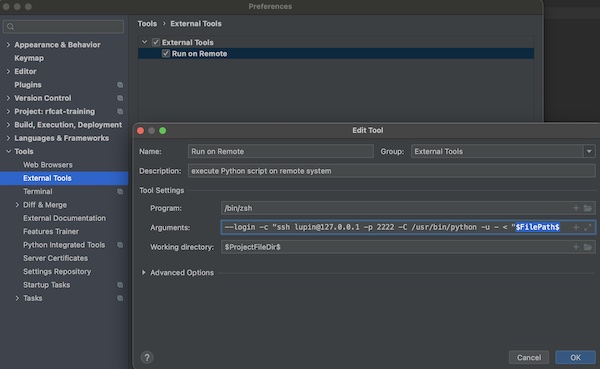
For all other scripts in the PyCharm project I don’t want to type the terminal commands always! So I’m using the feature “External Tools”. To do so, I add a new item and use the built-in variables (Macros) of PyCharm.

PyCharm CE add external tool

You simply give a Name Run on Remote, optional a short description, for Program your shell /bin/zsh and on Arguments --login -c "ssh user@localhost -p 2222 -C /usr/bin/python -u - < "$FilePah$. If you press button “OK” the input will be saved. The value for Working Directory $ProjectFileDir$ will be set (normally) automatically.

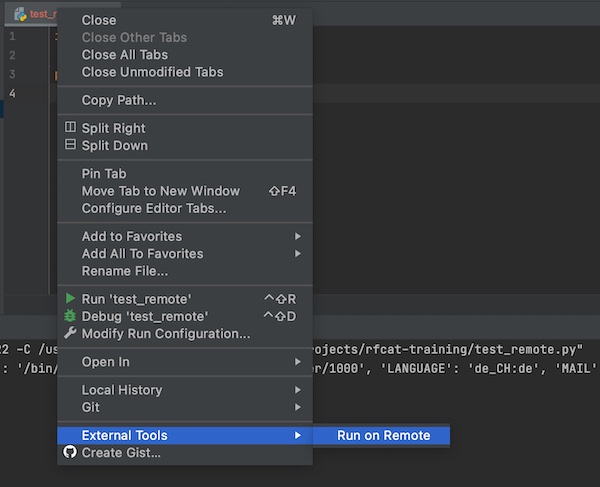
Now you can use the context menu to execute your script over SSH on remote machine.

PyCharm CE external tool remote execution

ooktools and Yard Stick One

In my last tutorial, I showed you how to install RfCat and the ooktools on your macOS, as I promised to go into more detail on the ooktools later – I want to keep this promise now.

Requirements

  • RfCat installed
  • ooktools installed
  • jq installed (optional)
  • you own a Yard Stick One (or any rfcat compatible device)
  • you own a Garage Door opener (or similar device)

Objective

Learn and understand the ooktools sub command ‘signal’.

ooktools signal

The ooktools offers many great features (look at the command line help)! In this tutorial I will focus on signal search, signal record, signal plot and signal play.

# show sub command signal help
$ python2.7 -m ooktools.console signal --help
...
Usage: console.py signal [OPTIONS] COMMAND [ARGS]…

Signal Commands.

Options:
--help  Show this message and exit.

Commands:
brute   Bruteforce a binary range.
jam     Jam a frequency by just sending noise.
play    Play frames from a source file.
plot    Plot frames from a recorded signal.
record  Record frames to a file.
search  Search for signals.
send    Send signals using a RFCat dongle.

Search a signal

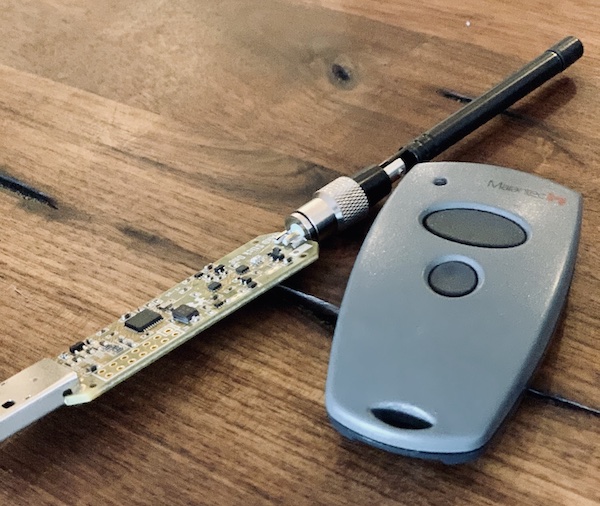
Garage Door Opener & Yard Stick One

My garage door opener has information about the frequency (868.3 MHz) on the back, which makes my search a little easier! If this is not the case for you, search for the FCC identifier.

If you have a rough idea about the frequency (and other values), look in the signal search help and compare all standard values with your needs! You only have to overwrite the values ​​which do not match (as arguments).

# show help for signal search
$ python2.7 -m ooktools.console signal search --help

# search signal in specific range
$ python2.7 -m ooktools.console signal search -S 868200000 -E 868400000

Note: Only signal search throws sometimes an Python/USB exception on my OS (after finish the search), all other commands work perfectly. If you have the same problem, reconnect the USB device (Yard Stick One)!

Record a signal

Now run the signal record. Go the same way like you did for the signal search! First look at the sub command help, overwrite the default values and run the command.

# show help for signal record
$ python2.7 -m ooktools.console signal record --help

# start a signal record
$ python2.7 -m ooktools.console signal record -F 868300000 -f 60 -D  ~/Desktop/test.json

After the signal record is finished, you can have a look on the JSON file.

# view file content and pipe output to jq (optional)
$ cat ~/Desktop/test.json | jq .

Plot the recorded signal

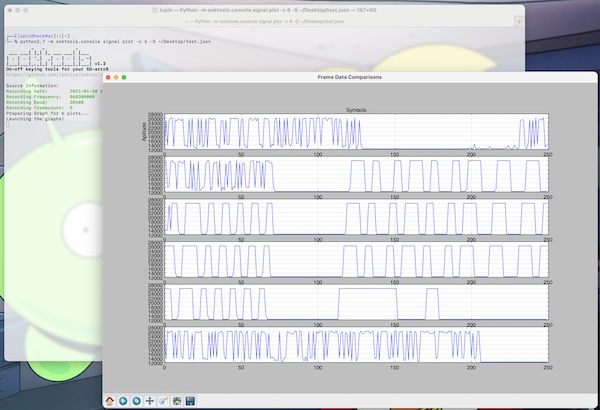
With signal plot you can easily create and watch frames from a recorded signal (json file). The help shows you the possible fine adjustments for the plot output. I have recorded 9 Frames, maybe that differs for you!

# show help for signal plot
$ python2.7 -m ooktools.console signal plot --help

# plot a signal record (number of frames)
$ python2.7 -m ooktools.console signal plot -c 6 -S ~/Desktop/test.json
ooktools plot

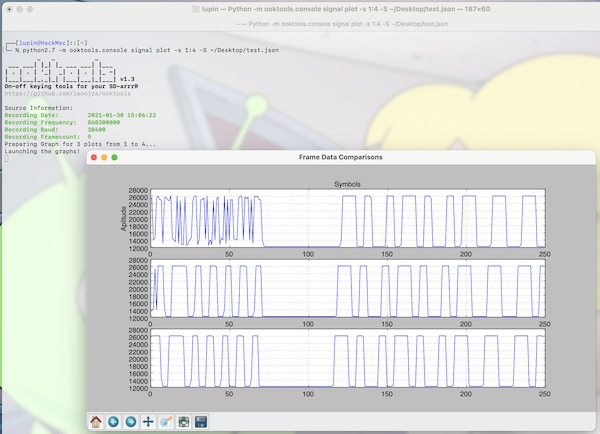
To specify the plot you can use sub command agrument --series.

# plot a signal record (series of fields)
$ python2.7 -m ooktools.console signal plot -s 1:4 -S ~/Desktop/test.json
ooktools plot series

Play a signal

It’s time to try. For that I have to walk a long way to the parking garage gate (I usually drive this route). For signal play sub command only two arguments are needed (source & repeats).

# show help for signal play
$ python2.7 -m ooktools.console signal play --help

# play a signal record
$ python2.7 -m ooktools.console signal play -r 2 -S ~/Desktop/test.json

I did not modify the record file, just run all recorded frames for 2 times. If you are wondering if this worked for me? No – the signal is sent too quickly this way. The gate doesn’t open like this. With tools like GQRX / URH & HackRF One I was able to compare the signals. So some fine-tuning is needed (baud rate/modulation/etc.). Nevertheless, you should have got a good overview of the ooktools.

Install Gqrx and GNU Radio on macOS (Big Sur)

I’ve tried many times and different ways but the installation of Gqrx and GNU Radio on macOS Big Sur via MacPorts failed always. I did not give up and found a working solution for me (my HackRF One) and these two needed tools. In this tutorial I would like to show you the installation (Gqrx & GNU Radio). If you need first to install HackRF One on macOS, please have a look here.

Install XQuartz

First download and installation starts with XQuartz. Download the latest DMG, run the installation and logout/login from your system.

Install Gqrx SDR

As already mentioned, Gqrx (at least for me) cannot installed on Big Sur via MacPorts. Therefore download and install the precompiled binary from Gqrx. As soon the installation was successful, you can connect and use the HackRF One.

Gqrx and HackRF One on macOS Big Sur

Install Python 3.7

The third step also requires a download and installation. Look for the version Python 3.7! Any version below will not work.

Install GNU Radio

Finally, at the last step, we can start to download and install GNU Radio. It’s a quite big application, so please be patient while processing. Also the startup of GNU Radio (inside XQuartz) takes always some few seconds.

GNU Radio on macOS Big Sur

If you consider the time (download/installation) compared to the MacPorts installation (download/build/installation), a time gain. Of course Xquartz is also needed for MacPorts. Here if you will try via MacPorts:

# install gr-osmosdr (incl hackrf + gnu radio)
$ sudo port install gr-osmosdr

# install gr-fosphor (needed by gnu radio)
$ sudo port install gr-fosphor

# install gqrx
$ sudo port install gqrx