Running ZAP Attack Proxy on Jenkins

This tutorial will explain how easy you implement ZAP Attack Proxy into Jenkins. Therefor we create a Freestyle job and will use the “Official OWASP ZAP Jenkins Plugin“. That you can follow and reproduce the tutorial, you need a running Jenkins instance with SSH access to it and proper system rights (OS, Jenkins).

Install ZAP Attack Proxy

Following steps needs to be done when SSH connection, to Jenkins, is established.

# download installer script
$ wget https://github.com/zaproxy/zaproxy/releases/download/v2.8.0/ZAP_2_8_0_unix.sh

# set chmod of script
$ chmod +x ZAP_2_8_0_unix.sh

# execute installer script
$ ./ZAP_2_8_0_unix.sh

# add environment variable (ZAPROXY_HOME)
$ echo "ZAPROXY_HOME=/usr/local/bin/" >> /etc/environment

# restart Jenkins
$ systemctl restart jenkins

Note: If you don’t restart Jenkins after creating “ZAPROXY_HOME”, you will run into trouble like “java.lang.IllegalArgumentException: ZAP INSTALLATION DIRECTORY IS MISSING, PROVIDED [ null ]”

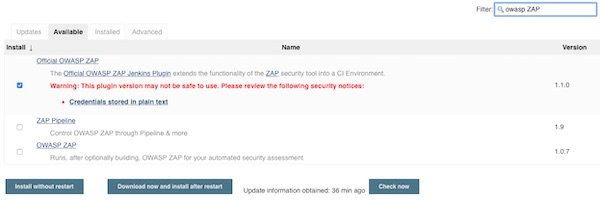
Install needed Jenkins PlugIn’s

Search for “OWAS ZAP” and for “HTML Publisher” plugins.

Jenkins Plugin OWASP ZAP
Official OWASP ZAP
Jenkins Plugin HTML Publisher
HTML Publisher

Configure Jenkins Freestyle job

All what we need is there, we can start to setup a Jenkins “Freestyle project” with the name “ZAPAttackProxy”.

Create new Jenkins Freestyle Project
Jenkins Freestyle Project

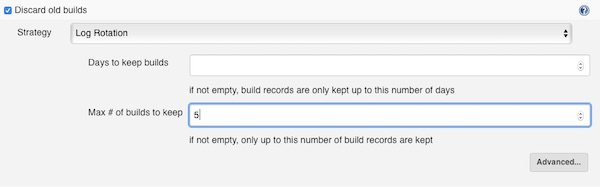
The next setting is optional… I recommend to find your own value (I go with 5 for that example).

Discard old builds
Max # of builds to keep

On every build (Jenkins job run) the workspace should be clean. Please enable the checkbox.

Delete workspace before build starts

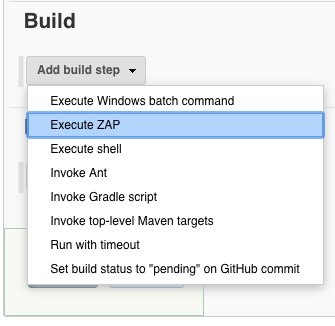
We add now the build step. This build step is available because of the PlugIn “Official OWASP ZAP“.

Add build step Execute ZAP
Build step: Execute ZAP

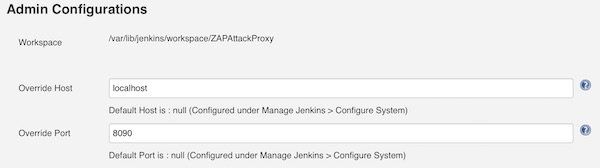
Now we have many fields to configure. We start to set the values for section “Admin Configurations”.

ZAP Admin Configuration
Admin Configuration

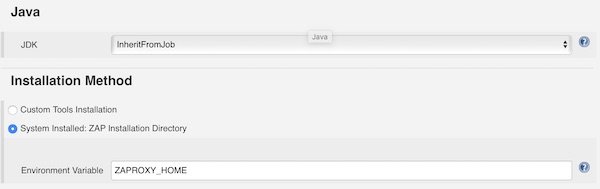
As we already installed ZAP and created the entry into /etc/environment, we can now use that variable.

ZAP Installation Method
Installation Method

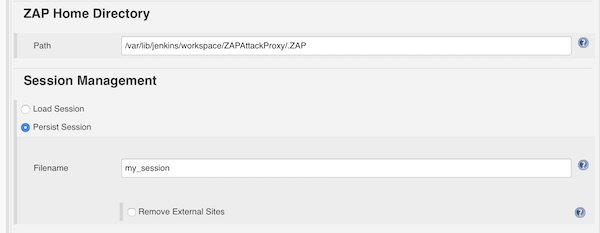
For ZAP Home Directory we add the path to the workspace and let the build create the directory “.ZAP”. For Session Management we choose “Persist Session” and give filename “my_session”.

ZAP Home Directory and Session Management
Home Directory & Session Management

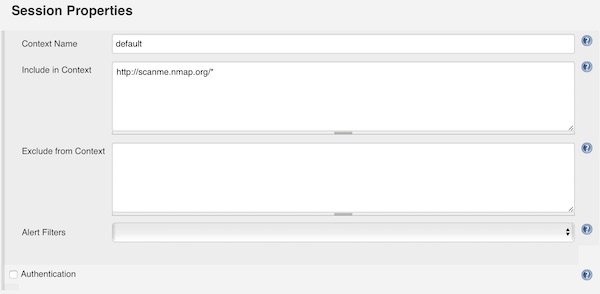
Under section “Session Properties” you add the Context Name “default” and for “Include in Context” you can add IP’s and/or Domains. For that example I choose “http://scanme.nmap.org/*”.

ZAP Session Properties
Session Properties

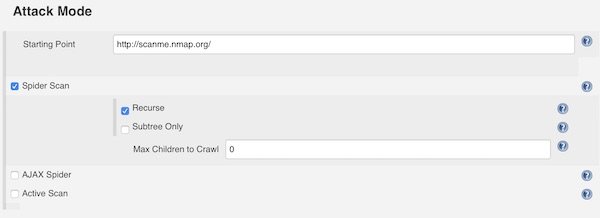
In section “Attack Method” you can choose different attack methods like Spider Scan and so on. Please set always a “Starting Point”. The settings here are self explainable.

ZAP Attack Method
Attack Method

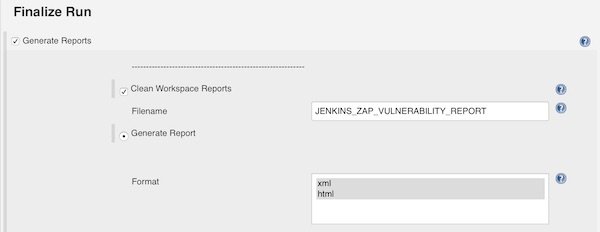
Enable checkbox “Generate Reports” in section “Finalize Run”. Now enter a filename and select “XML” and “HTML” format.

ZAP Finalize Run
Finalize Run

Note: You can ignore the HTTP 404 error.

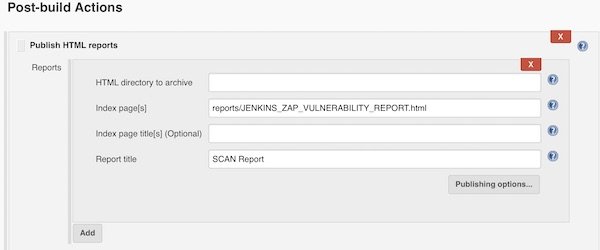
We are done! To provide on our job dashboard a link for HTML report, you can use now the HTML Publisher.

ZAP Publish HTML reports
Publish HTML reports

Execute the job and play with “Attack Methods”…

Nessus on AWS

Nessus is a vulnerability scanner from Tenable. In this tutorial I will show how you can install Nessus on AWS (Debian), how you connect your local browser and perform a simple network scan. You need only a AWS account (eq Free Tier), SSH and a web browser.

Note: Please have a look on that page about pentesting on AWS first.

Create new EC2 instance

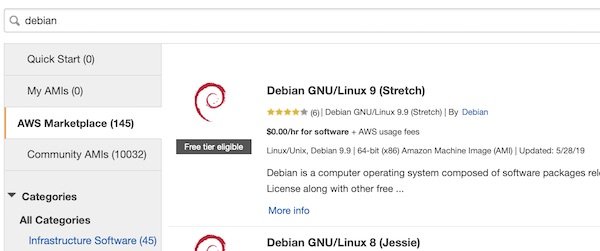
Login into your AWS console (or use AWSCLI), create a new SecurityGroup with SSH port 22 only (inbound) and launch a new instance. Search for “Debian”…

AWS EC2 Debian 9
Debian 9 on AWS Maretplace

Press button “Select” and finish all needed following steps (save your keys). After your EC2 instance is ready check for IP or DNS and connect.

# connect via SSH to EC2 instance
$ ssh -i ~/.ssh/ admin@<instance>

# compile a list of locale definition files (optional)
$ sudo locale-gen UTF-8

Install Nessus

Open download page and select latest version for Debian (as I wrote this tutorial it was Nessus-8.5.1-debian6_amd64.deb). Confirm and download. Via SCP, in new terminal, you can upload the file to your EC2 instance.

# copy file from local to remote
$ scp -i ~/.ssh/ ~/Downloads/Nessus-8.5.1-debian6_amd64.deb  admin@<instance>:/tmp

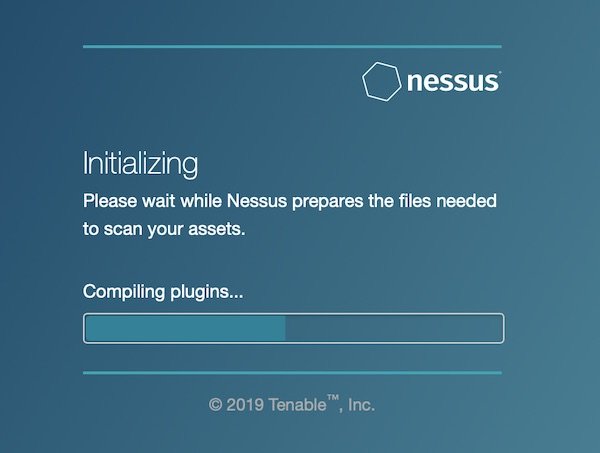
Back to instance terminal … Now install and start Nessus.

# install package
$ sudo dpkg -i /tmp/Nessus-8.5.1-debian6_amd64.deb

# start Nessus
$ sudo /etc/init.d/nessusd start

Use Nessus

To make our life easier, we will create a simple SSH port-forward.

# create port-forwarding
$ ssh -i ~/.ssh/ -L 8834:127.0.0.1:8834 admin@<instance>

# open browser
$ open https://localhost:8834

Now you can open your favourite browser with URL: https://localhost:8834.

Nessus Initialization
Initialisation of Nessus

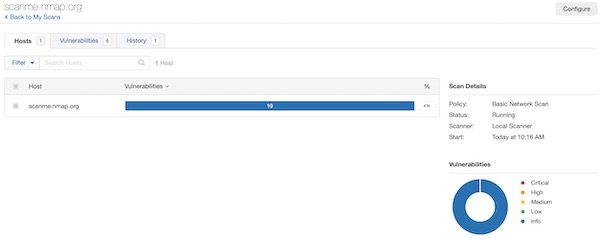
When the initialization has been completed successfully, login and create a new scan. Select “Basic Network Scan” and add URL: http://scanme.nmap.org. Select “Basic Network Scan” and “Port scan (common ports)” for scan settings. Save and start your created scan. Please be patient, the scan will take a while.

Nessus scan
Running Nessus scan

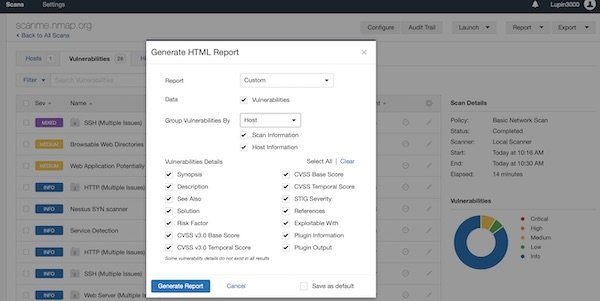
Create a scan report

After a while, the scan is complete. Now you can create a “Custom” report. BTW … feature is only available for completed scans. So select “Export” – “Custom” and generate the report.

Nessus Report
Create custom HTML report

Apache Guacamole

Apache Guacamole … What is it about? It’s a client-less remote gateway for Telnet, SSH, RDP and VNC. Client-less, because there is no need to install any plugin or additional software for users (clients). The client will use just the browser (also without any plugin). In this tutorial we will create a very simple environment via Vagrant and use Guacamole. Why the tutorial? Because I know a lot of testers for example – who work with Windows, who are not allowed to install any software (eq Putty) but still need access to environments. … Next point are for example public security groups on cloud providers. Here only one port would be needed to support different protocols on different hosts (incl. file transfer).

What we need?

Project preparation

# create project
$ mkdir -p ~/Projects/Guacamole/src

# change directory
$ cd ~/Projects/Guacamole/

# create needed files in root folder
$ touch {Vagrantfile,ShellProvisioner.sh}

# create needed files in root folder
$ touch ./src/{guacamole.properties,server.xml,user-mapping.xml,Xwrapper.config}

# show project (optional)
$ tree ~/Projects/Guacamole/
|____src
| |____guacamole.properties
| |____server.xml
| |____user-mapping.xml
| |____Xwrapper.config
|____ShellProvisioner.sh
|____Vagrantfile

Okay, via your favorite editor you now add the content of all files. All files inside directory “src” are configuration files (installed on Guacamole host).

# Hostname and port of guacamole proxy
guacd-hostname:      localhost
guacd-port:          4822
available-languages: en, de

auth-provider: net.sourceforge.guacamole.net.basic.BasicFileAuthenticationProvider
basic-user-mapping: /etc/guacamole/user-mapping.xml
<?xml version="1.0" encoding="UTF-8"?>
<Server port="-1" shutdown="SHUTDOWN">
  <Listener className="org.apache.catalina.startup.VersionLoggerListener" />
  <Listener className="org.apache.catalina.core.AprLifecycleListener" SSLEngine="on" />
  <Listener className="org.apache.catalina.core.JreMemoryLeakPreventionListener" />
  <Listener className="org.apache.catalina.mbeans.GlobalResourcesLifecycleListener" />
  <Listener className="org.apache.catalina.core.ThreadLocalLeakPreventionListener" />
  <GlobalNamingResources>
    <Resource name="UserDatabase" auth="Container"
              type="org.apache.catalina.UserDatabase"
              description="User database that can be updated and saved"
              factory="org.apache.catalina.users.MemoryUserDatabaseFactory"
              pathname="conf/tomcat-users.xml" />
  </GlobalNamingResources>
  <Service name="Catalina">
    <Connector port="55555" protocol="HTTP/1.1"
               connectionTimeout="20000"
               redirectPort="8443" />
    <Engine name="Catalina" defaultHost="localhost">
      <Realm className="org.apache.catalina.realm.LockOutRealm">
        <Realm className="org.apache.catalina.realm.UserDatabaseRealm"
               resourceName="UserDatabase"/>
      </Realm>
      <Host name="localhost"  appBase="webapps"
            unpackWARs="true" autoDeploy="true">
        <Valve className="org.apache.catalina.valves.AccessLogValve" directory="logs"
               prefix="localhost_access_log" suffix=".txt"
               pattern="%h %l %u %t "%r" %s %b" />
      </Host>
    </Engine>
  </Service>
</Server>

This file (user-mapping.xml) is the configuration for all your connections.

<user-mapping>

  <authorize username="USERNAME" password="PASSWORD">
    <!--
    <connection name="Debian2: RDP Connection">
      <protocol>rdp</protocol>
      <param name="hostname">localhost</param>
      <param name="port">3389</param>
    </connection>
    -->

    <connection name="Debian2: VNC Connection">
      <protocol>vnc</protocol>
      <param name="hostname">localhost</param>
      <param name="port">5901</param>
      <param name="password">vagrant</param>
    </connection>

    <connection name="Debian2: SSH Connection">
      <protocol>ssh</protocol>
      <param name="hostname">localhost</param>
      <param name="port">22</param>
      <param name="username">vagrant</param>
    </connection>

    <connection name="Debian1: SSH Connection">
      <protocol>ssh</protocol>
      <param name="hostname">192.168.10.5</param>
      <param name="port">22</param>
      <param name="username">vagrant</param>
    </connection>

    <connection name="Debian2: Telnet Connection">
      <protocol>telnet</protocol>
      <param name="hostname">localhost</param>
      <param name="port">23</param>
      <param name="username">vagrant</param>
    </connection>
  </authorize>
</user-mapping>
allowed_users=anybody

The ShellProvisioner.sh includes all installation and configuration for Guacamole All examples are provided but for Debian RDP is currently not working and I commented out.

echo '>>>>Install some default packages<<<<<'
sudo apt update -y -q
sudo apt install -y -q build-essential htop libcairo2-dev libjpeg62-turbo-dev libjpeg-dev libpng-dev libossp-uuid-dev
# install optional guacamole packages eq FFmpeg, SSH
sudo apt install -y -q libavcodec-dev libavutil-dev libswscale-dev libpango1.0-dev libssh2-1-dev libssl-dev libvorbis-dev libwebp-dev

echo '>>>>Install and configure tomcat packages<<<<<'
sudo apt install -y -q tomcat9 tomcat9-admin tomcat9-common tomcat9-user
sudo mkdir -p /usr/share/tomcat9/.guacamole
sudo cp /tmp/guacamole/server.xml /etc/tomcat9/server.xml
sudo chown root:tomcat /etc/tomcat9/server.xml
sudo chmod 0640 /etc/tomcat9/server.xml

echo '>>>>Configure default guacamole directory structure<<<<<'
sudo cp -r /tmp/guacamole /etc/guacamole
sudo mkdir -p /etc/guacamole/{extensions,lib}
sudo chown -R root:root /etc/guacamole
sudo chmod 0640 /etc/guacamole/user-mapping.xml
sudo chown root:tomcat /etc/guacamole/user-mapping.xml
sudo ln -s /etc/guacamole/guacamole.properties /var/lib/tomcat9/.guacamole

echo '>>>>Install and configure telnet packages<<<<<'
sudo apt install -y -q telnetd libtelnet-dev

echo '>>>>Install and configure xrdp packages<<<<<'
# actualy broken becauce of freerdp2-dev on debian
# sudo apt install -y -q xrdp freerdp2-dev
# sudo cp /etc/guacamole/Xwrapper.config /etc/X11/Xwrapper.config
# sudo chown root:root /etc/X11/Xwrapper.config
# sudo chmod 0644 /etc/X11/Xwrapper.config
# sudo systemctl enable xrdp.service
# sudo systemctl enable xrdp-sesman.service
# sudo systemctl start xrdp
# sudo systemctl start xrdp-sesman

echo '>>>>Install and configure vnc packages'
sudo apt install -y -q xfce4 xfce4-goodies gnome-icon-theme tightvncserver libvncserver-dev libpulse-dev

echo '>>>>Install guacamole client and restart tomcat<<<<<'
curl -s -O -J -L "http://apache.org/dyn/closer.cgi?action=download&filename=guacamole/1.0.0/binary/guacamole-1.0.0.war"
sudo cp guacamole-1.0.0.war /var/lib/tomcat9/webapps/guacamole.war
sudo chown tomcat:tomcat /var/lib/tomcat9/webapps/guacamole.war
sudo systemctl restart tomcat9

echo '>>>>Install guacamole server<<<<<'
curl -s -O -J -L "http://apache.org/dyn/closer.cgi?action=download&filename=guacamole/1.0.0/source/guacamole-server-1.0.0.tar.gz"
tar xzf guacamole-server-1.0.0.tar.gz
cd guacamole-server-1.0.0/
# space after etc is wrong
sudo ./configure --with-init-dir=/etc /init.d
sudo make
sudo make install
sudo ldconfig
sudo update-rc.d guacd defaults

echo '>>>>Start guacamole server/daemon<<<<<'
sudo systemctl start guacd

echo '>>>>Show open ports<<<<<'
sudo lsof -i -P -n | grep LISTEN

echo '>>>>Start clean-up<<<<<'
sudo rm /etc/guacamole/Xwrapper.config
sudo rm /etc/guacamole/server.xml
sudo rm -fr /tmp/guacamole
sudo rm -fr /home/vagrant/guacamole-server-1.0.0s
sudo rm /home/vagrant/guacamole-server-1.0.0.tar.gz
sudo rm /home/vagrant/guacamole-1.0.0.war
# -*- mode: ruby -*-
# vi: set ft=ruby :

BOX_1_NAME = "debian-1-guacamole"
BOX_2_NAME = "debian-2-guacamole"
BOX_BASE = "generic/debian10"
BOX_RAM_MB = 1024
BOX_CPU_COUNT = 1
BOX_GUI = false
BOX_SYNC_DIR = true

Vagrant.configure("2") do |config|

  config.vm.define BOX_1_NAME do |deb1|
    deb1.vm.box = BOX_BASE
    deb1.vm.synced_folder ".", "/vagrant", disabled: BOX_SYNC_DIR
    deb1.vm.hostname = BOX_1_NAME
    deb1.vm.network "private_network", ip: "192.168.10.5"
    deb1.vm.provider "virtualbox" do |vb1|
      vb1.name = BOX_1_NAME
      vb1.cpus = BOX_CPU_COUNT
      vb1.memory = BOX_RAM_MB
      vb1.gui = BOX_GUI
    end
  end

  config.vm.define BOX_2_NAME do |deb2|
    deb2.vm.box = BOX_BASE
    deb2.vm.synced_folder ".", "/vagrant", disabled: BOX_SYNC_DIR
    deb2.vm.hostname = BOX_2_NAME
    deb2.vm.network "forwarded_port", guest: 55555, host: 55555
    # deb2.vm.network "forwarded_port", guest: 5901, host: 5901
    # deb2.vm.network "forwarded_port", guest: 3389, host: 3389
    # deb2.vm.network "forwarded_port", guest: 23, host: 2323
    deb2.vm.network "private_network", ip: "192.168.10.10"
    deb2.vm.provider "virtualbox" do |vb2|
      vb2.name = BOX_2_NAME
      vb2.cpus = BOX_CPU_COUNT
      vb2.memory = BOX_RAM_MB
      vb2.gui = BOX_GUI
    end
    deb2.vm.provision "file", source: "./src", destination: "/tmp/guacamole"
    deb2.vm.provision "shell", name: "install", path: "./ShellProvisioner.sh"
  end

end

Usage

First start-up the environment (via simple Vagrant command) and next start the VNC inside the box. You can do via vagrant ssh or you start the VNC via Browser (SSH).

# start environment (be patient)
$ vagrant up

# show status (optional)
$ vagrant status

# ssh into 2nd box
$ vagrant ssh debian-2-guacamole

# start VNC server on user vagrant
$ vncserver

# Password: vagrant
# Verify: vagrant
# Would you like to enter a view-only password (y/n)? n

# exit ssh into box
$ exit

# open browser with URL
$ open http://localhost:55555/guacamole

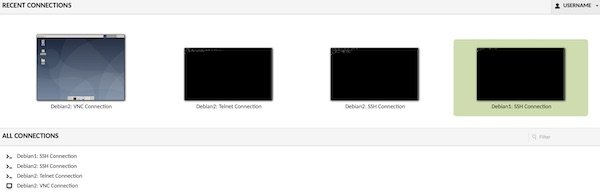
Now login with “USERNAME/PASSWORD” (see src/user-mapping.xml) on http://localhost:55555/guacamole. If everything works it should look like this:

Guacamole on browser

Please have a look here https://guacamole.apache.org/doc/gug/index.html to learn more about configuration and authentication. All files which we used in this tutorial are available via https://github.com/Lupin3000/GuacamoleExample.

Simple VPN via WireGuard

This tutorial will show how to setup a simple test environment via Vagrant and to install, configure and use WireGuard VPN software. In this tutorial Debian 10 is used, you can find the documentation about other OS on WireGuard website.

Preparation

First make sure VirtualBox and Vagrant are installed in latest versions. Now create needed project and files.

# create directory
$ mkdir -p ~/Projects/WireGuard

# change directory
$ cd ~/Projects/WireGuard

# create needed files
$ touch Vagrantfile
$ touch machines.yml
--
- name: host-a
  box: generic/debian10
  ip: 192.168.100.10
  cpus: 1
  memory: 1024
- name: host-b
  box: generic/debian10
  ip: 192.168.100.20
  cpus: 1
  memory: 1024
# -*- mode: ruby -*-
# vi: set ft=ruby :

require 'yaml'
machines = YAML.load_file('machines.yml')

Vagrant.configure("2") do |config|
  machines.each do |machines|
    config.vm.define machines["name"] do |machine|
      # box settings
      machine.vm.hostname = machines["name"]
      machine.vm.box = machines["box"]
      machine.vm.synced_folder ".", "/vagrant", disabled: true
      machine.vm.network "private_network", ip: machines["ip"]

      # virtualbox settings
      machine.vm.provider :virtualbox do |vb|
        vb.name = machines["name"]
        vb.cpus = machines["cpus"]
        vb.memory = machines["memory"]
        vb.gui = false
      end

      # provision all
      machine.vm.provision "shell", name: "all", inline: <<-SHELL
        sudo echo "deb http://deb.debian.org/debian/ unstable main" > /etc/apt/sources.list.d/unstable.list
        sudo printf 'Package: *\nPin: release a=unstable\nPin-Priority: 90\n' > /etc/apt/preferences.d/limit-unstable
        sudo apt update -y && sudo apt install -y wireguard
      SHELL

      # provision only host-a
      if machines["name"] == 'host-a'
        machine.vm.provision "shell", name: "host-a only", inline: <<-SHELL
          sudo su -
          cd ~
          wg genkey > private
          ip link add wg0 type wireguard
          ip addr add 10.0.0.1/24 dev wg0
          wg set wg0 private-key ./private
          ip link set wg0 up
          ip addr
          wg
        SHELL
      end

      # provision only host-b
      if machines["name"] == 'host-b'
        machine.vm.provision "shell", name: "host-b only", inline: <<-SHELL
          sudo su -
          cd ~
          wg genkey > private
          wg pubkey < private
          ip link add wg0 type wireguard
          ip addr add 10.0.0.2/24 dev wg0
          wg set wg0 private-key ./private
          ip link set wg0 up
          ip addr
          wg
        SHELL
      end
    end
  end
end

Usage

All files are created and we can start to start the environment.

# validate Vagrantfile
$ vagrant validate

# start environment
$ vagrant up

For box 1 (host-a)

# ssh into box
$ vagrant ssh host-a

# check network interfaces (for ip)
$ sudo ip addr

# check wg settings
$ sudo wg

# configure VPN interface
$ sudo wg set wg0 peer 0WqUA1Se9Cp/+/AUwiK+K7Nb67kzfyH1Q+SZB9QxFUI= allowed-ips 10.0.0.2/24 endpoint 192.168.100.20:36096

# ping via normal interface and VPN interface
$ ping -c 1  192.168.100.20
$ ping -c 1  10.0.0.1

# check wg settings
$ sudo wg

For box 2 (host-b)

# ssh into box
$ vagrant ssh host-b

# check network interfaces (for ip)
$ sudo ip addr

# check wg settings
$ sudo wg

# configure VPN interface
$ sudo wg set wg0 peer 5QYy8eps/qU2SAZibvfokLwwORxRHQ04JfX9107Db2k= allowed-ips 10.0.0.1/24 endpoint 192.168.100.10:36096

# ping via normal interface and VPN interface
$ ping -c 1  192.168.100.20
$ ping -c 1  10.0.0.2

# check wg settings
$ sudo wg

Important is that your ports and keys will be different and be patient before start ping each other – have fun…