The title says it, … this tutorial is about Packer, CentOS 7 and Vagrant. After that, you should be able to integrate the creation of Vagrant base boxes into your Build-server. There is on small exception to other – the VirtualBox Guest Additions will be provided via PlugIn! Because other users could may have different versions.
Preconditions
Project structure
$ tree
.
├── Makefile
├── packer.json
├── src
│   ├── Vagrantfile.tpl
│   └── ks.cfg
└── target
File contents
CURRENT_DIR := $(shell pwd)

.PHONY: clean

help:
	@echo "Run make with:"
	@echo " > validate       ...to run packer validation"
	@echo " > build          ...to start packer build"
	@echo " > up             ...to start vagrant"
	@echo " > reload         ...to reload vagrant"
	@echo " > ssh            ...to ssh into vm"
	@echo " > clean          ...to cleanup for next build"

validate:
	packer validate $(CURRENT_DIR)/packer.json

build:
	packer build $(CURRENT_DIR)/packer.json
	cp $(CURRENT_DIR)/src/Vagrantfile.tpl $(CURRENT_DIR)/target/Vagrantfile

up:
	vagrant box add packer/centos7 $(CURRENT_DIR)/target/virtualbox-CentOS-7.box
	cd $(CURRENT_DIR)/target && vagrant up

reload:
	cd $(CURRENT_DIR)/target && vagrant reload

ssh:
	cd $(CURRENT_DIR)/target && vagrant ssh

clean:
	cd $(CURRENT_DIR)/target && vagrant halt
	cd $(CURRENT_DIR)/target && vagrant destroy -f
	rm -fr $(CURRENT_DIR)/builds/
	rm -fr $(CURRENT_DIR)/target/* $(CURRENT_DIR)/target/.* 2> /dev/null
	vagrant box remove packer/centos7
{
  "variables": {
    "file": "http://linuxsoft.cern.ch/centos/7/isos/x86_64/CentOS-7-x86_64-Minimal-1511.iso",
    "checksum": "88c0437f0a14c6e2c94426df9d43cd67",
    "type": "md5",
    "non_gui": "false"
  },
  "builders": [
    {
      "type": "virtualbox-iso",
      "iso_url": "{{ user `file` }}",
      "iso_checksum": "{{ user `checksum` }}",
      "iso_checksum_type": "md5",
      "headless": "{{ user `non_gui` }}",
      "output_directory": "builds",
      "vm_name": "CentOS7_to_Vagrant",
      "guest_os_type": "RedHat_64",
      "disk_size": "10240",
      "vboxmanage": [
        ["modifyvm", "{{.Name}}", "--memory", "2048"],
        ["modifyvm", "{{.Name}}", "--cpus", "2"],
        ["modifyvm", "{{.Name}}", "--audio", "none"],
        ["modifyvm", "{{.Name}}", "--usb", "off"]
      ],
      "http_directory": "src",
      "boot_wait": "5s",
      "boot_command": [
        "<tab> text ks=http://{{ .HTTPIP }}:{{ .HTTPPort }}/ks.cfg<enter><wait>"
      ],
      "ssh_username": "vagrant",
      "ssh_password": "vagrant",
      "ssh_port": 22,
      "ssh_wait_timeout": "600s",
      "guest_additions_path": "disable",
      "shutdown_command": "sudo shutdown -h 0"
    }
  ],
  "provisioners": [
    {
      "type": "shell",
      "inline": [
        "sudo yum update -y",
        "sudo rm -rf /tmp/*",
        "sudo rm -f /var/log/wtmp /var/log/btmp ",
        "sudo yum clean all",
        "sudo rm -rf /var/cache/* /usr/share/doc/*",
        "rm -f .bash_history",
        "history -c"
      ]
    }
  ],
  "post-processors": [
    {
      "type": "vagrant",
      "keep_input_artifact": false,
      "compression_level": 9,
      "output": "target/{{.Provider}}-CentOS-7.box"
    }
  ]
}
install
cdrom
lang en_US.UTF-8
keyboard us
timezone UTC
network --bootproto=dhcp
firewall --disabled
rootpw --plaintext packer
user --name=vagrant --password=vagrant
auth --enableshadow --passalgo=sha512 --kickstart
selinux --permissive
text
skipx
clearpart --all --initlabel
zerombr
autopart
bootloader --location=mbr
firstboot --disable
reboot
%packages --instLangs=en_US.utf8 --nobase --ignoremissing --excludedocs
@^minimal
@core
-aic94xx-firmware
-atmel-firmware
-b43-openfwwf
-bfa-firmware
-ipw2100-firmware
-ipw2200-firmware
-ivtv-firmware
-iwl100-firmware
-iwl105-firmware
-iwl135-firmware
-iwl1000-firmware
-iwl2000-firmware
-iwl2030-firmware
-iwl3160-firmware
-iwl3945-firmware
-iwl4965-firmware
-iwl5000-firmware
-iwl5150-firmware
-iwl6000-firmware
-iwl6000g2a-firmware
-iwl6000g2b-firmware
-iwl6050-firmware
-iwl7260-firmware
-libertas-usb8388-firmware
-ql2100-firmware
-ql2200-firmware
-ql23xx-firmware
-ql2400-firmware
-ql2500-firmware
-rt61pci-firmware
-rt73usb-firmware
-xorg-x11-drv-ati-firmware
-zd1211-firmware
%end
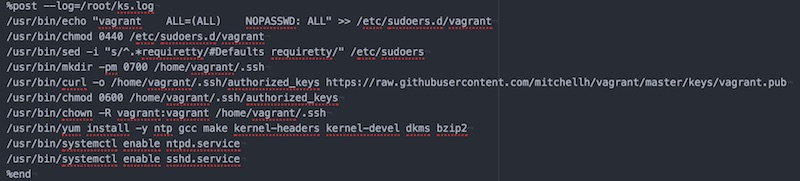
%post --log=/root/ks.log
SEE NEXT PICTURE!!!! The security settings of my provider does not allow this content!
%end
# -*- mode: ruby -*-

Vagrant.require_version ">= 1.8.1"

Vagrant.configure("2") do |config|

  config.vm.box = "packer/centos7"
  config.vm.box_url = "target/virtualbox-CentOS-7.box"
  config.vm.synced_folder ".", "/vagrant", disabled: true

  config.vm.provider "virtualbox" do |vb|
    vb.name = "CentOS-7"
    vb.cpus = "2"
    vb.memory = "2048"
    vb.gui = false
  end

end
Usage
# run packer build (via make)
$ make build

# run vagrant up (via make)
$ make run

# run vagrant reload (via make)
$ make reload

# run vagrant ssh (via make)
$ make ssh

# destroy everything (via make)
$ make clean