Install Gqrx and GNU Radio on macOS (Big Sur)

I’ve tried many times and different ways but the installation of Gqrx and GNU Radio on macOS Big Sur via MacPorts failed always. I did not give up and found a working solution for me (my HackRF One) and these two needed tools. In this tutorial I would like to show you the installation (Gqrx & GNU Radio). If you need first to install HackRF One on macOS, please have a look here.

Install XQuartz

First download and installation starts with XQuartz. Download the latest DMG, run the installation and logout/login from your system.

Install Gqrx SDR

As already mentioned, Gqrx (at least for me) cannot installed on Big Sur via MacPorts. Therefore download and install the precompiled binary from Gqrx. As soon the installation was successful, you can connect and use the HackRF One.

Gqrx and HackRF One on macOS Big Sur

Install Python 3.7

The third step also requires a download and installation. Look for the version Python 3.7! Any version below will not work.

Install GNU Radio

Finally, at the last step, we can start to download and install GNU Radio. It’s a quite big application, so please be patient while processing. Also the startup of GNU Radio (inside XQuartz) takes always some few seconds.

GNU Radio on macOS Big Sur

If you consider the time (download/installation) compared to the MacPorts installation (download/build/installation), a time gain. Of course Xquartz is also needed for MacPorts. Here if you will try via MacPorts:

# install gr-osmosdr (incl hackrf + gnu radio)
$ sudo port install gr-osmosdr

# install gr-fosphor (needed by gnu radio)
$ sudo port install gr-fosphor

# install gqrx
$ sudo port install gqrx
Install HackRF One on macOS (Big Sur)

This time it’s about installing HackRF One binaries on the macOS Big Sur. In another later tutorial I will dive deeper into macOS, HackRF ONE and GnuRadio (gnuradio-companion), but not yet. The installation takes place via latest MacPorts.

Preparation

  • macPorts installed
  • Commandline Tools installed (SDK higher 11)
  • HackRF One connected and started (via USB cable)

CommandLineTools SDK

My first installation failed with a error (even as MacPorts where completely new installed and Command Line Tools where installed, too). I looked into log file and saw a issue with clang version.

# read log file (optional)
$ cat /opt/local/var/macports/logs/_opt_local_var_macports_sources_rsync.macports.org_macports_release_tarballs_ports_science_hackrf/hackrf/main.log
 …
 clang: error: invalid version number in 'MACOSX_DEPLOYMENT_TARGET=11.0'
 …
 

# show clang version (optional)
$ clang --version

So looked it up on the Internet and saw that the clang version in the new SDK is higher and will solve this issue. To confirm I had a look installed SDK’s.

# list SDKs (optional)
$ ls /Library/Developer/CommandLineTools/SDKs/
MacOSX.sdk MacOSX10.14.sdk MacOSX10.15.sdk
CommandLine Tools 12.3

To be really sure. Yes new SDK is installed.

# list SDKs (optional)
$ ls /Library/Developer/CommandLineTools/SDKs/
MacOSX.sdk MacOSX10.14.sdk MacOSX10.15.sdk MacOSX11.1.sdk

# show xcrun configs (optional)
$ xcrun --sdk macosx11.1 --show-sdk-path
$ xcrun --sdk macosx11.1 --show-sdk-version

Installation

After the installation and verification (yes the new sdk was getting installed), I tried the macPorts installation again.

# install hackrf via mac ports
$ sudo port install hackrf

Test installation

This time all went fine and I could start testing the device.

# show USB device info (optional)
$ ioreg -p IOUSB -l -w 0 -b

# show hackrf info
$ hackrf_info

# start debug (optional)
$ hackrf_debug --si5351c -n 0 -r

# start record
$ hackrf_transfer -r myRecord.raw -f 433780000

# start transmit record
$ hackrf_transfer -t myRecord.raw -f 433780000 -x 20

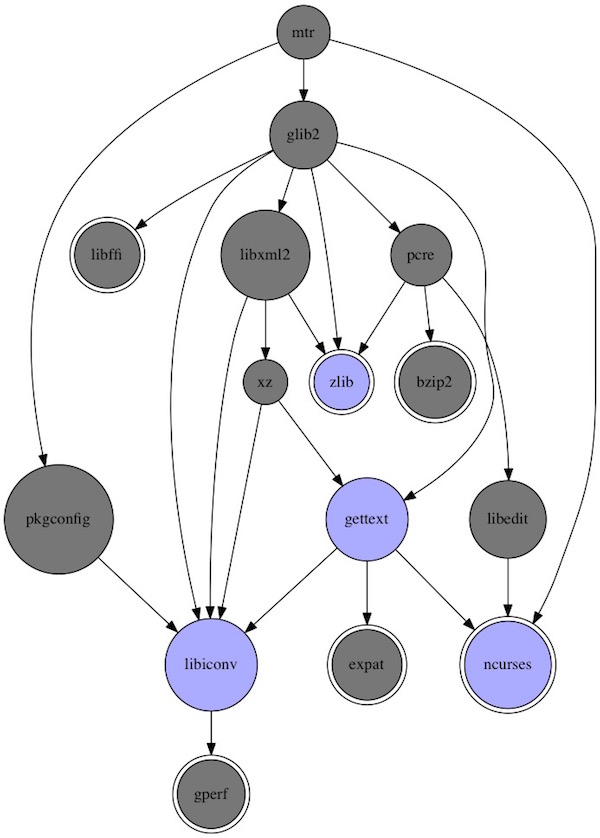
Visualization of package dependencies

Documentation takes time – sometimes a lot of time. Here a few examples how to create dependencies pictures with Graphviz via command line. These commands can then be easily transferred to a build-process to save your time.

Mac OS X

# install Graphviz on Mac OS X
$ curl -O http://www.graphviz.org/pub/graphviz/stable/macos/mountainlion/graphviz-2.36.0.pkg
$ open graphviz-2.36.0.pkg

# check installation
$ dot -V
dot - graphviz version 2.36.0 (20140111.2315)

# clone PureDarwin
$ git clone https://github.com/PureDarwin/PureDarwin.git

# change directory
$ cd PureDarwin/scripts/

# create graph for non-installed mtr
$ sudo ./pd_portviz mtr

CentOS 7

# install Graphviz on CentOS 7
$ yum install -y graphviz

# check installation
$ dot -V
dot - graphviz version 2.30.1 (20150306.0020)

# install rpmdep
$ yum install -y epel-release && yum install -y rpmorphan

# create graph for installed which
$ rpmdep -dot which.dot which

Debian 8

# install Graphviz on Debian 8
$ apt-get install -y graphviz

# check installation
$ dot -V
dot - graphviz version 2.38.0 (20140413.2041)

# install debtree
$ apt-get install -y debtree

# create graph for non-installed make
$ debtree --with-suggests make > make.dot

Example graph for mtr on Mac OS X

# convert .dot into png
$ dot -Tpng mtr.dot -o mtr.png

mtr dependencies

Monitor multiple remote log files with MultiTail

With MultiTail you are able to view one or multiple log files (on remote engines). Therefore it creates multiple split-windows on your console. You can configure these! To see all features look here.

Installation

# install on Mac OS via Mac Ports
$ sudo port install multitail

# install on Mac OS via Homebrew
$ sudo brew install multitail

# install on RHEL/CentOS/Fedora
$ yum install -y multitail

# install on Debian/Ubuntu/Mint
$ sudo apt-get install multitail

Examples

# example for two log-files
$ multitail log-file_a log-file_b

# example for two log-files and two columns
$ multitail -s 2 log-file_a log-file_a

# example for two log-files and different colors
$ multitail -ci green log-file_a -ci yellow -I log-file_a

# example for one log file on remote
$ multitail -l "ssh -t <user>@<host> tail -f log-file"

# example for four log files on remote
$ multitail -l "ssh -l <user> <host> tail -f log-file_a" -l "ssh -l <user> <host> tail -f log-file_b" -l "ssh -l <user> <host> tail -f log-file_c" -l "ssh -l <user> <host> tail -f log-file_d"

Note

If you look on multiple files at same time with MultiTail – just hit the “b” key to select the window, with up/down keys you can scroll.

Run your Python Selenium tests headless

This time i show you the headless testing with Selenium WebDriver and PhantomJS. This method can be used for example on continuous integration systems.

Install PhantomJS

Follow the documentation on PhantomJS website or as Mac OS X user simply use Mac Ports.

# on Mac OS X
$ sudo port install PhantomJS

# check version
$ phantomjs --version

Create a tiny test script

#!/usr/bin/env python
import unittest
from selenium import webdriver


class SearchContentOnWebsite(unittest.TestCase):

    def setUp(self):
        # create a new PhantomJS session
        self.driver = webdriver.PhantomJS()
        self.driver.set_window_size(800, 600)
        self.driver.get("http://softwaretester.info")

    def test_search_headline(self):
        title = 'This will fail | - Softwaretester -'
        assert title in self.driver.title

    def tearDown(self):
        self.driver.close()

if __name__ == "__main__":
    unittest.main(verbosity=2)

Just create a instance of PhantomJS WebDriver and run you tests. That is all! 😉

Simple ssh brute-force attack with Hydra

With Hydra you can recover your SSH credentials. Here a tiny tutorial how it works.

Installation

I do install via ports but also different other possibilities are available.

# update macports (optional)
$ sudo port selfupdate

# search port (optional)
$ port search hydra

# check dependencies (optional)
$ port rdeps hydra

# install port
$ sudo port install hydra

Test preparation

Now create two files (or download anywhere)

# create password file
$ vim passwords.txt

# create users file
$ vim users.txt

Create some content (by line) and start the ssh brute-force with Hydra.

Run SSH password recover

# use password.txt only
$ hydra -l root -P passwords.txt <target> ssh

# use user.txt only
$ hydra -L users.txt -p 12345 <target> ssh

# use user and password files
$ hydra -L users.txt -P passwords.txt <target> ssh

If Hydra found something, the message looks like:

[22][ssh] host: <target> login: <user> password: <password>

Note: for legal purposes only!

MacPorts Basics

Update Ports

$ sudo port selfupdate

Search Ports

Search for specific ports

$ port search python

Simple search for ports by line

$ port search --line python

Advanced search for ports (start with python)

$ port search --name --line --glob 'python*'

Install ports

$ sudo port install python34

Clean ports (if install fails)

$ port clean <portname>

Uninstall ports

$ sudo port uninstall <portname>

List installed ports

$ port installed

Update ports

Check for updates

$ port outdated

Update outdated ports

$ sudo port upgrade outdated

Update specific port

$ sudo port upgrade <portname>