Install YAWAST on Debian (Jessie)

This time i show YAWAST (Antecedent Web Application Security Toolkit) on Debian 8.6. YAWAST performs basic checks for penetration testers and security auditors.

System preparation

# update and upgrade system
$ apt-get update && apt-get upgrade

# install needed packages
$ apt-get install -y build-essential libssl-dev

# download ruby archive
$ wget https://cache.ruby-lang.org/pub/ruby/2.3/ruby-2.3.1.tar.gz

# unzip archive
$ tar -zxvf ruby-2.3.1.tar.gz

# change directory
$ cd ruby-2.3.1/

# run configuration
$ ./configure

# run compilation
$ make

# run intsallation
$ make install

# check version
$ ruby --version

Install YAWAST

# install YAWAST via gem
$ gem install yawast

# show help
$ yawast --help

Usage

# simple scan
$ yawast scan [URL]

# detect CMS
$ yawast cms [URL]

# show ssl information
$ yawast ssl [URL]

There is more! Read the documentation on GitHub adamcaudill/yawast.

Explain Shell direct from terminal

Explainshell.com rocks! Nevertheless, you lose time to leave the terminal (open browser, copy-paste). But there is a cool solution from ManKier. All what you need is curl.

Usage

# curl request for whoami
$ curl -Gs "https://www.mankier.com/api/explain/?cols="$(tput cols) --data-urlencode "q=whoami"

# curl request for df -h
$ curl -Gs "https://www.mankier.com/api/explain/?cols="$(tput cols) --data-urlencode "q=df -h"

Simpler usage

With a tiny script it will be more comfortable! Add the following to your .bashrc or .bash_profile (MAC OS X).

# explain.sh begins
explain () {
	if [ "$#" -eq 0 ]; then
		while read  -p "Command: " cmd; do
			curl -Gs "https://www.mankier.com/api/explain/?cols="$(tput cols) --data-urlencode "q=$cmd"
		done
		echo "Bye!"
	elif [ "$#" -eq 1 ]; then
		curl -Gs "https://www.mankier.com/api/explain/?cols="$(tput cols) --data-urlencode "q=$1"
	else
		echo "Usage"
		echo "explain                  interactive mode."
		echo "explain 'cmd -o | ...'   one quoted command to explain it."
	fi
}

Now you can do …

# explain one command
$ explain 'df -h'
...
df(1)
  df displays the amount of disk space available on the file system containing each file name
  argument. If no file name is given, the space available on all currently mounted file systems is
  shown. Disk space is shown in 1K blocks by default, unless the environment variable
  POSIXLY_CORRECT is set, in which case 512-byte blocks are used. If an argument is the absolute
  file name of a disk device node containing a mounted file system, df shows the space available on
  that file system rather than on the file system containing the device node. This version of df
  cannot show the space available on unmounted file systems, because on most kinds of systems doing
  so requires very nonportable intimate knowledge of file system structures.

  -h (-H, --HUMAN-READABLE)
    print sizes in powers of 1024 (e.g., 1023M)

… if you insert only “explain” an interactive mode will started!

Command-line fake data generator

In my search for a command-line fake data generator I’ve found phony. What can I say, the tool does exactly what it should! After installation, you no longer need to leave the terminal.

Installation

# install go and git (Debian 8)
$ apt-get install -y golang git

# set GOPATH environment variable for workspace
$ mkdir ~/.go
$ echo "GOPATH=$HOME/.go" >> ~/.bashrc
$ echo "export GOPATH" >> ~/.bashrc
$ echo "PATH=\$PATH:\$GOPATH/bin" >> ~/.bashrc
$ source ~/.bashrc

# install phony
$ go get github.com/yields/phony

# verfiy installation
$ phony --version

Usage

# show help
$ phony --help

# list phony generators
$ phony --list

# generate 10 e-mails
$ echo '{{email}}' | phony --max 10

# generate 5 users (first name, last name)
$ echo 'User: {{name.first}} {{name.last}}' | phony --max 5

There is more! Look at the examples!

Record and share terminal sessions

Sometimes it is so boring to tell other software testers what to do … and nobody read documentations. Here now a easy solution! Just record and share your terminal sessions.

Installation

# install Python3 with pip (on Debian 8)
$ apt-get install -y python3 python3-pip

# verify installation
$ python3 --version && pip3 --version

# install asciinema
$ apt-get install -y asciinema

# verify installation
$ asciinema --version

Note: read the documentation of asciinema for other OS!

Usage

# start recording
$ asciinema rec

# do some great stuff on new shell instance
...

# stop recording (Ctrl-D)
$ exit

# open/send URL

Tip: Sensitive data should be shared directly (via JSON file)!

# record to local file
$ asciinema rec record.json

# distribute in any way
...

# play local record
$ asciinema play record.json

Visualization of package dependencies

Documentation takes time – sometimes a lot of time. Here a few examples how to create dependencies pictures with Graphviz via command line. These commands can then be easily transferred to a build-process to save your time.

Mac OS X

# install Graphviz on Mac OS X
$ curl -O http://www.graphviz.org/pub/graphviz/stable/macos/mountainlion/graphviz-2.36.0.pkg
$ open graphviz-2.36.0.pkg

# check installation
$ dot -V
dot - graphviz version 2.36.0 (20140111.2315)

# clone PureDarwin
$ git clone https://github.com/PureDarwin/PureDarwin.git

# change directory
$ cd PureDarwin/scripts/

# create graph for non-installed mtr
$ sudo ./pd_portviz mtr

CentOS 7

# install Graphviz on CentOS 7
$ yum install -y graphviz

# check installation
$ dot -V
dot - graphviz version 2.30.1 (20150306.0020)

# install rpmdep
$ yum install -y epel-release && yum install -y rpmorphan

# create graph for installed which
$ rpmdep -dot which.dot which

Debian 8

# install Graphviz on Debian 8
$ apt-get install -y graphviz

# check installation
$ dot -V
dot - graphviz version 2.38.0 (20140413.2041)

# install debtree
$ apt-get install -y debtree

# create graph for non-installed make
$ debtree --with-suggests make > make.dot

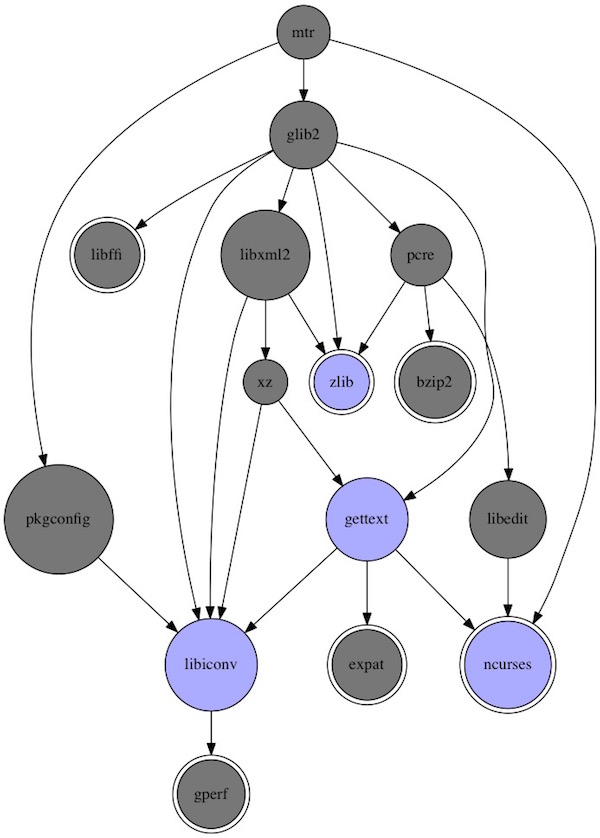
Example graph for mtr on Mac OS X

# convert .dot into png
$ dot -Tpng mtr.dot -o mtr.png

mtr dependencies

Multiple hosts provisioning with Vagrant, Ansible and virtualenv

In this tutorial we use Ansible (installed in virtualenv) and Vagrant. Furthermore, we have different machines (Debian, CentOS). For all hosts we want to have Provisioning on startup and via command.

Precondition

Folder structure

.
├── Makefile
├── Vagrantfile
├── playbook.yml
├── requirements.txt
└── roles
    └── common
        └── tasks
            └── main.yml

Files

ansible
ansible-lint
VAGRANTFILE_API_VERSION = "2"
 
Vagrant.configure(VAGRANTFILE_API_VERSION) do |config|

  # CentOS 7 VM
  config.vm.define "centos" do |centos|
    centos.vm.box = "lupin/centos7"
    centos.vm.network :forwarded_port, guest: 22, host: 2221, id: 'ssh'
    centos.vm.provider "virtualbox" do |vb|
       vb.name = "CentOS7-Vagrant-Ansible"
    end
    centos.vm.provision "ansible" do |ansible|
        # ansible.verbose = "v"
        ansible.playbook = "playbook.yml"
    end
  end

  # Debian 8 VM
  config.vm.define "debian" do |debian|
    debian.vm.box = "lupin/debian8"
    debian.vm.network :forwarded_port, guest: 22, host: 2222, id: 'ssh'
    debian.vm.provider "virtualbox" do |vb|
       vb.name = "Debian-Vagrant-Ansible"
    end
    debian.vm.provision "ansible" do |ansible|
        # ansible.verbose = "v"
        ansible.playbook = "playbook.yml"
    end
  end

end
---
- hosts: all
  become: yes
  gather_facts: yes
  roles:
    - common
---
- debug: msg="System {{ ansible_distribution }}"
ENV_DIR = env
CURRENT_DIR := $(shell pwd)
INTERPRETER = $(CURRENT_DIR)/$(ENV_DIR)/bin/
PATH := ${PATH}:$(INTERPRETER)

help:
	@echo "Run make <target> with:"
	@echo " > env           : create virtualenv on folder $(ENV_DIR)"
	@echo " > deps          : install dependentcies"
	@echo " > cleanenv      : delete virtualenv"
	@echo " > start         : run vagrant up"
	@echo " > provisioning  : start ansible provisioning"
	@echo " > kill          : run vagrant destroy"

debug:
	@echo " > ansible location is     : $(INTERPRETER)"
	@echo " > environment variable is : $(PATH)"
	vagrant status

env:
	virtualenv $(ENV_DIR) && \
	. $(ENV_DIR)/bin/activate && \
	make deps

deps:
	$(ENV_DIR)/bin/pip install -r requirements.txt

cleanenv:
	rm -fr $(ENV_DIR)

start:
	vagrant up

provisioning:
	vagrant provision

kill:
	vagrant destroy -f

Usage

# create environment
$ make env

# start vagrant (create VM`s and run provisioning)
$ make start

# run provisioning (on started VM`s)
$ make provisioning

# stop vagrant (delete VM`s)
$ make kill

# delete environment
$ make cleanenv

Hint

Check out the by Vagrant generated inventory file!

$ cat .vagrant/provisioners/ansible/inventory/vagrant_ansible_inventory