PHP QA Tools and Docker Jenkins

This Tutorial is about some simple PHP QA Tools and Docker Jenkins. I will show near how to install PHP and PHP Composer in an Jenkins Alpine Linux Docker inclusive some needed Jenkins PlugIns.

Note

If you have an running Docker Container already which you cannot stop, you can install needed packages directly via:

# list containers (optional)
$ docker ps -a

# access running container as root
$ docker exec -u 0 -it <Container Name> sh

# install packages and exit container
...

Now you can use the same commented commands as provided via Dockerfile. Otherwise follow next steps.

Let’s go

# create new project
$ mkdir -p ~/Projects/DockerJenkins && cd ~/Projects/DockerJenkins/

# create Dockerfile and plugins.txt
$ touch Dockerfile plugins.xt

# modify Dockerfile
$ vim Dockerfile

# modify plugins.txt
$ vim plugins.txt
FROM jenkins/jenkins:lts-alpine

USER root

RUN apk update && apk upgrade

# install needed libary packages
RUN apk --no-cache add libssh2 libpng freetype libjpeg-turbo libgcc \
libxml2 libstdc++ icu-libs libltdl libmcrypt

# install needed PHP packages
RUN apk --no-cache add php7 php7-fpm php7-opcache php7-gd php7-pdo_mysql \
php7-mysqli php7-mysqlnd php7-mysqli php7-zlib php7-curl php7-phar \
php7-iconv php7-pear php7-xml php7-pdo php7-ctype php7-mbstring \
php7-soap php7-intl php7-bcmath php7-dom php7-xmlreader php7-openssl \
php7-tokenizer php7-simplexml php7-json

# Download and install composer installer
RUN php -r "copy('https://getcomposer.org/installer', 'composer-setup.php');"
RUN php -r "if (hash_file('SHA384', 'composer-setup.php') === '544e09ee996cdf60ece3804abc52599c22b1f40f4323403c44d44fdfdd586475ca9813a858088ffbc1f233e9b180f061') { echo 'Installer verified'; } else { echo 'Installer corrupt'; unlink('composer-setup.php'); } echo PHP_EOL;"
RUN php composer-setup.php
RUN mv composer.phar /usr/local/bin/composer
RUN chmod +x /usr/local/bin/composer
RUN rm -f composer-setup.php

USER jenkins

# install plugins from plugins.txt
COPY plugins.txt /usr/share/jenkins/ref/plugins.txt
RUN /usr/local/bin/install-plugins.sh < /usr/share/jenkins/ref/plugins.txt
checkstyle:3.50
analysis-core:1.95
dry:2.50
pmd:3.50
violations:0.7.11

That was it! Now build the image, start and work with jenkins.

# build image from Dockerfile
$ docker build -t lupin/jenkins:lts-alpine .

# list images (optional)
$ docker images

# start container
$ docker run --name JenkinsPHP -p 8080:8080 lupin/jenkins:lts-alpine

Test

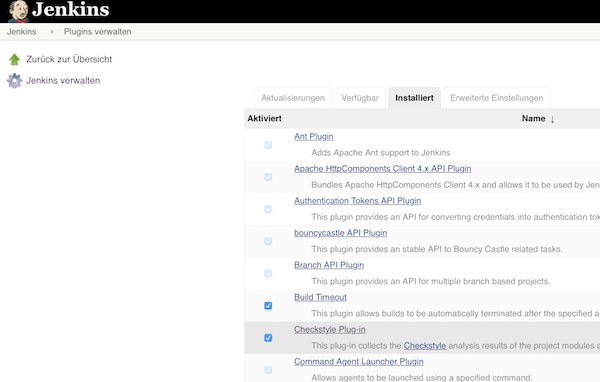
After starting, configuring and logging, you can see the already installed plugins in the Jenkins PlugIns!

Jenkins PlugIns

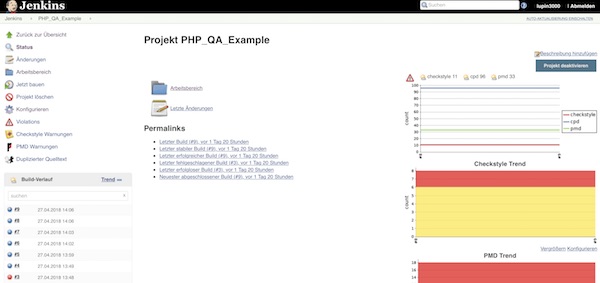
To test, you can create a simple freestyle job. Here you configure the repository, build steps and post-build actions. After a few runs, the results should be visible on the project side.

Jenkins Build Results

Create Alpine Linux VM with VirtualBox

Today a tutorial for creating a Alpine Linux VM with VirtualBox. The only limitation is that VirtualBox is already installed. Furthermore,  all of the steps are performed in the terminal (without VirtualBox-GUI).

Creation of VM

# change directory
$ cd VirtualBox\ VMs/

# download alpine iso
$ curl -o alpine-3.4.3-x86_64.iso http://dl-cdn.alpinelinux.org/alpine/v3.4/releases/x86_64/alpine-3.4.3-x86_64.iso

# checksum sha1 (optional)
$ openssl sha1 alpine-3.4.3-x86_64.iso

# create new directory
$ mkdir AlpineVM

# create storage medium for VM
$ VBoxManage createhd --filename ./AlpineVM/AlpineVM.vdi --size 8192

# list available OS types (just for fun and good to know)
$ VBoxManage list ostypes

# register new alpine VM
$ VBoxManage createvm --name "AlpineVM" --ostype Linux26_64 --register

# configure system settings of alpine VM
$ VBoxManage modifyvm "AlpineVM" --memory 1024 --cpus 1 --acpi on --pae off --hwvirtex on --nestedpaging on --rtcuseutc on --vram 16 --audio none --accelerate3d off --accelerate2dvideo off --usb on

# configure boot settings of VM
$ VBoxManage modifyvm "AlpineVM" --boot1 dvd --boot2 disk --boot3 none --boot4 none

# modify a storage controller (IDE)
$ VBoxManage storagectl "AlpineVM" --name "IDE" --add ide

# modify a storage controller (SATA)
$ VBoxManage storagectl "AlpineVM" --name "SATA" --add sata

# add storage medium to VM
$ VBoxManage storageattach "AlpineVM" --storagectl "SATA" --port 0 --device 0 --type hdd --medium ./AlpineVM/AlpineVM.vdi

# add alpine iso
$ VBoxManage storageattach "AlpineVM" --storagectl "IDE" --port 1 --device 0 --type dvddrive --medium alpine-3.4.3-x86_64.iso

# start alpine VM
$ VBoxManage startvm "AlpineVM"

Basic Alpine installation

# after login as user "root" (passwordless)

# run setup
$ setup-alpine

>>>
keyboard layout: "us"
keyboard variant: "us"
system hostname: "localhost"
initialise interface: "eth0, dhcp, no manual setup"
enter root password
timezone: "UTC"
HTTP/FTP proxy URL: "none"
Detect and add fastest mirror: "f"
SSH server: "openssh"
NTP client: "chrony"
install to disk: "sda"
install type: "sys"
erase & continue: "y"
<<<

# shutdown system
$ poweroff

Note: if you have an answers file you can do…

# download answers file
$ wget http://<uri>/<answers file>

# configuration via answers file
$ alpine-setup -f <path/to/answers file>

Remove medium (ISO)

# remove alpine iso
$ VBoxManage storageattach "AlpineVM" --storagectl "IDE" --port 1 --device 0 --type dvddrive --medium emptydrive

# start VM
$ VBoxManage startvm "AlpineVM"

Update Packages and install VirtualBox additions

# change directory
$ cd /etc

# enable repositories
$ vi apk/repositories

>>>
#/media/cdrom/apks
http://liskamm.alpinelinux.uk/v3.4/main
http://liskamm.alpinelinux.uk/v3.4/community
http://liskamm.alpinelinux.uk/edge/main
http://liskamm.alpinelinux.uk/edge/community
http://liskamm.alpinelinux.uk/edge/testing
<<<

# update and upgrade system
$ apk update && apk upgrade

# install virtualbox additions
$ apk add virtualbox-guest-modules-grsec virtualbox-additions-grsec

# reboot system
$ reboot

Optional steps

# install vim
$ apk add vim

# change directory
$ cd /etc

# modify sshd (manual) 
$ vim ssh/sshd_config

# restart sshd
$ init.d/sshd restart

# modify network interfaces (manual)
$ vim network/interfaces

# restart network
$ init.d/networking restart

Explain Shell direct from terminal

Explainshell.com rocks! Nevertheless, you lose time to leave the terminal (open browser, copy-paste). But there is a cool solution from ManKier. All what you need is curl.

Usage

# curl request for whoami
$ curl -Gs "https://www.mankier.com/api/explain/?cols="$(tput cols) --data-urlencode "q=whoami"

# curl request for df -h
$ curl -Gs "https://www.mankier.com/api/explain/?cols="$(tput cols) --data-urlencode "q=df -h"

Simpler usage

With a tiny script it will be more comfortable! Add the following to your .bashrc or .bash_profile (MAC OS X).

# explain.sh begins
explain () {
	if [ "$#" -eq 0 ]; then
		while read  -p "Command: " cmd; do
			curl -Gs "https://www.mankier.com/api/explain/?cols="$(tput cols) --data-urlencode "q=$cmd"
		done
		echo "Bye!"
	elif [ "$#" -eq 1 ]; then
		curl -Gs "https://www.mankier.com/api/explain/?cols="$(tput cols) --data-urlencode "q=$1"
	else
		echo "Usage"
		echo "explain                  interactive mode."
		echo "explain 'cmd -o | ...'   one quoted command to explain it."
	fi
}

Now you can do …

# explain one command
$ explain 'df -h'
...
df(1)
  df displays the amount of disk space available on the file system containing each file name
  argument. If no file name is given, the space available on all currently mounted file systems is
  shown. Disk space is shown in 1K blocks by default, unless the environment variable
  POSIXLY_CORRECT is set, in which case 512-byte blocks are used. If an argument is the absolute
  file name of a disk device node containing a mounted file system, df shows the space available on
  that file system rather than on the file system containing the device node. This version of df
  cannot show the space available on unmounted file systems, because on most kinds of systems doing
  so requires very nonportable intimate knowledge of file system structures.

  -h (-H, --HUMAN-READABLE)
    print sizes in powers of 1024 (e.g., 1023M)

… if you insert only “explain” an interactive mode will started!

Create own Docker port scanner

Today’s tutorial shows how quickly and easily a Docker port scanner can be created. With the knowledge you can then create additional Docker applications.

Preparation

# prepare knocker project (local)
$ mkdir ~/Projects/Knocker && cd ~/Projects/Knocker

# create Dockerfile (local)
$ vim Dockerfile

# create KnockerVM (local)
$ docker-machine create -d virtualbox KnockerVM

# pointing shell to KnockerVM (local)
$ eval $(docker-machine env KnockerVM)

# copy Dockerfile into KnockerVM (local)
$ docker-machine scp ~/Projects/Knocker/Dockerfile KnockerVM:Dockerfile

# SSH into KnockerVM (local)
$ docker-machine ssh KnockerVM

Dockerfile

FROM alpine

# install needed packages
RUN apk --update add wget build-base gcc abuild binutils binutils-doc gcc-doc

# download and unzip
RUN wget http://prdownloads.sourceforge.net/knocker/knocker-0.7.1.tar.gz
RUN tar -zxvf knocker-0.7.1.tar.gz && rm -f knocker-0.7.1.tar.gz

# configure, install and clean up
WORKDIR /knocker-0.7.1
RUN ./configure \
    && make install \
    && make clean

# create mountable directory
RUN mkdir /results
VOLUME /results
WORKDIR /results

# remove packages
RUN apk del wget build-base gcc abuild binutils binutils-doc gcc-doc \
    && rm -fr /knocker-0.7.1

ENTRYPOINT ["knocker"]

Usage

# build Docker image (KnockerVM)
$ docker build -t alpine/knocker .

# run Knocker help (KnockerVM)
$ docker run -ti --rm alpine/knocker --help

# run simple port scan (KnockerVM)
$ docker run -ti --rm alpine/knocker -H 192.168.192.1 -SP 1 -EP 10

# run port scan with (KnockerVM)
$ docker run -ti --rm -v /home/docker:/results alpine/knocker -H 192.168.192.1 -SP 80 -EP 90 -lf /results/report

# read report (KnockerVM)
$ cat report

Feel free to edit and/or expand! Knocker self can be found here.

Apache Jmeter and Docker

Okay, this time we will create a Docker-Jmeter test environment. We create some simple (but tiny) Docker images/containers which can be reused for future test runs. Here we follow the DRY rule. Next, we want to achieve.

$ java -jar apache-jmeter-3.0/bin/ApacheJMeter.jar -t /tutorial/jmx/simple.jmx -n -l /tutorial/results/log.jtl

Preconditions

Preparation

# create all directories
$ mkdir -p /tutorial/{java,jmeter,jmx,results}

# create Dockerfile for JAVA
$ cd /tutorial/java && vim Dockerfile

# build JAVA image
$ docker build -t alpine/java .

# create Dockerfile for Jmeter
$ cd /tutorial/jmeter && vim Dockerfile

# build Jmeter image
$ docker build -t alpine/jmeter .

# list Docker images (optional)
$ docker images
...
REPOSITORY          TAG                 IMAGE ID            CREATED             SIZE
alpine/jmeter       latest              0864228be6ef        15 seconds ago      150.2 MB
alpine/java         latest              068005f45866        5 minutes ago       102.8 MB
alpine              latest              f70c828098f5        5 days ago          4.795 MB

Dockerfile JAVA

FROM alpine

RUN apk --update add openjdk8-jre-base

ENTRYPOINT ["/usr/bin/java"]

Dockerfile Jmeter

FROM alpine

RUN apk --update add wget
RUN wget http://mirror.switch.ch/mirror/apache/dist//jmeter/binaries/apache-jmeter-3.0.tgz
RUN tar zxvf apache-jmeter-3.0.tgz
RUN apk del wget
RUN rm -f apache-jmeter-3.0.tgz
RUN rm -fr /apache-jmeter-3.0/docs

VOLUME /apache-jmeter-3.0

CMD ["/bin/true"]

JMX file

Create or copy existing JMX file on folder “/tutorial/jmx” with name “simple.jmx”.

# show JMX (optional)
$ ls /tutorial/jmx
...
simple.jmx

Create Jmeter container

# create jmeter container
$ docker create --name jmeter alpine/jmeter

# list containers (optional)
$ docker ps -a
...
CONTAINER ID        IMAGE               COMMAND             CREATED             STATUS      PORTS       NAMES
0916ff8f25bb        alpine/jmeter       "/bin/true"         7 seconds ago       Created                 jmeter

Note: The container was created but not running!

Test execution

# test run JAVA container (optional)
$ docker run -ti --rm --volumes-from jmeter alpine/java -jar /apache-jmeter-3.0/bin/ApacheJMeter.jar --version

# run Jmeter (without report)
$ docker run -ti --rm -v /tutorial/jmx:/jmx --volumes-from jmeter alpine/java -jar /apache-jmeter-3.0/bin/ApacheJMeter.jar -t /jmx/simple.jmx -n

# run Jmeter (with report)
$ docker run -ti --rm -v /tutorial/jmx:/jmx -v /tutorial/results:/results --volumes-from jmeter alpine/java -jar /apache-jmeter-3.0/bin/ApacheJMeter.jar -t /jmx/simple.jmx -n -l /results/log.jtl

# show report
$ cat /tutorial/results/log.jtl

🙂