Simple Jenkins pipeline on AWS (Part 1)

This tutorial serie should enable you to create own pipelines via Jenkins on AWS. Therefore we try to catch all needed basics with AWS IAM, EC2, ECR and ECS. Some of our configurations are recommended only for learning purpose, don’t use them on production! Why? Because these lessons are for people who starts on these topics and I will try to make all steps/configuration as easy as possible without focus on security. In this part we will create the environment and setup the “build step”.

Preconditions

  • AWS account (eq. free tier)
  • Git account (eq. GitLab, Bitbucket, GitHub, etc.)

AWS IAM

The first preparation you do on AWS IAM Management Console. Here you create and configure a new group. The benefit of this group is that you can reconfigure the policies for assigned users easily at anytime. Please name the group “PipelineExampleGroup”.

AWS IAM group name

Now search for EC2 Container Registry policies and enable checkbox for “AmazonEC2ContainerRegistryPowerUser”. For our example this policy is enough, but for production please don’t do that!
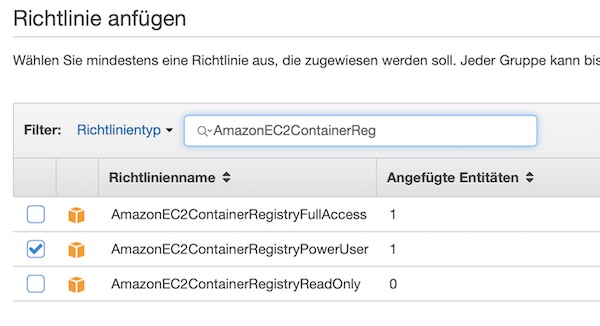
AWS IAM group policies

After the group is created, a user needs to be assigned to this group. Name the user “PipelineExampleUser”. Please enable checkbox “Programmatic access” for this user.
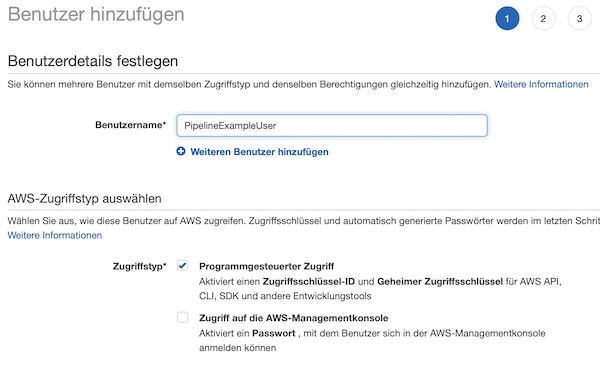
AWS IAM user name

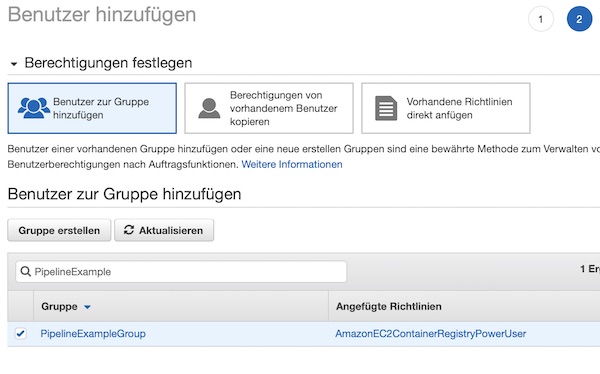
Assign the user to group.

AWS IAM user group

Before you finish the process, please choose Download .csv and then save the file to a safe location.

AWS Jenkins EC2 Instance

Now you can launch our EC2 instance. Do this on region “Frankfurt” (eu-central-1). Of course you can choose any other region, but please remember your choice later. At very first step select the template “Amazon Linux 2 AMI (HVM), SSD Volume Type”.

AWS EC2 AMI

The instance type “t2.micro” is enough for our example. For production you will need something else – depending to your needs.

AWS EC2 instance type

Now you need to be a little bit careful. On Instance Details step please select “Enable” for “Auto-assign Public IP” and “Stop” for “Shutdown Behavior”. For all other values the defaults should be fine. I select my default VPC and “No preference…” for Subnet.
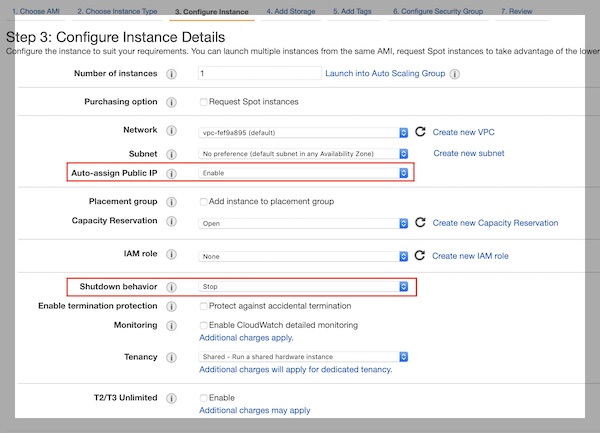
AWS EC2 instance details

15 Gb disk space are fine. For production you need to estimate differently.

AWS EC2 instance storage

With the tag you will have it easier to identify the instance later on console view. Enter values “Name” for “Key” and “Jenkins” for “Value”.

AWS EC2 instance tags

Create a new security group with name “ExampleSecurityGroup” and allow ports 22, 80 and 8080 (IPv4 only). You can change the configuration at any time later. On a production environment you should use other ports like 443 and IP restrictions.

AWS EC2 instance security group

Create a new key pair with name “ExampleKeyPair”. Don’t forget to save the key (“Download Key Pair”) and press “Launch Instances”!
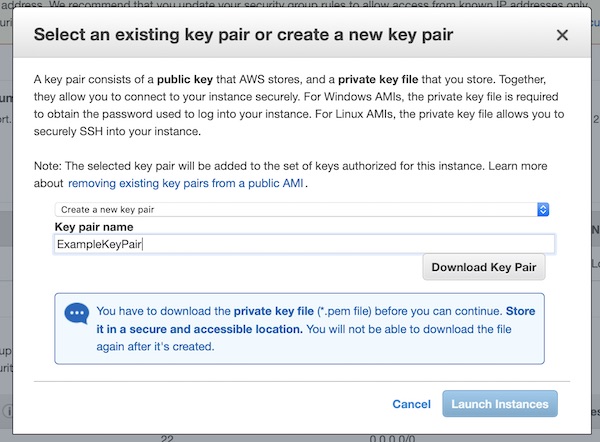
AWS EC2 instance key pair

Install and run Jenkins

The EC2 instance is running and you can connect via SSH to start all needed installations and configurations. Attention: Your Public IP/DNS will be different (also after every stop/start), via button “Connect” you can easily figure out your configuration. I will just use the term “<EC2 IP|DNS>” in my description.
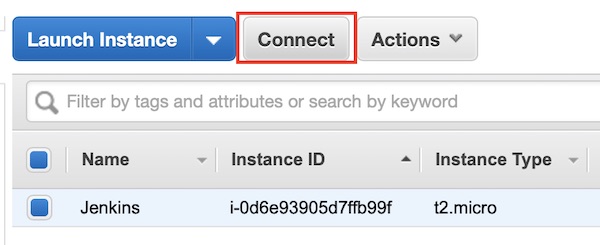
AWS EC2 connection
# move SSH keys (my are downloaded under Downloads)
$ mv ~/Downloads/ExampleKeyPair.pem.txt ~/.ssh/ExampleKeyPair.pem

# change permissions
$ chmod 0400 ~/.ssh/ExampleKeyPair.pem

# start ssh connection
$ ssh -i ~/.ssh/ExampleKeyPair.pem ec2-user@<EC2 IP|DNS>

# change to root user
$ sudo su -

# update system
$ yum update -y

# add latest Jenkins repository
$ wget -O /etc /yum.repos.d/jenkins.repo http://pkg.jenkins.io/redhat/jenkins.repo

# add key from Jenkins
$ rpm --import https://pkg.jenkins.io/redhat/jenkins.io.key

# install docker-ce
$ amazon-linux-extras install -y docker

# install java, git, jenkins and jq
$ yum install -y java git jenkins jq

# add jenkins to docker group
$ usermod -a -G docker jenkins

# enable and start docker
$ systemctl enable docker && systemctl start docker

# enable and start jenkins
$ systemctl enable jenkins && systemctl start jenkins

# get initial password
$ cat /var/lib/jenkins/secrets/initialAdminPassword

Note: I have a space after etc, because of security settings of my provider.

Do not close the SSH connection yet. Start your browser and following there the Jenkins installation steps. The URL is similar to your SSH connection – http://<EC2 IP|DNS>:8080. You should see the following screen and paste the initial password there.
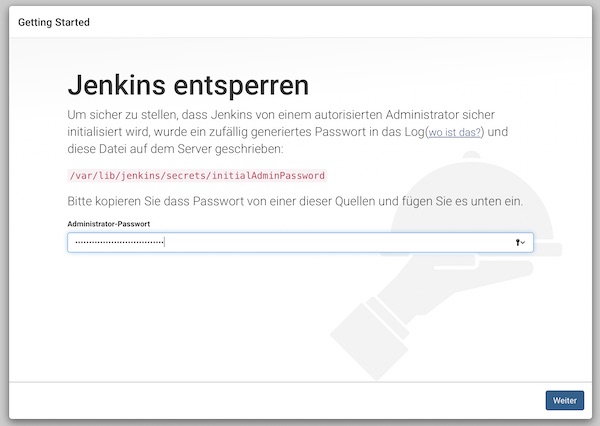
jenkins screen initial password

On next screen press button “Install suggested plugins” and wait for the screen to create administrator account. Fill in your credentials and finish the installation steps. The remaining configurations (on browser) will be made later.

AWS ECR

Before you can push images to ECR, you need to create a new repository. On the ECR page, choose button “Create repository”. Your AWS ECR console screen could look a little bit different.

AWS ECR repositories

Give a repository name “example/nginx” and press button “Create repository”.
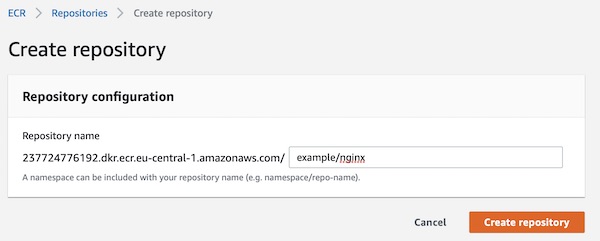
AWS ECR repository configuration

Done, your ECR repository is already created. You can see on overview page all needed informations like Repository name and URI. Your repository URI will be different to my. I will just use the term “<ECR URI>” in my description.

AWS ECR repository overview

Okay, now enable user jenkins to connect to ECR. Go back to terminal and execute following steps. You need now the credentials from downloaded csv file for “PipelineExampleUser”.

# change to jenkins user
$ su -s /bin/bash jenkins

# show docker info (optional)
$ docker info

# configure AWS-CLI options
$ aws configure
...
AWS Access Key ID [None]: <credentials.csv>
AWS Secret Access Key [None]: <credentials.csv>
Default region name [None]: eu-central-1
Default output format [None]: json
...

# list repositories in registry (optional)
$ aws ecr describe-repositories

Git Repository

I assume that you are familiar with Git. You must now create a Git Repository and create the following folders and files there. I will use my own private GitLab repository.

# show local project tree (optional)
$ tree ~/<path to your project>
|____index.html
|____Dockerfile
|____.gitignore
|____cicd
| |____build.sh
| |____Jenkinsfile
| |____deploy.sh
| |____task_definition.json
| |____test.sh
|____dev_credentials
| |____credentials.csv
|____.git

Content of files in root folder:

<!DOCTYPE html>
<html lang="en" dir="ltr">
  <head>
    <meta charset="utf-8">
    <title>DemoPipeline</title>
  </head>
  <body>
    Hello world...
  </body>
</html>
FROM nginx:stable-alpine

COPY index.html /usr/share/nginx/html/index.html
.DS_Store
dev_credentials/

Content of files in cicd folder:

pipeline {
  agent any
  parameters {
    string(name: 'REPONAME', defaultValue: 'example/nginx', description: 'AWS ECR Repository Name')
    string(name: 'ECR', defaultValue: '237724776192.dkr.ecr.eu-central-1.amazonaws.com/example/nginx', description: 'AWS ECR Registry URI')
    string(name: 'REGION', defaultValue: 'eu-central-1', description: 'AWS Region code')
    string(name: 'CLUSTER', defaultValue: 'ExampleCluster', description: 'AWS ECS Cluster name')
    string(name: 'TASK', defaultValue: 'ExampleTask', description: 'AWS ECS Task name')
  }
  stages {
    stage('BuildStage') {
      steps {
        sh "./cicd/build.sh -b ${env.BUILD_ID} -n ${params.REPONAME} -e ${params.ECR} -r ${params.REGION}"
      }
    }
    stage('DeployStage') {
      steps {
        sh "./cicd/deploy.sh"
      }
    }
    stage('TestStage') {
      steps {
        sh "./cicd/test.sh"
      }
    }
  }
}
{
    "family": "ExampleTask",
    "containerDefinitions": [
        {
            "image": "URI:NUMBER",
            "name": "ExampleContainer",
            "cpu": 0,
            "memory": 128,
            "essential": true,
            "portMappings": [
                {
                    "containerPort": 80,
                    "hostPort": 80
                }
            ]
        }
    ]
}

Note: Please set permission rights for shell scripts like $ chmod +x build.sh deploy.sh test.sh

#!/usr/bin/env bash

## shell options
set -e
set -u
set -f

## magic variables
declare REPONAME
declare ECR
declare REGION
declare BUILD_NUMBER
declare -r -i SUCCESS=0
declare -r -i NO_ARGS=85
declare -r -i BAD_ARGS=86
declare -r -i MISSING_ARGS=87

## script functions
function usage() {
  local FILE_NAME

  FILE_NAME=$(basename "$0")

  printf "Usage: %s [options...]\n" "$FILE_NAME"
  printf " -h\tprint help\n"
  printf " -n\tset ecr repository name\n"
  printf " -e\tset ecr repository uri\n"
  printf " -r\tset aws region\n"
  printf " -b\tset build number\n "
}

function no_args() {
  printf "Error: No arguments were passed\n"
  usage
  exit "$NO_ARGS"
}

function bad_args() {
  printf "Error: Wrong arguments supplied\n"
  usage
  exit "$BAD_ARGS"
}

function missing_args() {
  printf "Error: Missing argument for: %s\n" "$1"
  usage
  exit "$MISSING_ARGS"
}

## check script arguments
while getopts "hn:e:r:b:" OPTION; do
  case "$OPTION" in
    h) usage
       exit "$SUCCESS";;
    n) REPONAME="$OPTARG";;
    e) ECR="$OPTARG";;
    r) REGION="$OPTARG";;
    b) BUILD_NUMBER="$OPTARG";;
    *) bad_args;;
  esac
done

if [ "$OPTIND" -eq 1 ]; then
  no_args
fi

if [ -z "$REPONAME" ]; then
  missing_args '-n'
fi

if [ -z "$ECR" ]; then
  missing_args '-e'
fi

if [ -z "$REGION" ]; then
  missing_args '-r'
fi

if [ -z "$BUILD_NUMBER" ]; then
  missing_args '-b'
fi

## run main function
function main() {
  local LAST_ID

  # delete all previous image(s)
  LAST_ID=$(docker images -q "$REPONAME")
  if [ -n "$LAST_ID" ]; then
    docker rmi -f "$LAST_ID"
  fi

  # build new image
  docker build -t "$REPONAME:$BUILD_NUMBER" --pull=true .

  # tag image for AWS ECR
  docker tag "$REPONAME:$BUILD_NUMBER" "$ECR":"$BUILD_NUMBER"

  # basic auth into ECR
  $(aws ecr get-login --no-include-email --region "$REGION")

  # push image to AWS ECR
  docker push "$ECR":"$BUILD_NUMBER"
}

main

# exit
exit "$SUCCESS"

Inside folder “dev_credentials” I store the credentials.csv from AWS. The content of this folder will be only on my local machine, because via .gitignore I exclude the folder and files from git.

Jenkins job configuration

I will not use this tutorial to explain security topics for Jenkins, so we start directly with the configuration of the job (resp. project). On main page press now button “New item” or link “create new jobs”. Insert name “ExamplePipeline”, select “Pipeline” and press button “OK”.
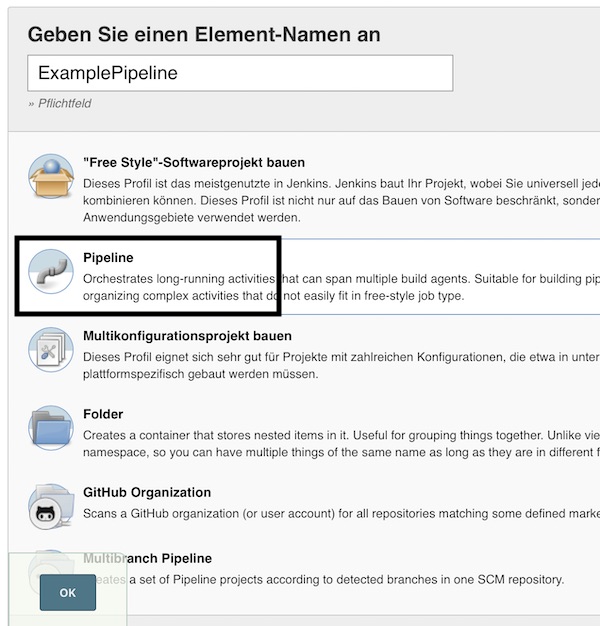
jenkins new job

To save some disk space enable checkbox discard old builds (5 builds are enough).

jenkins job discard old builds

Normally you would create a webhook to trigger the build after commit, but our EC2 instance does change the public IP/DNS on every stop/start. That’s why here we check the revision changes every 5 minutes on git and trigger the job if something has changed.

jenkins job build trigger

Add the repository (may credentials are needed), configure the branch and Jenkinsfile path.
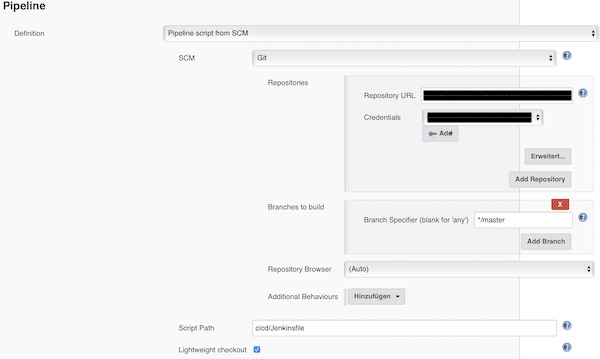
jenkins job scm pipeline

Press button “save”, _cross fingers_ and trigger manual the build. If you did nothing wrong, the job will run without issues and the ECR contains your images (depending how often you trigger the build).
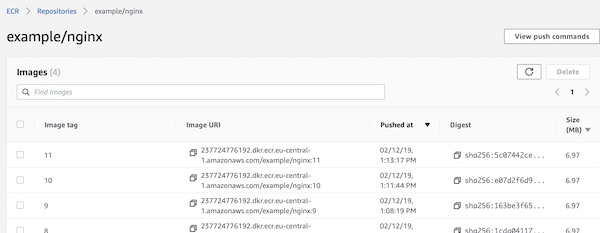
AWS ECR repository images

The next part of this tutorial series will be about deployment to ECS.

Jenkins and Sitespeed.io

While surfing the internet I stumbled across Sitespeed.io. It’s a amazing collection of Open Source Tools, which make performance measuring for developers and testers super easy. I tried it out and was immediately impressed. Here’s a little tutorial on how to use Jenkins and Sitespeed.

Requirements

Docker (latest)

Environment setup

With minimal 2 commands the environment (via Docker) is already created. Most of the time will be needed for the plugins installation.

# create Project
$ mkdir -p ~/Projects/Sitespeed/target && cd ~/Projects/Sitespeed

# pull latest sitespeed image (optional)
$ docker pull sitespeedio/sitespeed.io:latest

# start Jenkins container
$ docker run -e JAVA_OPTS="-Dhudson.model.DirectoryBrowserSupport.CSP=\"sandbox allow-scripts; style-src 'unsafe-inline' *;script-src 'unsafe-inline' *;\"" --name jenkins -v $(pwd)/target:/var/jenkins_home -v /var/run/docker.sock:/var/run/docker.sock -v $(which docker):$(which docker) -p 8080:8080 -p 9000:9000 jenkins/jenkins:lts

# open Jenkins in browser (be patient)
$ open http://localhost:8080

On setup wizard finish: unlock Jenkins, install the suggested plugins, create an account and finish the instance configuration.

Jenkins permissions to /var/run/docker.sock

Before you start with Jenkins job configuration, ensure that user jenkins has permissions to /var/run/docker.sock.

# test permissions
$ docker exec -ti jenkins docker info Got permission denied...

# create group docker
$ docker exec -ti -u 0 jenkins groupadd -for -g 0 docker

# add jenkins to group
$ docker exec -ti -u 0 jenkins usermod -aG docker jenkins

# restart jenkins container
$ docker restart jenkins

Jenkins job configuration

When Jenkins is ready (restarted), install the HTML Publisher PlugIn (no restart after installation of plugin required).

Jenkins HTML Publisher Plugin

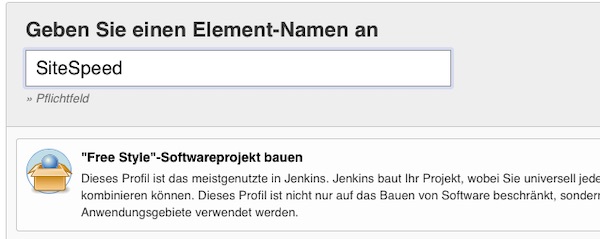
Create a new free-style project named SiteSpeed.

Jenkins SiteSpeed Project

Attention: You need to specify later the absolute path to the local directory /target/workspace/SiteSpeed. If you do not know how, press save and start the build without any job information (empty job configuration) and follow the optional instructions.

# change directory (optional)
$ cd ~/Projects/Sitespeed/target/workspace/SiteSpeed

# get absolute path (optional)
$ pwd

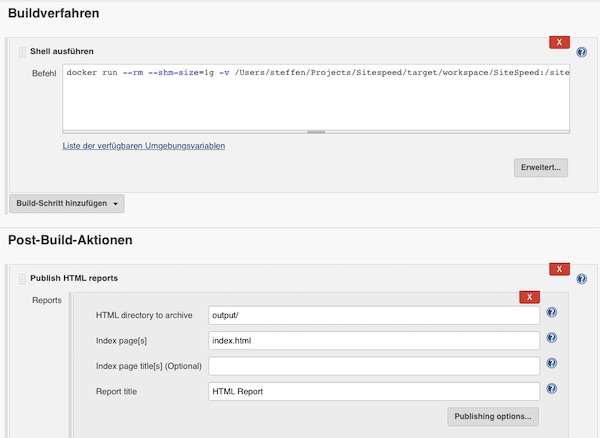
In my case the path is: “/Users/steffen/Projects/Sitespeed/target/workspace/SiteSpeed”. Under job configuration section “Build” enable “Execute shell” and paste following command.

docker run --rm --shm-size=1g -v /Users/steffen/Projects/Sitespeed/target/workspace/SiteSpeed:/sitespeed.io sitespeedio/sitespeed.io --visualMetrics --video --outputFolder output https://www.sitespeed.io/ -n 1

Via Post-Build-Action: Publish HTML reports you can enter the report very simple from the job project page.

Jenkins SiteSpeed Job Configuration

Save everything and run the job. After a short time you can look at the HTML report. See “Pages” > “https://www.sitespeed.io/” for screenshots, HAR and video files. On the website of sitespeed.io is a very detailed documentation and many more examples. Have fun!

Start with Vault 0.10.x

HashiCorp released Vault version 0.10.x on April 2018. The 0.10.x release delivers many new features and changes (eq. K/V Secrets Engine v2, Vault Web UI, etc.). Please have a look on vault/CHANGELOG for more informations. This tiny tutorial will concentrate now on usage of Vault’s Key-Value Secrets Engine via CLI.

Preparation

# download version 0.10.3
$ curl -C - -k https://releases.hashicorp.com/vault/0.10.3/vault_0.10.3_darwin_amd64.zip -o ~/Downloads/vault.zip

# unzip and delete archive
$ unzip ~/Downloads/vault.zip -d ~/Downloads/ && rm ~/Downloads/vault.zip

# change access permissions and move binary to target
$ chmod u+x ~/Downloads/vault && sudo mv ~/Downloads/vault /usr/local/

Start Vault server in development mode

# start in simple development mode
$ vault server -dev

Do not stop the process and open new tab on terminal [COMMAND] + [t].

# set environment variable
$ export VAULT_ADDR='http://127.0.0.1:8200'

# check vault status
$ vault status

Create, Read, Update and Delete secrets

# create secret (version: 1)
$ vault kv put secret/demosecret name=demo value=secret

# list secrets (optional)
$ vault kv list secret

# read secret
$ vault kv get secret/demosecret

# read secret (JSON)
$ vault kv get --format json secret/demosecret

# update secret (version: 2)
$ vault kv put secret/demosecret name=Demo value=secret foo=bar

# read secret (latest version)
$ vault kv get secret/demosecret

# read secret (specific version)
$ vault kv get --version 1 secret/demosecret

# read secret (specific field)
$ vault kv get --field=name secret/demosecret

# delete secret (latest version)
$ vault kv delete secret/demosecret

# show metadata
$ vault kv metadata get secret/demosecret

As you can see, there are minor changes to previous versions of Vault.

Note: The API for the Vault KV secrets engine even changed.

# read (version 1)
$ curl -H "X-Vault-Token: ..." https://127.0.0.1:8200/v1/secret/demosecret

# read (version 2)
$ curl -H "X-Vault-Token: ..." https://127.0.0.1:8200/v1/secret/data/demosecret

Okay, back to CLI and some examples which are better for automation. We will use the STDIN and a simple JSON file.

# create secret (version: 1)
$ echo -n "my secret" | vault kv put secret/demosecret2 name=-

# list secrets (optional)
$ vault kv list secret

# update secret (version: 2)
$ echo -n '{"name": "other secret"}' | vault kv put secret/demosecret2 -

# create JSON file
$ echo -n '{"name": "last secret"}' > ~/Desktop/demo.json

# update secret (version: 3)
$ vault kv put secret/demosecret2 @$HOME/Desktop/demo.json

# read secrets (different versions)
$ vault kv get --version 1 secret/demosecret2
$ vault kv get --version 2 secret/demosecret2
$ vault kv get --version 3 secret/demosecret2

# delete version permanent
$ vault kv destroy --versions 3 secret/demosecret2

# show metadata
$ vault kv metadata get secret/demosecret2

Web UI

Previously the Web UI was for Enterprise only, now it has been made open source.

# open URL in browser
$ open http://localhost:8200/

Now you can use the root token to sign in.

Running Jenkins on Kubernetes (Docker for Mac)

Now we will deploy Jenkins-Docker on local Kubernetes. If you haven’t Kubernetes running yet, feel free to have a look on my previous tutorial. I will try to describe with very basic steps the tutorial. That’s may confusing for advanced peoples or experts but it should help beginner to get in that topic. For example, this tutorial uses 2 YAML files.

Preparation

# create new project
$ mkdir -p ~/Projects/KubernetesJenkins && cd ~/Projects/KubernetesJenkins

# create needed files
$ touch namespace.yml pod.yml

# modify namespace.yml
$ vim namespace.yml

# modify pod.yml
$ vim pod.yml
apiVersion: v1
kind: Namespace
metadata:
  name: qa-namespace
  labels:
    name: qa-namespace
apiVersion: v1
kind: Pod
metadata:
  name: jenkins.example.com
  labels:
    app: qa-jenkins-app
  namespace: qa-namespace
spec:
  containers:
    - name: jenkins
      image: jenkins/jenkins:lts-alpine
      ports:
        - containerPort: 8080

Let’s go – start Jenkins container on Kubernetes

# show nodes (optional)
$ kubectl get nodes

# create namespace
$ kubectl create -f ~/Projects/KubernetesJenkins/namespace.yml

# show namespaces (optional)
$ kubectl get namespaces --show-labels

# create pod
$ kubectl create -f pod.yml

# show pods of namespace
$ kubectl get pods --namespace qa-namespace

# show pod informations (optional)
$ kubectl describe pod jenkins.example.com --namespace qa-namespace

Open Jenkins in Browser

Jenkins is already running but you cannot access Jenkins without one important step! You need to configure the network routing. Probably the easiest option to do that is a simple port-forward.

# show ports in use (optional)
$ lsof -i -P | grep -i "listen"

# create port-forward to specific namespace
$ kubectl port-forward jenkins.example.com 8080:8080 --namespace=qa-namespace

# open browser (new terminal)
$ open http://localhost:8080

The 2nd way is to expose a service. This possibility is recommended only for local environments! For example on AWS you use load-balancer and there the way is a little bit different.

# expose pod as service
$ kubectl expose pod jenkins.example.com --namespace=qa-namespace --type=NodePort --name jenkins-service

# show services in namespace (optional)
$ kubectl get services --namespace qa-namespace

# show service informations (optional)
$ kubectl get service jenkins-service --namespace qa-namespace

# get node port
$ kubectl describe service jenkins-service --namespace qa-namespace | grep NodePort

# open browser (same terminal)
$ open http://localhost:32654

Whatever way you prefer, you need the initial admin password for Jenkins and/or you may need to see logs.

# show key for Jenkins activation
$ kubectl exec jenkins.example.com --namespace qa-namespace -- cat /var/jenkins_home/secrets/initialAdminPassword

# show logs of pod
$ kubectl logs -f jenkins.example.com --namespace qa-namespace

That’s it… Now you can use Jenkins.

CleanUp

If you want to clean up, proceed as follows.

# delete service
$ kubectl delete service jenkins-service --namespace qa-namespace

# list services (optional)
$ kubectl get services --namespace qa-namespace

# delete pod
$ kubectl delete pod jenkins.example.com --force --namespace qa-namespace

# list pods (optional)
$ kubectl get pods --namespace qa-namespace

# delete namespace
$ kubectl delete namespaces qa-namespace

# list namespaces (optional)
$ kubectl get namespaces

Kubernetes with Docker for Mac

The newer versions of Docker for Mac actually bring everything for the use of Kubernetes. Since the current documentation is not so optimal, I try it in my own way. Since I plan to further testing tutorials on this topic, this guide will serve as a basis.

Preparation

Kubernetes is currently only supported via Docker Edge. Caution, if you switch from stable to edge all Docker images and containers will be deleted! If you are already using the Edge version, skip the following steps 1 till 3.

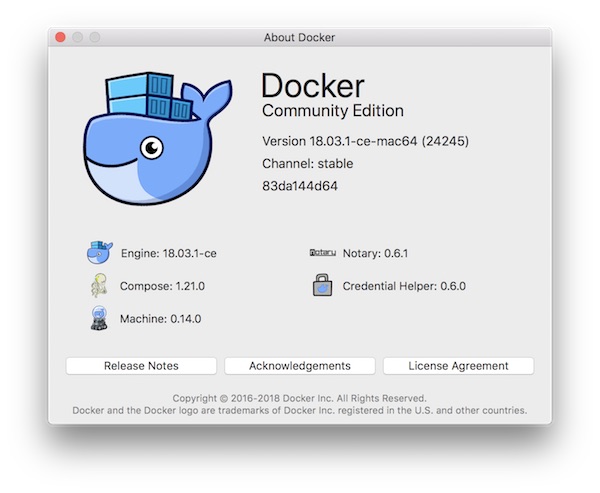
Docker for Mac Version Stable

  1. Download Docker for Mac Edge Version… You can exit Docker for Mac while downloading.
  2. After successful download of DMG start the installation (Replace the old version).
  3. Start Docker and follow the instructions.
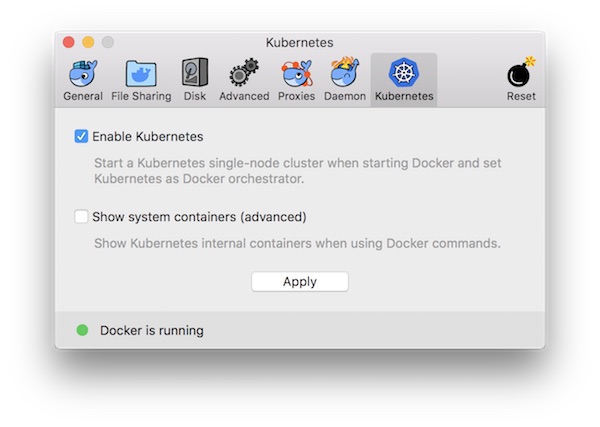
  4. Activate Kubernetes now via “Enable Kubernetes” checkbox and install the Kubernetes cluster. This can take a while, do not lose your patience!
  5. When the installation is finished you can check it.

Enable Kubernetes

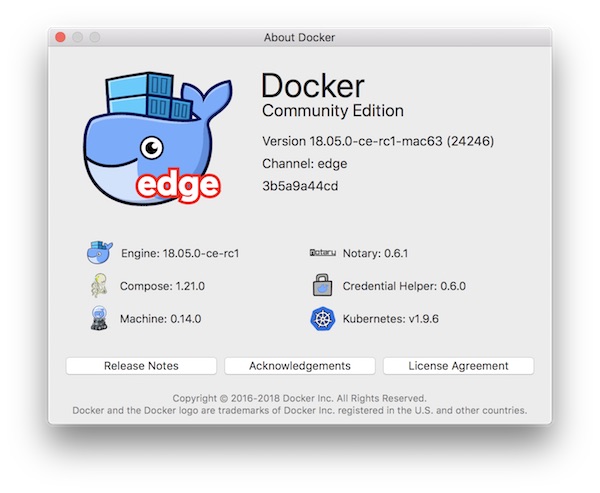
Docker Version Edge with Kubernetes

Note, if you have already used minikube, you should now switch the cluster. You can switch between clusters at any time via GUI or command-line.

# show kubectl version
$ kubectl version
Client Version: version.Info{Major:"1", Minor:"9", GitVersion:"v1.9.6", GitCommit:"9f8ebd171479bec0ada837d7ee641dec2f8c6dd1", GitTreeState:"clean", BuildDate:"2018-03-21T15:21:50Z", GoVersion:"go1.9.3", Compiler:"gc", Platform:"darwin/amd64"}
Unable to connect to the server: dial tcp 192.168.99.100:8443: i/o timeout

# show current context
$ kubectl config current-context
minikube

# switch context
$ kubectl config use-context docker-for-desktop
Switched to context "docker-for-desktop".

# show kubectl version
$ kubectl version
Client Version: version.Info{Major:"1", Minor:"9", GitVersion:"v1.9.6", GitCommit:"9f8ebd171479bec0ada837d7ee641dec2f8c6dd1", GitTreeState:"clean", BuildDate:"2018-03-21T15:21:50Z", GoVersion:"go1.9.3", Compiler:"gc", Platform:"darwin/amd64"}
Server Version: version.Info{Major:"1", Minor:"9", GitVersion:"v1.9.6", GitCommit:"9f8ebd171479bec0ada837d7ee641dec2f8c6dd1", GitTreeState:"clean", BuildDate:"2018-03-21T15:13:31Z", GoVersion:"go1.9.3", Compiler:"gc", Platform:"linux/amd64"}

Now it’s a good time to know some more about current cluster, nodes, pods and namespaces. This will help to understand everything better!

# show cluster informations
$ kubectl cluster-info
Kubernetes master is running at https://localhost:6443
KubeDNS is running at https://localhost:6443/api/v1/namespaces/kube-system/services/kube-dns:dns/proxy

To further debug and diagnose cluster problems, use 'kubectl cluster-info dump'.

# show nodes informations
$ kubectl get nodes
NAME                 STATUS    ROLES     AGE       VERSION
docker-for-desktop   Ready     master    14m       v1.9.6

# show pod informations
$ kubectl get pods
No resources found.

# show namespaces informations
$ kubectl get namespaces
NAME          STATUS    AGE
default       Active    23m
docker        Active    21m
kube-public   Active    23m
kube-system   Active    23m

As you can see, everything is working fine. The system is now ready for usage. By the way, have a look on your Docker images!

# list current Docker images (optional)
$ docker images
...

Deploying the Kubernetes Web UI Dashboard

Finally we deploy the Kubernetes Web UI Dashboard on our new Kubernetes Master as a Pod in namespace kube-system. The Dashboard is not installed/deployed by default. Although everything is possible via command-line, it can help to better understand and analyze the system.

# create a resource from a file
$ kubectl create -f https://raw.githubusercontent.com/kubernetes/dashboard/master/src/deploy/recommended/kubernetes-dashboard.yaml
secret "kubernetes-dashboard-certs" created
serviceaccount "kubernetes-dashboard" created
role "kubernetes-dashboard-minimal" created
rolebinding "kubernetes-dashboard-minimal" created
deployment "kubernetes-dashboard" created
service "kubernetes-dashboard" created

# list pods in specific namespace
$ kubectl get pods --namespace=kube-system
NAME                                         READY     STATUS    RESTARTS   AGE
etcd-docker-for-desktop                      1/1       Running   0          46m
kube-apiserver-docker-for-desktop            1/1       Running   0          46m
kube-controller-manager-docker-for-desktop   1/1       Running   0          46m
kube-dns-6f4fd4bdf-f7pjw                     3/3       Running   0          47m
kube-proxy-c676q                             1/1       Running   0          47m
kube-scheduler-docker-for-desktop            1/1       Running   0          46m
kubernetes-dashboard-5bd6f767c7-f9w4j        1/1       Running   0          1m

# forward port to specific pod (Attention! Your pod may have a different name!)
$ kubectl port-forward kubernetes-dashboard-5bd6f767c7-f9w4j 8443:8443 --namespace=kube-system
Forwarding from 127.0.0.1:8443 -> 8443

# open Web UI Dashboard
$ open https://localhost:8443

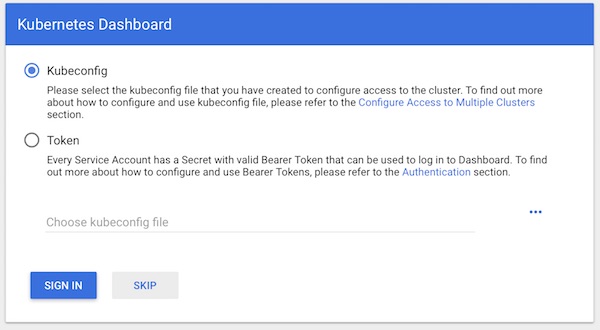
Skip Authentication

You can skip authentication and jump directly to the dashboard. This step should may give you a hint. Never ever do the same in production!

Kubernetes Dashboard

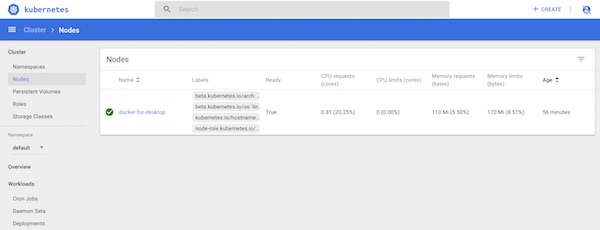
That’s it already! Have a look on created dashboard and get familiar with your new Kubernetes environment.

PHP QA Tools and Docker Jenkins

This Tutorial is about some simple PHP QA Tools and Docker Jenkins. I will show near how to install PHP and PHP Composer in an Jenkins Alpine Linux Docker inclusive some needed Jenkins PlugIns.

Note

If you have an running Docker Container already which you cannot stop, you can install needed packages directly via:

# list containers (optional)
$ docker ps -a

# access running container as root
$ docker exec -u 0 -it <Container Name> sh

# install packages and exit container
...

Now you can use the same commented commands as provided via Dockerfile. Otherwise follow next steps.

Let’s go

# create new project
$ mkdir -p ~/Projects/DockerJenkins && cd ~/Projects/DockerJenkins/

# create Dockerfile and plugins.txt
$ touch Dockerfile plugins.xt

# modify Dockerfile
$ vim Dockerfile

# modify plugins.txt
$ vim plugins.txt
FROM jenkins/jenkins:lts-alpine

USER root

RUN apk update && apk upgrade

# install needed libary packages
RUN apk --no-cache add libssh2 libpng freetype libjpeg-turbo libgcc \
libxml2 libstdc++ icu-libs libltdl libmcrypt

# install needed PHP packages
RUN apk --no-cache add php7 php7-fpm php7-opcache php7-gd php7-pdo_mysql \
php7-mysqli php7-mysqlnd php7-mysqli php7-zlib php7-curl php7-phar \
php7-iconv php7-pear php7-xml php7-pdo php7-ctype php7-mbstring \
php7-soap php7-intl php7-bcmath php7-dom php7-xmlreader php7-openssl \
php7-tokenizer php7-simplexml php7-json

# Download and install composer installer
RUN php -r "copy('https://getcomposer.org/installer', 'composer-setup.php');"
RUN php -r "if (hash_file('SHA384', 'composer-setup.php') === '544e09ee996cdf60ece3804abc52599c22b1f40f4323403c44d44fdfdd586475ca9813a858088ffbc1f233e9b180f061') { echo 'Installer verified'; } else { echo 'Installer corrupt'; unlink('composer-setup.php'); } echo PHP_EOL;"
RUN php composer-setup.php
RUN mv composer.phar /usr/local/bin/composer
RUN chmod +x /usr/local/bin/composer
RUN rm -f composer-setup.php

USER jenkins

# install plugins from plugins.txt
COPY plugins.txt /usr/share/jenkins/ref/plugins.txt
RUN /usr/local/bin/install-plugins.sh < /usr/share/jenkins/ref/plugins.txt
checkstyle:3.50
analysis-core:1.95
dry:2.50
pmd:3.50
violations:0.7.11

That was it! Now build the image, start and work with jenkins.

# build image from Dockerfile
$ docker build -t lupin/jenkins:lts-alpine .

# list images (optional)
$ docker images

# start container
$ docker run --name JenkinsPHP -p 8080:8080 lupin/jenkins:lts-alpine

Test

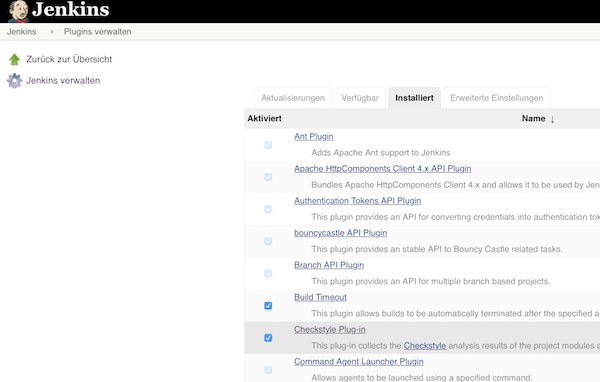
After starting, configuring and logging, you can see the already installed plugins in the Jenkins PlugIns!

Jenkins PlugIns

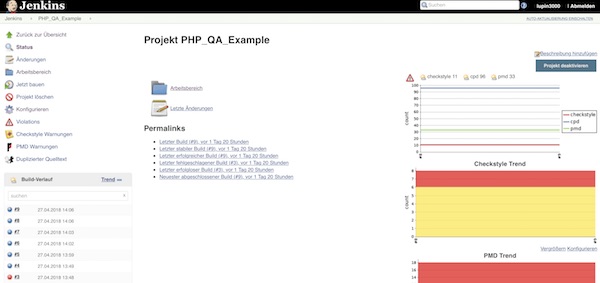
To test, you can create a simple freestyle job. Here you configure the repository, build steps and post-build actions. After a few runs, the results should be visible on the project side.

Jenkins Build Results

Create a simple video test environment (Part 3)

Okay, now is time to see some command line tools to analysis videos. I selected 4 Open-Source applications (avprobe, mediainfo, mplayer, exiftool).

Specification

  • docker
  • git

Get ready for docker images

On Bitbucket I created a repository with needed Dockerfiles for fast usage. You can also choose the installation method.

# change directory (optional)
$ cd ~/Projects/

# clone repository
$ git clone https://bitbucket.org/Lupin3000/tinydockerapps ~/Projects/tinydockerapps

# change directory
$ cd ~/Projects/VideoTest/

# build docker image for mediainfo
$ docker build -t debian/mediainfo ~/Projects/tinydockerapps/mediainfo/

# build docker image for mplayer
$ docker build -t debian/mplayer ~/Projects/tinydockerapps/mplayer/

# build docker image for exiftool
$ docker build -t debian/exiftool ~/Projects/tinydockerapps/exiftool/

# build docker image for avprobe
$ docker build -t debian/avprobe ~/Projects/tinydockerapps/avprobe/

# check available images (optional)
$ docker images

mediainfo

Lets start with mediainfo. Here some information about on wikipedia.

# list help
$ docker run --rm -i -v ~/Projects/VideoTest/:/mnt debian/mediainfo --help

# run simple scan
$ docker run --rm -i -v ~/Projects/VideoTest/:/mnt debian/mediainfo demo.mp4

# run full scan
$ docker run --rm -i -v ~/Projects/VideoTest/:/mnt debian/mediainfo -f demo.mp4

# show aspect ratio
$ docker run --rm -i -v ~/Projects/VideoTest/:/mnt debian/mediainfo --Inform="Video;%DisplayAspectRatio%" demo.mp4

# show duration
$ docker run --rm -i -v ~/Projects/VideoTest/:/mnt debian/mediainfo --Inform="General;%Duration/String3%" demo.mp4

# show audio format
$ docker run --rm -i -v ~/Projects/VideoTest/:/mnt debian/mediainfo --Inform="Audio;%Format%" demo.mp4

# show resolution and codec
$ docker run --rm -i -v ~/Projects/VideoTest/:/mnt debian/mediainfo --Inform="Video;Resolution=%Width%x%Height%\nCodec=%CodecID%" demo.mp4

# list all possible file parameters
$ docker run --rm -i -v ~/Projects/VideoTest/:/mnt debian/mediainfo --info-parameters | less

# create XML report (all internal tags)
$ docker run --rm -i -v ~/Projects/VideoTest/:/mnt debian/mediainfo -f --Output=XML demo.mp4

# show mediatrace info
$ docker run --rm -i -v ~/Projects/VideoTest/:/mnt debian/mediainfo --Details=1 demo.mp4

# create report file
$ docker run --rm -i -v ~/Projects/VideoTest/:/mnt debian/mediainfo demo.mp4 --LogFile="Report.log"

mplayer

Second application is mplayer. Here the wikipedia link.

# list help
$ docker run --rm -i -v ~/Projects/VideoTest/:/mnt debian/mplayer --help

# show all properties
$ docker run --rm -i -v ~/Projects/VideoTest/:/mnt debian/mplayer -vo null -ao null -frames 0 -identify demo.mp4

# show all video properties
$ docker run --rm -i -v ~/Projects/VideoTest/:/mnt debian/mplayer -vo null -ao null -frames 0 -identify demo.mp4 | grep VIDEO

# show all audio properties
$ docker run --rm -i -v ~/Projects/VideoTest/:/mnt debian/mplayer -vo null -ao null -frames 0 -identify demo.mp4 | grep AUDIO

# show video format
$ docker run --rm -i -v ~/Projects/VideoTest/:/mnt debian/mplayer -vo null -ao null -frames 0 -identify demo.mp4 | grep ID_VIDEO_FORMAT

exiftool

Now we take a look on exiftool. Here the wikipedia article and the official documentation.

# show all parameters
$ docker run --rm -i -v ~/Projects/VideoTest/:/mnt debian/exiftool demo.mp4

# show all parameters sort by group (including duplicate and unknown tags)
$ docker run --rm -i -v ~/Projects/VideoTest/:/mnt debian/exiftool -a -u -g1 demo.mp4

# show friendly parameters
$ docker run --rm -i -v ~/Projects/VideoTest/:/mnt debian/exiftool -s -G demo.mp4

# show Height and Width
$ docker run --rm -i -v ~/Projects/VideoTest/:/mnt debian/exiftool '-*source*image*' demo.mp4

# show audio format
$ docker run --rm -i -v ~/Projects/VideoTest/:/mnt debian/exiftool '-*Audio*Format*' demo.mp4

# show video duration
$ docker run --rm -i -v ~/Projects/VideoTest/:/mnt debian/exiftool '-*Duration*' demo.mp4 | head -1

# create json output with specific values
$ docker run --rm -i -v ~/Projects/VideoTest/:/mnt debian/exiftool -j -VideoFrameRate -MediaDuration demo.mp4 > report.json

# create csv report file with specific values
$ docker run --rm -i -v ~/Projects/VideoTest/:/mnt debian/exiftool -csv -FileSize -ImageWidth -ImageHeight -AudioFormat -AudioChannels demo.mp4 > report.csv

avprobe

Last but not least avprobe. Here the wikipedia article and detailed official documentation.

# list help
$ docker run --rm -i -v ~/Projects/VideoTest/:/mnt debian/avprobe --help

# list available formats
$ docker run --rm -i -v ~/Projects/VideoTest/:/mnt debian/avprobe -formats

# list available codecs
$ docker run --rm -i -v ~/Projects/VideoTest/:/mnt debian/avprobe -codecs

# show all properties
$ docker run --rm -i -v ~/Projects/VideoTest/:/mnt debian/avprobe demo.mp4

# show stream properties in json format
$ docker run --rm -i -v ~/Projects/VideoTest/:/mnt debian/avprobe -of json -loglevel quiet -show_streams demo.mp4

# show specific properties
$ docker run --rm -i -v ~/Projects/VideoTest/:/mnt debian/avprobe -show_format -show_streams -pretty demo.mp4

# show size properties
$ docker run --rm -i -v ~/Projects/VideoTest/:/mnt debian/avprobe -show_entries format=size demo.mp4

# show duration and size properties
$ docker run --rm -i -v ~/Projects/VideoTest/:/mnt debian/avprobe -loglevel quiet -show_entries format=duration,size demo.mp4

# show duration and size properties in json format
$ docker run --rm -i -v ~/Projects/VideoTest/:/mnt debian/avprobe -of json -loglevel quiet -show_entries format=duration,size demo.mp4

Compare tools by expecting specific result

I will not judge the applications against each other! But here a compare of complexity of commands and output for video duration.

# get duration by exiftool
$ exiftool -s -s -s  -MediaDuration demo.mp4
...
0:01:04

# get duration by mediainfo
$ mediainfo --Inform="General;%Duration/String3%" demo.mp4
...
00:01:04.884

# get duration by avprobe
$ avprobe -v error -sexagesimal -show_entries format=duration -of default=noprint_wrappers=1:nokey=1 demo.mp4
...
0:01:04.884000

# get duration by mplayer
$ mplayer -vo null -ao null -frames 0 -nolirc -identify demo.mp4 | grep ID_LENGTH | cut -d'=' -f2
...
64.88

Create a simple video test environment (Part 2)

In the first part we created the video test environment and you learned how to extend it. At the end of this tutorial you will know how to embed video content in the video test environment. Therefore, a few basics are shown around ffmpeg (how to create, edit and use videos).

Record and prepare some videos

The recording should contain video and sound and should be 5 minutes long. The content of the video does not matter!

# open Quicktime Player
$ open -a "QuickTime Player"

# press Control-Command-N, start record (approximately 5 min)
# save record into project folder as movie.mov (~/Projects/VideoTest/movie.mov)

As soon as a video is ready we have to create more.

# copy binary (optional)
$ sudo cp ~/Projects/VideoTest/ffmpeg /usr/local/bin/ffmpeg && sudo chmod a+rx /usr/local/bin/ffmpeg

# convert mov into mp4 (copy)
$ ffmpeg -i movie.mov -vcodec copy -acodec copy demo.mp4

# resize mp4 to 320x240 (filter_graph)
$ ffmpeg -i demo.mp4 -vf scale=320:240 ./src/demo_scaled.mp4

# create poster from mp4 (position and frame)
$ ffmpeg -i ./src/demo_scaled.mp4 -ss 00:00:30 -vframes 1 ./src/demo_poster.png

# create m3u8/ts files from mp4 (HLS - Apple HTTP Live Stream)
$ ffmpeg -i demo.mp4 -b:v 1M -g 60 -hls_time 2 -hls_list_size 0 -hls_segment_size 500000 ./src/output.m3u8

# run specific SHELL provisioner
$ vagrant provision --provision-with video

Note: After this step you will have many video files which you will use

  • ./movie.mov (original)
  • ./demo.mp4 (converted)
  • ./src/demo_scaled.mp4 (converted and resized)
  • ./src/output.m3u8
  • ./src/\*.ts

Get in contact with ffmpeg

I assume that ffmpeg is properly installed and the test environment is running.

# create target folder
$ mkdir ~/Projects/VideoTest/test

# extract some images from video
$ ffmpeg -i movie.mov -ss 00:00:30 -t 0.1 -f image2 -qscale 2 -vcodec mjpeg ./test/img-%03d.jpg

# create local m3u8/ts files from mp4
$ ffmpeg -i demo.mp4 -b:v 1M -g 60 -hls_time 2 -hls_list_size 0 -hls_segment_size 500000 ./test/output.m3u8

# extract mp4 from local m3u8/ts files
$ ffmpeg -i test/output.m3u8 -bsf:a aac_adtstoasc -vcodec copy -c copy -crf 50 ./test/output_local.mp4

# extract mp4 from url to m3u8 file (will not work with LiveStream)
$ ffmpeg -i http://localhost:8080/output.m3u8 -c copy -bsf:a aac_adtstoasc stream.mp4

Stream videos

# open browser
$ open -a Safari http://localhost:8080/livestream.html

# stream video (Real-Time Messaging Protocol)
$ ffmpeg -re -i demo.mp4 -vcodec libx264 -vprofile baseline -g 30 -acodec aac -strict -2 -f flv rtmp://localhost/show/stream

Stream from FaceTime HD Camera (macOS)

# open browser
$ open -a Safari http://localhost:8080/livestream.html

# list devices
$ ffmpeg -f avfoundation -list_devices true -i ""

# stream sound and video (Real-Time Messaging Protocol)
$ ffmpeg -f avfoundation -framerate 30 -i "0:0" -pix_fmt yuv420p -vcodec libx264 -vprofile baseline -g 30 -acodec libmp3lame -f flv rtmp://localhost/show/stream