Build a Docker Penetration Test environment

Today we build a penetration test environment via Docker. That means no Plug-Ins (for example: Java) are needed! If you are Mac OS X users, a VNC client is already included (since Yosemite).

Preparation:

# download all needed Docker images
$ docker pull owasp/zap2docker-stable
$ docker pull citizenstig/dvwa
$ docker pull jmbmxer/threadfix

# list local Docker images
$ docker images
...
REPOSITORY                TAG                 IMAGE ID            CREATED             SIZE
owasp/zap2docker-stable   latest              a774bdc65502        3 months ago        1.557 GB
jmbmxer/threadfix         latest              b6f1907a61cd        5 months ago        941 MB
citizenstig/dvwa          latest              c8312743bc09        23 months ago       478.5 MB

ZAP Attack Proxy

# run Docker container with ZAP Attack Proxy (insert and remember password)
$ docker run -u zap -p 5900:5900 -p 8080:8080 -v /tmp/reports:/home/zap/reports --name zap -i owasp/zap2docker-stable x11vnc --forever --usepw --create

# start VNC (Mac OS X)
$ open /System/Library/CoreServices/Applications/Screen\ Sharing.app/

…or use the short way via: [cmd] + [space] and type screen sharing
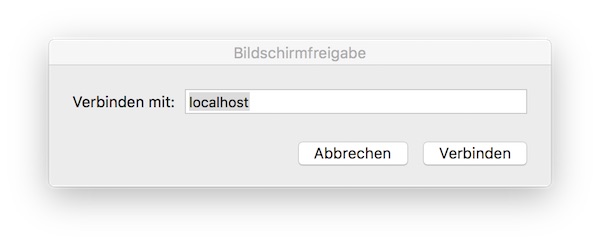
vnc connection to zap

Insert “localhost” and your given password… and follow introduction for ZAP startup. Now you configure the ZAP Proxy Settings.
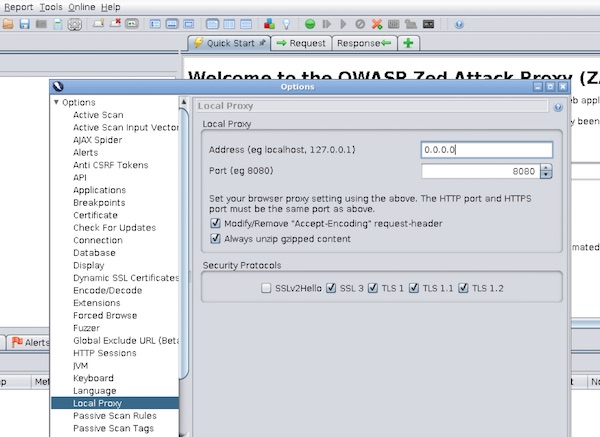
zap proxy configuration

Note: Select IP “0.0.0.0” for later use. You can also use “$ docker inspect zap” to find out the internal IP, but this could change on next start.

DVWA

# run Docker container with DVWA (2nd terminal)
$ docker run -d -p 8081:80 --name dvwa citizenstig/dvwa

# wait for startup
$ docker logs -f dvwa

# get host ip (from where you run browser)
$ ifconfig

Now start your Firefox browser and change proxy settings. Insert your IP!
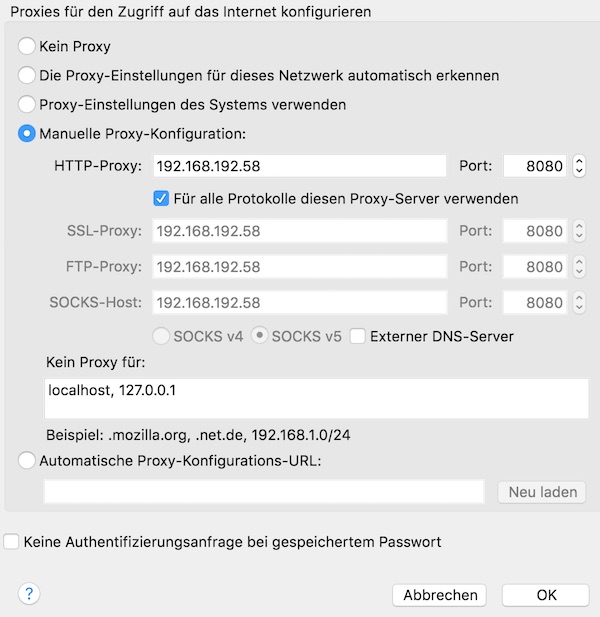
firefox proxy settings

Call URL for DVWA in Firefox and run your penetration tests.
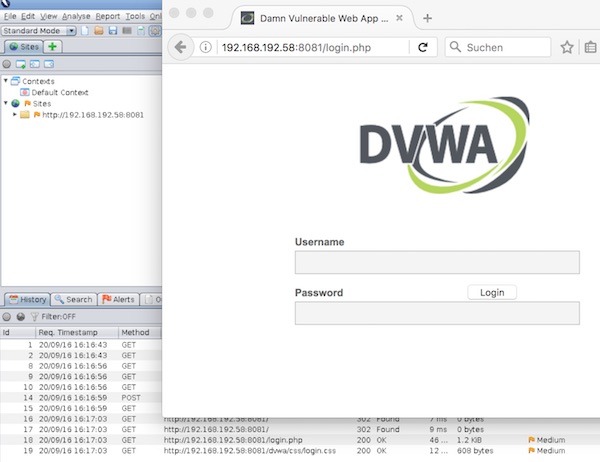
pentest firefox zap

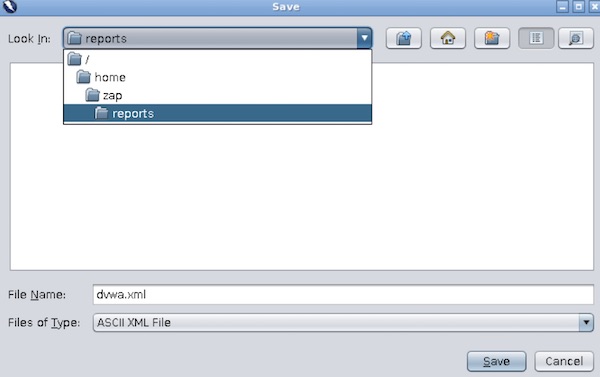
When you are done, export XML report

zap xml report
From now on, you can stop all running docker container.

ThreadFix

# run Docker container with ThreadFix
$ docker run -d -p 8443:8443 --name threadfix jmbmxer/threadfix start

# wait for startup
$ docker logs -f threadfix

Open Safari and call URL: https://localhost:8443/threadfix. Login with User: “user” and Password: “password”. Create a new team and add a application to team.

# open directory in finder
$ open /tmp/reports/

Import the ZAP XML report.
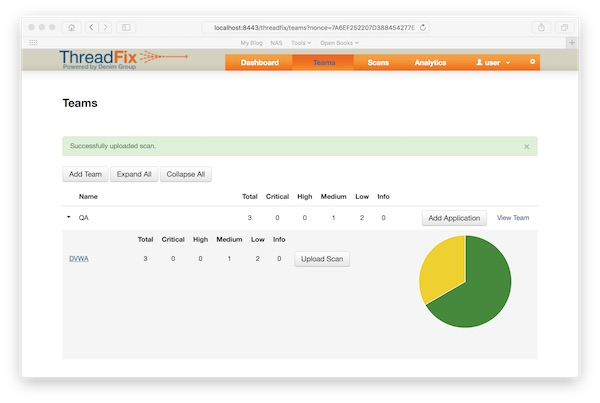
threadfix zap report

That is it… enjoy and expand your pentest laboratory!
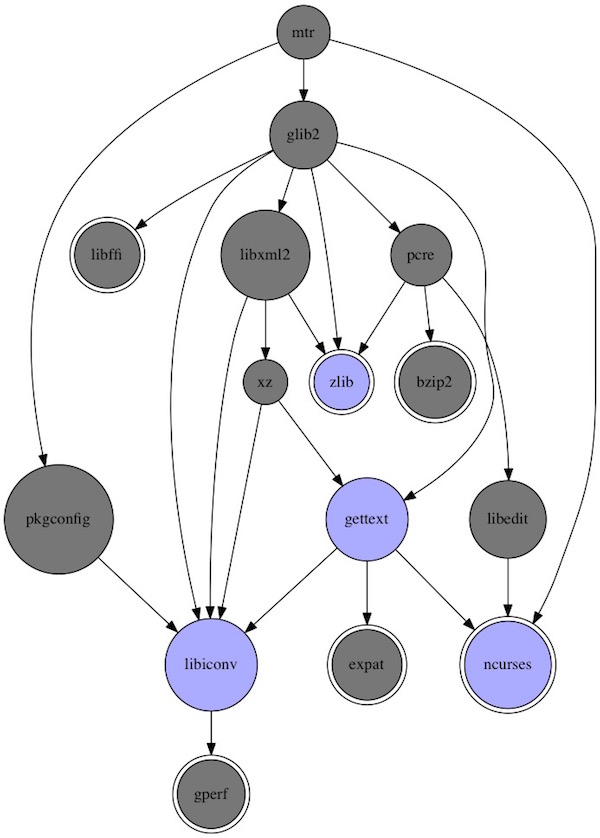
Visualization of package dependencies

Documentation takes time – sometimes a lot of time. Here a few examples how to create dependencies pictures with Graphviz via command line. These commands can then be easily transferred to a build-process to save your time.

Mac OS X

# install Graphviz on Mac OS X
$ curl -O http://www.graphviz.org/pub/graphviz/stable/macos/mountainlion/graphviz-2.36.0.pkg
$ open graphviz-2.36.0.pkg

# check installation
$ dot -V
dot - graphviz version 2.36.0 (20140111.2315)

# clone PureDarwin
$ git clone https://github.com/PureDarwin/PureDarwin.git

# change directory
$ cd PureDarwin/scripts/

# create graph for non-installed mtr
$ sudo ./pd_portviz mtr

CentOS 7

# install Graphviz on CentOS 7
$ yum install -y graphviz

# check installation
$ dot -V
dot - graphviz version 2.30.1 (20150306.0020)

# install rpmdep
$ yum install -y epel-release && yum install -y rpmorphan

# create graph for installed which
$ rpmdep -dot which.dot which

Debian 8

# install Graphviz on Debian 8
$ apt-get install -y graphviz

# check installation
$ dot -V
dot - graphviz version 2.38.0 (20140413.2041)

# install debtree
$ apt-get install -y debtree

# create graph for non-installed make
$ debtree --with-suggests make > make.dot

Example graph for mtr on Mac OS X

# convert .dot into png
$ dot -Tpng mtr.dot -o mtr.png

mtr dependencies

pylint and lxml

If you use Python virtualenv, pylint and lxml together, you may see error messages in pylint test results. It`s because only trusted C extension resources (the standard library) should be used. Here is an opportunity to improve the pylint test results.

Generate a .pylintrc file

# generate .pylintrc file
$ pylint --generate-rcfile > .pylintrc

Open the .pylintrc file to edit

# open with vim editor
$ vim .pylintrc

Add lxml to extension-pkg-whitelist

# A comma-separated list of package or module names from where C extensions may
# be loaded. Extensions are loading into the active Python interpreter and may
# run arbitrary code
extension-pkg-whitelist=lxml

If you now perform the pylint test again, no error relating to lxml should appear.

Simple lint for Markdown

With Markdownlint you can quickly check your own *.md files. You can use that tool for automation in your build environment.

Installation

# install via gem
$ sudo gem install mdl

# install via gem (Mac OS 10.11 - El Capitan)
$ sudo gem install -n /usr/local/bin mdl

# check version
$ mdl --version

Usage

The use of Markdownlint is very easy.

# scan a markdown file
$ mdl path/to/file.md

# scan a folder with different markdown files
$ mdl path/to/folder

Test XML command line with xmllint

In most Linux and BSD, xmllint is delivered or very easy to install. Xmllint can parse and validate one or more XML files with output as reports. A version for Windows is available, too!

The tiny example XML file:

<?xml version="1.0" encoding="UTF-8"?>
<company>
	<branch lang="de-DE">
		<team id="011">
			<name status="on">Develop</name>
			<size>8</size>
		</team>
	</branch>
	<branch lang="en-US">
		<team id="021">
			<name status="off">Sales</name>
			<size>5</size>
		</team>
		<team id="022">
			<name status="on">QA</name>
			<size>2</size>
		</team>
	</branch>
	<branch lang="de-CH">
		<team id="031">
			<name status="on">Develop</name>
			<size>5</size>
		</team>
		<team id="032">
			<name status="off">Consultant</name>
			<size>3</size>
		</team>
	</branch>
</company>

Usage Examples:

# simple validation
$ xmllint --valid example.xml

# validation but without result tree
$ xmllint --valid --noout example.xml

# validation agains a specific DTD schema
$ xmllint --noout --dtdvalid <URL> example.xml

# again RelaxNG schema
$ xmllint --relaxng <schema> example.xml

# again WXS schema
$ xmllint --schema <schema> example.xml

# again schematron
$ xmllint --schematron <schema> example.xml

Query with xmllint

$ xmllint --shell example.xml

# with cat
/ > cat //name
 -------
<name status="on">Develop</name>
 -------
<name status="off">Sales</name>
 -------
<name status="on">QA</name>
 -------
<name status="on">Develop</name>
 -------
<name status="off">Consultant</name>

# with cat and xpath 
/ > cat //*[contains(*,"Consultant")] 
 -------
<team id="032">
	<name status="off">Consultant</name>
	<size>3</size>
</team>

# with grep
/ > grep QA
/company/branch[2]/team[2]/name : ta-        2 QA

# exit
/ > exit

XPath with xmllint

# by root element
$ xmllint --xpath //company example.xml

# by child elements
$ xmllint --xpath //name example.xml 

# by specific child element
$ xmllint --xpath //branch[3] example.xml

# by last child element
$ xmllint --xpath '/company/branch[last()]' example.xml

# path expression
$ xmllint --xpath 'child::*/child::*/team' example.xml

# by attribute
$ xmllint --xpath '//branch[@lang="de-CH"]' example.xml

CSSLint with Grunt on Debian

This tutorial gives an tiny insight into CSSLint with Grunt on Debian. After that you should be able, to implement more Grunt tasks for your project.

Installation

As root or sudo user install needed packages!

# update your system
$ apt-get update && apt-get upgrade

# install nodejs and npm
$ apt-get install -y nodejs-legacy npm

# install grunt-cli (global)
$ npm install -g grunt-cli

Check the installation of all needed tools.

# show different versions
$ nodejs --version
$ npm --version
$ grunt --version

Create a new project

As “normal” user create a new project and install the needed plugin.

# create new folder
$ mkdir TestProject

# change directory
$ cd TestProject/

# interactively create a package.json file
$ npm init

# install the csslint plugin
$ npm install grunt-contrib-csslint --save-dev

If no problems occurred, the package.json file should look like:

{
  "name": "TestProject",
  "version": "0.0.1",
  "description": "my example project",
  "main": "index.js",
  "scripts": {
    "test": "echo \"Error: no test specified\" && exit 1"
  },
  "author": "lupin3000",
  "license": "ISC",
  "devDependencies": {
    "grunt": "^0.4.5", "grunt-contrib-csslint": "^0.4.0"
  }
}

Create a css folder and a css file with some mistakes like:

$ mkdir css
$ vim css/example.css

The example.css file contains some issues!

html, body {
  margin: 0;
  padding: 0 
  borde: 0;
}

In the last step we create the Gruntfile.js

# create Gruntfile.js
$ vim Gruntfile.js
module.exports = function(grunt) {
  grunt.initConfig({
    csslint: {
      // define the files to lint
      files: ['css/*.css'],
      strict: {
        options: {
          "import": 2
        }
      }
    }
  });
  grunt.loadNpmTasks("grunt-contrib-csslint");
};

Thats all, now run just the command and see the results.

# run csslinter
$ grunt csslint

Jenkins and jslint4java

This tutorial shows a very simple Jenkins – jslint4java integration over Shell.

Preconditions

Jenkins is installed

Steps

Start Jenkins, open the browser (http://<host>:8080) and setup a new “Free Style Project” (JS-Lint-Example).

# start jenkins
$ service jenkins start

Back to Jenkins… here you create a “Freestyle-Project”

Jenkins Freestyle Project

The tutorial does not use any VCS, so we press the “Build Now” button to create the project “workspace” folder. After successful creation, we create 3 new folders (src, lib, build) inside the workspace folder.

# create new folders inside the workspace
$ cd /var/lib/jenkins/workspace/JS-Lint-Example/
$ mkdir {src,lib,build}

# change owner of folders
$ chown jenkins:jenkins src/ lib/ build/

Now upload the jslint4java into the “lib” folder.

# upload jar to lib folder
$ scp jslint4java-2.0.5.jar <user>@<host>:/var/lib/jenkins/workspace/JS-Lint-Example/lib

# change owner and make executable
$ chown jenkins:jenkins jslint4java-2.0.5.jar
$ chmod u+x jslint4java-2.0.5.jar

It`s time to test if jslint4java is running. The 1st test can be done inside the terminal self.

$ java -jar jslint4java-2.0.5.jar --help

The 2nd test direct on Jenkins. Open the “JS-Lint-Example” job in browser – press link “Configure” and we create a “Build-Step” with “Execute Shell”.

Jenkins JSLint Test

After save and build the “Console Output” of the respective build should show the help. If there is a problem here, please check if Java is installed and the file permissions are correct. If everything works fine we create a simple JavaScript file and upload this into the “src” folder.

function myFunction(p1, p2) {
  return p1 * p2;
}

var person = {
  firstName:"John",
  lastName:"Doe",
  age:50,
  eyeColor:"blue"
};

test = myFunction(10, 10);

document.write('Hello World');
document.write(test);
document.write(person.firstName);
# upload example.js to src folder
$ scp example.js <user>@<host>:/var/lib/jenkins/workspace/JS-Lint-Example/src

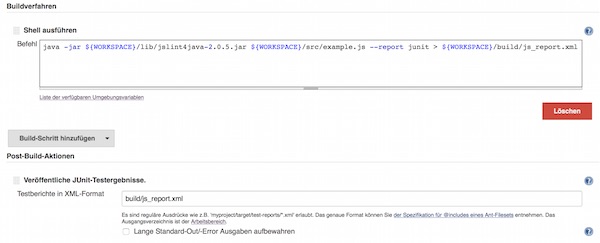
Now we change the “Execute Shell” command and add the “Post-Build-Action” – “Publish JUnit Test Results” with value “build/js_report.xml”.

Jslint Jenkins Configuration
java -jar ${WORKSPACE}/lib/jslint4java-2.0.5.jar ${WORKSPACE}/src/example.js --report junit > ${WORKSPACE}/build/js_report.xml

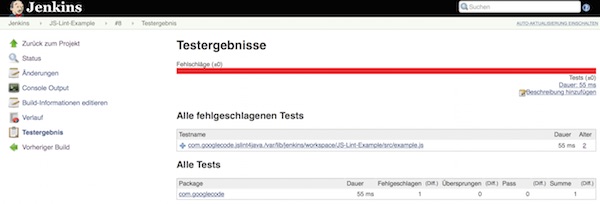
Ready,… after save and new build we can see the file “js_report.xml” into “build” folder and the jUnit  report into our project.

Jslint Jenkins jUnit Report

Integrate pylint in PyCharm

This tutorial shows, how to add pylint into PyCharm.

Preparation

# install pylint via pip
$ sudo pip install pylint

That was the easy way to install pylint…

Steps

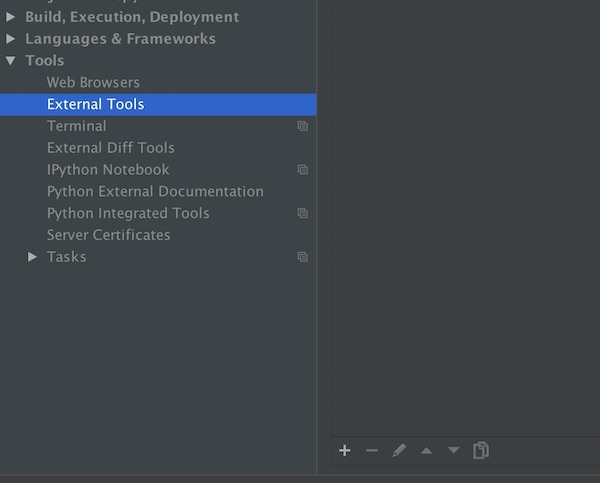
Open “Settings > Tools > External Tools” and press the “+” button.

pycharm external tools

Insert values

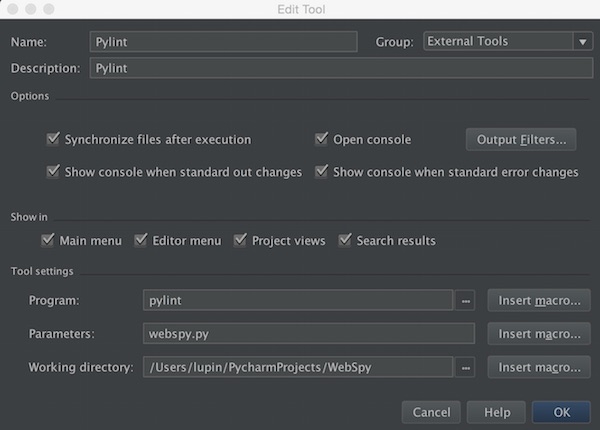
Inserts good values on name, description and select your favorite group. Enable more or less all checkboxes. Down the “Tool settings” insert program “pylint”, your specific parameters and working directory.

pycharm pylint

After press “OK” pylint integration is ready.

Extended

To be a little more flexible, you can use PyCharm macros. As an example use the value “$FilePath$” for Working directory and “$Promt$” for Parameters. This allows the use in other projects, too.

pycharm macros