RTP stream from Jetson Nano CSI Camera to macOS

Would you like to stream from the CSI Camera (Jetson Nano) to your macOS? No problem, it’s super easy! In this tutorial I will show you 2 ways to display the RTP video stream on your macOS. Both options require only a few steps and which one you choose is up to you.

Condition

  • Both devices (Jetson Nano & macOS) must be on the same network
  • SSH connection from macOS to Jetson Nano is available
  • You know the IP or the domain name (.local) of the macOS
  • Firewall on macOS is disabled (for simplicity)
  • The CSI camera on the Jetson Nano is operational

Use of ffplay

Download ffplay for macOS from the official provider site. Unzip the archive and move binary to target directory.

# move binary to target directory
$ mv ffplay /usr/local/bin/ffplay

# test ffplay version (optional)
$ ffplay -version

Now create an SDP file for ffplay (for example directly on your desktop).

SDP:
v=0
o=- 0 0 IN IP4 127.0.0.1
s=NanoStream
c=IN IP4 127.0.0.1
t=0 0
a=tool:libavformat 56.15.102
m=video 1234 RTP/AVP 96
a=rtpmap:96 H264/90000

Note: Note the port specification (m=video 1234 RTP/AVP 96), if this is already occupied on your system, you must change this value and adapt the following steps.

Connect (via SSH) to the Jetson Nano and start the video stream from the camera there.

# start video stream from csi camera
$ gst-launch-1.0 nvarguscamerasrc ! 'video/x-raw(memory:NVMM), format=NV12, width=1920, height=1080' ! nvvidconv flip-method=2 ! nvv4l2h264enc insert-sps-pps=true ! h264parse ! rtph264pay pt=96 ! udpsink host=(IP or Domain from macOS) port=1234 sync=false -e

If there are no problems, leave this terminal connection and start another terminal on the macOS.

# start ffplay
$ ffplay -protocol_whitelist "file,udp,rtp" -i ~/Desktop/ffplay.sdp

After confirming the command, a window should open after a few seconds and you will see the video stream.

Use of VLC

Download latest VLC player from official VLC website. Now install VLC Player. Optionally you can test whether everything works. Also create an SDP file for the VLC Player.

c=IN IP4 127.0.0.1
m=video 1234 RTP/AVP 96
a=rtpmap:96 H264/90000

Connect (via SSH) to the Jetson Nano and start the video stream from the camera there.

# start video stream from csi camera
$ gst-launch-1.0 nvarguscamerasrc ! 'video/x-raw(memory:NVMM), format=NV12, width=1920, height=1080' ! nvvidconv flip-method=2 ! nvv4l2h264enc insert-sps-pps=true ! h264parse ! rtph264pay pt=96 ! udpsink host=(IP or Domain from macOS) port=1234 sync=false -e

Note: Depending on your camera position, you can change the value of flip-method=2 (1 to 4).

If there are no problems, leave this terminal connection and double click on the SDP file for the VLC player. Here, too, you should be able to watch the stream after a few seconds.

Notice

If you have already cloned/installed the repository dusty-nv/jetson-inference, you can view the different video streams in the same way on macOS!

# video viewer
$ video-viewer --bitrate=1000000 --output-codec=h264 csi://0 rtp://(IP or Domain from macOS):1234 --headless

# pose estimation
$ posenet --bitrate=1000000 --output-codec=h264 csi://0 rtp://(IP or Domain from macOS):1234 --headless

# image detection
$ imagenet --bitrate=1000000 --output-codec=h264 csi://0 rtp://(IP or Domain from macOS):1234 --headless

# object detection
$ detectnet --bitrate=1000000 --output-codec=h264 csi://0 rtp://(IP or Domain from macOS):1234 --headless

Hint: Don’t forget to re-enable the firewall (on your macOS) after you’r done!
Python, cmake and dlib on macOS

There is a very easy possibility to use dlib on macOS. Additional packages and package manager (for example brew) are not needed. Here are the instructions which you can follow independently in a few minutes.

Requirements

Steps

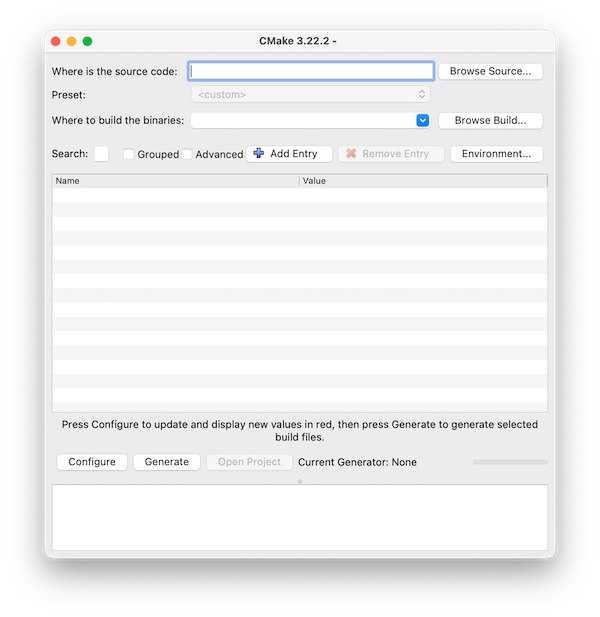
Download latest cmake version as *.dmg or *.tar.gz from cmake.org. After the app has been successfully installed, you can start it (but it is not necessary).

CMake.app on macOS

Inside the CMake application you will find the needed binary. All you have to do now is create a symlink and optionally check the version.

# create symlink
$ sudo ln -s /Applications/CMake.app/Contents/bin/cmake /usr/local/bin/cmake

# check version (optional)
$ cmake --version

Note: Close the terminal and restart if cmake is not found.

If you now want to install dlib in your Python project (in the virtual environment), there will no longer be an error message. Note that the installation may take some time.

# install dlib
(venv) $ pip3 install dlib

# verify dlib installation (optional)
(venv) $ pip3 freeze

That’s it. Made super easy and super fast without bloating the entire system with unnecessary ballast.

Invalid MIT-MAGIC-COOKIE-1

Problem

After an OS update including a restart of the system, an error occurs with SSH X11 forwarding. Instead of displaying the windows as usual, “Invalid MIT-MAGIC-COOKIE-1” is displayed in the terminal.

Here is the example. I connect to the Ubuntu with my macOS and get the error message.

┌──[lupin@HackMac]::[~]
└─ % ssh -C4Y lupin@10.0.0.12

lupin@nano4gb:~$ xeyes
Invalid MIT-MAGIC-COOKIE-1 keyError: Can't open display: localhost:10.0
lupin@nano4gb:~$ exit

1st Quick and dirty solution

Since I’m on my own and relatively secure network, I leave XQuartz running in the background, disable access control, reconnect and everything works again.

┌──[lupin@HackMac]::[~]
└─ % xhost +
access control disabled, clients can connect from any host

┌──[lupin@HackMac]::[~]
└─ % ssh -C4Y lupin@10.0.0.12

lupin@nano4gb:~$ xeyes
lupin@nano4gb:~$ exit

This setting is (fortunately) only valid for this one session. As soon as I end the connection, restart XQuartz and establish a new SSH connection, the error message appears again. Anyway a not so nice solution!

2nd Quick and dirty solution

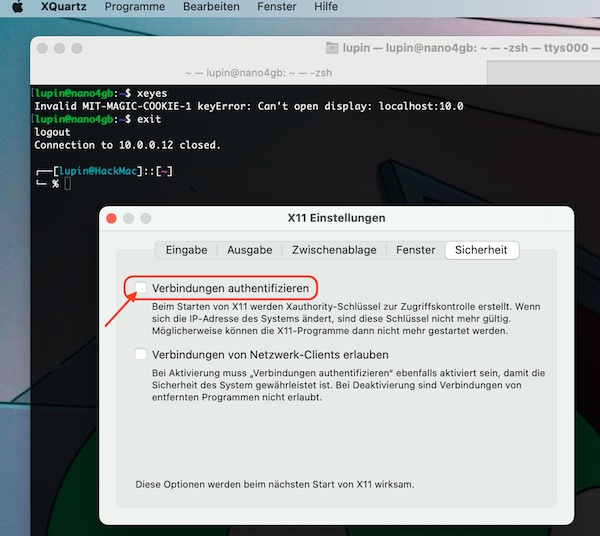
XQuartz offers the possibility to establish the connection without authentication. This solution is permanent and can be set up in the simplest way. Open the XQuartz settings and uncheck the respective checkbox.

XQuartz X11 Settings

Restart XQuartz, establish a new connection.

┌──[lupin@HackMac]::[~]
└─ % xhost
access control enabled, only authorized clients can connect

┌──[lupin@HackMac]::[~]
└─ % ssh -C4Y lupin@10.0.0.12

lupin@nano4gb:~$ xeyes
lupin@nano4gb:~$ exit
example for xeyes

Now everything works as usual. But even with this solution I have my doubts! So I undo the setting and restart XQuartz.

3rd Quick and dirty solution

As described in the previous step, I undid the setting and restarted XQuartz. Additionally I allowed local connections in the access control.

┌──[lupin@HackMac]::[~]
└─ % xhost
access control enabled, only authorized clients can connect

┌──[lupin@HackMac]::[~]
└─ % xhost +local:
non-network local connections being added to access control list

┌──[lupin@HackMac]::[~]
└─ % ssh -C4Y lupin@10.0.0.12

lupin@nano4gb:~$ xeyes
lupin@nano4gb:~$ exit

This solution also works but is not permanent and not secure.

What now?

Searching the internet didn’t really help me. Some of the suggested solutions are total nonsense (or I completely misunderstand). I’ve also read the man pages where it even says that the environment variable $DISPLAY should not be changed. With me (also due to the ignorance on my part) the first signs of despair are appearing! Trust me, I deleted also all recommended files, what did not change this situation.

My final Solution

In the end my problem was very easy to solve! I still had entries from already deleted macports in the .zprofile file, which set the local environment variable $DISPLAY. With the restart of my macOS, this export of the environment variable became active again, of course.

┌──[lupin@HackMac]::[~]
└─ % echo $DISPLAY
:0

┌──[lupin@HackMac]::[~]
└─ % vim .zprofile

# I deleted all old macports entries

┌──[lupin@HackMac]::[~]
└─ % sudo reboot

The result after the restart.

┌──[lupin@HackMac]::[~]
└─ % echo $DISPLAY           
/private/tmp/com.apple.launchd.ASpxDkLA98/org.xquartz:0

┌──[lupin@HackMac]::[~]
└─ % ssh -C4Y lupin@10.0.0.12

lupin@nano4gb:~$ xeyes

Everything is all right again. Oh yeah… that was troubleshooting. The good thing is I learned a lot about xhost, xauth plus my own systems.

First steps with Jetson Nano 2GB Developer Kit (Part 1)

The Jetson Nano Developer Kits are awesome to start with artificial intelligence and machine learning. To make your learning more successful, I will use this tutorial to explain some first important steps before you start.

Requirements

The values ​​in brackets are intended to indicate the hardware I am using. However, you can use other compatible hardware. Before you buy, see the documentation provided by Nvidia. Here you will find also a page with many good information collected.

  • Jetson Nano Developer Kit (2GB with WiFi)
  • 5V Fan (NF-A4x20 5V PWM)
  • USB or CSI camera (Raspberry Pi Camera Module V2)
  • Power Supply (Raspberry Pi 15W USB-C Power Supply)
  • Micro SD Card (SanDisk microSDXC-Karte Ultra UHS-I A1 64 GB)

additional Hardware:

  • Monitor & HDMI cable
  • Mouse & Keyboard
  • USB cable (Delock USB 2.0-Kabel USB C – Micro-USB B 1 m)

Objective

The first part should provide information about needed parts to buy and describes the necessary installation (headless).

Installation

After downloading the SD card image (Linux4Tegra, based on Ubuntu 18.04), you can write it to the SD card immediately. Make sure to use the correct image in each case! Here a short overview about commands if you use a macOS.

# list all attached disk devices
$ diskutil list external | fgrep '/dev/disk'

# partitioning a disk device (incl. delete)
$ sudo diskutil partitionDisk /dev/disk<n> 1 GPT "Free Space" "%noformat%" 100%

# extract archive and write to disk device
$ /usr/bin/unzip -p ~/Downloads/jetson-nano-2gb-jp46-sd-card-image.zip | sudo /bin/dd of=/dev/rdisk<n> bs=1m

There is no automatic indication of the dd progress but you can press [control] + [t] while dd is running.

The setup and boot of the Jetson Nano could be done in two different ways (with GUI or Headless). In case you choose the headless setup, connect your computer with the Micro-USB port of the Jetson Nano and follow the next instructions.

# list serial devices (optional)
$ ls /dev/cu.usbmodem*

# list serial devices (long listing format)
$ ls -l /dev/cu.usbmodem*
crw-rw-rw-  1 root  wheel   18,  24 Dec  2 07:23 /dev/cu.usbmodem<n>

# connect with terminal emulation
$ sudo screen /dev/cu.usbmodem<n> 115200

Now you simply follow the initial setup steps and reboot the device after your finish.

Connect to WiFi

If you have not setup the WiFi on initial setup, you can connect again via serial interface and follow the next steps.

# connect with terminal emulation
$ sudo screen /dev/cu.usbmodem<n> 115200

# enable (if WiFi is disabled)
$ nmcli r wifi on

# list available WiFi's
$ nmcli d wifi list

# connect to WiFi
$ nmcli d wifi connect <SSID> password <password>

# show status (optional)
$ nmcli dev status

# show connections (optional)
$ nmcli connection show

Finally you can run the update and installation of needed additional packages.

# update packages
$ sudo apt update -y && sudo apt upgrade -y

# install packages (optional)
$ sudo apt install -y vim tree

From this point on, nothing should stand in the way of the SSH connection, provided you are in the same network.

# get IP (on Jetson device)
$ ip -4 a

# connect via SSH (example for local device)
┌──[lupin@HackMac]::[~]
└─ % ssh -C4 <user>@<ip>

In next Part 2 we will add the fan (incl. installation of needed software) and add the camera.

PyCharm CE remote execution

Since I’m back to develop more in Python and need to execute my Python scripts also on remote machines – I asked my self: “How can I do with PyCharm CE and without any Plugin?” The solution was very easy and this tutorial is about.

Requirements

  • VirtualBox VM (e.g. Linux Debian incl. user and ssh server configured)
  • PyCharm CE installed

Note: Of course you could also use any other option then a Debian vm. Just adapt the tutorial steps for your specific needs.

Objective

Use terminal and external tools of PyCharm CE to execute Python scripts on remote machines.

Introduction

For this tutorial I’m using a VirtualBox VM (Debian Linux) which do have only a NAT interface configured. So I need to enable Port-forwarding for SSH. If this is not the case for you – you can jump over to the section where I explain the important steps in PyCharm.

Analysis of stopped VM’s

As a first step I check my VM settings (just to verify).

# list all vm's (optional)
$ VBoxManage list vms

# list all vm's and grep for name & nic rules
$ VBoxManage list -l vms | grep -i "Name:\|NIC 1 Rule"

Analysis of running VM’s

I don’t know the IP – so I do start the VM and check their all settings.

# start specific vm
$ VBoxManage startvm "Debian" --type headless

# list all running vm's (optional)
$ VBoxManage list runningvms

# list all running vm's and grep for name & nic rules (optional)
$ VBoxManage list runningvms -l | grep -i "Name:\|NIC Rule"

# list specific vm Nic informations (optional)
$ VBoxManage showvminfo "Debian" | grep -i "NIC"

# get IPv4 information of specific vm
$ VBoxManage guestproperty get "Debian" "/VirtualBox/GuestInfo/Net/0/V4/IP"

Add Port-forwarding

Now I know the IP (which in my case will not change) and can enable the Port-forwarding for SSH easily.

# shutdown specific vm
$ VBoxManage controlvm "Debian" poweroff

# add port-forwarding rule to specific vm
$ VBoxManage modifyvm "Debian" --natpf1 "SSH-PW,tcp,127.0.0.1,2222,10.0.2.15,22"

# list specific vm Nic informations (optional)
$ VBoxManage showvminfo "Debian" | grep -i "NIC 1 Rule"

# start specific vm
$ VBoxManage startvm "Debian" --type headless

# test ssh connection (optional)
$ ssh -p 2222 lupin@127.0.0.1 -v -C 'whoami && exit'

Note: On my VM (Debian) the user is named “lupin” this will be different for you! Also Openssh-server is enabled and I added my public ssh key on VM (authorized_keys).

PyCharm remote execution

As I also like and use the feature “scratches” of PyCharm, I will show first the remote execution of these files.

Prepare a scratch

I prepare a simple Python script scratch, which just prints out environment variables (same code I use later inside project example).

import os

print('hello world', os.environ)

To find the absolute path for my scratch.py – I run it. On terminal the path will be visible.

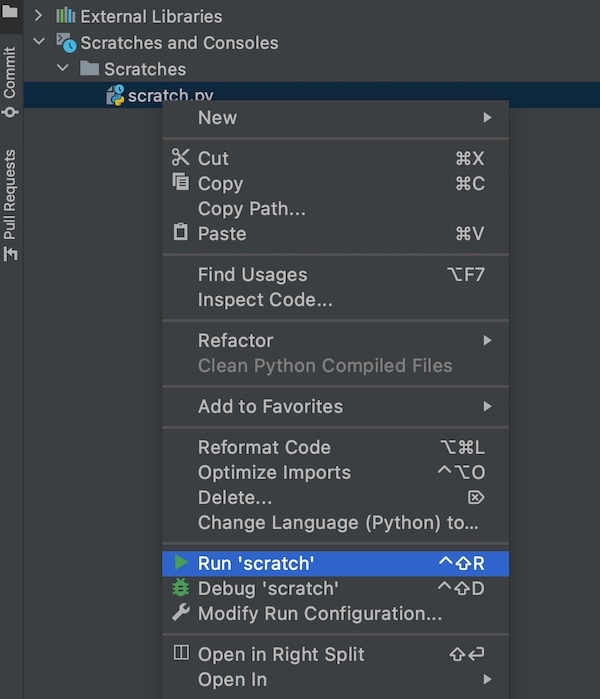
PyCharm run scratches

After I know the path I run some simple commands in PyCharm Terminal.

# execute local script via SSH on remote system
$ ssh -p 2222 user@127.0.0.1 -C "/usr/bin/python" < "path/to/scratches/scratch.py"

# same as above but with unbuffered binary stdout and stderr
$ ssh -p 2222 user@localhost -C "/usr/bin/python" -u - < "./test_remote.py"

It works perfectly fine.

Note: Please replace the value “user” in all ssh examples!

PyCharm CE remote scratch execution

Project files

For all other scripts in the PyCharm project I don’t want to type the terminal commands always! So I’m using the feature “External Tools”. To do so, I add a new item and use the built-in variables (Macros) of PyCharm.

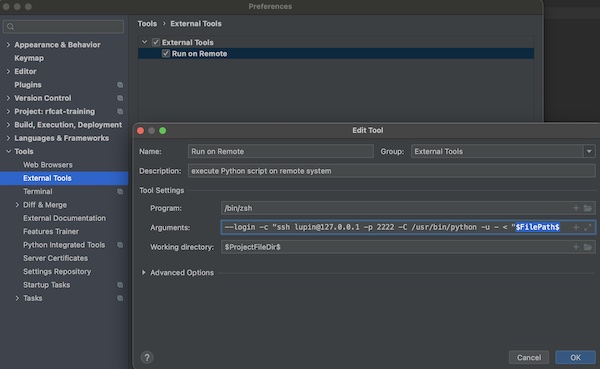
PyCharm CE add external tool

You simply give a Name Run on Remote, optional a short description, for Program your shell /bin/zsh and on Arguments --login -c "ssh user@localhost -p 2222 -C /usr/bin/python -u - < "$FilePah$. If you press button “OK” the input will be saved. The value for Working Directory $ProjectFileDir$ will be set (normally) automatically.

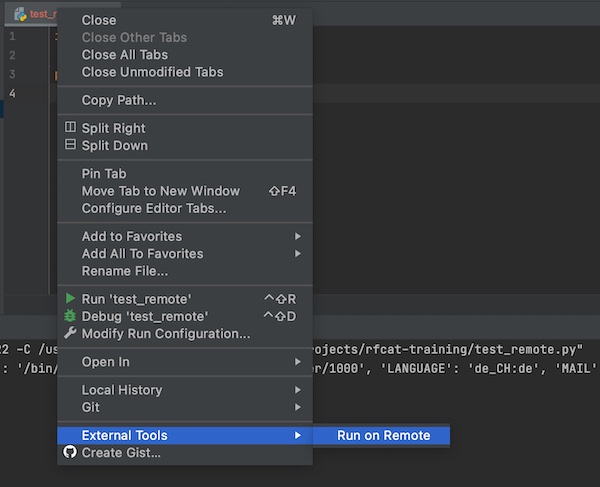
Now you can use the context menu to execute your script over SSH on remote machine.

PyCharm CE external tool remote execution

ooktools and Yard Stick One

In my last tutorial, I showed you how to install RfCat and the ooktools on your macOS, as I promised to go into more detail on the ooktools later – I want to keep this promise now.

Requirements

  • RfCat installed
  • ooktools installed
  • jq installed (optional)
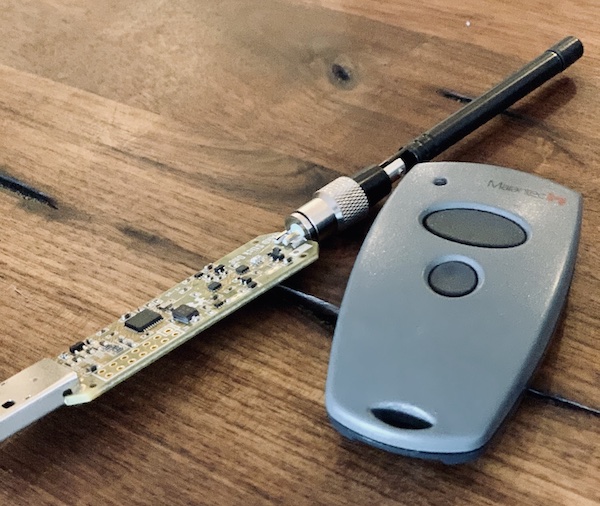
  • you own a Yard Stick One (or any rfcat compatible device)
  • you own a Garage Door opener (or similar device)

Objective

Learn and understand the ooktools sub command ‘signal’.

ooktools signal

The ooktools offers many great features (look at the command line help)! In this tutorial I will focus on signal search, signal record, signal plot and signal play.

# show sub command signal help
$ python2.7 -m ooktools.console signal --help
...
Usage: console.py signal [OPTIONS] COMMAND [ARGS]…

Signal Commands.

Options:
--help  Show this message and exit.

Commands:
brute   Bruteforce a binary range.
jam     Jam a frequency by just sending noise.
play    Play frames from a source file.
plot    Plot frames from a recorded signal.
record  Record frames to a file.
search  Search for signals.
send    Send signals using a RFCat dongle.

Search a signal

Garage Door Opener & Yard Stick One

My garage door opener has information about the frequency (868.3 MHz) on the back, which makes my search a little easier! If this is not the case for you, search for the FCC identifier.

If you have a rough idea about the frequency (and other values), look in the signal search help and compare all standard values with your needs! You only have to overwrite the values ​​which do not match (as arguments).

# show help for signal search
$ python2.7 -m ooktools.console signal search --help

# search signal in specific range
$ python2.7 -m ooktools.console signal search -S 868200000 -E 868400000

Note: Only signal search throws sometimes an Python/USB exception on my OS (after finish the search), all other commands work perfectly. If you have the same problem, reconnect the USB device (Yard Stick One)!

Record a signal

Now run the signal record. Go the same way like you did for the signal search! First look at the sub command help, overwrite the default values and run the command.

# show help for signal record
$ python2.7 -m ooktools.console signal record --help

# start a signal record
$ python2.7 -m ooktools.console signal record -F 868300000 -f 60 -D  ~/Desktop/test.json

After the signal record is finished, you can have a look on the JSON file.

# view file content and pipe output to jq (optional)
$ cat ~/Desktop/test.json | jq .

Plot the recorded signal

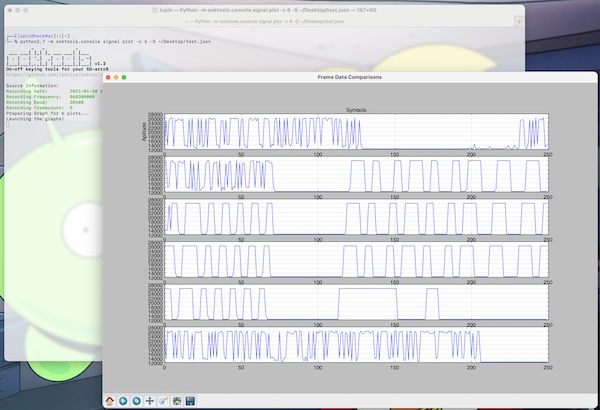
With signal plot you can easily create and watch frames from a recorded signal (json file). The help shows you the possible fine adjustments for the plot output. I have recorded 9 Frames, maybe that differs for you!

# show help for signal plot
$ python2.7 -m ooktools.console signal plot --help

# plot a signal record (number of frames)
$ python2.7 -m ooktools.console signal plot -c 6 -S ~/Desktop/test.json
ooktools plot

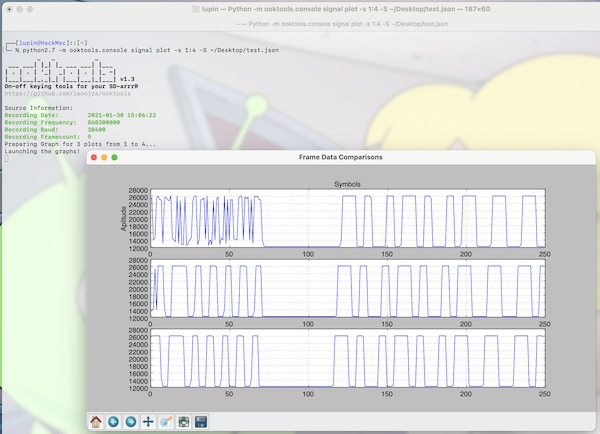
To specify the plot you can use sub command agrument --series.

# plot a signal record (series of fields)
$ python2.7 -m ooktools.console signal plot -s 1:4 -S ~/Desktop/test.json
ooktools plot series

Play a signal

It’s time to try. For that I have to walk a long way to the parking garage gate (I usually drive this route). For signal play sub command only two arguments are needed (source & repeats).

# show help for signal play
$ python2.7 -m ooktools.console signal play --help

# play a signal record
$ python2.7 -m ooktools.console signal play -r 2 -S ~/Desktop/test.json

I did not modify the record file, just run all recorded frames for 2 times. If you are wondering if this worked for me? No – the signal is sent too quickly this way. The gate doesn’t open like this. With tools like GQRX / URH & HackRF One I was able to compare the signals. So some fine-tuning is needed (baud rate/modulation/etc.). Nevertheless, you should have got a good overview of the ooktools.

RfCat on BigSur (Yard Stick One)

Some time ago, I wrote a tutorial about RfCat installation on Kali Linux. Many people asked me for similar tutorial on macOS (Big Sur). So I will use this time now (my first tutorial of year 2021), to show and try to explain (as best I can do). Also I will try to provide some basics for usage, as the community seems not so big and less online documentation is available like for other topics. You can reuse the knowledge for other OS, too.

Precondition

  • latest macOS Commandline Tools installed (xcode-select --install)

Install RfCat incl. everything needed

First you need to download libusb tarball, unzip the downloaded archive and compile/install it (don’t worry sounds harder as it is). If you choose other sources like macports, you may run into location issues (paths to binaries/libraries).

Note: the following examples will just provide the latest version (1.0.24), while I was writing this tutorial. Please look beforehand if there is a newer libusb version already available.

# download via curl
$ curl -L -C - "https://github.com/libusb/libusb/releases/download/v1.0.24/libusb-1.0.24.tar.bz2" -o ~/Downloads/libusb-1.0.24.tar.bz2

# unzip archive
$ tar -xf ~/Downloads/libusb-1.0.24.tar.bz2 -C ~/Downloads/

# change into extraced archive directory
$ cd Downloads/libusb-1.0.24

# verify dependencies for build and install process are available
$ ./configure

# run build
$ make

# run installation
$ sudo make install

# verify installation (optional)
$ ls -la /usr/local/lib/libusb*

# delete archive and directory (optional)
$ rm -fr ~/Downloads/libusb-1.0.24*

Install required Python packages with Python Pip. Without these the RfCat compilation, installation and usage will not correctly work!

Note: As I do have different Python version installed, I specify the excat Python version (2.7.x) in the following examples. If you have only the default MacOS Python version installed – you could use pip directly (without python2.7 -m).

# verify already installed packages (optional)
$ python2.7 -m pip freeze

# install libusb via pip
$ python2.7 -m pip install libusb

# install pyusb via pip
$ python2.7 -m pip install pyusb

# install pyreadline via pip
$ python2.7 -m pip install pyreadline

# install ipython via pip
$ python2.7 -m pip install ipython

# install PySide2 via pip
$ python2.7 -m pip install PySide2

Clone RfCat Git repository from Github (may some older online documentations still link to Bitbucket). In the following example I choose the Downloads directory – of course you can choose any preferred destination.

# clone from GitHub
$ git clone https://github.com/atlas0fd00m/rfcat.git ~/Downloads/rfcat

# change directory
$ cd Downloads/rfcat

# run the installation
$ sudo python2.7 setup.py install

# verify the installation (optional)
$ ls -la /usr/local/bin/rfcat*

# show rfcat help (optional)
$ /usr/local/bin/rfcat -h

# delete cloned directory (optional)
$ rm -fr ~/Downloads/rfcat

If everything went well so far, you should take a look at your installed Python packages.

# verify installed packages (optional)
$ python2.7 -m pip freeze | grep -i 'libusb\|pyusb\|pyreadline\|ipython\|PySide2\|rfcat'

Optional installation of ooktools

Now I recommend to install the ooktools packages via Python Pip. The ooktools will make your life much easier and you will have much faster results.

# install ooktools via pip
$ python2.7 -m pip install ooktools

# verify and show help (optional)
$ python2.7 -m ooktools.console --help

# verify and show specific help topic (optional)
$ python2.7 -m ooktools.console wave --help

I’ll go into the ooktools in a later tutorial, but not today.

Run RfCat

So far so good. Let’s start to connect the Yard Stick One (plug into USB) and run the first example. Always have in mind, the official operating frequencies (for the Yard Stick One):

  • 300 – 348 MHz
  • 391 – 464 MHz
  • 782 – 928 MHz

Note: RfCat expact the values in “Hz”, so 315 MHz are 315000000 Hz.

Hint: don’t put any other transmitter next to the Yard Stick One while you use it (eq. Mobile, Wifi router, etc.). You could destroy it or weaken/disrupt your signals.

# start rfcat (interactive Python)
$ sudo rfcat -r

If no error message appears, you’re good to go.

# start scan on specific frequency (315 MHz)
In [1]: d.specan(315000000)

You should see now the spectrum analyser.

RfCat specan on 315 MHz

Okay, stop the scanning process by closing the spectrum analyzer window. Now let’s start a simple record (also if you don’t have a signal nearby).

Note: there are many more settings and I cannot describe all here! It always depends to the problem you like/need to solve.

# enter the IDLE state (important after any action)
In [2]: d.setModeIDLE()

# specific frequency (315 MHz)
In [3]: d.setFreq(315000000)

# specific modulation (ASK/OOK/Manchester encoding)
In [4]: d.setMdmModulation(MOD_ASK_OOK)

# specific baudrate (4800 Hz)
In [5]: d.setMdmDRate(4800)

# turn on the amplifier
In [6]: d.setMaxPower()

# drops most blocks to pkts (CARRIER)
In [7]: d.lowball()

# start and dump data to screen
In [8]: d.RFlisten()

# stop listen (press Enter to stop)

# enter the IDLE state (or you need to unplug from USB)
In [9]: d.setModeIDLE()

# exit
In [10]: exit()

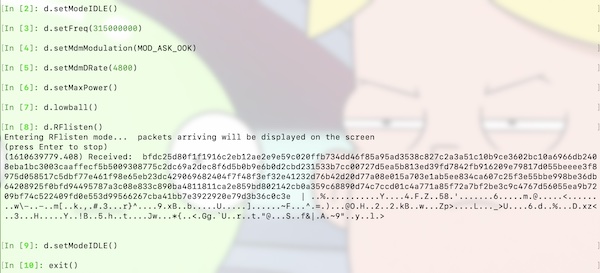
Your result should look like:

RfCat listen example

Hint: use the Tabulator key for command-line completion (also tab completion) and take use of the internal help of RfCat (eq. help(d.setMdmModulation))

The popular frequencies are mostly near by:

  • 315 MHz (car fobs)
  • 433 MHz (door openers, medical devices)
  • 868 MHz (door openers in EU/swiss)
  • 915 MHz (industrial equipment, medical devices)

Send via Python script

It would be not enough to show you only Command line and nothing about transmit. Therefore now a small Python script, which send out some example data. I think the following script is self explanatory.

from rflib import *

d = RfCat()
d.setFreq(315000000)
d.setMdmModulation(MOD_ASK_OOK)
d.setMdmDRate(4800)

print("Transmission starting")
d.RFxmit("\x2e\x2e\x2d\x2e\x2e\x2d\x2e\x00\x00\x00\x00\x00\x00"*10)
print("Transmission complete")

Hint: \x escape sequence means the next two characters are interpreted as hex digits for the character code (\x is used inside strings to represent a character), 0x is used for literal numbers in Python.

Install Gqrx and GNU Radio on macOS (Big Sur)

I’ve tried many times and different ways but the installation of Gqrx and GNU Radio on macOS Big Sur via MacPorts failed always. I did not give up and found a working solution for me (my HackRF One) and these two needed tools. In this tutorial I would like to show you the installation (Gqrx & GNU Radio). If you need first to install HackRF One on macOS, please have a look here.

Install XQuartz

First download and installation starts with XQuartz. Download the latest DMG, run the installation and logout/login from your system.

Install Gqrx SDR

As already mentioned, Gqrx (at least for me) cannot installed on Big Sur via MacPorts. Therefore download and install the precompiled binary from Gqrx. As soon the installation was successful, you can connect and use the HackRF One.

Gqrx and HackRF One on macOS Big Sur

Install Python 3.7

The third step also requires a download and installation. Look for the version Python 3.7! Any version below will not work.

Install GNU Radio

Finally, at the last step, we can start to download and install GNU Radio. It’s a quite big application, so please be patient while processing. Also the startup of GNU Radio (inside XQuartz) takes always some few seconds.

GNU Radio on macOS Big Sur

If you consider the time (download/installation) compared to the MacPorts installation (download/build/installation), a time gain. Of course Xquartz is also needed for MacPorts. Here if you will try via MacPorts:

# install gr-osmosdr (incl hackrf + gnu radio)
$ sudo port install gr-osmosdr

# install gr-fosphor (needed by gnu radio)
$ sudo port install gr-fosphor

# install gqrx
$ sudo port install gqrx