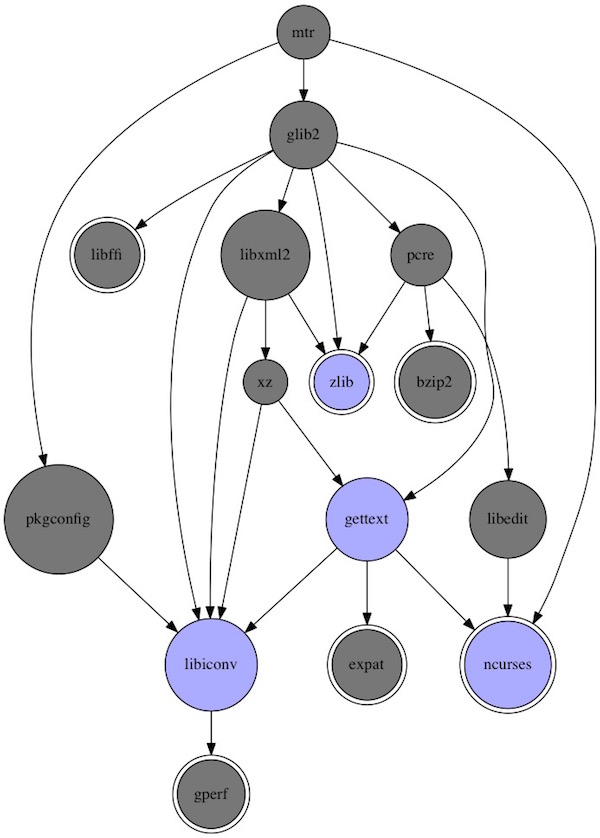
Visualization of package dependencies

Documentation takes time – sometimes a lot of time. Here a few examples how to create dependencies pictures with Graphviz via command line. These commands can then be easily transferred to a build-process to save your time.

Mac OS X

# install Graphviz on Mac OS X
$ curl -O http://www.graphviz.org/pub/graphviz/stable/macos/mountainlion/graphviz-2.36.0.pkg
$ open graphviz-2.36.0.pkg

# check installation
$ dot -V
dot - graphviz version 2.36.0 (20140111.2315)

# clone PureDarwin
$ git clone https://github.com/PureDarwin/PureDarwin.git

# change directory
$ cd PureDarwin/scripts/

# create graph for non-installed mtr
$ sudo ./pd_portviz mtr

CentOS 7

# install Graphviz on CentOS 7
$ yum install -y graphviz

# check installation
$ dot -V
dot - graphviz version 2.30.1 (20150306.0020)

# install rpmdep
$ yum install -y epel-release && yum install -y rpmorphan

# create graph for installed which
$ rpmdep -dot which.dot which

Debian 8

# install Graphviz on Debian 8
$ apt-get install -y graphviz

# check installation
$ dot -V
dot - graphviz version 2.38.0 (20140413.2041)

# install debtree
$ apt-get install -y debtree

# create graph for non-installed make
$ debtree --with-suggests make > make.dot

Example graph for mtr on Mac OS X

# convert .dot into png
$ dot -Tpng mtr.dot -o mtr.png

mtr dependencies

Vagrant – Authentication failure

Depending on the vagrant version and how you build/package boxes, you may know the Authentication failure after command “$ vagrant up“. Here now two simple tips, how to prevent or fix it.

Prevention

If you build on an existing box you should not allow Vagrant to automatically insert a new key pair.

# -*- mode: ruby -*-
# vi: set ft=ruby :

Vagrant.configure('2') do |config|

  config.ssh.insert_key = false
  ...

end

Workaround

If the problem already exists…

# start VM (local)
$ vagrant up
...
default: Warning: Authentication failure. Retrying...
Timed out while waiting for the machine to boot...
...

# login via password authentication (local -> VM)
$ vagrant ssh

# start edit authorized_keys (VM)
[vagrant@acme ~]$ vim .ssh/authorized_keys

# add latest key from https://github.com/mitchellh/vagrant/blob/master/keys/vagrant.pub and save

# leave vm (VM -> local)
$ exit

# stop VM (local)
$ vagrant halt

On command “$ vagrant halt” Vagrant will automatically insert a new keypair.

Visualisation of Docker and Kubernetes

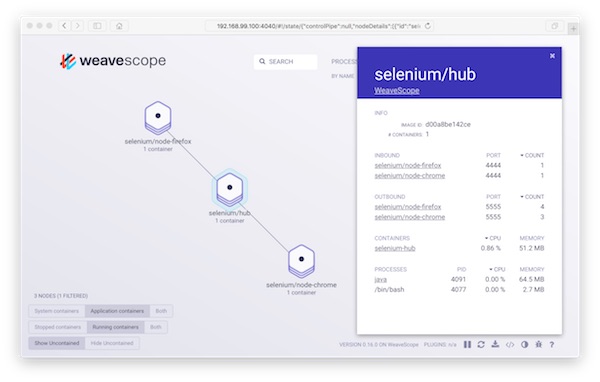
With Weave Scope you have in seconds a beautiful monitoring, visualisation & management for Docker and Kubernetes via your browser. I show with Docker-Selenium a simple example.

Preconditions

Lets go…

# create new Docker VM (local)
$ docker-machine create -d virtualbox WeaveScope

# pointing shell to WeaveScope VM (local)
$ eval $(docker-machine env WeaveScope)

# SSH into WeaveScope VM (local -> VM)
$ docker-machine ssh WeaveScope

# become root (VM)
$ sudo su -

# download scope (VM)
$ wget -O /usr/local/bin/scope https://git.io/scope

# change access rights of scope (VM)
$ chmod a+x /usr/local/bin/scope

# launch scope (VM)
# Do not forget the shown URL!!!
$ scope launch

# exit root and ssh (VM -> local)
$ exit

# create Selenium Hub (local)
$ docker run -d -p 4444:4444 --name selenium-hub selenium/hub:2.53.0

# create Selenium Chrome Node (local)
$ docker run -d --link selenium-hub:hub selenium/node-chrome:2.53.0

# create Selenium Firefox Node (local)
$ docker run -d --link selenium-hub:hub selenium/node-firefox:2.53.0

# show running containers (optional)
$ docker ps -a
...
CONTAINER ID        IMAGE                          COMMAND                  CREATED             STATUS              PORTS                    NAMES
a3e7b11c5a5f        selenium/node-firefox:2.53.0   "/opt/bin/entry_point"   9 seconds ago       Up 8 seconds                                 cocky_wing
699bf05681e8        selenium/node-chrome:2.53.0    "/opt/bin/entry_point"   42 seconds ago      Up 42 seconds                                distracted_darwin
bbc5f545261b        selenium/hub:2.53.0            "/opt/bin/entry_point"   2 minutes ago       Up 2 minutes        0.0.0.0:4444->4444/tcp   selenium-hub
9fe4e406fb50        weaveworks/scope:0.16.0        "/home/weave/entrypoi"   5 minutes ago       Up 5 minutes                                 weavescope

That’s it! Now start your browser and open the URL.

weavescope browser

Real-time log monitoring

You may need to watch different log files on automated test runs. With log.io you can simply monitoring log files via browser! This tutorial shows how easy it is.

Preconditions

Preparation

Create new project with following structure and files.

# create new project LogIO
$ mkdir -p ~/Projects/LogIO/data

# go into new Project
$ cd ~/Projects/LogIO

# create needed files in data
$ touch data/{harvester.conf,log_server.conf,web_server.conf,log.io}

# create Vagrantfile
$ touch Vagrantfile

# show files
$ tree .
.
├── Vagrantfile
└── data
    ├── harvester.conf
    ├── log.io
    ├── log_server.conf
    └── web_server.conf

File contents

# -*- mode: ruby -*-
# vi: set ft=ruby :
Vagrant.require_version ">= 1.8.1"
VAGRANTFILE_API_VERSION = "2"

Vagrant.configure(VAGRANTFILE_API_VERSION) do |config|

  config.vm.box = "centos/7"
  config.vm.network "public_network"
  config.vm.synced_folder "./data", "/vagrant", disabled: false

  config.vm.provider "virtualbox" do |vb|
    vb.name = "LogIO"
    vb.cpus = "2"
    vb.memory = "2048"
    vb.gui = false
  end

  config.vm.provision "shell", inline: <<-SHELL
    # install needed packages
    sudo yum update -y && sudo yum install -y epel-release
    sudo yum install -y vim net-tools npm nodejs
    sudo yum clean all
    # install log.io for user <root>
    sudo npm install -g log.io --user "root"
    # provide custom files for user <root>
    sudo rm -f /root/.log.io/*
    sudo cp /vagrant/*.conf /root/.log.io/
    sudo chown root:root /root/.log.io/*.conf
    # provide init.d for log.io
    sudo cp /vagrant/log.io /usr/local/bin/log.io
    sudo chmod +x /usr/local/bin/log.io
    sudo chown root:root /usr/local/bin/log.io
  SHELL

end

Configure your Harvesters…

exports.config = {
  nodeName: "application_server",
  logStreams: {
    apache: [
      "/var/log/apache2/access.log",
      "/var/log/apache2/error.log"
    ]
  },
  server: {
    // connect to log.io server
    host: '127.0.0.1',
    port: 28777
  }
}

Configure your log server…

exports.config = {
  host: '0.0.0.0',
  port: 28777
}

Configure your web server…

exports.config = {
  host: '0.0.0.0',
  port: 28778,

  /*
  // Enable HTTP Basic Authentication
  auth: {
    user: "admin",
    pass: "1234"
  },
  */

  /*
  // Enable HTTPS/SSL
  ssl: {
    key: '/path/to/privatekey.pem',
    cert: '/path/to/certificate.pem'
  },
  */

  /*
  // Restrict access to websocket (socket.io)
  // Uses socket.io 'origins' syntax
  restrictSocket: '*:*',
  */

  /*
  // Restrict access to http server (express)
  restrictHTTP: [
    "192.168.29.39",
    "10.0.*"
  ]
  */

}

Create simple init script…

#!/bin/bash

start() {
  echo "Starting log.io process..."
  /usr/bin/log.io-server &
  /usr/bin/log.io-harvester &
}

stop() {
  echo "Stopping io-log process..."
  pkill node
}

status() {
  echo "Status io-log process..."
  netstat -tlp | grep node
}

case "$1" in
  start) start;;
  stop) stop;;
  status) status;;
  *) echo "Usage: start|stop|status";;
esac

Usage

# start VM via vagrant
$ vagrant up

# SSH into VM
$ vagrant ssh

# become root
$ sudo su -

# start log.io
$ log.io start

# get ip
$ ip addr

Now open your browser with URL http://<ip>:28778
Docker Remote API and CentOS 7

This time again some topics in one tutorial. We touch Vagrant with Shell provision (external script), Docker Remote API and something CentOS 7 configuration.

Preconditions

Preparation

If you already have a CentOS 7 with Docker, you can skip these steps. Create a folder with the following 2 files…

# -*- mode: ruby -*-
# vi: set ft=ruby :

Vagrant.require_version ">= 1.8.1"
VAGRANTFILE_API_VERSION = "2"

Vagrant.configure(VAGRANTFILE_API_VERSION) do |config|

  config.vm.define "centos" do |centos|
    centos.vm.box = "centos/7"
    centos.vm.network "public_network"
    centos.vm.synced_folder ".", "/vagrant", disabled: true

    centos.vm.provider "virtualbox" do |vb|
      vb.name = "Docker-Jenkins"
      vb.cpus = "2"
      vb.memory = "2048"
    end

    centos.vm.provision "shell", path: "provision.sh"
  end
end
#!/usr/bin/env bash

yum update -y && yum install -y epel-release vim

tee /etc /yum.repos.d/docker.repo <<-'EOF'
[dockerrepo]
name=Docker Repository
baseurl=https://yum.dockerproject.org/repo/main/centos/$releasever/
enabled=1
gpgcheck=1
gpgkey=https://yum.dockerproject.org/gpg
EOF

yum install -y docker-engine jq

systemctl enable docker
systemctl start docker

Instructions

# start VM via Vagrant
$ vagrant up

# SSH into VM via Vagrant
$ vagrant ssh

# check if API is enabled (optional)
$ docker -H=tcp://127.0.0.1:4243 images

Now we edit docker.service file. The path may be different!

# find docker.service file
$ systemctl status docker

# edit docker.service
$ vim /usr/lib/systemd/system/docker.service

...
[Service]
ExecStart=
ExecStart=/usr/bin/docker daemon -H fd:// -D -H tcp://127.0.0.1:4243
...

# reload and restart docker service
$ systemctl daemon-reload && systemctl restart docker

# test docker API again
$ docker -H=tcp://127.0.0.1:4243 version

Note: Be careful if you use tcp://0.0.0.0:4243 !!!!

# some tests with curl and jq on Docker Remote API
$ curl -X GET http://127.0.0.1:4243/version | jq .
$ curl -X GET http://127.0.0.1:4243/info | jq .DriverStatus
$ curl -X GET http://127.0.0.1:4243/networks | jq '.[0]'

Read the manual of jq, the power of curl and jq together is awesome.

SSH-life easier with AppleScript

I love the Mac OS X Terminal and to do SSH with it. With increasing age I forget the many SSH connection variables. But with some AppleScript I help myself. Here now 3 simple examples.

Example 1:

User and target are hardcoded.

on RunTerminal()
    set ScriptCommand to "ssh user@123.456.78.9"
    tell application "Terminal"
        activate
        do script with command ScriptCommand in window 1
    end tell
end RunTerminal

on run
    RunTerminal()
end run

Example 2

Dialog for user and only target hardcoded.

global RemoteUser

on RunTerminal()
    set ScriptCommand to "ssh " & RemoteUser & "@192.168.0.1"
    tell application "Terminal"
        activate
        do script with command ScriptCommand in window 1
    end tell
end RunTerminal

on RunDialog()
    display dialog "Who should it be ?" default answer "root"
    set RemoteUser to text returned of result
end RunDialog

on run
    RunDialog()
    RunTerminal()
end run

Example 3

Dialog for user and list for targets.

global RemoteUser
global RemoteTarget

on RunTerminal()
    set ScriptCommand to "ssh " & RemoteUser & "@" & RemoteTarget
    tell application "Terminal"
        activate
        do script with command ScriptCommand in window 1
    end tell
end RunTerminal

on RunUserDialog()
    display dialog "Who should it be ?" default answer "root"
    set RemoteUser to text returned of result
end RunUserDialog

on RunTargetDialog()
    (choose from list {"192.168.0.1", "example.com", "123.456.678.9"} with prompt "What is your target ?")
    set RemoteTarget to result as text
end RunTargetDialog

on run
    RunUserDialog()
    RunTargetDialog()
    RunTerminal()
end run

After exporting as Executable you can put it on places where you want. Do not forget the appropriate icon!

Apache Jmeter and Docker

Okay, this time we will create a Docker-Jmeter test environment. We create some simple (but tiny) Docker images/containers which can be reused for future test runs. Here we follow the DRY rule. Next, we want to achieve.

$ java -jar apache-jmeter-3.0/bin/ApacheJMeter.jar -t /tutorial/jmx/simple.jmx -n -l /tutorial/results/log.jtl

Preconditions

Preparation

# create all directories
$ mkdir -p /tutorial/{java,jmeter,jmx,results}

# create Dockerfile for JAVA
$ cd /tutorial/java && vim Dockerfile

# build JAVA image
$ docker build -t alpine/java .

# create Dockerfile for Jmeter
$ cd /tutorial/jmeter && vim Dockerfile

# build Jmeter image
$ docker build -t alpine/jmeter .

# list Docker images (optional)
$ docker images
...
REPOSITORY          TAG                 IMAGE ID            CREATED             SIZE
alpine/jmeter       latest              0864228be6ef        15 seconds ago      150.2 MB
alpine/java         latest              068005f45866        5 minutes ago       102.8 MB
alpine              latest              f70c828098f5        5 days ago          4.795 MB

Dockerfile JAVA

FROM alpine

RUN apk --update add openjdk8-jre-base

ENTRYPOINT ["/usr/bin/java"]

Dockerfile Jmeter

FROM alpine

RUN apk --update add wget
RUN wget http://mirror.switch.ch/mirror/apache/dist//jmeter/binaries/apache-jmeter-3.0.tgz
RUN tar zxvf apache-jmeter-3.0.tgz
RUN apk del wget
RUN rm -f apache-jmeter-3.0.tgz
RUN rm -fr /apache-jmeter-3.0/docs

VOLUME /apache-jmeter-3.0

CMD ["/bin/true"]

JMX file

Create or copy existing JMX file on folder “/tutorial/jmx” with name “simple.jmx”.

# show JMX (optional)
$ ls /tutorial/jmx
...
simple.jmx

Create Jmeter container

# create jmeter container
$ docker create --name jmeter alpine/jmeter

# list containers (optional)
$ docker ps -a
...
CONTAINER ID        IMAGE               COMMAND             CREATED             STATUS      PORTS       NAMES
0916ff8f25bb        alpine/jmeter       "/bin/true"         7 seconds ago       Created                 jmeter

Note: The container was created but not running!

Test execution

# test run JAVA container (optional)
$ docker run -ti --rm --volumes-from jmeter alpine/java -jar /apache-jmeter-3.0/bin/ApacheJMeter.jar --version

# run Jmeter (without report)
$ docker run -ti --rm -v /tutorial/jmx:/jmx --volumes-from jmeter alpine/java -jar /apache-jmeter-3.0/bin/ApacheJMeter.jar -t /jmx/simple.jmx -n

# run Jmeter (with report)
$ docker run -ti --rm -v /tutorial/jmx:/jmx -v /tutorial/results:/results --volumes-from jmeter alpine/java -jar /apache-jmeter-3.0/bin/ApacheJMeter.jar -t /jmx/simple.jmx -n -l /results/log.jtl

# show report
$ cat /tutorial/results/log.jtl

🙂

dnstwist with docker

What happens when users make a typo in URL input? It can display a fake websites. This similar-looking domains can be used to attack you (Domain Name Permutation). With dnstwist you can find such “evil neighbors”. This tutorial shows how to use in a few seconds dnstwist.

Precondition

  • docker installed and running
  • docker-machine installed (optional)

Instructions

# create VM (optional)
$ docker-machine create -d virtualbox dnstwist

# pointing shell (optional)
$ eval $(docker-machine env dnstwist)

# download docker image (optional)
$ docker pull jrottenberg/dnstwist

# start dnstwist
$ docker run --rm jrottenberg/dnstwist bitbucket.org