Quick and dirty sync folders for Vagrant

Background

In our company we have different development teams working with same Vagrant boxes. As a challenge they need different sync folder locations – even inside teams. I’m just too lazy to provide and maintain all Vagrantfile templates for their needs. So i provide a quick and dirty solution for them.

Example

# -*- mode: ruby -*-
# vi: set ft=ruby :

Vagrant.configure("2") do |config|

  # box name
  config.vm.box = "lupin/centos7"

  # Disable replacing insecure key
  config.ssh.insert_key = false

  # Disable default synced folder
  config.vm.synced_folder ".", "/vagrant", disabled: true

  # Synced folder(s) by argument
  if !ENV['mount'].nil?

    loop do
      puts "local folder: "
      local_dir = STDIN.gets.chomp
      puts "target folder: "
      target_dir = STDIN.gets.chomp

      if local_dir.empty? || target_dir.empty?
        break
      end

      config.vm.synced_folder local_dir, target_dir
    end

  end

 # VirtualBox specific configuration
  config.vm.provider "virtualbox" do |vb|
    vb.gui = false
    vb.memory = "1024"
    vb.cpus = 1
    vb.name = "example_vm"
  end

end

Usage

# simple command
$ vagrant up

# check for synced folder(s)
$ vagrant ssh -c 'ls -la /'

# destroy environment
$ vagrant halt

# run with argument (mount)
$ mount=yes vagrant up
...
local folder:
src_a <ENTER>
target folder:
/vagrant_a <ENTER>
local folder:
src_b <ENTER>
target folder:
/vagrant_b <ENTER>
local folder:
<ENTER>
target folder:
<ENTER>
...

# show content
$ vagrant ssh -c 'cat /vagrant_a/SomeTestFile_a && cat /vagrant_b/SomeTestFile_b'
...
Hello world ... a
Hello world ... b
...

# destroy environment
$ vagrant destroy -f

😉
Create Alpine Linux VM with VirtualBox

Today a tutorial for creating a Alpine Linux VM with VirtualBox. The only limitation is that VirtualBox is already installed. Furthermore,  all of the steps are performed in the terminal (without VirtualBox-GUI).

Creation of VM

# change directory
$ cd VirtualBox\ VMs/

# download alpine iso
$ curl -o alpine-3.4.3-x86_64.iso http://dl-cdn.alpinelinux.org/alpine/v3.4/releases/x86_64/alpine-3.4.3-x86_64.iso

# checksum sha1 (optional)
$ openssl sha1 alpine-3.4.3-x86_64.iso

# create new directory
$ mkdir AlpineVM

# create storage medium for VM
$ VBoxManage createhd --filename ./AlpineVM/AlpineVM.vdi --size 8192

# list available OS types (just for fun and good to know)
$ VBoxManage list ostypes

# register new alpine VM
$ VBoxManage createvm --name "AlpineVM" --ostype Linux26_64 --register

# configure system settings of alpine VM
$ VBoxManage modifyvm "AlpineVM" --memory 1024 --cpus 1 --acpi on --pae off --hwvirtex on --nestedpaging on --rtcuseutc on --vram 16 --audio none --accelerate3d off --accelerate2dvideo off --usb on

# configure boot settings of VM
$ VBoxManage modifyvm "AlpineVM" --boot1 dvd --boot2 disk --boot3 none --boot4 none

# modify a storage controller (IDE)
$ VBoxManage storagectl "AlpineVM" --name "IDE" --add ide

# modify a storage controller (SATA)
$ VBoxManage storagectl "AlpineVM" --name "SATA" --add sata

# add storage medium to VM
$ VBoxManage storageattach "AlpineVM" --storagectl "SATA" --port 0 --device 0 --type hdd --medium ./AlpineVM/AlpineVM.vdi

# add alpine iso
$ VBoxManage storageattach "AlpineVM" --storagectl "IDE" --port 1 --device 0 --type dvddrive --medium alpine-3.4.3-x86_64.iso

# start alpine VM
$ VBoxManage startvm "AlpineVM"

Basic Alpine installation

# after login as user "root" (passwordless)

# run setup
$ setup-alpine

>>>
keyboard layout: "us"
keyboard variant: "us"
system hostname: "localhost"
initialise interface: "eth0, dhcp, no manual setup"
enter root password
timezone: "UTC"
HTTP/FTP proxy URL: "none"
Detect and add fastest mirror: "f"
SSH server: "openssh"
NTP client: "chrony"
install to disk: "sda"
install type: "sys"
erase & continue: "y"
<<<

# shutdown system
$ poweroff

Note: if you have an answers file you can do…

# download answers file
$ wget http://<uri>/<answers file>

# configuration via answers file
$ alpine-setup -f <path/to/answers file>

Remove medium (ISO)

# remove alpine iso
$ VBoxManage storageattach "AlpineVM" --storagectl "IDE" --port 1 --device 0 --type dvddrive --medium emptydrive

# start VM
$ VBoxManage startvm "AlpineVM"

Update Packages and install VirtualBox additions

# change directory
$ cd /etc

# enable repositories
$ vi apk/repositories

>>>
#/media/cdrom/apks
http://liskamm.alpinelinux.uk/v3.4/main
http://liskamm.alpinelinux.uk/v3.4/community
http://liskamm.alpinelinux.uk/edge/main
http://liskamm.alpinelinux.uk/edge/community
http://liskamm.alpinelinux.uk/edge/testing
<<<

# update and upgrade system
$ apk update && apk upgrade

# install virtualbox additions
$ apk add virtualbox-guest-modules-grsec virtualbox-additions-grsec

# reboot system
$ reboot

Optional steps

# install vim
$ apk add vim

# change directory
$ cd /etc

# modify sshd (manual) 
$ vim ssh/sshd_config

# restart sshd
$ init.d/sshd restart

# modify network interfaces (manual)
$ vim network/interfaces

# restart network
$ init.d/networking restart

Create own Docker port scanner

Today’s tutorial shows how quickly and easily a Docker port scanner can be created. With the knowledge you can then create additional Docker applications.

Preparation

# prepare knocker project (local)
$ mkdir ~/Projects/Knocker && cd ~/Projects/Knocker

# create Dockerfile (local)
$ vim Dockerfile

# create KnockerVM (local)
$ docker-machine create -d virtualbox KnockerVM

# pointing shell to KnockerVM (local)
$ eval $(docker-machine env KnockerVM)

# copy Dockerfile into KnockerVM (local)
$ docker-machine scp ~/Projects/Knocker/Dockerfile KnockerVM:Dockerfile

# SSH into KnockerVM (local)
$ docker-machine ssh KnockerVM

Dockerfile

FROM alpine

# install needed packages
RUN apk --update add wget build-base gcc abuild binutils binutils-doc gcc-doc

# download and unzip
RUN wget http://prdownloads.sourceforge.net/knocker/knocker-0.7.1.tar.gz
RUN tar -zxvf knocker-0.7.1.tar.gz && rm -f knocker-0.7.1.tar.gz

# configure, install and clean up
WORKDIR /knocker-0.7.1
RUN ./configure \
    && make install \
    && make clean

# create mountable directory
RUN mkdir /results
VOLUME /results
WORKDIR /results

# remove packages
RUN apk del wget build-base gcc abuild binutils binutils-doc gcc-doc \
    && rm -fr /knocker-0.7.1

ENTRYPOINT ["knocker"]

Usage

# build Docker image (KnockerVM)
$ docker build -t alpine/knocker .

# run Knocker help (KnockerVM)
$ docker run -ti --rm alpine/knocker --help

# run simple port scan (KnockerVM)
$ docker run -ti --rm alpine/knocker -H 192.168.192.1 -SP 1 -EP 10

# run port scan with (KnockerVM)
$ docker run -ti --rm -v /home/docker:/results alpine/knocker -H 192.168.192.1 -SP 80 -EP 90 -lf /results/report

# read report (KnockerVM)
$ cat report

Feel free to edit and/or expand! Knocker self can be found here.

SSH jump host example with vagrant

This time shows the tutorial two topics in one. The first topic is: “How an easy to configure SSH host jump”. The 2nd topic is: “Provisioning examples for Vagrant”.

Precondition

  • Vagrant installed
  • VirtualBox installed

File content

---
- name: jump_host
  box: centos/7
  ip: 192.168.100.10
  cpus: 1
  memory: 1024
- name: host_a
  box: centos/7
  ip: 192.168.100.20
  cpus: 1
  memory: 1024
- name: host_b
  box: centos/7
  ip: 192.168.100.30
  cpus: 1
  memory: 1024
Host *
  Compression yes
  AddressFamily inet
  Protocol 2
  ServerAliveInterval 60
  ServerAliveCountMax 30

Host jump_host
  HostName 192.168.x.x
  User testuser

Host host_*
  ProxyCommand ssh jump_host -W %h:%p
  User testuser
# -*- mode: ruby -*-

require 'yaml'

machines = YAML.load_file('machines.yml')
API_VERSION = "2"
KEY_LOCATION = "~/.ssh/id_rsa.pub"

Vagrant.require_version ">= 1.8.1"
Vagrant.configure(API_VERSION) do |config|

  # loop
  machines.each do |machines|
    # vm setup + provisioning
    config.vm.define machines["name"] do |machine|
      machine.vm.box = machines["box"]
      machine.vm.synced_folder ".", "/vagrant", disabled: true
      machine.vm.network "private_network", ip: machines["ip"]

      machine.vm.provider :virtualbox do |vb|
        vb.name = machines["name"]
        vb.cpus = machines["cpus"]
        vb.memory = machines["memory"]
        vb.gui = false
      end

      # provisioning: only jump_host
      if machines["name"] == 'jump_host'
        # prompt for interface
        machine.vm.network "public_network"

        machine.vm.provision "shell", inline: <<-SHELL
          cd /etc && sudo sed -i '/#AllowTcpForwarding yes/c\AllowTcpForwarding yes' ssh/sshd_config
          sudo systemctl restart sshd.service
          cd /etc && sudo grep -q 'host_a' hosts || echo '192.168.100.20  host_a' >> hosts
          cd /etc && sudo grep -q 'host_b' hosts || echo '192.168.100.30  host_b' >> hosts
        SHELL
      end

      # provisioning: all
      machine.vm.provision "file", source: KEY_LOCATION, destination: "/tmp/pub.key"

      machine.vm.provision "shell", inline: <<-SHELL
        sudo useradd testuser
        sudo mkdir /home/testuser/.ssh
        sudo touch /home/testuser/.ssh/authorized_keys
        sudo cat /tmp/pub.key > /home/testuser/.ssh/authorized_keys
        sudo rm -f /tmp/pub.key
        sudo chmod 0700 /home/testuser/.ssh
        sudo chmod 0644 /home/testuser/.ssh/authorized_keys
        sudo chown -R testuser:testuser /home/testuser/.ssh
      SHELL
    end
  end
end

Note: Replace values for HostName “192.168.x.x” by real IP from jump_host and KEY_LOCATION “~/.ssh/id_rsa.pub”!

Steps

# create and goto project
$ mkdir ~/Projects/JumpHostExample && cd ~/Projects/JumpHostExample

# create yaml file
$ vim machines.yml

# create Vagrantfile
$ vim Vagrantfile

# start Vagrant
$ vagrant up

# get IP from jump_host (for config)
$ ssh jump_host -c "ip addr show enp0s9"

# create or edit ssh config
$ vim ~/.ssh/config

# ssh into hosts via jump_host
$ ssh host_a
$ ssh host_b

Create simple CentOS 7 Virtualbox with Packer

As a software tester you need many virtual machines, the creating can be very time consuming. Of course tools like Vagrant helps a lot but the creation for BaseBoxes starts most with installation from ISO`s. Exact here helps Packer! This tutorial shows an example for CentOS7 – VirtualBox.

Preconditions

Preparation

1st you need to install Packer. The following example shows one way that works well with Mac OS X (El Capitan).

# change into Downloads
$ cd ~/Downloads/

# download packer archive (Mac OS X)
$ curl -O https://releases.hashicorp.com/packer/0.10.1/packer_0.10.1_darwin_amd64.zip

# unzip packer archive
$ unzip packer_0.10.1_darwin_amd64.zip

# move packer binary
$ sudo mv packer /usr/local/bin

# check packer version
$ packer --version

Other OS? Take a look here.

Instructions

# create new project
$ mkdir ~/Projects/PackerExample && cd ~/Projects/PackerExample

# create kickstart directory and configuration
$ mkdir ~/Projects/PackerExample/http && touch ~/Projects/PackerExample/http/ks.cfg

# create new Packer JSON file
$ touch ~/Projects/PackerExample/example.json

# how it looks (before running)
$ tree .
.
├── example.json
└── http
    └── ks.cfg
{
  "variables": {
    "iso": "http://linuxsoft.cern.ch/centos/7/isos/x86_64/CentOS-7-x86_64-Minimal-1511.iso",
    "checksum": "88c0437f0a14c6e2c94426df9d43cd67"
  },
  "builders": [
    {
      "type": "virtualbox-iso",
      "iso_url": "{{ user `iso` }}",
      "iso_checksum": "{{ user `checksum` }}",
      "iso_checksum_type": "md5",
      "vm_name": "MyCentOS7",
      "guest_os_type": "RedHat_64",
      "ssh_username": "root",
      "ssh_password": "packer",
      "ssh_port": 22,
      "ssh_wait_timeout": "600s",
      "vboxmanage": [
        ["modifyvm", "{{.Name}}", "--memory", "2048"],
        ["modifyvm", "{{.Name}}", "--cpus", "2"],
        ["modifyvm", "{{.Name}}", "--audio", "none"]
      ],
      "disk_size": "10240",
      "http_directory": "http",
      "boot_command": [
        "<tab> text ks=http://{{ .HTTPIP }}:{{ .HTTPPort }}/ks.cfg<enter><wait>"
      ],
      "shutdown_command": "/sbin/halt -p"
    }
  ]
}

More about Packer – VirtualBox? Take a look here.

install
cdrom
lang en_US.UTF-8
keyboard us
timezone UTC
network --bootproto=dhcp
rootpw --plaintext packer
user --name=frank --password=Test123
auth --enableshadow --passalgo=sha512 --kickstart
firewall --disabled
selinux --permissive
bootloader --location=mbr

text
skipx
zerombr

clearpart --all --initlabel
autopart

firstboot --disable
reboot

%packages --instLangs=en_US.utf8 --nobase --ignoremissing --excludedocs
@core
%end

%post --log=/root/ks.log
yum -y update
%end

More about CentOS 7 – Kickstart? Take a look here.

Validation and Build

# validate JSON
$ packer validate example.json

# run the build
$ packer build example.json

Result

$ tree .
.
├── example.json
├── http
│   └── ks.cfg
├── output-virtualbox-iso
│   ├── MyCentOS7-disk1.vmdk
│   └── MyCentOS7.ovf
└── packer_cache
    └── 4bbec2cca90f761e144becb1a24c2914eddd21d06292d6dfb415beb51ef9e69f.iso

Visualisation of Docker and Kubernetes

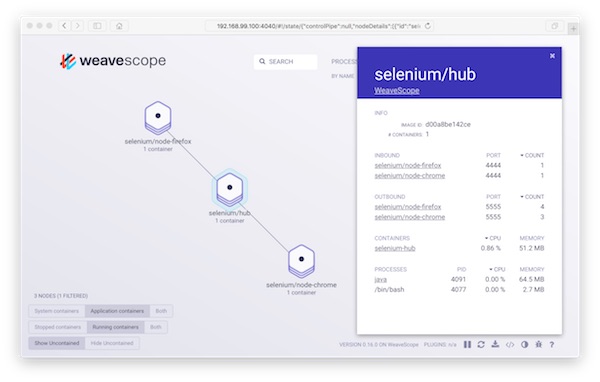
With Weave Scope you have in seconds a beautiful monitoring, visualisation & management for Docker and Kubernetes via your browser. I show with Docker-Selenium a simple example.

Preconditions

Lets go…

# create new Docker VM (local)
$ docker-machine create -d virtualbox WeaveScope

# pointing shell to WeaveScope VM (local)
$ eval $(docker-machine env WeaveScope)

# SSH into WeaveScope VM (local -> VM)
$ docker-machine ssh WeaveScope

# become root (VM)
$ sudo su -

# download scope (VM)
$ wget -O /usr/local/bin/scope https://git.io/scope

# change access rights of scope (VM)
$ chmod a+x /usr/local/bin/scope

# launch scope (VM)
# Do not forget the shown URL!!!
$ scope launch

# exit root and ssh (VM -> local)
$ exit

# create Selenium Hub (local)
$ docker run -d -p 4444:4444 --name selenium-hub selenium/hub:2.53.0

# create Selenium Chrome Node (local)
$ docker run -d --link selenium-hub:hub selenium/node-chrome:2.53.0

# create Selenium Firefox Node (local)
$ docker run -d --link selenium-hub:hub selenium/node-firefox:2.53.0

# show running containers (optional)
$ docker ps -a
...
CONTAINER ID        IMAGE                          COMMAND                  CREATED             STATUS              PORTS                    NAMES
a3e7b11c5a5f        selenium/node-firefox:2.53.0   "/opt/bin/entry_point"   9 seconds ago       Up 8 seconds                                 cocky_wing
699bf05681e8        selenium/node-chrome:2.53.0    "/opt/bin/entry_point"   42 seconds ago      Up 42 seconds                                distracted_darwin
bbc5f545261b        selenium/hub:2.53.0            "/opt/bin/entry_point"   2 minutes ago       Up 2 minutes        0.0.0.0:4444->4444/tcp   selenium-hub
9fe4e406fb50        weaveworks/scope:0.16.0        "/home/weave/entrypoi"   5 minutes ago       Up 5 minutes                                 weavescope

That’s it! Now start your browser and open the URL.

weavescope browser

Real-time log monitoring

You may need to watch different log files on automated test runs. With log.io you can simply monitoring log files via browser! This tutorial shows how easy it is.

Preconditions

Preparation

Create new project with following structure and files.

# create new project LogIO
$ mkdir -p ~/Projects/LogIO/data

# go into new Project
$ cd ~/Projects/LogIO

# create needed files in data
$ touch data/{harvester.conf,log_server.conf,web_server.conf,log.io}

# create Vagrantfile
$ touch Vagrantfile

# show files
$ tree .
.
├── Vagrantfile
└── data
    ├── harvester.conf
    ├── log.io
    ├── log_server.conf
    └── web_server.conf

File contents

# -*- mode: ruby -*-
# vi: set ft=ruby :
Vagrant.require_version ">= 1.8.1"
VAGRANTFILE_API_VERSION = "2"

Vagrant.configure(VAGRANTFILE_API_VERSION) do |config|

  config.vm.box = "centos/7"
  config.vm.network "public_network"
  config.vm.synced_folder "./data", "/vagrant", disabled: false

  config.vm.provider "virtualbox" do |vb|
    vb.name = "LogIO"
    vb.cpus = "2"
    vb.memory = "2048"
    vb.gui = false
  end

  config.vm.provision "shell", inline: <<-SHELL
    # install needed packages
    sudo yum update -y && sudo yum install -y epel-release
    sudo yum install -y vim net-tools npm nodejs
    sudo yum clean all
    # install log.io for user <root>
    sudo npm install -g log.io --user "root"
    # provide custom files for user <root>
    sudo rm -f /root/.log.io/*
    sudo cp /vagrant/*.conf /root/.log.io/
    sudo chown root:root /root/.log.io/*.conf
    # provide init.d for log.io
    sudo cp /vagrant/log.io /usr/local/bin/log.io
    sudo chmod +x /usr/local/bin/log.io
    sudo chown root:root /usr/local/bin/log.io
  SHELL

end

Configure your Harvesters…

exports.config = {
  nodeName: "application_server",
  logStreams: {
    apache: [
      "/var/log/apache2/access.log",
      "/var/log/apache2/error.log"
    ]
  },
  server: {
    // connect to log.io server
    host: '127.0.0.1',
    port: 28777
  }
}

Configure your log server…

exports.config = {
  host: '0.0.0.0',
  port: 28777
}

Configure your web server…

exports.config = {
  host: '0.0.0.0',
  port: 28778,

  /*
  // Enable HTTP Basic Authentication
  auth: {
    user: "admin",
    pass: "1234"
  },
  */

  /*
  // Enable HTTPS/SSL
  ssl: {
    key: '/path/to/privatekey.pem',
    cert: '/path/to/certificate.pem'
  },
  */

  /*
  // Restrict access to websocket (socket.io)
  // Uses socket.io 'origins' syntax
  restrictSocket: '*:*',
  */

  /*
  // Restrict access to http server (express)
  restrictHTTP: [
    "192.168.29.39",
    "10.0.*"
  ]
  */

}

Create simple init script…

#!/bin/bash

start() {
  echo "Starting log.io process..."
  /usr/bin/log.io-server &
  /usr/bin/log.io-harvester &
}

stop() {
  echo "Stopping io-log process..."
  pkill node
}

status() {
  echo "Status io-log process..."
  netstat -tlp | grep node
}

case "$1" in
  start) start;;
  stop) stop;;
  status) status;;
  *) echo "Usage: start|stop|status";;
esac

Usage

# start VM via vagrant
$ vagrant up

# SSH into VM
$ vagrant ssh

# become root
$ sudo su -

# start log.io
$ log.io start

# get ip
$ ip addr

Now open your browser with URL http://<ip>:28778

Docker Remote API and CentOS 7

This time again some topics in one tutorial. We touch Vagrant with Shell provision (external script), Docker Remote API and something CentOS 7 configuration.

Preconditions

Preparation

If you already have a CentOS 7 with Docker, you can skip these steps. Create a folder with the following 2 files…

# -*- mode: ruby -*-
# vi: set ft=ruby :

Vagrant.require_version ">= 1.8.1"
VAGRANTFILE_API_VERSION = "2"

Vagrant.configure(VAGRANTFILE_API_VERSION) do |config|

  config.vm.define "centos" do |centos|
    centos.vm.box = "centos/7"
    centos.vm.network "public_network"
    centos.vm.synced_folder ".", "/vagrant", disabled: true

    centos.vm.provider "virtualbox" do |vb|
      vb.name = "Docker-Jenkins"
      vb.cpus = "2"
      vb.memory = "2048"
    end

    centos.vm.provision "shell", path: "provision.sh"
  end
end
#!/usr/bin/env bash

yum update -y && yum install -y epel-release vim

tee /etc /yum.repos.d/docker.repo <<-'EOF'
[dockerrepo]
name=Docker Repository
baseurl=https://yum.dockerproject.org/repo/main/centos/$releasever/
enabled=1
gpgcheck=1
gpgkey=https://yum.dockerproject.org/gpg
EOF

yum install -y docker-engine jq

systemctl enable docker
systemctl start docker

Instructions

# start VM via Vagrant
$ vagrant up

# SSH into VM via Vagrant
$ vagrant ssh

# check if API is enabled (optional)
$ docker -H=tcp://127.0.0.1:4243 images

Now we edit docker.service file. The path may be different!

# find docker.service file
$ systemctl status docker

# edit docker.service
$ vim /usr/lib/systemd/system/docker.service

...
[Service]
ExecStart=
ExecStart=/usr/bin/docker daemon -H fd:// -D -H tcp://127.0.0.1:4243
...

# reload and restart docker service
$ systemctl daemon-reload && systemctl restart docker

# test docker API again
$ docker -H=tcp://127.0.0.1:4243 version

Note: Be careful if you use tcp://0.0.0.0:4243 !!!!

# some tests with curl and jq on Docker Remote API
$ curl -X GET http://127.0.0.1:4243/version | jq .
$ curl -X GET http://127.0.0.1:4243/info | jq .DriverStatus
$ curl -X GET http://127.0.0.1:4243/networks | jq '.[0]'

Read the manual of jq, the power of curl and jq together is awesome.