Invalid MIT-MAGIC-COOKIE-1

Problem

After an OS update including a restart of the system, an error occurs with SSH X11 forwarding. Instead of displaying the windows as usual, “Invalid MIT-MAGIC-COOKIE-1” is displayed in the terminal.

Here is the example. I connect to the Ubuntu with my macOS and get the error message.

┌──[lupin@HackMac]::[~]
└─ % ssh -C4Y lupin@10.0.0.12

lupin@nano4gb:~$ xeyes
Invalid MIT-MAGIC-COOKIE-1 keyError: Can't open display: localhost:10.0
lupin@nano4gb:~$ exit

1st Quick and dirty solution

Since I’m on my own and relatively secure network, I leave XQuartz running in the background, disable access control, reconnect and everything works again.

┌──[lupin@HackMac]::[~]
└─ % xhost +
access control disabled, clients can connect from any host

┌──[lupin@HackMac]::[~]
└─ % ssh -C4Y lupin@10.0.0.12

lupin@nano4gb:~$ xeyes
lupin@nano4gb:~$ exit

This setting is (fortunately) only valid for this one session. As soon as I end the connection, restart XQuartz and establish a new SSH connection, the error message appears again. Anyway a not so nice solution!

2nd Quick and dirty solution

XQuartz offers the possibility to establish the connection without authentication. This solution is permanent and can be set up in the simplest way. Open the XQuartz settings and uncheck the respective checkbox.
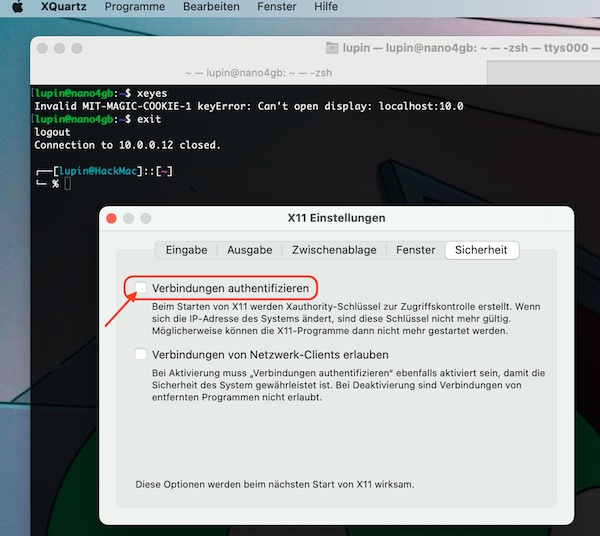
XQuartz X11 Settings

Restart XQuartz, establish a new connection.

┌──[lupin@HackMac]::[~]
└─ % xhost
access control enabled, only authorized clients can connect

┌──[lupin@HackMac]::[~]
└─ % ssh -C4Y lupin@10.0.0.12

lupin@nano4gb:~$ xeyes
lupin@nano4gb:~$ exit
example for xeyes

Now everything works as usual. But even with this solution I have my doubts! So I undo the setting and restart XQuartz.

3rd Quick and dirty solution

As described in the previous step, I undid the setting and restarted XQuartz. Additionally I allowed local connections in the access control.

┌──[lupin@HackMac]::[~]
└─ % xhost
access control enabled, only authorized clients can connect

┌──[lupin@HackMac]::[~]
└─ % xhost +local:
non-network local connections being added to access control list

┌──[lupin@HackMac]::[~]
└─ % ssh -C4Y lupin@10.0.0.12

lupin@nano4gb:~$ xeyes
lupin@nano4gb:~$ exit

This solution also works but is not permanent and not secure.

What now?

Searching the internet didn’t really help me. Some of the suggested solutions are total nonsense (or I completely misunderstand). I’ve also read the man pages where it even says that the environment variable $DISPLAY should not be changed. With me (also due to the ignorance on my part) the first signs of despair are appearing! Trust me, I deleted also all recommended files, what did not change this situation.

My final Solution

In the end my problem was very easy to solve! I still had entries from already deleted macports in the .zprofile file, which set the local environment variable $DISPLAY. With the restart of my macOS, this export of the environment variable became active again, of course.

┌──[lupin@HackMac]::[~]
└─ % echo $DISPLAY
:0

┌──[lupin@HackMac]::[~]
└─ % vim .zprofile

# I deleted all old macports entries

┌──[lupin@HackMac]::[~]
└─ % sudo reboot

The result after the restart.

┌──[lupin@HackMac]::[~]
└─ % echo $DISPLAY           
/private/tmp/com.apple.launchd.ASpxDkLA98/org.xquartz:0

┌──[lupin@HackMac]::[~]
└─ % ssh -C4Y lupin@10.0.0.12

lupin@nano4gb:~$ xeyes

Everything is all right again. Oh yeah… that was troubleshooting. The good thing is I learned a lot about xhost, xauth plus my own systems.
First steps with Jetson Nano 2GB Developer Kit (Part 3)

In the two previous steps you installed the Jetson nano operating system and installed the necessary hardware pereferie. In this part you will learn how to recognize faces in pictures. In addition, it is shown how to use this remote via SSH/X11 Forward (headless).

Note: If you like to use the GUI, you can jump directly to section “Python & OpenCV” and adapt necessary steps.

Preparation

Since I use macOS myself, this tutorial will also be based on this. If you are a user of another operating system, search the Internet for the relevant solution for the “Preparation” section. However, the other sections are independent of the operating system.

If you haven’t done it, install XQuartz on your macOS now. To do this, download the latest version (as DMG) from the official site and run the installation. Of course, if you prefer to use a package manager like Homebrew, that’s also possible! If you do not have to log in again automatically after the installation, carry out this step yourself! That’s pretty much it. It shouldn’t need anything other than starting XQuarts.

Now start the SSH connection to the Jetson Nano (while XQuarts is running in the background).

# connect via SSH
$ ssh -C4Y <user>@<nano ip>

X11 Forwarding

You might want to check your SSH configuration for X11 on the Jetson Nano first.

# verify current SSH configuration
$ sshd -T | grep -i 'x11\|forward'

Important are following setings x11forwarding yes, x11uselocalhost yes and allowtcpforwarding yes. If these values ​​are not set, you must configure them and restart the SSHD service. Normally, however, these are already preconfigured on latest Jetson Nano OS versions.

# edit configuration
$ sudo vim / etc /ssh/sshd_config

# restart service after changes
$ sudo systemctl restart sshd

# check sshd status (optional)
$ sudo systemctl status sshd

Note: The spaces between slashes and etc is wrong! But my provider does not allow the correct information for security reasons.

You may have noticed that you established the SSH connection with “-Y”. You can check that with the environment variable $DISPLAY.

# show value of $DISPLAY (optional)
$ echo $DISPLAY
localhost:10.0

Attention: If the output is empty, check all previous steps carefully again!

Python & OpenCV

Normally Python3.x and OpenCV already exist. If you also want to check this first, proceed as follows.

# verify python OpenCV version (optional)
$ python3
>>> import cv2
>>> cv2.__version__
>>> exit()

Then it finally starts. Now we develop the Python script and test with pictures whether we recognize the faces of people. If you don’t have any pictures of people yet, check this page. The easiest way is to downnload the images into the HOME directory. But you can also create your own pictures with the USB or CSI camera.

# change into home directory
$ cd ~

# create python script file
$ touch face_detection.py

# start file edit
$ vim face_detection.py

Here the content of the Python Script.

#!/usr/bin/env python3

import argparse
from pathlib import Path
import sys
import cv2

# define argparse description/epilog
description = 'Image Face detection'
epilog = 'The author assumes no liability for any damage caused by use.'

# create argparse Object
parser = argparse.ArgumentParser(prog='./face_detection.py', description=description, epilog=epilog)

# set mandatory arguments
parser.add_argument('image', help="Image path", type=str)

# read arguments by user
args = parser.parse_args()

# set all variables
IMG_SRC = args.image
FRONTAL_FACE_XML_SRC = '/usr/share/opencv4/haarcascades/haarcascade_frontalface_default.xml'

# verify files existing
image = Path(IMG_SRC)
if not image.is_file():
    sys.exit('image not found')

haarcascade = Path(FRONTAL_FACE_XML_SRC)
if not haarcascade.is_file():
    sys.exit('haarcascade not found')

# process image
face_cascade = cv2.CascadeClassifier(FRONTAL_FACE_XML_SRC)
img = cv2.imread(cv2.samples.findFile(IMG_SRC))
gray_scale = cv2.cvtColor(img, cv2.COLOR_BGR2GRAY)
detect_face = face_cascade.detectMultiScale(gray_scale, 1.3, 5)

for (x_pos, y_pos, width, height) in detect_face:
    cv2.rectangle(img, (x_pos, y_pos), (x_pos + width, y_pos + height), (10, 10, 255), 2)

# show result
cv2.imshow("Detection result", img)

# close
cv2.waitKey(0)
cv2.destroyAllWindows()

Hint: You may have noticed that we use existing XML files in the script. Have a look under the path, there are more resources.

# list all haarcascade XML files
$ ls -lh /usr/share/opencv4/haarcascades/

When everything is done, start the script include specifying the image arguments.

# run script
$ python3 face_detection.py <image>

# or with executable permissions
$ ./face_detection.py <image>

You should now see the respective results. With this we end the 3rd part. Customize or extend the script as you wish.

First steps with Jetson Nano 2GB Developer Kit (Part 1)

The Jetson Nano Developer Kits are awesome to start with artificial intelligence and machine learning. To make your learning more successful, I will use this tutorial to explain some first important steps before you start.

Requirements

The values ​​in brackets are intended to indicate the hardware I am using. However, you can use other compatible hardware. Before you buy, see the documentation provided by Nvidia. Here you will find also a page with many good information collected.

  • Jetson Nano Developer Kit (2GB with WiFi)
  • 5V Fan (NF-A4x20 5V PWM)
  • USB or CSI camera (Raspberry Pi Camera Module V2)
  • Power Supply (Raspberry Pi 15W USB-C Power Supply)
  • Micro SD Card (SanDisk microSDXC-Karte Ultra UHS-I A1 64 GB)

additional Hardware:

  • Monitor & HDMI cable
  • Mouse & Keyboard
  • USB cable (Delock USB 2.0-Kabel USB C – Micro-USB B 1 m)

Objective

The first part should provide information about needed parts to buy and describes the necessary installation (headless).

Installation

After downloading the SD card image (Linux4Tegra, based on Ubuntu 18.04), you can write it to the SD card immediately. Make sure to use the correct image in each case! Here a short overview about commands if you use a macOS.

# list all attached disk devices
$ diskutil list external | fgrep '/dev/disk'

# partitioning a disk device (incl. delete)
$ sudo diskutil partitionDisk /dev/disk<n> 1 GPT "Free Space" "%noformat%" 100%

# extract archive and write to disk device
$ /usr/bin/unzip -p ~/Downloads/jetson-nano-2gb-jp46-sd-card-image.zip | sudo /bin/dd of=/dev/rdisk<n> bs=1m

There is no automatic indication of the dd progress but you can press [control] + [t] while dd is running.

The setup and boot of the Jetson Nano could be done in two different ways (with GUI or Headless). In case you choose the headless setup, connect your computer with the Micro-USB port of the Jetson Nano and follow the next instructions.

# list serial devices (optional)
$ ls /dev/cu.usbmodem*

# list serial devices (long listing format)
$ ls -l /dev/cu.usbmodem*
crw-rw-rw-  1 root  wheel   18,  24 Dec  2 07:23 /dev/cu.usbmodem<n>

# connect with terminal emulation
$ sudo screen /dev/cu.usbmodem<n> 115200

Now you simply follow the initial setup steps and reboot the device after your finish.

Connect to WiFi

If you have not setup the WiFi on initial setup, you can connect again via serial interface and follow the next steps.

# connect with terminal emulation
$ sudo screen /dev/cu.usbmodem<n> 115200

# enable (if WiFi is disabled)
$ nmcli r wifi on

# list available WiFi's
$ nmcli d wifi list

# connect to WiFi
$ nmcli d wifi connect <SSID> password <password>

# show status (optional)
$ nmcli dev status

# show connections (optional)
$ nmcli connection show

Finally you can run the update and installation of needed additional packages.

# update packages
$ sudo apt update -y && sudo apt upgrade -y

# install packages (optional)
$ sudo apt install -y vim tree

From this point on, nothing should stand in the way of the SSH connection, provided you are in the same network.

# get IP (on Jetson device)
$ ip -4 a

# connect via SSH (example for local device)
┌──[lupin@HackMac]::[~]
└─ % ssh -C4 <user>@<ip>

In next Part 2 we will add the fan (incl. installation of needed software) and add the camera.

PyCharm CE remote execution

Since I’m back to develop more in Python and need to execute my Python scripts also on remote machines – I asked my self: “How can I do with PyCharm CE and without any Plugin?” The solution was very easy and this tutorial is about.

Requirements

  • VirtualBox VM (e.g. Linux Debian incl. user and ssh server configured)
  • PyCharm CE installed

Note: Of course you could also use any other option then a Debian vm. Just adapt the tutorial steps for your specific needs.

Objective

Use terminal and external tools of PyCharm CE to execute Python scripts on remote machines.

Introduction

For this tutorial I’m using a VirtualBox VM (Debian Linux) which do have only a NAT interface configured. So I need to enable Port-forwarding for SSH. If this is not the case for you – you can jump over to the section where I explain the important steps in PyCharm.

Analysis of stopped VM’s

As a first step I check my VM settings (just to verify).

# list all vm's (optional)
$ VBoxManage list vms

# list all vm's and grep for name & nic rules
$ VBoxManage list -l vms | grep -i "Name:\|NIC 1 Rule"

Analysis of running VM’s

I don’t know the IP – so I do start the VM and check their all settings.

# start specific vm
$ VBoxManage startvm "Debian" --type headless

# list all running vm's (optional)
$ VBoxManage list runningvms

# list all running vm's and grep for name & nic rules (optional)
$ VBoxManage list runningvms -l | grep -i "Name:\|NIC Rule"

# list specific vm Nic informations (optional)
$ VBoxManage showvminfo "Debian" | grep -i "NIC"

# get IPv4 information of specific vm
$ VBoxManage guestproperty get "Debian" "/VirtualBox/GuestInfo/Net/0/V4/IP"

Add Port-forwarding

Now I know the IP (which in my case will not change) and can enable the Port-forwarding for SSH easily.

# shutdown specific vm
$ VBoxManage controlvm "Debian" poweroff

# add port-forwarding rule to specific vm
$ VBoxManage modifyvm "Debian" --natpf1 "SSH-PW,tcp,127.0.0.1,2222,10.0.2.15,22"

# list specific vm Nic informations (optional)
$ VBoxManage showvminfo "Debian" | grep -i "NIC 1 Rule"

# start specific vm
$ VBoxManage startvm "Debian" --type headless

# test ssh connection (optional)
$ ssh -p 2222 lupin@127.0.0.1 -v -C 'whoami && exit'

Note: On my VM (Debian) the user is named “lupin” this will be different for you! Also Openssh-server is enabled and I added my public ssh key on VM (authorized_keys).

PyCharm remote execution

As I also like and use the feature “scratches” of PyCharm, I will show first the remote execution of these files.

Prepare a scratch

I prepare a simple Python script scratch, which just prints out environment variables (same code I use later inside project example).

import os

print('hello world', os.environ)

To find the absolute path for my scratch.py – I run it. On terminal the path will be visible.

PyCharm run scratches

After I know the path I run some simple commands in PyCharm Terminal.

# execute local script via SSH on remote system
$ ssh -p 2222 user@127.0.0.1 -C "/usr/bin/python" < "path/to/scratches/scratch.py"

# same as above but with unbuffered binary stdout and stderr
$ ssh -p 2222 user@localhost -C "/usr/bin/python" -u - < "./test_remote.py"

It works perfectly fine.

Note: Please replace the value “user” in all ssh examples!

PyCharm CE remote scratch execution

Project files

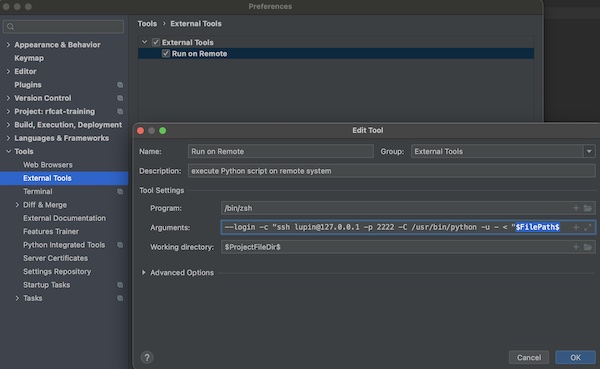
For all other scripts in the PyCharm project I don’t want to type the terminal commands always! So I’m using the feature “External Tools”. To do so, I add a new item and use the built-in variables (Macros) of PyCharm.

PyCharm CE add external tool

You simply give a Name Run on Remote, optional a short description, for Program your shell /bin/zsh and on Arguments --login -c "ssh user@localhost -p 2222 -C /usr/bin/python -u - < "$FilePah$. If you press button “OK” the input will be saved. The value for Working Directory $ProjectFileDir$ will be set (normally) automatically.

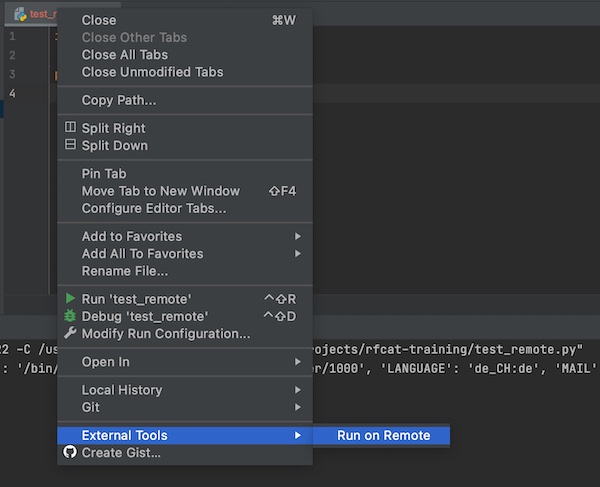
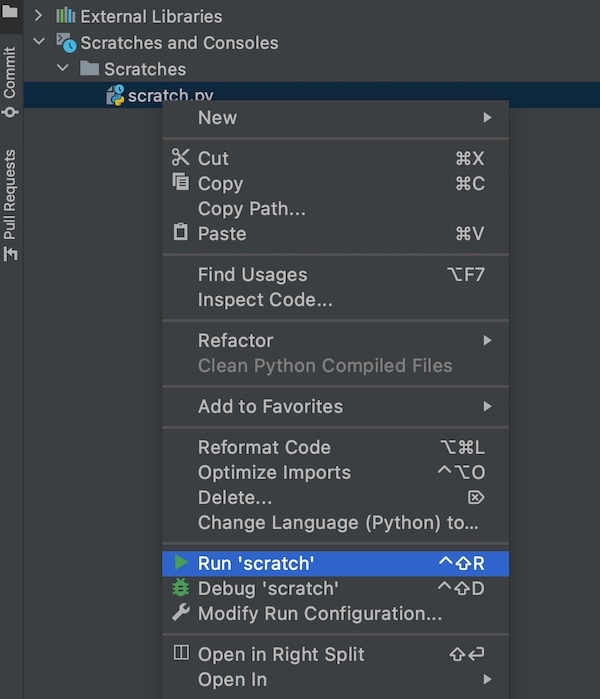
Now you can use the context menu to execute your script over SSH on remote machine.

PyCharm CE external tool remote execution

macOS internet connection and service order

Many times I’v got asked (directly, via messages or forums) why the macOS internet connection does not work anymore, while using devices like Shark Jack, O.MG Cable and so on. In my tutorials I also did not mention this in detail, because I assumed this should be clear. A big mistake from my side. Therefore now this article. I will now do my best to explain, using a few examples, how to prioritize the services so that you do not lose your internet connection from your macOS. I will use the internet connection via Wifi hotspot.

Note: I show here an specific example for Shark Jack now. But main target is that you understand and can reuse your knowledge also for different other situations.

Network locations

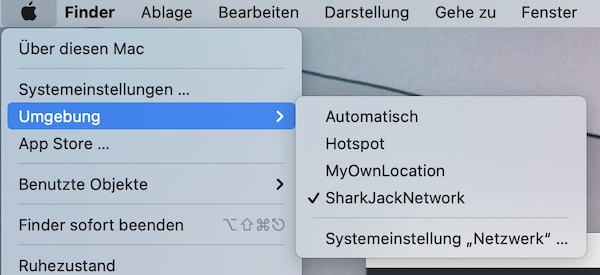
The first part is about macOS network locations. To not destroy your current settings, we will create a new network location (all via command line).

Warning: The following steps will disconnect your internet connection (briefly), because the new created network location is not populated. Read the tutorial carefully before you execute any command!

# list all network locations
$ networksetup -listlocations

# show name of the current location
$ networksetup -getcurrentlocation

# create new location (SharkJackNetwork)
$ networksetup -createlocation SharkJackNetwork

# change location
$ networksetup -switchtolocation SharkJackNetwork

# lists network interfaces (should be empty)
$ networksetup -listallnetworkservices

Services

The newly created network location does not contain any service now. In the next second part we create two (Wifi and Bluetooth), set own DNS server and test. If you have stored your Wifi credentials (see Keychain Access.app), the internet connection will automatically established again.

# list all hardware ports with corresponding device name and port
$ networksetup -listallhardwareports

# create WI-FI service (named WLAN)
$ networksetup -createnetworkservice WLAN "WI-FI"

# create Bluetooth PAN service (named Bluetooth)
$ networksetup -createnetworkservice Bluetooth "Bluetooth PAN"

# lists network interfaces (WLAN and Bluetooth)
$ networksetup -listallnetworkservices

# add dns server (to WLAN)
$ networksetup -setdnsservers WLAN 8.8.8.8 8.8.4.4

# verify DNS settings (optional)
$ dig +all example.com

My MacBook Pro does not provide an RJ45 interface (only USB-C). Therefore I buyed a Multi-Port-Adapter from Satechi. After plug in, I add this device now to my services. There are many other vendors as well, for such please choose your own name.

# list all hardware ports with corresponding device name and port
$ networksetup -listallhardwareports

# create adapter service (named Satechi)
$ networksetup -createnetworkservice Satechi "USB 10/100/1000 LAN"

Now it’s time to use Shark Jack. Turn it on (arming mode), plug into adapter, wait for IP and test. If you haven’t changed it, the default IP is “172.16..24.1”, the user is “root” and password is “hak5shark”.

# wait for IP
$ ifconfig en8

# run command over SSH
$ ssh -C4 root@172.16.24.1 -C 'pwd'

# ping google dns
$ ping -c 1 google.com

The internet connection is not working anymore but Wifi seems working correctly!

Service order

Now it comes to the order of all services (prioritization). Here we ensure that internet connection works again.

# show services in the order they are contacted for a connection
$ networksetup -listnetworkserviceorder

# command to designate the order network services are contacted
$ networksetup -ordernetworkservices WLAN Satechi Bluetooth

# ping google dns
$ ping -c 1 google.com

All good now … The newly created network location (incl. services) can be used as soon you develop your Shark Jack payloads. Specific to your environment needs, you can create and use many of these network locations (to quickly switch between).

macOS network locations via gui

First steps with Shark Jack

After you receive your new Shark Jack device from Hak5, you need to upgrade the Firmware. This tiny tutorial will guide you through the process. You should plan a maximum of 10 minutes of your life for this action.

Preparation

Enable the Arming mode (middle switch position) and connect with your RJ45 interface, also connect USB-C for charging. Do not stop charging while the whole upgrade process! In case your local device does not provide such interface, I have really good experience with the multiport adapter from SATECHI.

Download and install latest Firmware

The default settings for your new Shark Jack are:

  • IP: 172.16.24.1 (Arming mode)
  • User: root
  • Password: hak5shark

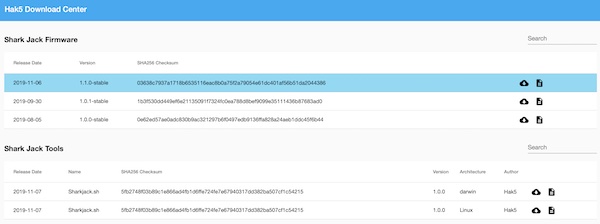
Download latest Shark Jack Firmware from here.

Hak5  Download Center - SharkJack
# download Firmware (via command line)
$ curl -L -C - https://downloads.hak5.org/api/devices/sharkjack/firmwares/1.1.0-stable -o ~/Downloads/upgrade-1.1.0.bin

# verify SHA256 checksum (optional)
$ shasum -a 256 ~/Downloads/upgrade-1.1.0.bin

# copy Firmware from local to Shark Jack device
$ scp -C4 ~/Downloads/upgrade-1.1.0.bin root@172.16.24.1:/tmp/

# SSH into SharkJack device
$ ssh -C4 root@172.16.24.1

# list directory content (optional)
root@shark:~# ls -la

# show current version
root@shark:~# cat VERSION
1.0

# start update
root@shark:~# sysupgrade -n /tmp/upgrade-1.1.0.bin

Now be patient and do not remove the Shark Jack from RJ45 or the USB-C for charging! The device installs the new firmware and reboots. For me it was around 3 – 4 minutes.

# check interface status (optional)
$ ifconfig

# SSH into Shark Jack device
$ ssh -C4 root@172.16.24.1

# show current version
root@shark:~# cat VERSION
1.1.0

That’s it … have fun and success.

Wifi Pineapple, tcpdump and Wireshark

Your Wifi Pineapple is up and running and some connected clients produce a lot of network traffic. What also means half of your MITM work is already done. 😉 Without any additional module you can already analys this traffic with tcpdump, which is installed by default. In combination with Wireshark (SSH Remote Capture) you can reach awesome goals.

Objectives

In this tutorial I will explain how easy you can obtain important network information via your MITM attack with tcpdump and/or Wireshark.

Step 1: some preparation first

Start the Wifi Pineapple, enable Internet sharing and verify your configurations. Without internet sharing your wifi clients don’t produce valuable traffic! In previous tutorials about Wifi Pineapple I wrote down two options how you can share internet on macOS (here and here you will find them).

Step 2: add an station (STA) to access point (AP)

For next step it’s needed to understand your network interfaces. On all Pineapple devices (Nano/Tetra) you have 2 WLAN interfaces -> wlan0 and wlan1 (inclusiv some other eq eth). Of course tcpdump would analyze the traffic for all interfaces but to be more precise and correct you should sniff packets on specific interface. So depended how an AP is created (open or FakeAP) and an STA is connected you need to decide on which interface you will work (wlan0 or wlan1mon).

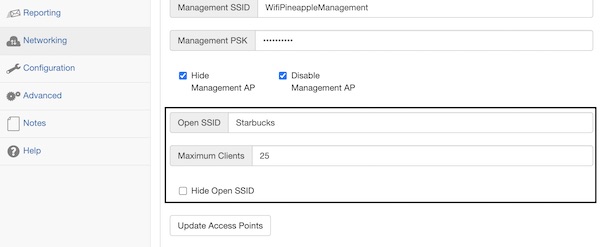
For this example I will not create a fake AP (wlan1mon), I simply use the Open SSID (under menu item Networking). The SSID of my choise is Starbucks.

Open SSID configuration on Wifi Pineapple

As a STA I choose my own iPad (172.16.42.187).

iPad client on WiFi Pineapple

As I am mostly trust nothing, I can verify simply (ifconfig on Wifi Pineapple).

# get interface status (optional)
$ ssh -C4 root@172.16.42.1 "ifconfig"
wlan0     Link encap:Ethernet  HWaddr 00:13:37:A7:A3:3D  
          inet6 addr: fe80::213:37ff:fea7:a33d/64 Scope:Link
          UP BROADCAST RUNNING MULTICAST  MTU:1500  Metric:1
          RX packets:334 errors:0 dropped:0 overruns:0 frame:0
          TX packets:479 errors:0 dropped:0 overruns:0 carrier:0
          collisions:0 txqueuelen:1000
          RX bytes:36864 (36.0 KiB)  TX bytes:58796 (57.4 KiB)

wlan1     Link encap:Ethernet  HWaddr 00:13:37:A7:A3:3E  
          UP BROADCAST MULTICAST  MTU:1500  Metric:1
          RX packets:0 errors:0 dropped:0 overruns:0 frame:0
          TX packets:0 errors:0 dropped:0 overruns:0 carrier:0
          collisions:0 txqueuelen:1000
          RX bytes:0 (0.0 B)  TX bytes:0 (0.0 B)

Step 3: analys traffic with tcpdump

Our tcpdump examples will be executed directly on the Pineapple device, therefore please SSH into it.

# ssh into Pineapple
$ ssh -C4 root@172.16.42.1

The following tcpdump examples will help you to understand the basics. In case you need a deeper explanation about the commands use this free online service.

# show DNS traffic
$ tcpdump -i wlan0 -nn -l udp port 53

# show HTTP User Agent and Hosts
$ tcpdump -i wlan0 -nn -l -A -s1500 | egrep -i 'User-Agent:|Host:'

# show HTTP requests and Hosts
$ tcpdump -i wlan0 -nn -l -s 0 -v | egrep -i "POST /|GET /|Host:"

# show e-mail recipients
$ tcpdump -i wlan0 -nn -l port 25 | egrep -i 'MAIL FROM\|RCPT TO'

# show FTP data
$ tcpdump -i wlan0 -nn -v port ftp or ftp-data

# show all passwords different protocols
$ tcpdump -i wlan0 port http or port ftp or port smtp or port imap or port pop3 or port telnet -l -A | egrep -i -B5 'pass=|pwd=|log=|login=|user=|username=|pw=|passw=|passwd=|password=|pass:|user:|username:|password:|login:|pass |user '

Step 4: analys traffic with Wireshark

As disk space and hardware resources are not that high on Pineapple devices, why not use local Wireshark and analyze the traffic via remote?

In case you don’t have Wireshark already installed, now it will be the best time for it. Otherwise you can’t follow now this last part now.

To start tcpdump and Wireshark only a single one-liner is needed. Note: The Wireshark path I use in the example, is only for macOS!

# start tcpdump via SSH and Wireshark remote capture
$ ssh root@172.16.42.1 'tcpdump -i wlan0 -s0 -nn -w - not port 22' | /Applications/Wireshark.app/Contents/MacOS/Wireshark -k -i -

Here now some examples for Wireshark display filters.

Wireshark display filter for DNS

DNS queries and specific IP (STA)

(dns.flags.response == 0) && (ip.src == 172.16.42.187)

DNS responses and specific IP (STA)

(dns.flags.response == 1) && (ip.src == 172.16.42.187)

All HTTP requests

http.request

All HTTP responces and HTTP status code 200

(http.response) && (http.response.code == 200)

As you can see now, for such network analytics no additional Wifi Pineapple modules are required. What does not mean that I don’t like them.

Get IP of headless Virtualbox VM

This short article will describe how you will get quickly the IP for an headless running Virtualbox VM. For demonstration purpose, I have assigned an “Bridged Interface” on NIC 1. So the IP is dynamically allocated (IP address is being assigned by DHCP).

# start VM headless (if not running)
$ VBoxManage startvm --type headless "vm name"

# check VM state (optional)
$ VBoxManage showvminfo "vm name" | grep "State"

# show IP
$ VBoxManage guestproperty get "vm name" "/VirtualBox/GuestInfo/Net/0/V4/IP"
...
Value: 172.20.10.6
...

That was super easy … now you can connect via SSH (if SSH service is running).

# start SSH connection
$ ssh -C4 remote_user@172.20.10.6