HAR with Python WebDriver and BrowserMob Proxy

This time is shown how to automate performance test for web sites. Tools in usage are Python Selenium WebDriver and BrowserMob proxy. The results are HAR files which can be viewed in HAR Viewer.

Precondition

  • JAVA installed
  • Python Packages for selenium and browsermob-proxy
selenium
browsermob-proxy

Preparation

Download BrowserMob Proxy and check if proxy can started by command-line.

# change to 
$ cd browsermob-proxy-2.1.0-beta-1/bin/

# start proxy on port 9090
$ ./browsermob-proxy -port 9090

Create Python Class

#!/usr/bin/env python
# -*- coding: utf-8 -*-
"""Python - BrowserMob - WebDriver"""
from browsermobproxy import Server
from selenium import webdriver
import json


class CreateHar(object):
    """create HTTP archive file"""

    def __init__(self, mob_path):
        """initial setup"""
        self.browser_mob = mob_path
        self.server = self.driver = self.proxy = None

    @staticmethod
    def __store_into_file(title, result):
        """store result"""
        har_file = open(title + '.har', 'w')
        har_file.write(str(result))
        har_file.close()

    def __start_server(self):
        """prepare and start server"""
        self.server = Server(self.browser_mob)
        self.server.start()
        self.proxy = self.server.create_proxy()

    def __start_driver(self):
        """prepare and start driver"""
        profile = webdriver.FirefoxProfile()
        profile.set_proxy(self.proxy.selenium_proxy())
        self.driver = webdriver.Firefox(firefox_profile=profile)

    def start_all(self):
        """start server and driver"""
        self.__start_server()
        self.__start_driver()

    def create_har(self, title, url):
        """start request and parse response"""
        self.proxy.new_har(title)
        self.driver.get(url)
        result = json.dumps(self.proxy.har, ensure_ascii=False)
        self.__store_into_file(title, result)

    def stop_all(self):
        """stop server and driver"""
        self.server.stop()
        self.driver.quit()


if __name__ == '__main__':
    path = "browsermob-proxy-2.1.0-beta-1/bin/browsermob-proxy"
    RUN = CreateHar(path)
    RUN.start_all()
    RUN.create_har('google', 'http://google.com')
    RUN.create_har('stackoverflow', 'http://stackoverflow.com')
    RUN.stop_all()

Note: The highlighted line must contain the path to BrowserMob Proxy!
Happy testing! If you use PhantomJS instead of Firefox, you can use this on Build server like Jenkins/Hudson and so on, too.
UI testing with DalekJS and PhantomJS on CentOS

With DalekJS you can automate your functional GUI tests very easy. This article describe how to prepare the test environment on CentOS.

Setup

First, the necessary packages are installed.

# install EPEL (Extra Packages for Enterprise Linux)
$ yum install -y epel-release

# check repositories
$ yum repolist

# update all
$ yum -y update

# install packages
$ yum install -y vim nodejs npm bzip2 freetype fontconfig

# check versions of nodejs and npm
$ node --version
$ npm --version

# change to tmp folder
$ cd /tmp/

# download PhantomJS and unzip
$ curl -O https://phantomjs.googlecode.com/files/phantomjs-1.9.2-linux-x86_64.tar.bz2
$ tar xvf phantomjs-1.9.2-linux-x86_64.tar.bz2

# copy binary, delete unneeded files and check version
$ cp phantomjs-1.9.2-linux-x86_64/bin/phantomjs /usr/local/bin/
$ rm -fr phantomjs-1.9.2-linux-x86_64
$ rm -f phantomjs-1.9.2-linux-x86_64.tar.bz2
$ phantomjs --version

# install dalek-cli (global) and check version
$ npm install dalek-cli -g
$ dalek --version

It is also possible to compile PhantomJS itself, but this takes a lot of time.

PrepareĀ test project

Once all is installed without any issues you can start to create the test project.

# change to home folder
$ cd ~/

# create project folder and change into
$ mkdir DalekTest && cd DalekTest

# create package.json interactively
$ npm init

# install dalekjs on project
$ npm install dalekjs --save-dev

Create test case

Now it is time for the first Test Case. I have used the example from Dalek website.

# create test case file
$ touch test_title.js

# insert content
$ vim test_title.js
module.exports = {'Page title is correct': function (test) {
  test
    .open('http://google.com')
    .assert.title().is('Google', 'It has title')
    .done();
  }
};

Run test

By default DalekJS use PhantomJS as browser. For running the test case simple use dalek command and as argument the test case file (*.js).

# run test case
$ dalek test_title.js

Full webpage screenshot

For various reasons screenshots for webpages are needed. If automated test scripts fail, documentations must be created or in some other situations. With PhantomJS it is very easy to create these screenshots very fast by command-line. All what is needed a small JavaScript like this.

JavaScript

var phantom;
var console;
var system = require('system');
var fs = require('fs');
var page = require('webpage').create();

var Info = {
	isDate: function () {
		'use strict';
		var mydate = new Date().toDateString();
		return mydate;
	},
	isTime: function () {
		'use strict';
		var mytime = new Date().getTime();
		return mytime;
	}
};

var Target = {
	isLocation: function () {
		'use strict';
		var args = system.args,
		    mylocation = 'http://google.com';
		if (args.length > 1) {
			mylocation = system.args[1];
			console.log('[LOG] use argument location');
		} else {
			console.log('[LOG] use default location');
		}
		return mylocation;
	},
	isSaveFolder: function () {
		'use strict';
		var folder = 'log';
		if (!fs.exists(folder)) {
			console.log('[LOG] creat directory ' + folder);
			fs.makeDirectory(folder);
		}
		if (!fs.isWritable(folder)) {
			console.error('[LOG] ' + folder + ' is not writable!');
			phantom.exit(1);
		}
		return folder;
	}
};

page.open(Target.isLocation(), function (status) {
	'use strict';
	switch (status) {
	case 'success':
		console.log('[LOG] page open successfully' + Info.isDate());
		var folder = Target.isSaveFolder();
		page.render(folder + fs.separator + Info.isTime() + '.png');
		phantom.exit(0);
		break;
	case 'fail':
		console.error('[LOG] page not open successfully');
		phantom.exit(1);
		break;
	default:
		console.error('[LOG] fail to open with unknown status:' + status);
		phantom.exit(1);
		break;
	}
});

After save the script you can run it like:

# screenshot of softwaretester.info
$ phantomjs screenshot.js "http://softwaretester.info"

Run your Python Selenium tests headless

This time i show you the headless testing with Selenium WebDriver and PhantomJS. This method can be used for example on continuous integration systems.

Install PhantomJS

Follow the documentation on PhantomJS website or as Mac OS X user simply use Mac Ports.

# on Mac OS X
$ sudo port install PhantomJS

# check version
$ phantomjs --version

Create a tiny test script

#!/usr/bin/env python
import unittest
from selenium import webdriver


class SearchContentOnWebsite(unittest.TestCase):

    def setUp(self):
        # create a new PhantomJS session
        self.driver = webdriver.PhantomJS()
        self.driver.set_window_size(800, 600)
        self.driver.get("http://softwaretester.info")

    def test_search_headline(self):
        title = 'This will fail | - Softwaretester -'
        assert title in self.driver.title

    def tearDown(self):
        self.driver.close()

if __name__ == "__main__":
    unittest.main(verbosity=2)

Just create a instance of PhantomJS WebDriver and run you tests. That is all! šŸ˜‰

Start with Python and Selenium WebDriver

This introduction should give you some hints about Python and Selenium WebDriver. I will use this in following tutorials as a base.

Preconditions

  • Python installed
  • pip (package manager) installed
  • Editor or IDE installed

Preparation

As first step simply install or upgrade the Selenium package.

# install or upgrade selenium
$ pip install -U selenium

# get information about package
$ pip show selenium

This is a fairly simple process. After the successful command execution you will have the Selenium WebDriver client library on your machine with all that is needed to create automated scripts.

The first script

Now start using the unittest library. The script comments help to describe the code.

#!/usr/bin/env python
import unittest
from selenium import webdriver


class SearchContentOnWebsite(unittest.TestCase):
    """define a class that inherits the TestCase class"""

    def setUp(self):
        """perform some tasks at the start of each test"""
        # create a new Firefox session
        self.driver = webdriver.Firefox()
        # wait for a certain amount of time
        self.driver.implicitly_wait(30)
        # maximize browser window
        self.driver.maximize_window()
        # navigate to the start URL
        self.driver.get("http://softwaretester.info")

    def test_search_headline(self):
        """a very simple test case"""
        link_text = 'Modern Status Plugin'
        title = 'Jenkins - Modern Status Plugin | - Softwaretester -'
        # find a element with partial text
        elem = self.driver.find_element_by_partial_link_text(link_text)
        # click element
        elem.click()
        # assert that title have value
        assert title in self.driver.title

    def tearDown(self):
        """method to clean up any initialized values after the test"""
        # close the browser window
        self.driver.close()

if __name__ == "__main__":
    unittest.main(verbosity=2)

Run Test

To run the test simple call your script.

./my_first_test.py

# or
python my_first_test.py

CSSLint with Grunt on Debian

This tutorial gives an tiny insight into CSSLint with Grunt on Debian. After that you should be able, to implement more Grunt tasks for your project.

Installation

As root or sudo user install needed packages!

# update your system
$ apt-get update && apt-get upgrade

# install nodejs and npm
$ apt-get install -y nodejs-legacy npm

# install grunt-cli (global)
$ npm install -g grunt-cli

Check the installation of all needed tools.

# show different versions
$ nodejs --version
$ npm --version
$ grunt --version

Create a new project

As “normal” user create a new project and install the needed plugin.

# create new folder
$ mkdir TestProject

# change directory
$ cd TestProject/

# interactively create a package.json file
$ npm init

# install the csslint plugin
$ npm install grunt-contrib-csslint --save-dev

If no problems occurred, the package.json file should look like:

{
  "name": "TestProject",
  "version": "0.0.1",
  "description": "my example project",
  "main": "index.js",
  "scripts": {
    "test": "echo \"Error: no test specified\" && exit 1"
  },
  "author": "lupin3000",
  "license": "ISC",
  "devDependencies": {
    "grunt": "^0.4.5", "grunt-contrib-csslint": "^0.4.0"
  }
}

Create a css folder and a css file with some mistakesĀ like:

$ mkdir css
$ vim css/example.css

The example.css file contains some issues!

html, body {
  margin: 0;
  padding: 0 
  borde: 0;
}

In the last step we create the Gruntfile.js

# create Gruntfile.js
$ vim Gruntfile.js
module.exports = function(grunt) {
  grunt.initConfig({
    csslint: {
      // define the files to lint
      files: ['css/*.css'],
      strict: {
        options: {
          "import": 2
        }
      }
    }
  });
  grunt.loadNpmTasks("grunt-contrib-csslint");
};

Thats all, now run just the command and see the results.

# run csslinter
$ grunt csslint

Sass, Compass and Jenkins

This tutorial shows how Sass, Compass and Jenkins working together in very easy way. The goal is that Jenkins created the CSS from SCSS files.

Precondition

  • Jenkins installed
  • Ruby installed

Steps

In first step we need toĀ install Sass and Compass on the clients (Developer engines) and build server (Jenkins).

# check for installed libraries
$ gem list

# update gem`s
$ sudo gem update --system

# install sass and compass libraries
$ sudo gem install sass
$ sudo gem install compass

Now we create on one client the project.

# change to specific folder
$ cd ~/path/to/folder

# create compass project
$ compass create --bare --sass-dir "sass" --css-dir "css" --javascripts-dir "js" --images-dir "img"

# create folders
$ mkdir img js css sass/partials

# create files
$ touch index.html js/main.js sass/style.scss sass/partials/_reset.scss sass/partials/_content.scss

Now add and edit some content to the files with your favorite editor and commit all to your repository. The content for the tutorial looks like this:

require 'compass/import-once/activate'
# Require any additional compass plugins here.

# Set this to the root of your project when deployed:
http_path = "/"
css_dir = "css"
sass_dir = "sass"
images_dir = "img"
javascripts_dir = "js"

# You can select your preferred output style here (can be overridden via the command line):
output_style = :compressed

# To enable relative paths to assets via compass helper functions. Uncomment:
# relative_assets = true

# To disable debugging comments that display the original location of your selectors. Uncomment:
line_comments = false


# If you prefer the indented syntax, you might want to regenerate this
# project again passing --syntax sass, or you can uncomment this:
# preferred_syntax = :sass
# and then run:
# sass-convert -R --from scss --to sass sass scss && rm -rf sass && mv scss sass
<!doctype html>
<head>
	<title>Lorem ipsum</title>
	<meta charset="utf-8">
	<meta name="viewport" content="width=device-width">
	<link rel="stylesheet" href="css/styles.css">
</head>
<body>
	<header>
		Header Content
	</header>
	<div id="wrapper">
		<h1>Lorem ipsum</h1>
		<article>
			<section>
				<h2>Lorem ipsum</h2>
				<p>Lorem ipsum dolor sit amet</p>
			</section>
			<section>
				<h2>Lorem ipsum</h2>
				<p>Lorem ipsum dolor sit amet</p>
			</section>
		</article>
	</div>
	<footer>
		Footer Content
	</footer>
	<script src="js/main.js"></script>
</body>
</html>
@import "compass";
@import "partials/reset";
@import "partials/content";
html, body, div, span, applet, object, iframe, h1, h2, h3, h4, h5, h6, p, blockquote, pre, a, abbr, acronym, address, big, cite, code, del, dfn, em, img, ins, kbd, q, s, samp, small, strike, strong, sub, sup, tt, var, b, u, i, center, dl, dt, dd, ol, ul, li, fieldset, form, label, legend, table, caption, tbody, tfoot, thead, tr, th, td, article, aside, canvas, details, embed, figure, figcaption, footer, header, hgroup, menu, nav, output, ruby, section, summary, time, mark, audio, video {
	margin: 0;
	padding: 0;
	border: 0;
	font-size: 100%;
	font: inherit;
	vertical-align: baseline;
}
article, aside, details, figcaption, figure, footer, header, hgroup, menu, nav, section {
	display: block;
}
body {
	line-height: 1;
}
ol, ul {
	list-style: none;
}
blockquote, q {
	quotes: none;
}
blockquote:before, blockquote:after, q:before, q:after {
	content: '';
	content: none;
}
table {
	border-collapse: collapse;
	border-spacing: 0;
}
$color_001: #000000; // Black
$color_002: #FFFFFF; // White
$color_003: #FF0000; // Red

body {
	color: $color_002;
	background-color: $color_001;
}

Okay… now lets go to Jenkins. Here we create a new “Freestyle Job” and configure theĀ Source-Code-Management and insert the following command into “Execute Shell”

rm -fr ${WORKSPACE}/css
compass compile

Thats it… after running the build into the workspace you should see the folder “css” and a file “style.css” the content should look like:

html,body,div,span,applet,object,iframe,h1,h2,h3,h4,h5,h6,p,blockquote,pre,a,abbr,acronym,address,big,cite,code,del,dfn,em,img,ins,kbd,q,s,samp,small,strike,strong,sub,sup,tt,var,b,u,i,center,dl,dt,dd,ol,ul,li,fieldset,form,label,legend,table,caption,tbody,tfoot,thead,tr,th,td,article,aside,canvas,details,embed,figure,figcaption,footer,header,hgroup,menu,nav,output,ruby,section,summary,time,mark,audio,video{margin:0;padding:0;border:0;font-size:100%;font:inherit;vertical-align:baseline}article,aside,details,figcaption,figure,footer,header,hgroup,menu,nav,section{display:block}body{line-height:1}ol,ul{list-style:none}blockquote,q{quotes:none}blockquote:before,blockquote:after,q:before,q:after{content:'';content:none}table{border-collapse:collapse;border-spacing:0}body{color:#fff;background-color:#000}


Publish continuous integration status on Desktop

In one of my last tutorials, i show how to develop test tools for software tester with Python. Now i will show you, how to publish continuous integration status information for other team members like Scrum master, Product owner or Test manager.

Preconditions

Note

If you don`t have Jenkins or Hudson running, search some public services with Google!

Example:Ā inurl:8080 intitle:”Dashboard [Jenkins]”

Steps

Create a python script like this:

#!/usr/bin/env python
#  -*- coding: utf-8 -*-

import ast
import urllib


class JenkinsAPI(object):

    api = "/api/python?depth=1&tree=jobs[displayName,lastBuild[result]]"

    def __init__(self):
        self.url = 'http://masi.vuse.vanderbilt.edu:8080/jenkins/'

    def _get_status(self):
        xml_input_no_filter = ast.literal_eval(
            urllib.urlopen(self.url + self.api).read()
        )
        all_jobs = xml_input_no_filter['jobs']
        return all_jobs

    def show_results(self):
        job = self._get_status()
        fail = [row for row in job if 'SUCCESS' != row['lastBuild']['result']]
        passed = len(job) - len(fail)
        print "Jenkins: %s" % self.url
        print "Jobs: %s - Successful: %s - Failed: %s" % (
            len(job), passed, len(fail)
        )
        if len(fail) > 0:
            for (i, item) in enumerate(fail):
                print " > Job: %s - %s" % (
                    item['displayName'], item['lastBuild']['result']
                )
            del i


if __name__ == '__main__':
    RUN = JenkinsAPI()
    RUN.show_results()

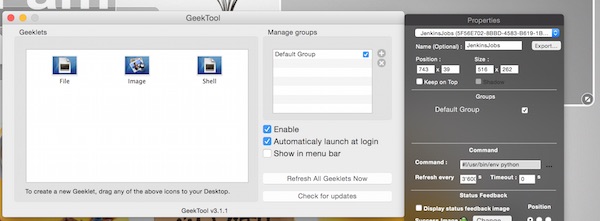
Now start GeekTool and create a new Geeklet. Drag a Shell Geeklet on you Desktop. Now insert values for name, size, set colors and so on and add the python script on “Command”.

Create Geeklet

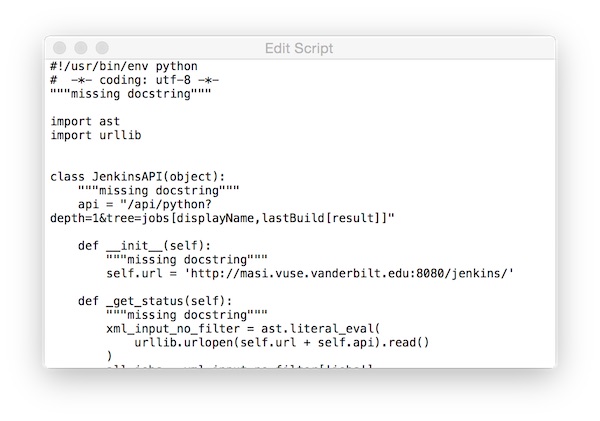
… the script.

Geeklet Command

Thats it! Now you can export the Geeklet and share it with you team members. My current screen looks like:

Geeklet result