Apache Guacamole

Apache Guacamole … What is it about? It’s a client-less remote gateway for Telnet, SSH, RDP and VNC. Client-less, because there is no need to install any plugin or additional software for users (clients). The client will use just the browser (also without any plugin). In this tutorial we will create a very simple environment via Vagrant and use Guacamole. Why the tutorial? Because I know a lot of testers for example – who work with Windows, who are not allowed to install any software (eq Putty) but still need access to environments. … Next point are for example public security groups on cloud providers. Here only one port would be needed to support different protocols on different hosts (incl. file transfer).

What we need?

Project preparation

# create project
$ mkdir -p ~/Projects/Guacamole/src

# change directory
$ cd ~/Projects/Guacamole/

# create needed files in root folder
$ touch {Vagrantfile,ShellProvisioner.sh}

# create needed files in root folder
$ touch ./src/{guacamole.properties,server.xml,user-mapping.xml,Xwrapper.config}

# show project (optional)
$ tree ~/Projects/Guacamole/
|____src
| |____guacamole.properties
| |____server.xml
| |____user-mapping.xml
| |____Xwrapper.config
|____ShellProvisioner.sh
|____Vagrantfile

Okay, via your favorite editor you now add the content of all files. All files inside directory “src” are configuration files (installed on Guacamole host).

# Hostname and port of guacamole proxy
guacd-hostname:      localhost
guacd-port:          4822
available-languages: en, de

auth-provider: net.sourceforge.guacamole.net.basic.BasicFileAuthenticationProvider
basic-user-mapping: /etc/guacamole/user-mapping.xml
<?xml version="1.0" encoding="UTF-8"?>
<Server port="-1" shutdown="SHUTDOWN">
  <Listener className="org.apache.catalina.startup.VersionLoggerListener" />
  <Listener className="org.apache.catalina.core.AprLifecycleListener" SSLEngine="on" />
  <Listener className="org.apache.catalina.core.JreMemoryLeakPreventionListener" />
  <Listener className="org.apache.catalina.mbeans.GlobalResourcesLifecycleListener" />
  <Listener className="org.apache.catalina.core.ThreadLocalLeakPreventionListener" />
  <GlobalNamingResources>
    <Resource name="UserDatabase" auth="Container"
              type="org.apache.catalina.UserDatabase"
              description="User database that can be updated and saved"
              factory="org.apache.catalina.users.MemoryUserDatabaseFactory"
              pathname="conf/tomcat-users.xml" />
  </GlobalNamingResources>
  <Service name="Catalina">
    <Connector port="55555" protocol="HTTP/1.1"
               connectionTimeout="20000"
               redirectPort="8443" />
    <Engine name="Catalina" defaultHost="localhost">
      <Realm className="org.apache.catalina.realm.LockOutRealm">
        <Realm className="org.apache.catalina.realm.UserDatabaseRealm"
               resourceName="UserDatabase"/>
      </Realm>
      <Host name="localhost"  appBase="webapps"
            unpackWARs="true" autoDeploy="true">
        <Valve className="org.apache.catalina.valves.AccessLogValve" directory="logs"
               prefix="localhost_access_log" suffix=".txt"
               pattern="%h %l %u %t "%r" %s %b" />
      </Host>
    </Engine>
  </Service>
</Server>

This file (user-mapping.xml) is the configuration for all your connections.

<user-mapping>

  <authorize username="USERNAME" password="PASSWORD">
    <!--
    <connection name="Debian2: RDP Connection">
      <protocol>rdp</protocol>
      <param name="hostname">localhost</param>
      <param name="port">3389</param>
    </connection>
    -->

    <connection name="Debian2: VNC Connection">
      <protocol>vnc</protocol>
      <param name="hostname">localhost</param>
      <param name="port">5901</param>
      <param name="password">vagrant</param>
    </connection>

    <connection name="Debian2: SSH Connection">
      <protocol>ssh</protocol>
      <param name="hostname">localhost</param>
      <param name="port">22</param>
      <param name="username">vagrant</param>
    </connection>

    <connection name="Debian1: SSH Connection">
      <protocol>ssh</protocol>
      <param name="hostname">192.168.10.5</param>
      <param name="port">22</param>
      <param name="username">vagrant</param>
    </connection>

    <connection name="Debian2: Telnet Connection">
      <protocol>telnet</protocol>
      <param name="hostname">localhost</param>
      <param name="port">23</param>
      <param name="username">vagrant</param>
    </connection>
  </authorize>
</user-mapping>
allowed_users=anybody

The ShellProvisioner.sh includes all installation and configuration for Guacamole All examples are provided but for Debian RDP is currently not working and I commented out.

echo '>>>>Install some default packages<<<<<'
sudo apt update -y -q
sudo apt install -y -q build-essential htop libcairo2-dev libjpeg62-turbo-dev libjpeg-dev libpng-dev libossp-uuid-dev
# install optional guacamole packages eq FFmpeg, SSH
sudo apt install -y -q libavcodec-dev libavutil-dev libswscale-dev libpango1.0-dev libssh2-1-dev libssl-dev libvorbis-dev libwebp-dev

echo '>>>>Install and configure tomcat packages<<<<<'
sudo apt install -y -q tomcat9 tomcat9-admin tomcat9-common tomcat9-user
sudo mkdir -p /usr/share/tomcat9/.guacamole
sudo cp /tmp/guacamole/server.xml /etc/tomcat9/server.xml
sudo chown root:tomcat /etc/tomcat9/server.xml
sudo chmod 0640 /etc/tomcat9/server.xml

echo '>>>>Configure default guacamole directory structure<<<<<'
sudo cp -r /tmp/guacamole /etc/guacamole
sudo mkdir -p /etc/guacamole/{extensions,lib}
sudo chown -R root:root /etc/guacamole
sudo chmod 0640 /etc/guacamole/user-mapping.xml
sudo chown root:tomcat /etc/guacamole/user-mapping.xml
sudo ln -s /etc/guacamole/guacamole.properties /var/lib/tomcat9/.guacamole

echo '>>>>Install and configure telnet packages<<<<<'
sudo apt install -y -q telnetd libtelnet-dev

echo '>>>>Install and configure xrdp packages<<<<<'
# actualy broken becauce of freerdp2-dev on debian
# sudo apt install -y -q xrdp freerdp2-dev
# sudo cp /etc/guacamole/Xwrapper.config /etc/X11/Xwrapper.config
# sudo chown root:root /etc/X11/Xwrapper.config
# sudo chmod 0644 /etc/X11/Xwrapper.config
# sudo systemctl enable xrdp.service
# sudo systemctl enable xrdp-sesman.service
# sudo systemctl start xrdp
# sudo systemctl start xrdp-sesman

echo '>>>>Install and configure vnc packages'
sudo apt install -y -q xfce4 xfce4-goodies gnome-icon-theme tightvncserver libvncserver-dev libpulse-dev

echo '>>>>Install guacamole client and restart tomcat<<<<<'
curl -s -O -J -L "http://apache.org/dyn/closer.cgi?action=download&filename=guacamole/1.0.0/binary/guacamole-1.0.0.war"
sudo cp guacamole-1.0.0.war /var/lib/tomcat9/webapps/guacamole.war
sudo chown tomcat:tomcat /var/lib/tomcat9/webapps/guacamole.war
sudo systemctl restart tomcat9

echo '>>>>Install guacamole server<<<<<'
curl -s -O -J -L "http://apache.org/dyn/closer.cgi?action=download&filename=guacamole/1.0.0/source/guacamole-server-1.0.0.tar.gz"
tar xzf guacamole-server-1.0.0.tar.gz
cd guacamole-server-1.0.0/
# space after etc is wrong
sudo ./configure --with-init-dir=/etc /init.d
sudo make
sudo make install
sudo ldconfig
sudo update-rc.d guacd defaults

echo '>>>>Start guacamole server/daemon<<<<<'
sudo systemctl start guacd

echo '>>>>Show open ports<<<<<'
sudo lsof -i -P -n | grep LISTEN

echo '>>>>Start clean-up<<<<<'
sudo rm /etc/guacamole/Xwrapper.config
sudo rm /etc/guacamole/server.xml
sudo rm -fr /tmp/guacamole
sudo rm -fr /home/vagrant/guacamole-server-1.0.0s
sudo rm /home/vagrant/guacamole-server-1.0.0.tar.gz
sudo rm /home/vagrant/guacamole-1.0.0.war
# -*- mode: ruby -*-
# vi: set ft=ruby :

BOX_1_NAME = "debian-1-guacamole"
BOX_2_NAME = "debian-2-guacamole"
BOX_BASE = "generic/debian10"
BOX_RAM_MB = 1024
BOX_CPU_COUNT = 1
BOX_GUI = false
BOX_SYNC_DIR = true

Vagrant.configure("2") do |config|

  config.vm.define BOX_1_NAME do |deb1|
    deb1.vm.box = BOX_BASE
    deb1.vm.synced_folder ".", "/vagrant", disabled: BOX_SYNC_DIR
    deb1.vm.hostname = BOX_1_NAME
    deb1.vm.network "private_network", ip: "192.168.10.5"
    deb1.vm.provider "virtualbox" do |vb1|
      vb1.name = BOX_1_NAME
      vb1.cpus = BOX_CPU_COUNT
      vb1.memory = BOX_RAM_MB
      vb1.gui = BOX_GUI
    end
  end

  config.vm.define BOX_2_NAME do |deb2|
    deb2.vm.box = BOX_BASE
    deb2.vm.synced_folder ".", "/vagrant", disabled: BOX_SYNC_DIR
    deb2.vm.hostname = BOX_2_NAME
    deb2.vm.network "forwarded_port", guest: 55555, host: 55555
    # deb2.vm.network "forwarded_port", guest: 5901, host: 5901
    # deb2.vm.network "forwarded_port", guest: 3389, host: 3389
    # deb2.vm.network "forwarded_port", guest: 23, host: 2323
    deb2.vm.network "private_network", ip: "192.168.10.10"
    deb2.vm.provider "virtualbox" do |vb2|
      vb2.name = BOX_2_NAME
      vb2.cpus = BOX_CPU_COUNT
      vb2.memory = BOX_RAM_MB
      vb2.gui = BOX_GUI
    end
    deb2.vm.provision "file", source: "./src", destination: "/tmp/guacamole"
    deb2.vm.provision "shell", name: "install", path: "./ShellProvisioner.sh"
  end

end

Usage

First start-up the environment (via simple Vagrant command) and next start the VNC inside the box. You can do via vagrant ssh or you start the VNC via Browser (SSH).

# start environment (be patient)
$ vagrant up

# show status (optional)
$ vagrant status

# ssh into 2nd box
$ vagrant ssh debian-2-guacamole

# start VNC server on user vagrant
$ vncserver

# Password: vagrant
# Verify: vagrant
# Would you like to enter a view-only password (y/n)? n

# exit ssh into box
$ exit

# open browser with URL
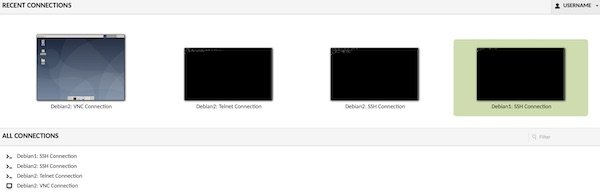
$ open http://localhost:55555/guacamole

Now login with “USERNAME/PASSWORD” (see src/user-mapping.xml) on http://localhost:55555/guacamole. If everything works it should look like this:

Guacamole on browser

Please have a look here https://guacamole.apache.org/doc/gug/index.html to learn more about configuration and authentication. All files which we used in this tutorial are available via https://github.com/Lupin3000/GuacamoleExample.

Simple Jenkins pipeline on AWS (Part 2)

In previous tutorial I showed you how to create the environment and how to implement the build steps for Jenkins pipeline. Now I will show you to setup the deploy step.

Preconditions

AWS ECS Cluster

Create a very small AWS ECS cluster in region “Frankfurt” (eu-central-1). Therefore enter Amazon ECS Clusters and press button “Create Cluster”.

AWS ECS create cluster

Select template “EC2 Linux + Networking” and continue to next step.

AWS ECS cluster template

On section “Configure cluster” you give a name like “ExampleCluster”.

AWS ECS configure cluster

On section “Instance configuration” select “On-Demand Instance”, “t2.micro”, “1”, “22” and “None – unable to SSH”.

AWS ECS instance configuration

In the section “Networking” you have to be careful now. Your values ​​will be different from mine! Under VPC, select the same value as for the EC2 Jenkins instance (I selected default VPC). Now you can choose one of the subnets. We created the security group together with the EC2 Jenkins instance, so select “ExampleSecurityGroup” here.

AWS ECS networking

Okay, press button “Create” and wait till the cluster is created. The cluster creation can take a while, so please be patient.

AWS ECS Task Definition

The cluster is running and the “Task Definition” can be created. So press button “Create new Task Definition”.

AWS ECS task definition

Select “EC2” on page launch type compatibility and press button “Next step”.

AWS ECS task launch type

On section “Configure task and container definitions” set value “ExampleTask” for input field “Task Definition Name” and for “Network Mode” select “<default>”.

AWS ECS task definition name

On section “Container Definition” press button “Add Container”. A new window will slide in. Here give the “Container name” value “ExampleContainer”, add under image your latest version from ECR (my latest is 24). Set values “128” for “Memory Limits (MiB)”, “80:80” for “Port mappings” and press button “Add”.

AWS ECS task add container

You are done with your task definition configuration, scroll down and press button “Create”.

AWS IAM

Before we can go through the next steps, we need to adjust the group policy for “PipelineExampleGroup”. You must add the “AmazonECS_FullAccess” policy. _For our example this is okay, but never use this policy in production!_

AWS ECS IAM

Run task on ECS cluster (via Jenkins)

Now you only need to modify two files in your repository. Replace the content of “deploy.sh” and “Jenkinsfile” with following contents.

pipeline {
  agent any
  parameters {
    string(name: 'REPONAME', defaultValue: 'example/nginx', description: 'AWS ECR Repository Name')
    string(name: 'ECR', defaultValue: '237724776192.dkr.ecr.eu-central-1.amazonaws.com/example/nginx', description: 'AWS ECR Registry URI')
    string(name: 'REGION', defaultValue: 'eu-central-1', description: 'AWS Region code')
    string(name: 'CLUSTER', defaultValue: 'ExampleCluster', description: 'AWS ECS Cluster name')
    string(name: 'TASK', defaultValue: 'ExampleTask', description: 'AWS ECS Task name')
  }
  stages {
    stage('BuildStage') {
      steps {
        sh "./cicd/build.sh -b ${env.BUILD_ID} -n ${params.REPONAME} -e ${params.ECR} -r ${params.REGION}"
      }
    }
    stage('DeployStage') {
      steps {
        sh "./cicd/deploy.sh -b ${env.BUILD_ID} -e ${params.ECR} -c ${params.CLUSTER} -t ${params.TASK}"
      }
    }
    stage('TestStage') {
      steps {
        sh "./cicd/test.sh"
      }
    }
  }
}
#!/usr/bin/env bash

## shell options
set -e
set -u
set -f

## magic variables
declare ECR
declare CLUSTER
declare TASK
declare BUILD_NUMBER
declare -r -i SUCCESS=0
declare -r -i NO_ARGS=85
declare -r -i BAD_ARGS=86
declare -r -i MISSING_ARGS=87

## script functions
function usage() {
  local FILE_NAME

  FILE_NAME=$(basename "$0")

  printf "Usage: %s [options...]\n" "$FILE_NAME"
  printf " -h\tprint help\n"
  printf " -e\tset ecr repository uri\n"
  printf " -c\tset esc cluster name uri\n"
  printf " -t\tset esc task name\n"
  printf " -b\tset build number\n "
}

function no_args() {
  printf "Error: No arguments were passed\n"
  usage
  exit "$NO_ARGS"
}

function bad_args() {
  printf "Error: Wrong arguments supplied\n"
  usage
  exit "$BAD_ARGS"
}

function missing_args() {
  printf "Error: Missing argument for: %s\n" "$1"
  usage
  exit "$MISSING_ARGS"
}

## check script arguments
while getopts "he:c:t:b:" OPTION; do
  case "$OPTION" in
    h) usage
       exit "$SUCCESS";;
    e) ECR="$OPTARG";;
    c) CLUSTER="$OPTARG";;
    t) TASK="$OPTARG";;
    b) BUILD_NUMBER="$OPTARG";;
    *) bad_args;;
  esac
done

if [ "$OPTIND" -eq 1 ]; then
  no_args
fi

if [ -z "$ECR" ]; then
  missing_args '-e'
fi

if [ -z "$CLUSTER" ]; then
  missing_args '-c'
fi

if [ -z "$TASK" ]; then
  missing_args '-t'
fi

if [ -z "$BUILD_NUMBER" ]; then
  missing_args '-b'
fi

## run main function
function main() {
  local TASK_ARN
  local TASK_ID
  local ACTIVE_TASK_DEF
  local TASK_DEFINITION
  local TASK_DEF_ARN

  # list running task
  TASK_ARN="$(aws ecs list-tasks --cluster "$CLUSTER" --desired-status RUNNING --family "$TASK" | jq -r .taskArns[0])"
  TASK_ID="${TASK_ARN#*:task/}"

  # stop running task
  if [ -n "$TASK_ID" ] && [ "$TASK_ID" != "null" ]; then
    printf "INFO: Stop Task %s\n" "$TASK_ID"
    aws ecs stop-task --cluster "$CLUSTER" --task "$TASK_ID"
  fi

  # list active task definition
  ACTIVE_TASK_DEF="$(aws ecs list-task-definitions --family-prefix "$TASK" --status ACTIVE | jq -r .taskDefinitionArns[0])"

  # derigister task definition
  if [ -n "$ACTIVE_TASK_DEF" ]; then
    printf "INFO: Deregister Task Definition %s\n" "$ACTIVE_TASK_DEF"
    aws ecs deregister-task-definition --task-definition "$ACTIVE_TASK_DEF"
  fi

  # read task definition template
  TASK_DEFINITION=$(cat ./cicd/task_definition.json)

  # create new task definition file
  TASK_DEFINITION="${TASK_DEFINITION/URI/$ECR}"
  echo "${TASK_DEFINITION/NUMBER/$BUILD_NUMBER}" > ecs_task_definition.json

  # register new task definition
  TASK_DEF_ARN="$(aws ecs register-task-definition --cli-input-json file://ecs_task_definition.json | jq -r .taskDefinition.taskDefinitionArn)"

  # run task by task definition
  aws ecs run-task --task-definition "$TASK_DEF_ARN" --cluster "$CLUSTER"
}

main

# exit
exit "$SUCCESS"

Commit your changes and wait for build trigger (or trigger manually). After successful deployment, your ECS cluster will have a running task now. On section “Container” you can see the link.

AWS ECS cluster task container

Every time when you modify files and commit them into your Git repository, the pipeline will be triggered and latest version will be visible in browser.

That’s it with this part of the series. Cu soon in next part.

Simple Jenkins pipeline on AWS (Part 1)

This tutorial serie should enable you to create own pipelines via Jenkins on AWS. Therefore we try to catch all needed basics with AWS IAM, EC2, ECR and ECS. Some of our configurations are recommended only for learning purpose, don’t use them on production! Why? Because these lessons are for people who starts on these topics and I will try to make all steps/configuration as easy as possible without focus on security. In this part we will create the environment and setup the “build step”.

Preconditions

  • AWS account (eq. free tier)
  • Git account (eq. GitLab, Bitbucket, GitHub, etc.)

AWS IAM

The first preparation you do on AWS IAM Management Console. Here you create and configure a new group. The benefit of this group is that you can reconfigure the policies for assigned users easily at anytime. Please name the group “PipelineExampleGroup”.

AWS IAM group name

Now search for EC2 Container Registry policies and enable checkbox for “AmazonEC2ContainerRegistryPowerUser”. For our example this policy is enough, but for production please don’t do that!

AWS IAM group policies

After the group is created, a user needs to be assigned to this group. Name the user “PipelineExampleUser”. Please enable checkbox “Programmatic access” for this user.

AWS IAM user name

Assign the user to group.

AWS IAM user group

Before you finish the process, please choose Download .csv and then save the file to a safe location.

AWS Jenkins EC2 Instance

Now you can launch our EC2 instance. Do this on region “Frankfurt” (eu-central-1). Of course you can choose any other region, but please remember your choice later. At very first step select the template “Amazon Linux 2 AMI (HVM), SSD Volume Type”.

AWS EC2 AMI

The instance type “t2.micro” is enough for our example. For production you will need something else – depending to your needs.

AWS EC2 instance type

Now you need to be a little bit careful. On Instance Details step please select “Enable” for “Auto-assign Public IP” and “Stop” for “Shutdown Behavior”. For all other values the defaults should be fine. I select my default VPC and “No preference…” for Subnet.

AWS EC2 instance details

15 Gb disk space are fine. For production you need to estimate differently.

AWS EC2 instance storage

With the tag you will have it easier to identify the instance later on console view. Enter values “Name” for “Key” and “Jenkins” for “Value”.

AWS EC2 instance tags

Create a new security group with name “ExampleSecurityGroup” and allow ports 22, 80 and 8080 (IPv4 only). You can change the configuration at any time later. On a production environment you should use other ports like 443 and IP restrictions.

AWS EC2 instance security group

Create a new key pair with name “ExampleKeyPair”. Don’t forget to save the key (“Download Key Pair”) and press “Launch Instances”!

AWS EC2 instance key pair

Install and run Jenkins

The EC2 instance is running and you can connect via SSH to start all needed installations and configurations. Attention: Your Public IP/DNS will be different (also after every stop/start), via button “Connect” you can easily figure out your configuration. I will just use the term “<EC2 IP|DNS>” in my description.

AWS EC2 connection
# move SSH keys (my are downloaded under Downloads)
$ mv ~/Downloads/ExampleKeyPair.pem.txt ~/.ssh/ExampleKeyPair.pem

# change permissions
$ chmod 0400 ~/.ssh/ExampleKeyPair.pem

# start ssh connection
$ ssh -i ~/.ssh/ExampleKeyPair.pem ec2-user@<EC2 IP|DNS>

# change to root user
$ sudo su -

# update system
$ yum update -y

# add latest Jenkins repository
$ wget -O /etc /yum.repos.d/jenkins.repo http://pkg.jenkins.io/redhat/jenkins.repo

# add key from Jenkins
$ rpm --import https://pkg.jenkins.io/redhat/jenkins.io.key

# install docker-ce
$ amazon-linux-extras install -y docker

# install java, git, jenkins and jq
$ yum install -y java git jenkins jq

# add jenkins to docker group
$ usermod -a -G docker jenkins

# enable and start docker
$ systemctl enable docker && systemctl start docker

# enable and start jenkins
$ systemctl enable jenkins && systemctl start jenkins

# get initial password
$ cat /var/lib/jenkins/secrets/initialAdminPassword

Note: I have a space after etc, because of security settings of my provider.

Do not close the SSH connection yet. Start your browser and following there the Jenkins installation steps. The URL is similar to your SSH connection – http://<EC2 IP|DNS>:8080. You should see the following screen and paste the initial password there.

jenkins screen initial password

On next screen press button “Install suggested plugins” and wait for the screen to create administrator account. Fill in your credentials and finish the installation steps. The remaining configurations (on browser) will be made later.

AWS ECR

Before you can push images to ECR, you need to create a new repository. On the ECR page, choose button “Create repository”. Your AWS ECR console screen could look a little bit different.

AWS ECR repositories

Give a repository name “example/nginx” and press button “Create repository”.

AWS ECR repository configuration

Done, your ECR repository is already created. You can see on overview page all needed informations like Repository name and URI. Your repository URI will be different to my. I will just use the term “<ECR URI>” in my description.

AWS ECR repository overview

Okay, now enable user jenkins to connect to ECR. Go back to terminal and execute following steps. You need now the credentials from downloaded csv file for “PipelineExampleUser”.

# change to jenkins user
$ su -s /bin/bash jenkins

# show docker info (optional)
$ docker info

# configure AWS-CLI options
$ aws configure
...
AWS Access Key ID [None]: <credentials.csv>
AWS Secret Access Key [None]: <credentials.csv>
Default region name [None]: eu-central-1
Default output format [None]: json
...

# list repositories in registry (optional)
$ aws ecr describe-repositories

Git Repository

I assume that you are familiar with Git. You must now create a Git Repository and create the following folders and files there. I will use my own private GitLab repository.

# show local project tree (optional)
$ tree ~/<path to your project>
|____index.html
|____Dockerfile
|____.gitignore
|____cicd
| |____build.sh
| |____Jenkinsfile
| |____deploy.sh
| |____task_definition.json
| |____test.sh
|____dev_credentials
| |____credentials.csv
|____.git

Content of files in root folder:

<!DOCTYPE html>
<html lang="en" dir="ltr">
  <head>
    <meta charset="utf-8">
    <title>DemoPipeline</title>
  </head>
  <body>
    Hello world...
  </body>
</html>
FROM nginx:stable-alpine

COPY index.html /usr/share/nginx/html/index.html
.DS_Store
dev_credentials/

Content of files in cicd folder:

pipeline {
  agent any
  parameters {
    string(name: 'REPONAME', defaultValue: 'example/nginx', description: 'AWS ECR Repository Name')
    string(name: 'ECR', defaultValue: '237724776192.dkr.ecr.eu-central-1.amazonaws.com/example/nginx', description: 'AWS ECR Registry URI')
    string(name: 'REGION', defaultValue: 'eu-central-1', description: 'AWS Region code')
    string(name: 'CLUSTER', defaultValue: 'ExampleCluster', description: 'AWS ECS Cluster name')
    string(name: 'TASK', defaultValue: 'ExampleTask', description: 'AWS ECS Task name')
  }
  stages {
    stage('BuildStage') {
      steps {
        sh "./cicd/build.sh -b ${env.BUILD_ID} -n ${params.REPONAME} -e ${params.ECR} -r ${params.REGION}"
      }
    }
    stage('DeployStage') {
      steps {
        sh "./cicd/deploy.sh"
      }
    }
    stage('TestStage') {
      steps {
        sh "./cicd/test.sh"
      }
    }
  }
}
{
    "family": "ExampleTask",
    "containerDefinitions": [
        {
            "image": "URI:NUMBER",
            "name": "ExampleContainer",
            "cpu": 0,
            "memory": 128,
            "essential": true,
            "portMappings": [
                {
                    "containerPort": 80,
                    "hostPort": 80
                }
            ]
        }
    ]
}

Note: Please set permission rights for shell scripts like $ chmod +x build.sh deploy.sh test.sh

#!/usr/bin/env bash

## shell options
set -e
set -u
set -f

## magic variables
declare REPONAME
declare ECR
declare REGION
declare BUILD_NUMBER
declare -r -i SUCCESS=0
declare -r -i NO_ARGS=85
declare -r -i BAD_ARGS=86
declare -r -i MISSING_ARGS=87

## script functions
function usage() {
  local FILE_NAME

  FILE_NAME=$(basename "$0")

  printf "Usage: %s [options...]\n" "$FILE_NAME"
  printf " -h\tprint help\n"
  printf " -n\tset ecr repository name\n"
  printf " -e\tset ecr repository uri\n"
  printf " -r\tset aws region\n"
  printf " -b\tset build number\n "
}

function no_args() {
  printf "Error: No arguments were passed\n"
  usage
  exit "$NO_ARGS"
}

function bad_args() {
  printf "Error: Wrong arguments supplied\n"
  usage
  exit "$BAD_ARGS"
}

function missing_args() {
  printf "Error: Missing argument for: %s\n" "$1"
  usage
  exit "$MISSING_ARGS"
}

## check script arguments
while getopts "hn:e:r:b:" OPTION; do
  case "$OPTION" in
    h) usage
       exit "$SUCCESS";;
    n) REPONAME="$OPTARG";;
    e) ECR="$OPTARG";;
    r) REGION="$OPTARG";;
    b) BUILD_NUMBER="$OPTARG";;
    *) bad_args;;
  esac
done

if [ "$OPTIND" -eq 1 ]; then
  no_args
fi

if [ -z "$REPONAME" ]; then
  missing_args '-n'
fi

if [ -z "$ECR" ]; then
  missing_args '-e'
fi

if [ -z "$REGION" ]; then
  missing_args '-r'
fi

if [ -z "$BUILD_NUMBER" ]; then
  missing_args '-b'
fi

## run main function
function main() {
  local LAST_ID

  # delete all previous image(s)
  LAST_ID=$(docker images -q "$REPONAME")
  if [ -n "$LAST_ID" ]; then
    docker rmi -f "$LAST_ID"
  fi

  # build new image
  docker build -t "$REPONAME:$BUILD_NUMBER" --pull=true .

  # tag image for AWS ECR
  docker tag "$REPONAME:$BUILD_NUMBER" "$ECR":"$BUILD_NUMBER"

  # basic auth into ECR
  $(aws ecr get-login --no-include-email --region "$REGION")

  # push image to AWS ECR
  docker push "$ECR":"$BUILD_NUMBER"
}

main

# exit
exit "$SUCCESS"

Inside folder “dev_credentials” I store the credentials.csv from AWS. The content of this folder will be only on my local machine, because via .gitignore I exclude the folder and files from git.

Jenkins job configuration

I will not use this tutorial to explain security topics for Jenkins, so we start directly with the configuration of the job (resp. project). On main page press now button “New item” or link “create new jobs”. Insert name “ExamplePipeline”, select “Pipeline” and press button “OK”.

jenkins new job

To save some disk space enable checkbox discard old builds (5 builds are enough).

jenkins job discard old builds

Normally you would create a webhook to trigger the build after commit, but our EC2 instance does change the public IP/DNS on every stop/start. That’s why here we check the revision changes every 5 minutes on git and trigger the job if something has changed.

jenkins job build trigger

Add the repository (may credentials are needed), configure the branch and Jenkinsfile path.

jenkins job scm pipeline

Press button “save”, _cross fingers_ and trigger manual the build. If you did nothing wrong, the job will run without issues and the ECR contains your images (depending how often you trigger the build).

AWS ECR repository images

The next part of this tutorial series will be about deployment to ECS.

Jenkins and Sitespeed.io

While surfing the internet I stumbled across Sitespeed.io. It’s a amazing collection of Open Source Tools, which make performance measuring for developers and testers super easy. I tried it out and was immediately impressed. Here’s a little tutorial on how to use Jenkins and Sitespeed.

Requirements

Docker (latest)

Environment setup

With minimal 2 commands the environment (via Docker) is already created. Most of the time will be needed for the plugins installation.

# create Project
$ mkdir -p ~/Projects/Sitespeed/target && cd ~/Projects/Sitespeed

# pull latest sitespeed image (optional)
$ docker pull sitespeedio/sitespeed.io:latest

# start Jenkins container
$ docker run -e JAVA_OPTS="-Dhudson.model.DirectoryBrowserSupport.CSP=\"sandbox allow-scripts; style-src 'unsafe-inline' *;script-src 'unsafe-inline' *;\"" --name jenkins -v $(pwd)/target:/var/jenkins_home -v /var/run/docker.sock:/var/run/docker.sock -v $(which docker):$(which docker) -p 8080:8080 -p 9000:9000 jenkins/jenkins:lts

# open Jenkins in browser (be patient)
$ open http://localhost:8080

On setup wizard finish: unlock Jenkins, install the suggested plugins, create an account and finish the instance configuration.

Jenkins permissions to /var/run/docker.sock

Before you start with Jenkins job configuration, ensure that user jenkins has permissions to /var/run/docker.sock.

# test permissions
$ docker exec -ti jenkins docker info Got permission denied...

# create group docker
$ docker exec -ti -u 0 jenkins groupadd -for -g 0 docker

# add jenkins to group
$ docker exec -ti -u 0 jenkins usermod -aG docker jenkins

# restart jenkins container
$ docker restart jenkins

Jenkins job configuration

When Jenkins is ready (restarted), install the HTML Publisher PlugIn (no restart after installation of plugin required).

Jenkins HTML Publisher Plugin

Create a new free-style project named SiteSpeed.

Jenkins SiteSpeed Project

Attention: You need to specify later the absolute path to the local directory /target/workspace/SiteSpeed. If you do not know how, press save and start the build without any job information (empty job configuration) and follow the optional instructions.

# change directory (optional)
$ cd ~/Projects/Sitespeed/target/workspace/SiteSpeed

# get absolute path (optional)
$ pwd

In my case the path is: “/Users/steffen/Projects/Sitespeed/target/workspace/SiteSpeed”. Under job configuration section “Build” enable “Execute shell” and paste following command.

docker run --rm --shm-size=1g -v /Users/steffen/Projects/Sitespeed/target/workspace/SiteSpeed:/sitespeed.io sitespeedio/sitespeed.io --visualMetrics --video --outputFolder output https://www.sitespeed.io/ -n 1

Via Post-Build-Action: Publish HTML reports you can enter the report very simple from the job project page.

Jenkins SiteSpeed Job Configuration

Save everything and run the job. After a short time you can look at the HTML report. See “Pages” > “https://www.sitespeed.io/” for screenshots, HAR and video files. On the website of sitespeed.io is a very detailed documentation and many more examples. Have fun!

Create QA dashboards with Grafana (Part 1)

Since I have my new role (Head of QA), many employees constantly want metrics from me. That means a lot of work for me. But since I do not always want to deal with such things, I have searched for a simpler way. So the question was – how can I deliver this data at any time and possibly from different sources (eq. JIRA, pipelines, test results, Salesforce, etc.)? Hmmm … Grafana is awesome – not only for DevOps! So in this tutorial series, I’d like to show you how to create nice and meaningful dashboards for your QA metrics in Grafana.

What you need?

  • Docker installed (latest version)
  • Bash (min. 3.2.x)

Prepare the project

In order to create dashboards in Grafana, you need a small environment (Grafana/InfluxDB) as well as some data. The next steps will help you to create them. The environment/services are simulated by docker containers. For the fictitious data, just use the bash script which I created for this tutorial.

# create project
$ mkdir -p ~/Projects/GrafanaDemo && cd ~/Projects/GrafanaDemo

# create file docker-compose.yml
$ touch docker-compose.yml

# create file CreateData.sh
$ touch CreateData.sh

# change file permissions
$ chmod u+x CreateData.sh

Now copy/paste the content of the two files with your favorite editor. The content of docker-compose.yml.

version: '3'

networks:
  grafana-demo:
    driver: bridge
    ipam:
      driver: default
      config:
        - subnet: 10.1.0.0/24

services:

  influxdb:
    container_name: influxdb
    networks:
      grafana-demo:
        ipv4_address: 10.1.0.10
    ports:
      - '8086:8086'
    image: influxdb

  grafana:
    container_name: grafana
    networks:
      grafana-demo:
        ipv4_address: 10.1.0.20
    ports:
      - '3000:3000'
    image: grafana/grafana
    environment:
      - 'GF_INSTALL_PLUGINS=grafana-piechart-panel'
    depends_on:
      - influxdb

And here the content of CreateData.sh.

#!/usr/bin/env  bash

# shell options
#set -x
#set -v
set -e
set -u
set -f

# magic variables
declare -r OPTS="htsp"
declare -a TIMESTAMPS
declare -a OPTIONS=(false false false)
declare -r -a DATABASES=(test_db support_db pipeline_db)
declare -r -a TESTER=(Tina Robert)
declare -r -a SUPPORTER=(Jennifer Mary Tom)
declare -r -a STAGES=(S1 S2 S3)
declare -r -a BUILD=(SUCCESS FAILURE ABORTED)
declare -r -i SUCCESS=0
declare -r -i BAD_ARGS=85
declare -r -i NO_ARGS=86

# functions
function usage() {
  local count
  local file_name=$(basename "$0")

  printf "Usage: %s [options...]\n" "$file_name"
  for (( count=1; count<${#OPTS}; count++ )); do
    printf "%s\tcreate %s and content\n" "-${OPTS:$count:1}" "${DATABASES[$count - 1]}"
  done
  exit "$SUCCESS"
}

function bad_args() {
  printf "Error: Wrong arguments supplied\n"
  usage
  exit "$BAD_ARGS"
}

function no_args() {
  printf "Error: No options were passed\n"
  usage
  exit "$NO_ARGS"
}

function create_timestamp_array() {
  local counter=1
  local timestamp

  while [ "$counter" -le 30 ]; do
    timestamp=$(date -v -"$counter"d +"%s")
    TIMESTAMPS+=("$timestamp")
    ((counter++))
  done
}

function curl_post() {
  local url=$(printf 'http://localhost:8086/write?db=%s&precision=s' "$2")

  curl -i -X POST "$url" --data-binary "$1"
}

function create_test_results() {
  local passed
  local failed
  local skipped
  local count
  local str

  for count in "${TESTER[@]}"; do
    passed=$((RANDOM % 30 + 20))
    failed=$((RANDOM % passed))
    skipped=$((passed - failed))
    str=$(printf 'suite,app=demo,qa=%s passed=%i,failed=%i,skipped=%i %i' "$count" "$passed" "$failed" "$skipped" "$1")
    echo "$2: $str"
    curl_post "$str" "$2"
  done
}

function create_support_results() {
  local items=(1 2 none)
  local in
  local out
  local str
  local count

  for count in "${SUPPORTER[@]}"; do
    in=$((RANDOM % 25))
    out=$((RANDOM % 25))
    str=$(printf 'tickets,support=%s in=%i,out=%i %i' "$count" "$in" "$out" "$1")
    echo "$2: $str"
    curl_post "$str" "$2"
  done
}

function create_pipeline_results() {
  local status
  local duration
  local str
  local count

  for count in "${STAGES[@]}"; do
    status=${BUILD[$RANDOM % ${#BUILD[@]} ]}
    duration=$(( 3+RANDOM%(3-17) )).$(( RANDOM%999 ))
    str=$(printf 'pipeline,stage=%s status="%s",duration=%s %i' "$count" "$status" "$duration" "$1")
    echo "$2: $str"
    curl_post "$str" "$2"
  done
}

function main() {
  local repeat=$(printf '=%.0s' {1..80})

  create_timestamp_array

  for ((i = 0; i < ${#OPTIONS[@]}; ++i)); do
    if [[ "${OPTIONS[$i]}" == "true" ]]; then
      printf "Create database: %s\n" "${DATABASES[$i]}"
      printf "%s\n" "$repeat"
      curl -i -X POST http://localhost:8086/query --data-urlencode "q=CREATE DATABASE ${DATABASES[$i]}"
      printf "Generate content of database: %s\n" "${DATABASES[$i]}"
      printf "%s\n" "$repeat"
      for item in "${TIMESTAMPS[@]}"; do
        if [[ "${DATABASES[$i]}" == "${DATABASES[0]}" ]]; then
          create_test_results "$item" "${DATABASES[$i]}"
        fi
        if [[ "${DATABASES[$i]}" == "${DATABASES[1]}" ]]; then
          create_support_results "$item" "${DATABASES[$i]}"
        fi
        if [[ "${DATABASES[$i]}" == "${DATABASES[2]}" ]]; then
          create_pipeline_results "$item" "${DATABASES[$i]}"
        fi
      done
    fi
  done
}

# script arguments
while getopts "$OPTS" OPTION; do
  case "$OPTION" in
    h)
        usage;;
    t)
        OPTIONS[0]="true";;
    s)
        OPTIONS[1]="true";;
    p)
        OPTIONS[2]="true";;
    *)
        bad_args;;
  esac
done

if [ $OPTIND -eq 1 ]; then
  no_args
fi

# main function
main

# exit
exit "$SUCCESS"

Start environment and create data

Once the project and the files have been created, you can build and start the environment. For this you use Docker Compose.

# validate docker-compose file (optional)
$ docker-compose config

# run environment
$ docker-compose up -d

# get IP from grafana container (optional)
$ docker inspect -f '{{range .NetworkSettings.Networks}}{{.IPAddress}}{{end}}' grafana
10.1.0.20

# get IP from influxdb container (optional)
$ docker inspect -f '{{range .NetworkSettings.Networks}}{{.IPAddress}}{{end}}' influxdb
10.1.0.10

# show created docker network (optional)
$ docker network ls | grep -i 'grafana*'

# show docker containers (optional)
$ docker ps -a | grep -i 'grafana\|influxdb'

In next step you create the InfluxDB databases (incl. fictitious measurements, series and data) via Bash script.

# ping influxdb (optional)
$ curl -I http://localhost:8086/ping

# show help (optional)
$ ./CreateData.sh -h

# create databases and contents (execute only 1x)
$ ./CreateData.sh -t -s -p

# show current databases (optional)
$ curl -G http://localhost:8086/query?pretty=true --data-urlencode "q=SHOW DATABASES"

# show test_db series (optional)
$ curl -G http://localhost:8086/query?pretty=true --data-urlencode "db=test_db" --data-urlencode "q=SHOW SERIES"

# show test_db measurements (optional)
$ curl -G http://localhost:8086/query?pretty=true --data-urlencode "db=test_db" --data-urlencode "q=SHOW MEASUREMENTS"

Note: You could use influx command to administrate InfluxDB directly.

# exec docker container
$ docker exec -ti influxdb influx

# list all databases
> show databases

# use specific database test_db
> use test_db

# show series of test_db
> show series

# show measurements of test_db
> show measurements

# drop measurements of test_db (in case something went wrong)
> drop measurement suite

Okay the environment preparation is done. Now start Grafana in browser.

# open Grafana in browser
$ open http://localhost:3000

New Grafana Login

The default username and password is “admin:admin“. Note, if you use docker-compose down you have to repeat most of steps like data creation. Better use docker-compose stop! … See you in 2nd part – where we add data sources and create dashboards.

Vagrant and Vault

I was a little surprised why there is no Vagrant plug-in for Vault. Then I thought no matter, because the Vagrantfile is actually a Ruby script. Let me try it. I have to say right away that I’m not a Ruby developer! But here is my solution which has brought me to the goal.

Prerequisite

  • latest Vault installed (0.11.0)
  • latest Vagrant installed (2.1.3)

Prepare project and start Vault

# create new project
$ mkdir -p ~/Projects/vagrant-vault && cd ~/Projects/vagrant-vault

# create 2 empty files
$ touch vagrant.hcl Vagrantfile

# start Vault in development mode
$ vault server -dev

Here my simple vagrant policy (don’t do that in production).

path "secret/*" {
  capabilities = ["read", "list"]
}

And here is my crazy and fancy Vagrantfile

# -*- mode: ruby -*-
# vi: set ft=ruby :

require 'net/http'
require 'uri'
require 'json'
require 'ostruct'

################ YOUR SETTINGS ####################
ROLE_ID = '99252343-090b-7fb0-aa26-f8db3f5d4f4d'
SECRET_ID = 'b212fb14-b7a4-34d3-2ce0-76fe85369434'
URL = 'http://127.0.0.1:8200/v1/'
SECRET_PATH = 'secret/data/vagrant/test'
###################################################

def getToken(url, role_id, secret_id)
  uri = URI.parse(url + 'auth/approle/login')
  request = Net::HTTP::Post.new(uri)
  request.body = JSON.dump({
    "role_id" => role_id,
    "secret_id" => secret_id
  })

  req_options = {
    use_ssl: uri.scheme == "https",
  }

  response = Net::HTTP.start(uri.hostname, uri.port, req_options) do |http|
    http.request(request)
  end

  if response.code == "200"
    result = JSON.parse(response.body, object_class: OpenStruct)
    token = result.auth.client_token
    return token
  else
    return ''
  end
end

def getSecret(url, secret_url, token)
  uri = URI.parse(url + secret_url)
  request = Net::HTTP::Get.new(uri)
  request["X-Vault-Token"] = token

  req_options = {
    use_ssl: uri.scheme == "https",
  }

  response = Net::HTTP.start(uri.hostname, uri.port, req_options) do |http|
    http.request(request)
  end

  if response.code == "200"
    result = JSON.parse(response.body, object_class: OpenStruct)
    return result
  else
    return ''
  end
end

token = getToken(URL, ROLE_ID, SECRET_ID)

unless token.to_s.strip.empty?
  result = getSecret(URL, SECRET_PATH, token)
  unless result.to_s.strip.empty?
    sec_a = result.data.data.secret_a
    sec_b = result.data.data.secret_b
  end
else
  puts 'Error - please check your settings'
  exit(1)
end

Vagrant.configure("2") do |config|
  config.vm.box = "centos/7"
  config.vm.post_up_message = 'Secret A:' + sec_a + ' - Secret B:' + sec_b
end

Configure Vault

# set environment variables (new terminal)
$ export VAULT_ADDR='http://127.0.0.1:8200'

# check status (optional)
$ vault status

# create simple kv secret
$ vault kv put secret/vagrant/test secret_a=foo secret_b=bar

# show created secret (optional)
$ vault kv get --format yaml -field=data secret/vagrant/test

# create/import vagrant policy
$ vault policy write vagrant vagrant.hcl

# show created policy (optional)
$ vault policy read vagrant

# enable AppRole auth method
$ vault auth enable approle

# create new role
$ vault write auth/approle/role/vagrant token_num_uses=1 token_ttl=10m token_max_ttl=20m policies=vagrant

# show created role (optional)
$ vault read auth/approle/role/vagrant

# show role_id
$ vault read auth/approle/role/vagrant/role-id
...
99252343-090b-7fb0-aa26-f8db3f5d4f4d
...

# create and show secret_id
$ vault write -f auth/approle/role/vagrant/secret-id
...
b212fb14-b7a4-34d3-2ce0-76fe85369434
...

Run it

# starts and provisions the vagrant environment
$ vagrant up

😉 … it just works

Start with Vault 0.10.x

HashiCorp released Vault version 0.10.x on April 2018. The 0.10.x release delivers many new features and changes (eq. K/V Secrets Engine v2, Vault Web UI, etc.). Please have a look on vault/CHANGELOG for more informations. This tiny tutorial will concentrate now on usage of Vault’s Key-Value Secrets Engine via CLI.

Preparation

# download version 0.10.3
$ curl -C - -k https://releases.hashicorp.com/vault/0.10.3/vault_0.10.3_darwin_amd64.zip -o ~/Downloads/vault.zip

# unzip and delete archive
$ unzip ~/Downloads/vault.zip -d ~/Downloads/ && rm ~/Downloads/vault.zip

# change access permissions and move binary to target
$ chmod u+x ~/Downloads/vault && sudo mv ~/Downloads/vault /usr/local/

Start Vault server in development mode

# start in simple development mode
$ vault server -dev

Do not stop the process and open new tab on terminal [COMMAND] + [t].

# set environment variable
$ export VAULT_ADDR='http://127.0.0.1:8200'

# check vault status
$ vault status

Create, Read, Update and Delete secrets

# create secret (version: 1)
$ vault kv put secret/demosecret name=demo value=secret

# list secrets (optional)
$ vault kv list secret

# read secret
$ vault kv get secret/demosecret

# read secret (JSON)
$ vault kv get --format json secret/demosecret

# update secret (version: 2)
$ vault kv put secret/demosecret name=Demo value=secret foo=bar

# read secret (latest version)
$ vault kv get secret/demosecret

# read secret (specific version)
$ vault kv get --version 1 secret/demosecret

# read secret (specific field)
$ vault kv get --field=name secret/demosecret

# delete secret (latest version)
$ vault kv delete secret/demosecret

# show metadata
$ vault kv metadata get secret/demosecret

As you can see, there are minor changes to previous versions of Vault.

Note: The API for the Vault KV secrets engine even changed.

# read (version 1)
$ curl -H "X-Vault-Token: ..." https://127.0.0.1:8200/v1/secret/demosecret

# read (version 2)
$ curl -H "X-Vault-Token: ..." https://127.0.0.1:8200/v1/secret/data/demosecret

Okay, back to CLI and some examples which are better for automation. We will use the STDIN and a simple JSON file.

# create secret (version: 1)
$ echo -n "my secret" | vault kv put secret/demosecret2 name=-

# list secrets (optional)
$ vault kv list secret

# update secret (version: 2)
$ echo -n '{"name": "other secret"}' | vault kv put secret/demosecret2 -

# create JSON file
$ echo -n '{"name": "last secret"}' > ~/Desktop/demo.json

# update secret (version: 3)
$ vault kv put secret/demosecret2 @$HOME/Desktop/demo.json

# read secrets (different versions)
$ vault kv get --version 1 secret/demosecret2
$ vault kv get --version 2 secret/demosecret2
$ vault kv get --version 3 secret/demosecret2

# delete version permanent
$ vault kv destroy --versions 3 secret/demosecret2

# show metadata
$ vault kv metadata get secret/demosecret2

Web UI

Previously the Web UI was for Enterprise only, now it has been made open source.

# open URL in browser
$ open http://localhost:8200/

Now you can use the root token to sign in.

Create a simple video test environment (Part 3)

Okay, now is time to see some command line tools to analysis videos. I selected 4 Open-Source applications (avprobe, mediainfo, mplayer, exiftool).

Specification

  • docker
  • git

Get ready for docker images

On Bitbucket I created a repository with needed Dockerfiles for fast usage. You can also choose the installation method.

# change directory (optional)
$ cd ~/Projects/

# clone repository
$ git clone https://bitbucket.org/Lupin3000/tinydockerapps ~/Projects/tinydockerapps

# change directory
$ cd ~/Projects/VideoTest/

# build docker image for mediainfo
$ docker build -t debian/mediainfo ~/Projects/tinydockerapps/mediainfo/

# build docker image for mplayer
$ docker build -t debian/mplayer ~/Projects/tinydockerapps/mplayer/

# build docker image for exiftool
$ docker build -t debian/exiftool ~/Projects/tinydockerapps/exiftool/

# build docker image for avprobe
$ docker build -t debian/avprobe ~/Projects/tinydockerapps/avprobe/

# check available images (optional)
$ docker images

mediainfo

Lets start with mediainfo. Here some information about on wikipedia.

# list help
$ docker run --rm -i -v ~/Projects/VideoTest/:/mnt debian/mediainfo --help

# run simple scan
$ docker run --rm -i -v ~/Projects/VideoTest/:/mnt debian/mediainfo demo.mp4

# run full scan
$ docker run --rm -i -v ~/Projects/VideoTest/:/mnt debian/mediainfo -f demo.mp4

# show aspect ratio
$ docker run --rm -i -v ~/Projects/VideoTest/:/mnt debian/mediainfo --Inform="Video;%DisplayAspectRatio%" demo.mp4

# show duration
$ docker run --rm -i -v ~/Projects/VideoTest/:/mnt debian/mediainfo --Inform="General;%Duration/String3%" demo.mp4

# show audio format
$ docker run --rm -i -v ~/Projects/VideoTest/:/mnt debian/mediainfo --Inform="Audio;%Format%" demo.mp4

# show resolution and codec
$ docker run --rm -i -v ~/Projects/VideoTest/:/mnt debian/mediainfo --Inform="Video;Resolution=%Width%x%Height%\nCodec=%CodecID%" demo.mp4

# list all possible file parameters
$ docker run --rm -i -v ~/Projects/VideoTest/:/mnt debian/mediainfo --info-parameters | less

# create XML report (all internal tags)
$ docker run --rm -i -v ~/Projects/VideoTest/:/mnt debian/mediainfo -f --Output=XML demo.mp4

# show mediatrace info
$ docker run --rm -i -v ~/Projects/VideoTest/:/mnt debian/mediainfo --Details=1 demo.mp4

# create report file
$ docker run --rm -i -v ~/Projects/VideoTest/:/mnt debian/mediainfo demo.mp4 --LogFile="Report.log"

mplayer

Second application is mplayer. Here the wikipedia link.

# list help
$ docker run --rm -i -v ~/Projects/VideoTest/:/mnt debian/mplayer --help

# show all properties
$ docker run --rm -i -v ~/Projects/VideoTest/:/mnt debian/mplayer -vo null -ao null -frames 0 -identify demo.mp4

# show all video properties
$ docker run --rm -i -v ~/Projects/VideoTest/:/mnt debian/mplayer -vo null -ao null -frames 0 -identify demo.mp4 | grep VIDEO

# show all audio properties
$ docker run --rm -i -v ~/Projects/VideoTest/:/mnt debian/mplayer -vo null -ao null -frames 0 -identify demo.mp4 | grep AUDIO

# show video format
$ docker run --rm -i -v ~/Projects/VideoTest/:/mnt debian/mplayer -vo null -ao null -frames 0 -identify demo.mp4 | grep ID_VIDEO_FORMAT

exiftool

Now we take a look on exiftool. Here the wikipedia article and the official documentation.

# show all parameters
$ docker run --rm -i -v ~/Projects/VideoTest/:/mnt debian/exiftool demo.mp4

# show all parameters sort by group (including duplicate and unknown tags)
$ docker run --rm -i -v ~/Projects/VideoTest/:/mnt debian/exiftool -a -u -g1 demo.mp4

# show friendly parameters
$ docker run --rm -i -v ~/Projects/VideoTest/:/mnt debian/exiftool -s -G demo.mp4

# show Height and Width
$ docker run --rm -i -v ~/Projects/VideoTest/:/mnt debian/exiftool '-*source*image*' demo.mp4

# show audio format
$ docker run --rm -i -v ~/Projects/VideoTest/:/mnt debian/exiftool '-*Audio*Format*' demo.mp4

# show video duration
$ docker run --rm -i -v ~/Projects/VideoTest/:/mnt debian/exiftool '-*Duration*' demo.mp4 | head -1

# create json output with specific values
$ docker run --rm -i -v ~/Projects/VideoTest/:/mnt debian/exiftool -j -VideoFrameRate -MediaDuration demo.mp4 > report.json

# create csv report file with specific values
$ docker run --rm -i -v ~/Projects/VideoTest/:/mnt debian/exiftool -csv -FileSize -ImageWidth -ImageHeight -AudioFormat -AudioChannels demo.mp4 > report.csv

avprobe

Last but not least avprobe. Here the wikipedia article and detailed official documentation.

# list help
$ docker run --rm -i -v ~/Projects/VideoTest/:/mnt debian/avprobe --help

# list available formats
$ docker run --rm -i -v ~/Projects/VideoTest/:/mnt debian/avprobe -formats

# list available codecs
$ docker run --rm -i -v ~/Projects/VideoTest/:/mnt debian/avprobe -codecs

# show all properties
$ docker run --rm -i -v ~/Projects/VideoTest/:/mnt debian/avprobe demo.mp4

# show stream properties in json format
$ docker run --rm -i -v ~/Projects/VideoTest/:/mnt debian/avprobe -of json -loglevel quiet -show_streams demo.mp4

# show specific properties
$ docker run --rm -i -v ~/Projects/VideoTest/:/mnt debian/avprobe -show_format -show_streams -pretty demo.mp4

# show size properties
$ docker run --rm -i -v ~/Projects/VideoTest/:/mnt debian/avprobe -show_entries format=size demo.mp4

# show duration and size properties
$ docker run --rm -i -v ~/Projects/VideoTest/:/mnt debian/avprobe -loglevel quiet -show_entries format=duration,size demo.mp4

# show duration and size properties in json format
$ docker run --rm -i -v ~/Projects/VideoTest/:/mnt debian/avprobe -of json -loglevel quiet -show_entries format=duration,size demo.mp4

Compare tools by expecting specific result

I will not judge the applications against each other! But here a compare of complexity of commands and output for video duration.

# get duration by exiftool
$ exiftool -s -s -s  -MediaDuration demo.mp4
...
0:01:04

# get duration by mediainfo
$ mediainfo --Inform="General;%Duration/String3%" demo.mp4
...
00:01:04.884

# get duration by avprobe
$ avprobe -v error -sexagesimal -show_entries format=duration -of default=noprint_wrappers=1:nokey=1 demo.mp4
...
0:01:04.884000

# get duration by mplayer
$ mplayer -vo null -ao null -frames 0 -nolirc -identify demo.mp4 | grep ID_LENGTH | cut -d'=' -f2
...
64.88