Create REST API mock server with Docker

This time again a tutorial with various instructions. It is a REST API services for development and testing purposes and some simple Docker instructions.

Preconditions

Note: For Mac OS X and Windows use Docker Toolbox!

Create and connect into Boot2Docker VM

# create new boot2docker vm
$ docker-machine create -d virtualbox apivm

# list created vm(s)
$ docker-machine ls

# list informations (optional)
$ docker-machine inspect apimock

# ssh into boot2docker vm
$ docker-machine ssh apivm

Create Dockerfile (inside VM)

# create new Dockerfile
$ vi Dockerfile
FROM ubuntu

# install python packages
RUN apt-get update && apt-get -y install python python-dev python-pip

# install python libraries
RUN pip install mock-server tornado==4.2

# create directory
RUN mkdir -p api

EXPOSE 8888

CMD ["mock-server","--address=0.0.0.0","--dir=api"]

Create Docker image and container (inside VM)

# create Docker image
$ docker build -t api_image .

# list Docker image(s)
$ docker images

# create and start new container from Docker image
$ docker run --name api_container -d -p 8888:8888 api_image

# list Docker container(s)
$ docker ps -a

Run application in browser

Now open a browser and call URL like: http://<192.168.99.100>:8888/__manage. You can now begin to create and use REST API resources.

Create Windows 10 Vagrant Base Box

In the first part I have shown how to create the Windows 10 VirtualBox VM. This time I will show you how to create a Vagrant Base Box.

Preconditions

Important Windows 10 Settings

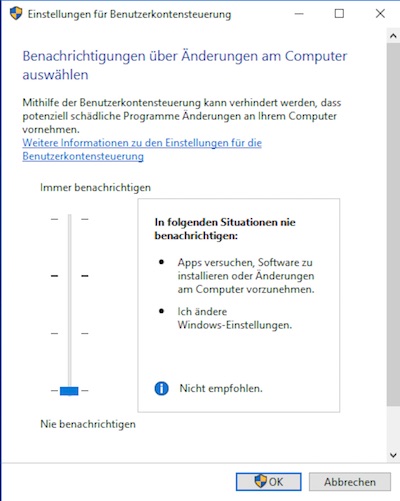
Turn off and disable UAC (here you will find different ways)

disable windows 10 uac

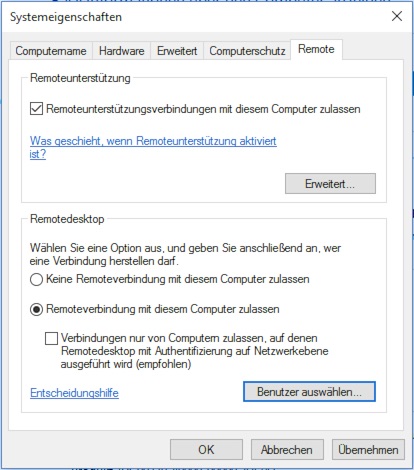
Enable Remote Desktop

remote desktop settings

Configure WinRM on Windows

open the Command Prompt as Admin

> winrm quickconfig -q
> winrm set winrm/config/winrs @{MaxMemoryPerShellMB="300"}
> winrm set winrm/config @{MaxTimeoutms="1800000"}
> winrm set winrm/config/service @{AllowUnencrypted="true"}
> winrm set winrm/config/service/auth @{Basic="true"}
> sc config WinRM start=auto

Optional Settings for Windows

open the PowerShell as Admin

# remove all of the metro apps
> Get-AppXPackage -AllUsers | Remove-AppXPackage

# remove log files
> Get-Childitem "C:\Windows\Logs\dosvc" | Remove-Item -Verbose

# disables the system restore feature
> Disable-ComputerRestore c:

# disable hibernation
> powercfg -h off

# allow Powershell scripts to provision
> Set-ExecutionPolicy -ExecutionPolicy Unrestricted

Okay,… that is all. Now shutdown windows…

Create Vagrant BaseBox

# goto default directory
$ cd VirtualBox\ VMs/

# create base box from VM
$ vagrant package --base Win10x64 --output Win10x64.box

# add box
$ vagrant box add lupin/windows10 Win10x64.box

# check vagrant boxes
$ vagrant box list

Create and run test project

# create project folder
$ mkdir ~/test_project && cd ~/test_project

# initializes to be a Vagrant environment
$ vagrant init lupin/windows10

# edit Vagrantfile
$ vim Vagrantfile

# start VM
$ vagrant up

# start rdp client
$ vagrant rdp
# -*- mode: ruby -*-
# vi: set ft=ruby :

Vagrant.configure(2) do |config|

  config.vm.box = "lupin/windows10"
  config.vm.guest = :windows
  config.vm.communicator = "winrm"
  config.winrm.username = "vagrant"
  config.winrm.password = "vagrant"
  config.vm.boot_timeout = 600
  config.vm.network :forwarded_port, guest: 3389, host: 3389
  config.vm.network :forwarded_port, guest: 5985, host: 5985, id: "winrm", auto_correct: true

  config.vm.provider "virtualbox" do |vb|
    # vb.gui = true
    vb.memory = "2048"
    vb.cpus = 2
    vb.name = "Windows_Vagrant"
  end

end

Values for username and password should match your needs!

Create Windows 10 VirtualBox VM

This tutorial is designed to prepare for another!

Preconditions

Prepare VM

# switch into default VirtualBox directory
$ cd VirtualBox\ VMs/

# create new VirtualBox VM
$ VBoxManage createvm --name "Win10x64" --ostype Windows10_64 --register

# configure system settings of VM
$ VBoxManage modifyvm "Win10x64" --memory 2048 --cpus 2 --acpi on --pae on --hwvirtex on --nestedpaging on

# configure boot settings of VM
$ VBoxManage modifyvm "Win10x64" --boot1 dvd --boot2 disk --boot3 none --boot4 none

# configure video settings
$ VBoxManage modifyvm "Win10x64" --vram 128 --accelerate3d on

# configure audio settings
$ VBoxManage modifyvm "Win10x64" --audio coreaudio --audiocontroller hda

# configure network settings
$ VBoxManage modifyvm "Win10x64" --nic1 nat

# configure usb settings
$ VBoxManage modifyvm "Win10x64" --usb on

# create storage medium for VM
$ VBoxManage createhd --filename ./Win10x64/Win10x64.vdi --size 30000

# modify a storage controller
$ VBoxManage storagectl "Win10x64" --name "SATA" --add sata

# attache storage medium to VM
$ VBoxManage storageattach "Win10x64" --storagectl "SATA" --port 0 --device 0 --type hdd --medium ./Win10x64/Win10x64.vdi

# add windows iso
$ VBoxManage storageattach "Win10x64" --storagectl "SATA" --port 1 --device 0 --type dvddrive --medium /path/to/windows.iso

# add guest addition iso
$ VBoxManage storageattach "Win10x64" --storagectl "SATA" --port 2 --device 0 --type dvddrive --medium /path/to/VBoxGuestAdditions.iso

# start VM
$ VBoxManage startvm Win10x64

You can now begin the installation. Do not forget the Guest Additions! After successful installation and configuration, you can remove the unnecessary media.

# remove media (on stopped VM)
$ VBoxManage storageattach "Win10x64" --storagectl "SATA" --port 1 --device 0 --type dvddrive --medium none
$ VBoxManage storageattach "Win10x64" --storagectl "SATA" --port 2 --device 0 --type dvddrive --medium none

Multiple hosts provisioning with Vagrant, Ansible and virtualenv

In this tutorial we use Ansible (installed in virtualenv) and Vagrant. Furthermore, we have different machines (Debian, CentOS). For all hosts we want to have Provisioning on startup and via command.

Precondition

Folder structure

.
├── Makefile
├── Vagrantfile
├── playbook.yml
├── requirements.txt
└── roles
    └── common
        └── tasks
            └── main.yml

Files

ansible
ansible-lint
VAGRANTFILE_API_VERSION = "2"
 
Vagrant.configure(VAGRANTFILE_API_VERSION) do |config|

  # CentOS 7 VM
  config.vm.define "centos" do |centos|
    centos.vm.box = "lupin/centos7"
    centos.vm.network :forwarded_port, guest: 22, host: 2221, id: 'ssh'
    centos.vm.provider "virtualbox" do |vb|
       vb.name = "CentOS7-Vagrant-Ansible"
    end
    centos.vm.provision "ansible" do |ansible|
        # ansible.verbose = "v"
        ansible.playbook = "playbook.yml"
    end
  end

  # Debian 8 VM
  config.vm.define "debian" do |debian|
    debian.vm.box = "lupin/debian8"
    debian.vm.network :forwarded_port, guest: 22, host: 2222, id: 'ssh'
    debian.vm.provider "virtualbox" do |vb|
       vb.name = "Debian-Vagrant-Ansible"
    end
    debian.vm.provision "ansible" do |ansible|
        # ansible.verbose = "v"
        ansible.playbook = "playbook.yml"
    end
  end

end
---
- hosts: all
  become: yes
  gather_facts: yes
  roles:
    - common
---
- debug: msg="System {{ ansible_distribution }}"
ENV_DIR = env
CURRENT_DIR := $(shell pwd)
INTERPRETER = $(CURRENT_DIR)/$(ENV_DIR)/bin/
PATH := ${PATH}:$(INTERPRETER)

help:
	@echo "Run make <target> with:"
	@echo " > env           : create virtualenv on folder $(ENV_DIR)"
	@echo " > deps          : install dependentcies"
	@echo " > cleanenv      : delete virtualenv"
	@echo " > start         : run vagrant up"
	@echo " > provisioning  : start ansible provisioning"
	@echo " > kill          : run vagrant destroy"

debug:
	@echo " > ansible location is     : $(INTERPRETER)"
	@echo " > environment variable is : $(PATH)"
	vagrant status

env:
	virtualenv $(ENV_DIR) && \
	. $(ENV_DIR)/bin/activate && \
	make deps

deps:
	$(ENV_DIR)/bin/pip install -r requirements.txt

cleanenv:
	rm -fr $(ENV_DIR)

start:
	vagrant up

provisioning:
	vagrant provision

kill:
	vagrant destroy -f

Usage

# create environment
$ make env

# start vagrant (create VM`s and run provisioning)
$ make start

# run provisioning (on started VM`s)
$ make provisioning

# stop vagrant (delete VM`s)
$ make kill

# delete environment
$ make cleanenv

Hint

Check out the by Vagrant generated inventory file!

$ cat .vagrant/provisioners/ansible/inventory/vagrant_ansible_inventory

PyCharm, Vagrant and Ansible

This tutorial is about the interaction of PyCharm (Community Edition), Vagrant and Ansible. I want to show how you can simplify your daily work.

Preconditions

The disclosures in the brackets are my current versions. Mac OS X user need to have Command Line Tools installed!

Folder and file structure

.
├── Makefile
├── Vagrantfile
├── inventory
├── playbook.yml
└── roles
    └── common
        └── tasks
            └── main.yml

File contents

help:
	@echo "Run make <target> with:"
	@echo " > start         : to create vm via vagrant"
	@echo " > provisioning  : to start ansible on vm"
	@echo " > kill          : to stop and destroy vm"

start:
	vagrant up

provisioning:
	ansible-playbook -i inventory playbook.yml

kill:
	vagrant destroy -f
VAGRANTFILE_API_VERSION = "2"

Vagrant.configure(VAGRANTFILE_API_VERSION) do |config|
  config.vm.box = "demo/centos7"
  config.vm.provider "virtualbox" do |vb|
     vb.name = "Vagrant-Ansible"
  end
  config.vm.provision "ansible" do |ansible|
      # ansible.verbose = "v"
      ansible.playbook = "playbook.yml"
  end
end
[vagrant-example]
127.0.0.1 ansible_ssh_user=vagrant ansible_ssh_port=2222 ansible_ssh_private_key_file=.vagrant/machines/default/virtualbox/private_key
---
- hosts: all
  become: yes
  gather_facts: yes
  roles:
    - common
---
- name: upgrade all packages via yum
  yum: name=* state=latest
  when: (ansible_distribution == 'CentOS') or
        (ansible_distribution == 'Red Hat Enterprise Linux')
  tags:
    - common

- name: upgrade all packages via apt
  apt: upgrade=dist
  when: (ansible_distribution == 'Debian') or
        (ansible_distribution == 'Ubuntu')
  tags:
    - common

Little hint

If you do not know the path for ansible_ssh_private_key_file, just type $ vagrant ssh-config!

PyCharm – External Tools

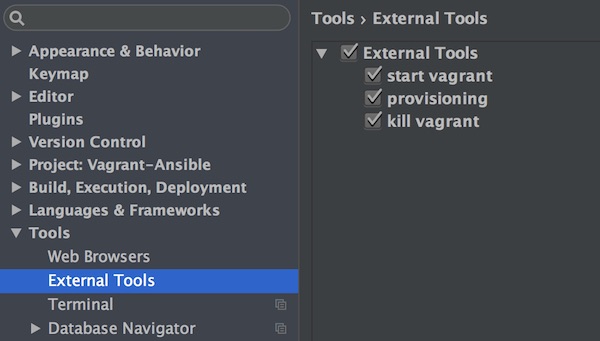
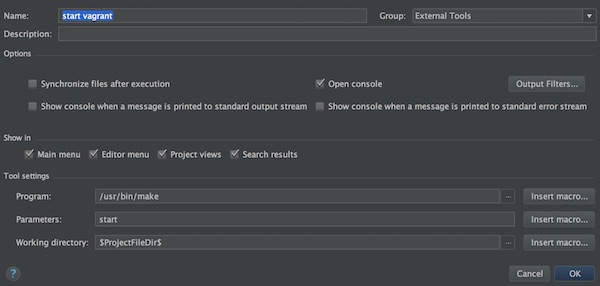
In the last step we configure the PyCharm (External Tools). We do this for every command from Makefile exept help.

PyCharm-ExternalTool Configuration

PyCharm Make Commands

Create private vagrant box repository

For various reasons it may happen that the public Vagrant box repository should not be used. But Vagrant boxes should be available on the internal network. In addition, these boxes are to be versioned. With a few steps, this can be realized by Nginx.

Preparation

Nginx

# install epel-release
$ yum install -y epel-release && yum update -y

# install nginx, and additional tools
$ yum install -y nginx vim tree

# configure nginx to be automatically started at boot 
$ systemctl enable nginx

# start nginx
$ systemctl start nginx

# create new folders
$ mkdir -p /usr/share/nginx/html/devops/vagrant/boxes

# set access rights
$ chmod 755 -R /usr/share/nginx/html/devops/

# create JSON file
$ touch /usr/share/nginx/html/devops/vagrant/centos.json

# show current state
$ tree /usr/share/nginx/html/devops/
/usr/share/nginx/html/devops/
└── vagrant
    ├── boxes
    │ └── CentOS7.box
    └── centos.json

# get sha1 checksum from box
$ sha1sum /usr/share/nginx/html/devops/vagrant/boxes/CentOS7.box

# edit JSON file
$ vim /usr/share/nginx/html/devops/vagrant/centos.json

# edit nginx conf
$ vim /etc /nginx/nginx.conf

# check nginx config
$ nginx -t

# restart nginx
$ systemctl restart nginx

# enter permissive mode
$ setenforce 0
{
    "name": "demo/centos7",
    "description": "This box contains CentOS 7 64-bit.",
    "versions": [{
        "version": "0.1.0",
        "providers": [{
                "name": "virtualbox",
                "url": "http://<target>/devops/vagrant/boxes/CentOS7.box",
                "checksum_type": "sha1",
                "checksum": "99e6d7fc44cccabdfc6ed9ce178ca65fd9dcbac8"
        }]
    }]
}
...

# resolve vagrant json file(s)
location ~ ^/devops/vagrant/$ {
    index $1.json;
    try_files $uri $uri/ $1.json =404;
    autoindex off;
}
# enable auto indexing for boxes
location ~ ^/devops/vagrant/boxes/$ {
    try_files $uri $uri/ =404;
    autoindex on;
    autoindex_exact_size on;
    autoindex_localtime on;
}
# serve json with specific header
    location ~ \.json$ {
    add_header Content-Type application/json;
}
# serve box(s) with specific header
location ~ \.box$ {
    add_header Content-Type application/octet-stream;
}

...

Client

On your browser check following URL`s before proceeding: http://<target>/devops/vagrant/centos.json and http://<target>/devops/vagrant/boxes/

# create project directory
$ mkdir ~/tutorial && cd ~/tutorial

# add base box repository
$ vagrant box add demo/centos7 http://<target>/devops/vagrant/centos.json

# list all boxes
$ vagrant box list
demo/centos7  (virtualbox, 0.1.0)

# create Vagrant project
$ vagrant init demo/centos7

Nginx (Part 2)

# edit JSON file
$ vim /usr/share/nginx/html/devops/vagrant/centos.json

Attention! I use for this demonstration the same box!

{
    "name": "demo/centos7",
    "description": "This box contains CentOS 7 64-bit.",
    "versions": [{
        "version": "0.1.0",
        "providers": [{
                "name": "virtualbox",
                "url": "http://<target>/devops/vagrant/boxes/CentOS7.box",
                "checksum_type": "sha1",
                "checksum": "99e6d7fc44cccabdfc6ed9ce178ca65fd9dcbac8"
        }]
    },{
        "version": "0.1.1",
        "providers": [{
                "name": "virtualbox",
                "url": "http://<target>/devops/vagrant/boxes/CentOS7.box",
                "checksum_type": "sha1",
                "checksum": "99e6d7fc44cccabdfc6ed9ce178ca65fd9dcbac8"
        }]
    }]
}

Client (Part 2)

# check box version
$ vagrant box outdated
A newer version of the box 'demo/centos7' is available! You currently
have version '0.1.0'. The latest is version '0.1.1'. Run
`vagrant box update` to update.

You can add now more boxes with different JSON files!
Create vagrant box from CentOS 7 VirtualBox

This time I will show you, how to create a basic Vagrant box from a CentOS 7 VirtualBox. Caution, use only for educational purposes and not for productive environments!

Preparation

Network configuration

On VirtualBox select mode “NAT” or “Bridged”.

$ vi /etc /sysconfig/network-scripts/ifcfg-enp0s3
$ service network restart

Install virtualbox guest additions 

# Update
$ yum update -y

# Install development tools
$ yum groupinstall -y "Development Tools"

# restart vm
$ reboot

# insert cd
# Devices -> Install Guest Additions

# mount cd
$ mount /dev/cdrom /mnt

# start guest additions installation
$ sh /mnt/VBoxLinuxAdditions.run --nox11

Prepare Vagrant SSH access

# Edit sudoers file to disable requiretty
$ visudo

# Defaults    requiretty

# add user vagrant 
$ useradd vagrant

# set password for user vagrant (vagrant)
$ passwd vagrant

# create vagrant sudoers file 
$ visudo -f /etc /sudoers.d/vagrant

vagrant ALL=(ALL) NOPASSWD:ALL

# change to user vagrant
$ su - vagrant

# create ssh folder with access rights
$ mkdir .ssh && chmod 0700 .ssh && cd .ssh

# create authorized_keys file
$ echo "ssh-rsa AAAAB3NzaC1yc2EAAAABIwAAAQEA6NF8iallvQVp22WDkTkyrtvp9eWW6A8YVr+kz4TjGYe7gHzIw+niNltGEFHzD8+v1I2YJ6oXevct1YeS0o9HZyN1Q9qgCgzUFtdOKLv6IedplqoPkcmF0aYet2PkEDo3MlTBckFXPITAMzF8dJSIFo9D8HfdOV0IAdx4O7PtixWKn5y2hMNG0zQPyUecp4pzC6kivAIhyfHilFR61RGL+GPXQ2MWZWFYbAGjyiYJnAmCP3NOTd0jMZEnDkbUvxhMmBYSdETk1rRgm+R4LOzFUGaHqHDLKLX+FIPKcF96hrucXzcWyLbIbEgE98OHlnVYCzRdK8jlqm8tehUc9c9WhQ== vagrant insecure public key" > authorized_keys

# set access rights for authorized_keys file
$ chmod 0600 authorized_keys

# clear history and switch back to root user
$ history -c && exit

# clear history and shutdown
$ history -c && shutdown -h 0

Create Vagrant box

# create new folder for Vagrant project and change into VM folder
$ mkdir ~/VagrantProject && cd ~/VirtualBox\ VMs/

# create base box from VM
$ vagrant package --base CentOS7 --output ~/VagrantProject/CentOS7.box

# change back to Vagrant project folder
$ cd ~/VagrantProject

# add box
$ vagrant box add lupin/centos7 CentOS7.box

# check vagrant boxes
$ vagrant box list

Create project and start with work

# create project
$ vagrant init lupin/centos7

# edit vagrantfile 
$ vim Vagrantfile

  config.vm.provision "shell", inline: <<-SHELL
     sudo yum update -y
     sudo yum install -y vim tree
  SHELL

# creates and configures guest machine 
$ vagrant up

# SSH into a running Vagrant machine
$ vagrant ssh

# ... do your stuff ...

# stop Vagrant machine
$ vagrant halt

Python profiling with PyCharm Community Edition

Before we start, if you don`t know what is profiling read this Wikipedia article! In my opinion profiling should be a part of every development/build process! Whether the responsibility lies with QA or development. Python profiler are supported only in PyCharm Professional Edition. This article show you the possibilities for the community edition.

Preparation

  • PyCharm installed
  • Virtualenv or similar installed (optional)
  • PyCharm BashSupport Plugin installed

The easiest Profiler

With Unix/Linux time command you have allready a simple profiler! Time writes a message to standard output. Here you will find some information on Stackoverflow.

#!/usr/bin/env python
# -*- coding: utf-8 -*-


def hello_world():

    for i in range(1, 5):
        print '%d Hello world from python...' % i


if __name__ == '__main__':
    hello_world()

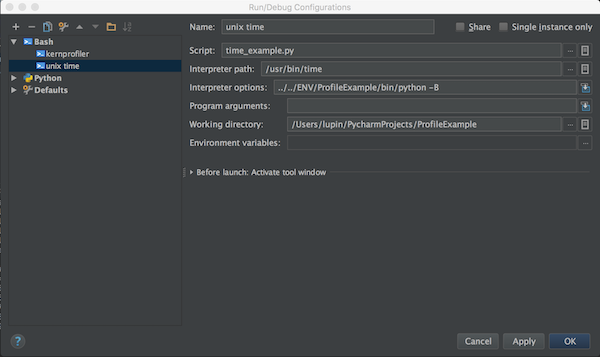
With BashSupport Plugin we can setup the “Run/Debug Configuration” like:

unix time profiler

Better informations

But now we need better information. For this we use cProfile, cprofilev and snakeviz.

# cProfile is part of standard python library

# install snakeviz
$ pip install snakeviz

# install cprofildev
$ pip install cprofilev

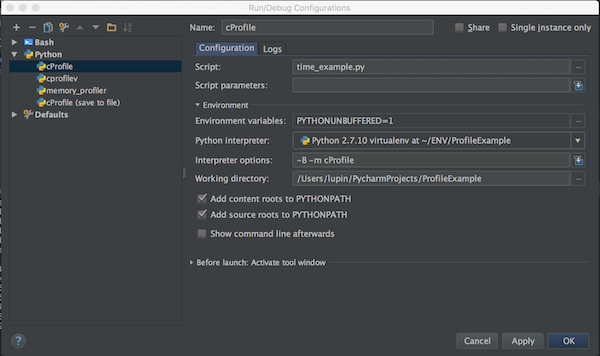
“Run/Debug Configuration” example

cProfile simple

Now will store the results into a file

cProfile store output

With snakeviz you can open the profile in browser:

$ snakeviz output.prof

The other option is to use cprofilev:

cprofilev

Even more information

If that was not enough,… we install some more libraries.

# install line_profiler
$ pip install line_profiler

# install memory_profiler and psutil
$ pip install memory_profiler
$ pip install psutil

Now we need to change the example code. We add the decorator…

#!/usr/bin/env python
# -*- coding: utf-8 -*-


@profile
def hello_world():

    for i in range(1, 5):
        print '%d Hello world from python...' % i


if __name__ == '__main__':
    hello_world()

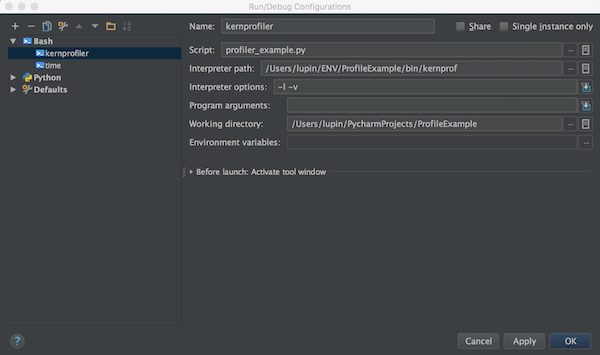
the line_profiler configuration

kernprofiler

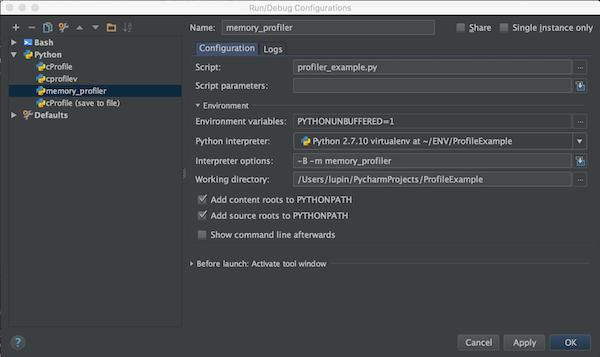
the memory_profiler

memory profiler

All configurations could now startet via the “Run” button. There are even more Profiler that you can use with similar PyCharm.