With Docker you can quickly and easily install, configure and use Selenium Grid. This tutorial shows the respective steps that you need as a software tester (or Developer). Instead of Python you can also use other languages, which are supported by Selenium.
Preconditions
- Python installed (min. 2.7)
- virtualenv installed (optional)
- docker-machine installed
- docker-compose installed
Preparation of files
# create new project
$ mkdir -p ~/Project/SeleniumTutorial && cd ~/Project/SeleniumTutorial

# create docker-compose.yml (version 1)
$ vim v1-docker-compose.yml

# or create docker-compose.yml (version 2)
$ vim v2-docker-compose.yml

# create python example.py
$ vim example.py
Note: You can opt for a version of docker-compose.yml!
Version: 1
---
selenium_hub:
  image: selenium/hub
  ports:
    - 4444:4444
node_1:
  image: selenium/node-chrome
  links:
    - selenium_hub:hub
node_2:
  image: selenium/node-firefox
  links:
    - selenium_hub:hub
Version: 2
---
version: '2'
services:
  selenium_hub:
    image: selenium/hub
    ports:
      - 4444:4444
  node_1:
    image: selenium/node-chrome
    depends_on:
      - selenium_hub
    environment:
      - HUB_PORT_4444_TCP_ADDR=selenium_hub
  node_2:
    image: selenium/node-firefox
    environment:
      - HUB_PORT_4444_TCP_ADDR=selenium_hub
    depends_on:
      - selenium_hub
import os
import datetime
import time
import unittest
from selenium import webdriver
class Example(unittest.TestCase):
def setUp(self):
self.driver = webdriver.Remote(
command_executor='http://192.168.99.100:4444/wd/hub',
desired_capabilities={
'browserName': 'firefox',
'javascriptEnabled': True
}
)
self.driver.get('http://softwaretester.info/')
def test_something(self):
dt_format = '%Y%m%d_%H%M%S'
cdt = datetime.datetime.fromtimestamp(time.time()).strftime(dt_format)
current_location = os.getcwd()
img_folder = current_location + '/images/'
if not os.path.exists(img_folder):
os.mkdir(img_folder)
picture = img_folder + cdt + '.png'
self.driver.save_screenshot(picture)
def tearDown(self):
self.driver.quit()
if __name__ == "__main__":
unittest.main(verbosity=1)
Create environment
# create new VM
$ docker-machine create -d virtualbox Grid

# pointing shell
$ eval $(docker-machine env Grid)

# show status (optional)
$ docker-machine ls
...
NAME   ACTIVE   DRIVER       STATE     URL                         SWARM   DOCKER    ERRORS
Grid   *        virtualbox   Running   tcp://192.168.99.100:2376           v1.11.1

# run docker-compose (Version: 1)
$ docker-compose -f v1-docker-compose.yml up -d

# run docker-compose (Version: 2)
$ docker-compose -f v2-docker-compose.yml up -d

# show status (Version: 1)
$ docker-compose -f v1-docker-compose.yml ps
...
             Name                         Command           State           Ports
------------------------------------------------------------------------------------------
seleniumtutorial_node_1_1         /opt/bin/entry_point.sh   Up
seleniumtutorial_node_2_1         /opt/bin/entry_point.sh   Up
seleniumtutorial_selenium_hub_1   /opt/bin/entry_point.sh   Up      0.0.0.0:4444->4444/tcp

# show status (Version: 2)
$ docker-compose -f v2-docker-compose.yml ps
...
             Name                         Command           State           Ports
------------------------------------------------------------------------------------------
seleniumtutorial_node_1_1         /opt/bin/entry_point.sh   Up
seleniumtutorial_node_2_1         /opt/bin/entry_point.sh   Up
seleniumtutorial_selenium_hub_1   /opt/bin/entry_point.sh   Up      0.0.0.0:4444->4444/tcp
Open Browser
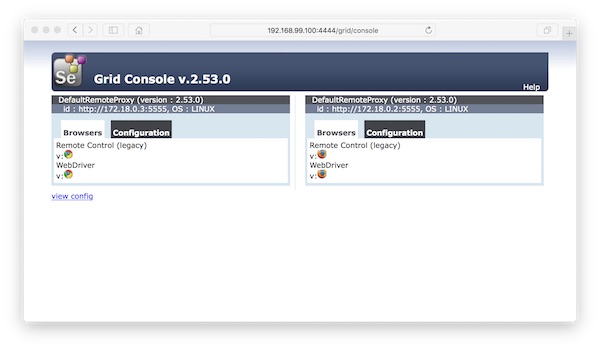
Run Python script
# run python selenium script
$ python -B ~/Projects/Selenium/example.py
Note: Via browserName (example.py) you can choose the respective browser (firefox or chrome)!
Note: Via docker-compose scale you can add/remove node instances!
# create 2 instances (Version: 1)
$ docker-compose -f v1-docker-compose.yml scale node_1=2

# create 3 instances (Version: 2)
$ docker-compose -f v2-docker-compose.yml scale node_2=3