RTP stream from Jetson Nano CSI Camera to macOS

Would you like to stream from the CSI Camera (Jetson Nano) to your macOS? No problem, it’s super easy! In this tutorial I will show you 2 ways to display the RTP video stream on your macOS. Both options require only a few steps and which one you choose is up to you.

Condition

  • Both devices (Jetson Nano & macOS) must be on the same network
  • SSH connection from macOS to Jetson Nano is available
  • You know the IP or the domain name (.local) of the macOS
  • Firewall on macOS is disabled (for simplicity)
  • The CSI camera on the Jetson Nano is operational

Use of ffplay

Download ffplay for macOS from the official provider site. Unzip the archive and move binary to target directory.

# move binary to target directory
$ mv ffplay /usr/local/bin/ffplay

# test ffplay version (optional)
$ ffplay -version

Now create an SDP file for ffplay (for example directly on your desktop).

SDP:
v=0
o=- 0 0 IN IP4 127.0.0.1
s=NanoStream
c=IN IP4 127.0.0.1
t=0 0
a=tool:libavformat 56.15.102
m=video 1234 RTP/AVP 96
a=rtpmap:96 H264/90000

Note: Note the port specification (m=video 1234 RTP/AVP 96), if this is already occupied on your system, you must change this value and adapt the following steps.

Connect (via SSH) to the Jetson Nano and start the video stream from the camera there.

# start video stream from csi camera
$ gst-launch-1.0 nvarguscamerasrc ! 'video/x-raw(memory:NVMM), format=NV12, width=1920, height=1080' ! nvvidconv flip-method=2 ! nvv4l2h264enc insert-sps-pps=true ! h264parse ! rtph264pay pt=96 ! udpsink host=(IP or Domain from macOS) port=1234 sync=false -e

If there are no problems, leave this terminal connection and start another terminal on the macOS.

# start ffplay
$ ffplay -protocol_whitelist "file,udp,rtp" -i ~/Desktop/ffplay.sdp

After confirming the command, a window should open after a few seconds and you will see the video stream.

Use of VLC

Download latest VLC player from official VLC website. Now install VLC Player. Optionally you can test whether everything works. Also create an SDP file for the VLC Player.

c=IN IP4 127.0.0.1
m=video 1234 RTP/AVP 96
a=rtpmap:96 H264/90000

Connect (via SSH) to the Jetson Nano and start the video stream from the camera there.

# start video stream from csi camera
$ gst-launch-1.0 nvarguscamerasrc ! 'video/x-raw(memory:NVMM), format=NV12, width=1920, height=1080' ! nvvidconv flip-method=2 ! nvv4l2h264enc insert-sps-pps=true ! h264parse ! rtph264pay pt=96 ! udpsink host=(IP or Domain from macOS) port=1234 sync=false -e

Note: Depending on your camera position, you can change the value of flip-method=2 (1 to 4).

If there are no problems, leave this terminal connection and double click on the SDP file for the VLC player. Here, too, you should be able to watch the stream after a few seconds.

Notice

If you have already cloned/installed the repository dusty-nv/jetson-inference, you can view the different video streams in the same way on macOS!

# video viewer
$ video-viewer --bitrate=1000000 --output-codec=h264 csi://0 rtp://(IP or Domain from macOS):1234 --headless

# pose estimation
$ posenet --bitrate=1000000 --output-codec=h264 csi://0 rtp://(IP or Domain from macOS):1234 --headless

# image detection
$ imagenet --bitrate=1000000 --output-codec=h264 csi://0 rtp://(IP or Domain from macOS):1234 --headless

# object detection
$ detectnet --bitrate=1000000 --output-codec=h264 csi://0 rtp://(IP or Domain from macOS):1234 --headless

Hint: Don’t forget to re-enable the firewall (on your macOS) after you’r done!
Python, cmake and dlib on macOS

There is a very easy possibility to use dlib on macOS. Additional packages and package manager (for example brew) are not needed. Here are the instructions which you can follow independently in a few minutes.

Requirements

Steps

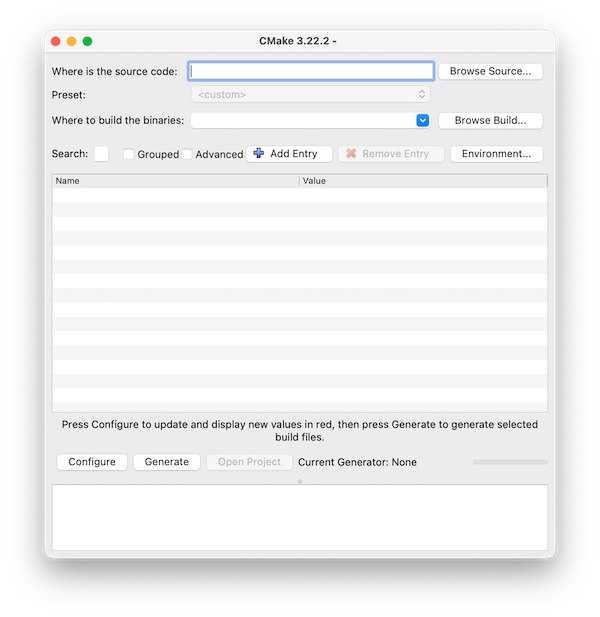
Download latest cmake version as *.dmg or *.tar.gz from cmake.org. After the app has been successfully installed, you can start it (but it is not necessary).

CMake.app on macOS

Inside the CMake application you will find the needed binary. All you have to do now is create a symlink and optionally check the version.

# create symlink
$ sudo ln -s /Applications/CMake.app/Contents/bin/cmake /usr/local/bin/cmake

# check version (optional)
$ cmake --version

Note: Close the terminal and restart if cmake is not found.

If you now want to install dlib in your Python project (in the virtual environment), there will no longer be an error message. Note that the installation may take some time.

# install dlib
(venv) $ pip3 install dlib

# verify dlib installation (optional)
(venv) $ pip3 freeze

That’s it. Made super easy and super fast without bloating the entire system with unnecessary ballast.

RPLidar A1 with ROS Melodic on Ubuntu 18.04

If you are (for example) an owner of NVIDIA Jetson Nano Developer Kit and RPLidar, you can use ROS Melodic to realize obstacle avoidance or simultaneous localization and mapping (SLAM). Here is a beginner’s tutorial for installing the necessary software.

Requirements

Objective

Installing ROS Melodic on Ubuntu 18.04 with Catkin Workspace and use of Python 2.7 for RPLIDAR A1.

Preparation

If you already have the necessary packages installed, you can skip this step.

# update & upgrade
$ sudo apt update && sudo apt upgrade -y

# install needed packages
$ sudo apt install -y git build-essential
Install package

If you run Ubuntu in VirtualBox it is recommended to install the Extension Pack and the VirtualBox Guest Additions.

# install needed packages
$ sudo apt install -y dkms linux-headers-$(uname -r)

# Menu -> Devices -> Insert Guest Additions Image

# reboot system
$ sudo reboot

Install ROS Melodic

For Ubuntu 18.04 you need the latest version ROS 1 (Robot Operating System) Melodic. The packages are not included in the standard sources.

Hint: If you still want to use a newer version of Ubuntu (like 20.04) you need ROS 2 Noetic!

Note: By default the ROS Melodic is using Python 2.7. For higher Python version the following description is not working! But it would also be possible to use Python 3.x, only the steps for installation are little different.

Add ROS repository

The ROS Melodic installation is relatively easy but can take a while depending on the internet connection, as there are many packages to be installed.

# update and install packages
$ sudo apt update && sudo apt install -y ros-melodic-desktop-full python-rosdep python-rosinstall python-rosinstall-generator python-wstool

# verify installation (optional)
$ ls -la /opt/ros/melodic/
add bashrc source
# initialize & update
$ sudo rosdep init && rosdep update

# show ros environment variables (optional)
$ printenv | grep ROS

Create a Catkin workspace

You now need the Catkin Workspace with the necessary RPLIDAR packages/binaries (RPLIDAR SDK from Slamtec).

# create and change into directory
$ mkdir -p $HOME/catkin_ws/src && cd $HOME/catkin_ws/src

# clone Git repository
$ git clone https://github.com/Slamtec/rplidar_ros.git

# change directory
$ cd $HOME/catkin_ws/

# build workspace
$ catkin_make

# verify directory content (optional)
$ ls -la devel/

# refresh environment variables
$ source devel/setup.bash

# verify path variable (optional)
$ echo $ROS_PACKAGE_PATH

# build node
$ catkin_make rplidarNode

Okay, that’s it… Wasn’t very difficult, but a lot of steps.

Start ROS Melodic

Now connect the RPLIDAR device. If you use VirtualBox, pass through the USB from host to guest.

# list USB device and verify permissions
$ ls -la /dev | grep ttyUSB

# change permissions
$ sudo chmod 0666 /dev/ttyUSB0

From now on you need two terminals! Once you have successfully gotartet roscore in the first terminal, switch to the second terminal.

# change directory
$ cd $HOME/catkin_ws/

# launch roscore
$ roscore

Note: Don’t close the first terminal though or don’t stop the running process!

# change directory
$ cd $HOME/catkin_ws

# refresh environment variables
$ source $HOME/catkin_ws/devel/setup.bash

# run UI
$ roslaunch rplidar_ros view_rplidar.launch

Sorry for using screenshots but my provider doesn’t allow the use of certain words or characters. πŸ™

Invalid MIT-MAGIC-COOKIE-1

Problem

After an OS update including a restart of the system, an error occurs with SSH X11 forwarding. Instead of displaying the windows as usual, “Invalid MIT-MAGIC-COOKIE-1” is displayed in the terminal.

Here is the example. I connect to the Ubuntu with my macOS and get the error message.

β”Œβ”€β”€[lupin@HackMac]::[~]
└─ % ssh -C4Y lupin@10.0.0.12

lupin@nano4gb:~$ xeyes
Invalid MIT-MAGIC-COOKIE-1 keyError: Can't open display: localhost:10.0
lupin@nano4gb:~$ exit

1st Quick and dirty solution

Since I’m on my own and relatively secure network, I leave XQuartz running in the background, disable access control, reconnect and everything works again.

β”Œβ”€β”€[lupin@HackMac]::[~]
└─ % xhost +
access control disabled, clients can connect from any host

β”Œβ”€β”€[lupin@HackMac]::[~]
└─ % ssh -C4Y lupin@10.0.0.12

lupin@nano4gb:~$ xeyes
lupin@nano4gb:~$ exit

This setting is (fortunately) only valid for this one session. As soon as I end the connection, restart XQuartz and establish a new SSH connection, the error message appears again. Anyway a not so nice solution!

2nd Quick and dirty solution

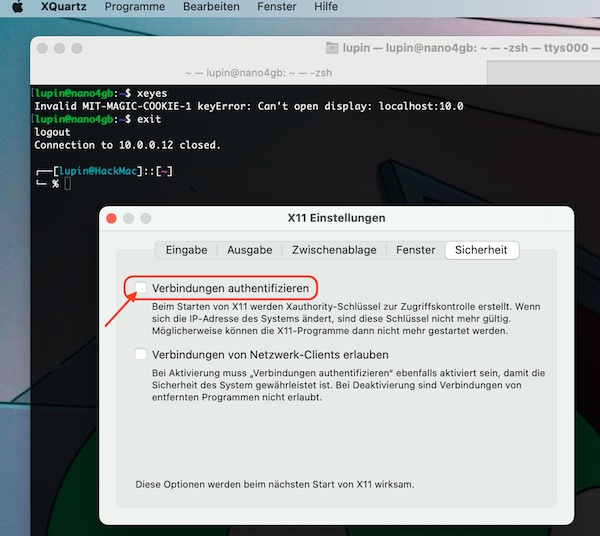
XQuartz offers the possibility to establish the connection without authentication. This solution is permanent and can be set up in the simplest way. Open the XQuartz settings and uncheck the respective checkbox.

XQuartz X11 Settings

Restart XQuartz, establish a new connection.

β”Œβ”€β”€[lupin@HackMac]::[~]
└─ % xhost
access control enabled, only authorized clients can connect

β”Œβ”€β”€[lupin@HackMac]::[~]
└─ % ssh -C4Y lupin@10.0.0.12

lupin@nano4gb:~$ xeyes
lupin@nano4gb:~$ exit
example for xeyes

Now everything works as usual. But even with this solution I have my doubts! So I undo the setting and restart XQuartz.

3rd Quick and dirty solution

As described in the previous step, I undid the setting and restarted XQuartz. Additionally I allowed local connections in the access control.

β”Œβ”€β”€[lupin@HackMac]::[~]
└─ % xhost
access control enabled, only authorized clients can connect

β”Œβ”€β”€[lupin@HackMac]::[~]
└─ % xhost +local:
non-network local connections being added to access control list

β”Œβ”€β”€[lupin@HackMac]::[~]
└─ % ssh -C4Y lupin@10.0.0.12

lupin@nano4gb:~$ xeyes
lupin@nano4gb:~$ exit

This solution also works but is not permanent and not secure.

What now?

Searching the internet didn’t really help me. Some of the suggested solutions are total nonsense (or I completely misunderstand). I’ve also read the man pages where it even says that the environment variable $DISPLAY should not be changed. With me (also due to the ignorance on my part) the first signs of despair are appearing! Trust me, I deleted also all recommended files, what did not change this situation.

My final Solution

In the end my problem was very easy to solve! I still had entries from already deleted macports in the .zprofile file, which set the local environment variable $DISPLAY. With the restart of my macOS, this export of the environment variable became active again, of course.

β”Œβ”€β”€[lupin@HackMac]::[~]
└─ % echo $DISPLAY
:0

β”Œβ”€β”€[lupin@HackMac]::[~]
└─ % vim .zprofile

# I deleted all old macports entries

β”Œβ”€β”€[lupin@HackMac]::[~]
└─ % sudo reboot

The result after the restart.

β”Œβ”€β”€[lupin@HackMac]::[~]
└─ % echo $DISPLAY           
/private/tmp/com.apple.launchd.ASpxDkLA98/org.xquartz:0

β”Œβ”€β”€[lupin@HackMac]::[~]
└─ % ssh -C4Y lupin@10.0.0.12

lupin@nano4gb:~$ xeyes

Everything is all right again. Oh yeah… that was troubleshooting. The good thing is I learned a lot about xhost, xauth plus my own systems.

First steps with Jetson Nano 2GB Developer Kit (Part 1)

The Jetson Nano Developer Kits are awesome to start with artificial intelligence and machine learning. To make your learning more successful, I will use this tutorial to explain some first important steps before you start.

Requirements

The values ​​in brackets are intended to indicate the hardware I am using. However, you can use other compatible hardware. Before you buy, see the documentation provided by Nvidia. Here you will find also a page with many good information collected.

  • Jetson Nano Developer Kit (2GB with WiFi)
  • 5V Fan (NF-A4x20 5V PWM)
  • USB or CSI camera (Raspberry Pi Camera Module V2)
  • Power Supply (Raspberry Pi 15W USB-C Power Supply)
  • Micro SD Card (SanDisk microSDXC-Karte Ultra UHS-I A1 64 GB)

additional Hardware:

  • Monitor & HDMI cable
  • Mouse & Keyboard
  • USB cable (Delock USB 2.0-Kabel USB C – Micro-USB B 1 m)

Objective

The first part should provide information about needed parts to buy and describes the necessary installation (headless).

Installation

After downloading the SD card image (Linux4Tegra, based on Ubuntu 18.04), you can write it to the SD card immediately. Make sure to use the correct image in each case! Here a short overview about commands if you use a macOS.

# list all attached disk devices
$ diskutil list external | fgrep '/dev/disk'

# partitioning a disk device (incl. delete)
$ sudo diskutil partitionDisk /dev/disk<n> 1 GPT "Free Space" "%noformat%" 100%

# extract archive and write to disk device
$ /usr/bin/unzip -p ~/Downloads/jetson-nano-2gb-jp46-sd-card-image.zip | sudo /bin/dd of=/dev/rdisk<n> bs=1m

There is no automatic indication of the dd progress but you can press [control] + [t] while dd is running.

The setup and boot of the Jetson Nano could be done in two different ways (with GUI or Headless). In case you choose the headless setup, connect your computer with the Micro-USB port of the Jetson Nano and follow the next instructions.

# list serial devices (optional)
$ ls /dev/cu.usbmodem*

# list serial devices (long listing format)
$ ls -l /dev/cu.usbmodem*
crw-rw-rw-  1 root  wheel   18,  24 Dec  2 07:23 /dev/cu.usbmodem<n>

# connect with terminal emulation
$ sudo screen /dev/cu.usbmodem<n> 115200

Now you simply follow the initial setup steps and reboot the device after your finish.

Connect to WiFi

If you have not setup the WiFi on initial setup, you can connect again via serial interface and follow the next steps.

# connect with terminal emulation
$ sudo screen /dev/cu.usbmodem<n> 115200

# enable (if WiFi is disabled)
$ nmcli r wifi on

# list available WiFi's
$ nmcli d wifi list

# connect to WiFi
$ nmcli d wifi connect <SSID> password <password>

# show status (optional)
$ nmcli dev status

# show connections (optional)
$ nmcli connection show

Finally you can run the update and installation of needed additional packages.

# update packages
$ sudo apt update -y && sudo apt upgrade -y

# install packages (optional)
$ sudo apt install -y vim tree

From this point on, nothing should stand in the way of the SSH connection, provided you are in the same network.

# get IP (on Jetson device)
$ ip -4 a

# connect via SSH (example for local device)
β”Œβ”€β”€[lupin@HackMac]::[~]
└─ % ssh -C4 <user>@<ip>

In next Part 2 we will add the fan (incl. installation of needed software) and add the camera.

VirtualBox USB passthrough

Yes, this topic is very easy via VirtualBox UI and many people would not have in mind to do these actions with command line. But as I do mostly all tasks while development via terminal, I thought some other persons are interested in the solution, too. So here now a short tutorial to attach/detach USB devices on VirtualBox machines.

Requirements

Objective

Learn and understand the basics for command line USB passthrough for VirtualBox.

Gather informations of USB devices

In a first step it’s important to gather all informations about possible USB devices. There are 3 important values ​​to be determined.

  • UUID
  • VendorId
  • ProductId

In order to better understand which devices are involved, the product name is also an advantage.

# list all usb devices
$ VBoxManage list usbhost

# list all usb devices with specific information
$ VBoxManage list usbhost | grep -i "UUID\|VendorId\|ProductId\|Product\|Current State"

The value of “Current State” can provide you the information if a USB device is in usage or captured by a VM already.

Analysis of VM’s

In the second step, it is advisable to check whether the respective USB standard is configured in the target VM (and whether USB is turned on). There are currently 3 options that VirtualBox supports.

  • USB 1.1: OHCI
  • USB 2.0: OHCI + EHCI
  • USB 3.0: xHCI

Note: My VM is named Debian in all examples, please change this value for your specific needs!

# show all informations for specific vm
$ VBoxManage showvminfo "Debian"

# show usb status for specific vm
$ VBoxManage showvminfo "Debian" | grep -i "ohci\|ehci\|xhci"

Add/remove USB devices

In many cases, USB 1.1 is enabled by default and deactivation leads to a misconfiguration. But there are, as almost always, exceptions.

  • USB 1.1: --usb on|off
  • USB 2.0: --usbehci on|off
  • USB 3.0: --usbxhci on|off

Note: For these kind of configurations the VM should be stopped (turned off).

# enable USB 2.0 for specific vm
$ VBoxManage modifyvm "Debian" --usbehci on

# disable USB 2.0 for specific vm
$ VBoxManage modifyvm "Debian" --usbehci off

# enable USB 3.0 for specific vm
$ VBoxManage modifyvm "Debian" --usbxhci on

# disable USB 3.0 for specific vm
$ VBoxManage modifyvm "Debian" --usbxhci off

If you know the UUID (see first step), you can now attach/detach the respective USB devices.

Note: You can make the following changes during the VM is running. Don’t forget to change the UUID value from my examples.

# attach specifc usb device to specifc vm
$ VBoxManage controlvm "Debian" usbattach "076866d4-436e-424d-be64-660c23248f37"

# detach specifc usb device to specifc vm
$ VBoxManage controlvm "Debian" usbdetach "076866d4-436e-424d-be64-660c23248f37"

Nothing more is needed for this very simple task. But you can save some time and automate these steps with the following section!

Usage of USB filters

VirtualBox USB filters will help you to automatically assign USB devices to your VM. With other words – As soon as the VM starts (or is started) and the USB device is recognized by VirtualBox (and it’s not in use by the host), it will be made available to the guest.

Additionally it’s important to understand that there are two kind of filters (global and machine specifc). Global filters (IHostUSBDeviceFilter) are applied before any machine specific filter (IUSBDeviceFilter).

  • --target <uuid|vmname>|global
  • --action ignore|hold (global filters only)
  • --active yes|no

In this tutorial I focus only on machine specific filters.

# verify for filter on specific vm
$ VBoxManage showvminfo "Debian" | awk '/^USB Device Filters:/,/^Available remote USB devices:/'

Important is the value “index” from 0 to n! If you create the first filter – the index starts with an 0, the second filter with an 1 and so on. To add a filter you must provide the VendorId and ProductId (as minimum) from first section (values inside the brackets), the name is can be chosen free.

Note: you have to adjust the following values in my examples ​​for your environment.

# show help for usb filters
$ VBoxManage usbfilter --help

# create usb filter for specifc vm
$ VBoxManage usbfilter add 0 --target "Debian" --name 'YARD Stick One' --vendorid 1d50 --productid 605b --remote no

# modify usb filter for specifc vm
$ VBoxManage usbfilter modify 0 --target "Debian" --name 'YARD Stick One' --vendorid 1d50 --productid 605b --remote no --manufacturer 'great scott gadgets'

# delete usb filter for specifc vm
$ VBoxManage usbfilter remove 0 --target "Debian"

USB filters are a very nice feature of VirtualBox, just play around and do some further research on it – I’m sure you will love it!

Something awesome for your Docker pipelines

While my constant research for pipeline tools, I have found a fantastic security scanner for Docker images. Something you could use quickly under the topic of CI/CD and DevSecOps for your development. It’s named anchore/grype and the best it’s Open source, really fast and delivers many nice options for reports.

Requirements

  • Docker installed (to pull images)

Hint: You also can load and scan *.tar archives.

Objective

Short introduction in installation and usage of Grype (locally to evaluate).

Note: The later integration into your pipelines shouldn’t be a problem. I will add the Grype repository to my watchlist and for sure try it out in my pipelines.

Installation and default configuration

This first step should only take a few minutes.

# install the latest version to /usr/local/bin
$ curl -sSfL https://raw.githubusercontent.com/anchore/grype/main/install.sh | sh -s -- -b /usr/local/bin

# install the latest version to ~/Downloads
$ curl -sSfL https://raw.githubusercontent.com/anchore/grype/main/install.sh | sh -s -- -b ~/Downloads

# move binary to /usr/local/bin/grype (if you define different location)
$ mv ~/Downloads/grype /usr/local/bin/grype

# create configuration file
$ vim ~/.grype.yaml

# show help
$ grype --help

I copied the content in short form from the official GitHub repository. You can adapt this to your needs at any time.

check-for-app-update: true
fail-on-severity: ''
output: "table"
scope: "squashed"
quiet: false
db:
  auto-update: true
  cache-dir: "~/.grype/db"
  update-url: "https://toolbox-data.anchore.io/grype/databases/listing.json"
log:
  file: ""
  level: "error"
  structured: false

Prepare the database

The Anchore Feed Service provides regular updates about publicly available vulnerabilities. In this section I will guide you to derive the updates manually.

# check database status (optional)
$ grype db status

# check feed service for new updates
$ grype db check

# run database update
$ grype db update

# verify db files (optional)
$ ls -la ~/.grype/db/

Usage examples

Even as the usage of Grype is very simple, here some short examples.

# scan image with configuration settings
$ grype node

# scans for vulnerabilities on all image layer and set output format
$ grype --scope all-layers -o cyclonedx node

# stop if a severity high is found with exit code 1
$ grype --fail-on high node

# show last exit status (optional)
$ echo $?

To stop your validation/pipeline on certain severities of security risks (exit code 1), you can choose between following options: negligible, low, medium, high & critical.

Hint: To save the reports you could use the redirect, to the output stream to a file.

Clean up

Don’t forget to clean up your system!

# list all Docker images (optional)
$ docker images

# delete specific Docker image by name
$ docker rmi node

PyCharm CE remote execution

Since I’m back to develop more in Python and need to execute my Python scripts also on remote machines – I asked my self: “How can I do with PyCharm CE and without any Plugin?” The solution was very easy and this tutorial is about.

Requirements

  • VirtualBox VM (e.g. Linux Debian incl. user and ssh server configured)
  • PyCharm CE installed

Note: Of course you could also use any other option then a Debian vm. Just adapt the tutorial steps for your specific needs.

Objective

Use terminal and external tools of PyCharm CE to execute Python scripts on remote machines.

Introduction

For this tutorial I’m using a VirtualBox VM (Debian Linux) which do have only a NAT interface configured. So I need to enable Port-forwarding for SSH. If this is not the case for you – you can jump over to the section where I explain the important steps in PyCharm.

Analysis of stopped VM’s

As a first step I check my VM settings (just to verify).

# list all vm's (optional)
$ VBoxManage list vms

# list all vm's and grep for name & nic rules
$ VBoxManage list -l vms | grep -i "Name:\|NIC 1 Rule"

Analysis of running VM’s

I don’t know the IP – so I do start the VM and check their all settings.

# start specific vm
$ VBoxManage startvm "Debian" --type headless

# list all running vm's (optional)
$ VBoxManage list runningvms

# list all running vm's and grep for name & nic rules (optional)
$ VBoxManage list runningvms -l | grep -i "Name:\|NIC Rule"

# list specific vm Nic informations (optional)
$ VBoxManage showvminfo "Debian" | grep -i "NIC"

# get IPv4 information of specific vm
$ VBoxManage guestproperty get "Debian" "/VirtualBox/GuestInfo/Net/0/V4/IP"

Add Port-forwarding

Now I know the IP (which in my case will not change) and can enable the Port-forwarding for SSH easily.

# shutdown specific vm
$ VBoxManage controlvm "Debian" poweroff

# add port-forwarding rule to specific vm
$ VBoxManage modifyvm "Debian" --natpf1 "SSH-PW,tcp,127.0.0.1,2222,10.0.2.15,22"

# list specific vm Nic informations (optional)
$ VBoxManage showvminfo "Debian" | grep -i "NIC 1 Rule"

# start specific vm
$ VBoxManage startvm "Debian" --type headless

# test ssh connection (optional)
$ ssh -p 2222 lupin@127.0.0.1 -v -C 'whoami && exit'

Note: On my VM (Debian) the user is named “lupin” this will be different for you! Also Openssh-server is enabled and I added my public ssh key on VM (authorized_keys).

PyCharm remote execution

As I also like and use the feature “scratches” of PyCharm, I will show first the remote execution of these files.

Prepare a scratch

I prepare a simple Python script scratch, which just prints out environment variables (same code I use later inside project example).

import os

print('hello world', os.environ)

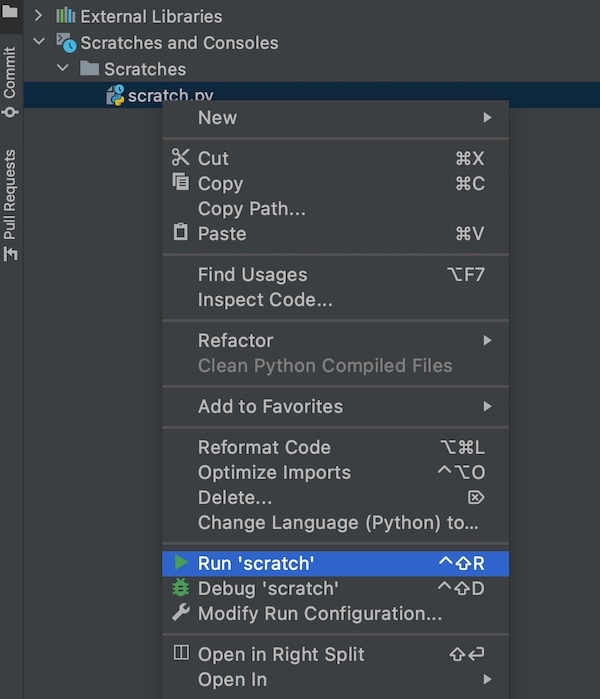
To find the absolute path for my scratch.py – I run it. On terminal the path will be visible.

PyCharm run scratches

After I know the path I run some simple commands in PyCharm Terminal.

# execute local script via SSH on remote system
$ ssh -p 2222 user@127.0.0.1 -C "/usr/bin/python" < "path/to/scratches/scratch.py"

# same as above but with unbuffered binary stdout and stderr
$ ssh -p 2222 user@localhost -C "/usr/bin/python" -u - < "./test_remote.py"

It works perfectly fine.

Note: Please replace the value “user” in all ssh examples!

PyCharm CE remote scratch execution

Project files

For all other scripts in the PyCharm project I don’t want to type the terminal commands always! So I’m using the feature “External Tools”. To do so, I add a new item and use the built-in variables (Macros) of PyCharm.

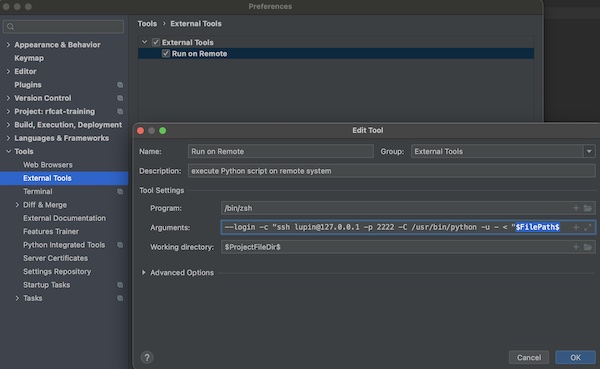
PyCharm CE add external tool

You simply give a Name Run on Remote, optional a short description, for Program your shell /bin/zsh and on Arguments --login -c "ssh user@localhost -p 2222 -C /usr/bin/python -u - < "$FilePah$. If you press button “OK” the input will be saved. The value for Working Directory $ProjectFileDir$ will be set (normally) automatically.

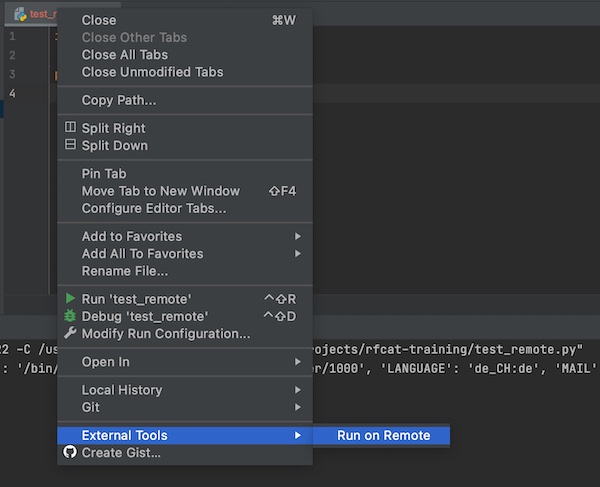
Now you can use the context menu to execute your script over SSH on remote machine.

PyCharm CE external tool remote execution