Terminal keyboard shortcuts you should know

Some terminal keyboard shortcuts for you as power user.

Cursor position

  • [ctrl] + [a] – Go to beginning of line
  • [ctrl] + [e] – Go to end of line
  • [ctrl] + [xx] – Toggle between beginning and end of line
  • [alt] + [arrow left] – One word left
  • [alt] + [arrow right] –  One word right
  • [arrow left] – One character left
  • [arrow right] – One character right

Command History

  • [arrow up] – Previous command
  • [arrow down] – Next command
  • [ctrl] + [r] – Search in the command history
  • [ctrl] + [g] – Stop search in command history

Edit

  • [cmd] + [v] – Insert from clipboard
  • [ctrl] + [c] – Interrupt input
  • [ctrl] + [l] – Clear screen
  • [ctrl] + [d] – Delete character under the cursor
  • [ctrl] + [h] – Delete character before the cursor
  • [ctrl] + [w] – Delete word under the cursor
  • [crtl] + [u] – Delete the Line before the cursor
  • [esc] + [t] – Swap last two words before the cursor

Terminal

  • [ctrl] + [d] – Exit current terminal
  • [cmd] + [q] – Exit all terminals
  • [cmd] + [t] – New terminal tab
  • [cmd] + [shift] + [+] – Increase font size
  • [cmd] + [shift] + [-] – Decrease font size
  • [cmd] + [0] – Default font size

Create information gathering test application

It is time again for an extensive tutorial. This time, a tiny test application for passive and active information gathering. After the instruction you are welcome to improve the application with more features! Okay let’s start…

What should it do?

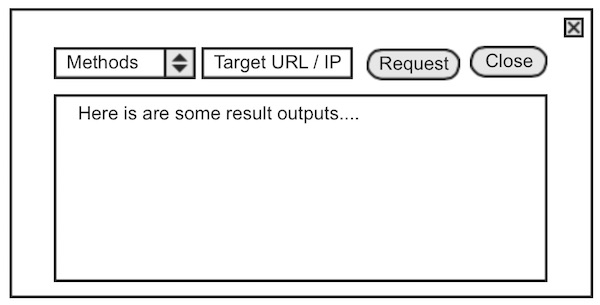
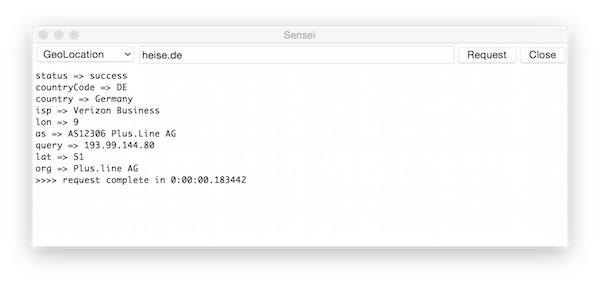
The security tester selects a information gathering method first. As second step the testers insert the URL or IP in a testfield and press a button. The result should printed out in a text area. The GUI should look like this:

Sensei Mockup

How it is implemented?

The prefered language is Python 2.7. So it is portable to different OS and for the most of methods are already packages available. The GUI is done with Tkinter. Tkinter provides all objects which are needed as widgets and ranges for this scope out completely. The file and folder structure look like:

├── essential
│   ├── __init__.py
│   └── timestop.py
├── gathering
│   ├── __init__.py
│   ├── geolocation.py
│   ├── icmpping.py
│   ├── information.py
│   ├── wappalyzer.py
│   └── whoisgathering.py
├── requirements.txt
└── sensei.py

File content

Files in root directory:

requests
python-Wappalyzer
python-whois
#!/usr/bin/env python
#  -*- coding: utf-8 -*-
from urlparse import urlparse
from gathering import IcmpPing, WhoisGathering, GeoLocation, WappAlyzer
from Tkinter import (Tk, Frame, StringVar, OptionMenu, Entry, Button, Text,
                     W, E, END, FALSE)


class Sensei(object):

    def __init__(self):
        self.root = Tk()
        self.root.title('Sensei')
        self.root.resizable(width=FALSE, height=FALSE)
        self.select = [
            'ICMP Ping', 'Whois', 'GeoLocation', 'Wappalyzer'
        ]
        self.option = StringVar(self.root)
        self.option.set(self.select[0])
        self.method = None
        self.url = None
        self.result = None

    def create_gui(self):
        self._top_frame()
        self._output_frame()
        self.root.mainloop()

    def quite_app(self):
        self.root.quit()

    def _start_request(self):
        self.result.delete(1.0, END)
        action = None
        target = self.url.get()
        method = self.option.get()
        if method == 'ICMP Ping':
            action = IcmpPing()
        elif method == 'Whois':
            action = WhoisGathering()
        elif method == 'GeoLocation':
            action = GeoLocation()
        elif method == 'Wappalyzer':
            action = WappAlyzer()
        if target:
            action.set_target(target)
            action.do_request()
            value = action.get_result()
        else:
            value = 'Internal Error'
        self.result.insert(END, value)

    def check_protocol(self, value):
        target = self.url.get()
        if value == 'Wappalyzer':
            if 'http' not in target:
                self.url.insert(0, 'http://')
        else:
            if 'http' in target:
                new_target = urlparse(target)
                self.url.delete(0, END)
                self.url.insert(0, new_target[1])

    def _top_frame(self):
        top_frame = Frame(self.root)
        top_frame.grid(column=0, row=0, sticky=W+E)
        self.method = OptionMenu(
            top_frame, self.option, *self.select, command=self.check_protocol
        )
        self.method.config(width=15)
        self.method.grid(column=0, row=0)
        self.url = Entry(top_frame, width=50)
        self.url.grid(column=1, row=0)
        Button(top_frame, text='Request', command=self._start_request).grid(
            column=2, row=0)
        Button(top_frame, text='Close', command=self.quite_app).grid(
            column=3, row=0)

    def _output_frame(self):
        output_frame = Frame(self.root)
        output_frame.grid(column=0, row=2, sticky=W+E)
        self.result = Text(output_frame, height=15)
        self.result.grid(column=0, row=0)


if __name__ == '__main__':
    RUN = Sensei()
    RUN.create_gui()

Files in essential:

#!/usr/bin/env python
#  -*- coding: utf-8 -*-
from essential.timestop import TimeStop
#!/usr/bin/env python
#  -*- coding: utf-8 -*-
from datetime import datetime


class TimeStop(object):
    """missing docstring"""

    __start = None

    @classmethod
    def start_measure(cls):
        cls.__start = datetime.now()

    @classmethod
    def stop_measure(cls):
        stop = datetime.now()
        total = stop - cls.__start
        return ">>>> request complete in " + str(total)

Files in gathering:

#!/usr/bin/env python
#  -*- coding: utf-8 -*-

from gathering.information import InformationGathering
from gathering.icmpping import IcmpPing
from gathering.whoisgathering import WhoisGathering
from gathering.geolocation import GeoLocation
from gathering.wappalyzer import WappAlyzer
#!/usr/bin/env python
#  -*- coding: utf-8 -*-


class InformationGathering(object):

    def __init__(self):
        self.errors = 0
        self.target = ''
        self.result = ''

    def set_target(self, target):
        victim = target.strip(' \t\n\r')
        if not victim:
            self.errors += 1
            self.result = 'No target given!'
        else:
            self.target = target

    def get_result(self):
        return self.result
#!/usr/bin/env python
#  -*- coding: utf-8 -*-
from gathering.information import InformationGathering
from essential.timestop import TimeStop
import os
import platform


class IcmpPing(InformationGathering):

    COMMAND = ''

    def __create_command(self):
        operation_system = platform.system()
        if operation_system == "Windows":
            self.COMMAND = "ping -n 1 "
        elif operation_system == "Linux":
            self.COMMAND = "ping -c 1 "
        else:
            self.COMMAND = "ping -c 1 "

    def do_request(self):
        if self.errors == 0:
            self.__create_command()
            command = self.COMMAND + self.target
            TimeStop.start_measure()
            response = os.popen(command)
            for line in response.readlines():
                self.result += line
            self.result += TimeStop.stop_measure()
#!/usr/bin/env python
#  -*- coding: utf-8 -*-
from gathering.information import InformationGathering
from essential.timestop import TimeStop
import whois


class WhoisGathering(InformationGathering):

    def do_request(self):
        if self.errors == 0:
            TimeStop.start_measure()
            result = whois.whois(self.target)
            self.result += result.text
            self.result += TimeStop.stop_measure()
#!/usr/bin/env python
#  -*- coding: utf-8 -*-
from gathering.information import InformationGathering
from essential.timestop import TimeStop
import requests


class GeoLocation(InformationGathering):

    API = 'http://ip-api.com/json/'

    def do_request(self):
        if self.errors == 0:
            target = self.API + self.target
            TimeStop.start_measure()
            response = requests.get(target)
            output = response.json()
            for key, val in output.items():
                if val:
                    self.result += str(key) + " => " + str(val) + "\n"
            self.result += TimeStop.stop_measure()
#!/usr/bin/env python
#  -*- coding: utf-8 -*-
from gathering.information import InformationGathering
from essential.timestop import TimeStop
from Wappalyzer import Wappalyzer, WebPage


class WappAlyzer(InformationGathering):

    def do_request(self):
        if self.errors == 0:
            TimeStop.start_measure()
            wappalyzer = Wappalyzer.latest()
            website = WebPage.new_from_url(self.target)
            output = wappalyzer.analyze(website)
            for val in output:
                self.result += " => " + str(val) + "\n"
            self.result += TimeStop.stop_measure()

That was it. The result looks like this:

Sensei

Improve it with your ideas!

UI testing with DalekJS and PhantomJS on CentOS

With DalekJS you can automate your functional GUI tests very easy. This article describe how to prepare the test environment on CentOS.

Setup

First, the necessary packages are installed.

# install EPEL (Extra Packages for Enterprise Linux)
$ yum install -y epel-release

# check repositories
$ yum repolist

# update all
$ yum -y update

# install packages
$ yum install -y vim nodejs npm bzip2 freetype fontconfig

# check versions of nodejs and npm
$ node --version
$ npm --version

# change to tmp folder
$ cd /tmp/

# download PhantomJS and unzip
$ curl -O https://phantomjs.googlecode.com/files/phantomjs-1.9.2-linux-x86_64.tar.bz2
$ tar xvf phantomjs-1.9.2-linux-x86_64.tar.bz2

# copy binary, delete unneeded files and check version
$ cp phantomjs-1.9.2-linux-x86_64/bin/phantomjs /usr/local/bin/
$ rm -fr phantomjs-1.9.2-linux-x86_64
$ rm -f phantomjs-1.9.2-linux-x86_64.tar.bz2
$ phantomjs --version

# install dalek-cli (global) and check version
$ npm install dalek-cli -g
$ dalek --version

It is also possible to compile PhantomJS itself, but this takes a lot of time.

Prepare test project

Once all is installed without any issues you can start to create the test project.

# change to home folder
$ cd ~/

# create project folder and change into
$ mkdir DalekTest && cd DalekTest

# create package.json interactively
$ npm init

# install dalekjs on project
$ npm install dalekjs --save-dev

Create test case

Now it is time for the first Test Case. I have used the example from Dalek website.

# create test case file
$ touch test_title.js

# insert content
$ vim test_title.js
module.exports = {'Page title is correct': function (test) {
  test
    .open('http://google.com')
    .assert.title().is('Google', 'It has title')
    .done();
  }
};

Run test

By default DalekJS use PhantomJS as browser. For running the test case simple use dalek command and as argument the test case file (*.js).

# run test case
$ dalek test_title.js

Lynx text based web browser

Lynx can be used to check web site for accessibility, performance and SEO analysis.

Install Lynx

# install with yum
$ yum install -y lynx

# install with apt-get
$ apt-get install -y lynx

# install with Mac ports
$ sudo port install lynx

Use Lynx

# textual representation of the web page
$ lynx http://softwaretester.info

# print response header
$ lynx -head http://softwaretester.info
$ lynx -dump -head http://softwaretester.info

# show source code
$ lynx -source http://softwaretester.info

# grep links to STDOUT
$ lynx -dump http://softwaretester.info | grep "http:"

# count internal links
$ lynx -dump http://softwaretester.info | grep -o "http://softwaretester.info" | uniq | wc -l

# store external links into file
$ lynx -dump "http://softwaretester.info" | grep -o "http:.*" | grep -v "http://softwaretester.info*" > file.txt

Create a simple CGI server for Python

Sometimes there is a need that python scripts are executed directly from the browser. With CGIHTTPServer it goes very easily.

Create Folders

# create project folder
$ mkdir MyProject

# create cgi-bin folder
$ mkdir MyProject/cgi-bin

Create Python File

# create test.py
$ touch MyProject/cgi-bin/test.py

# modify test.py
$ vim MyProject/cgi-bin/test.py

Add some very simple content like:

#!/usr/bin/env python

print "Content-Type: text/html\n"
print "<html><head><title>Hello world</title></head>"
print "<body>"
print "<h1>hello world...</h1>"
print "<body>\n</html>"

Change the file permission

# change the permission
$ chmod 750 MyProject/cgi-bin/test.py

Run CGIHTTPServer

# change to project folder
$ cd MyProject/

# run CGIHTTPServer
$ python -m CGIHTTPServer

Now open the browser and call URL: “http://localhost:8000/cgi-bin/test.py

Python 3

In Python 3.3, the replacement for python -m CGIHTTPServer is python3 -m http.server --cgi.

Other examples

# show help
$ python3 -m http.server --help

# run server in Python 3
$ python3 -m http.server 8080

# run server in Python 3 on loopback interface
$ python3 -m http.server 8080 --bind 127.0.0.1

Install and upgrade pip on Mac OS X

Mac OS X latest Yosemite comes with Python version 2.7, but not with pip (package manager). If you have Command Line Tools installed, the installation of pip is very simple.

Installation

# install command line tools (if not installed)
$ xcode-select --install

# install pip via easy_install
$ sudo easy_install pip

# show current pip version (optional)
$ pip --version

Upgrade

# show current pip version (optional)
$ pip --version

# upgrade pip
$ sudo pip install --upgrade pip

In case you need to install and manage different versions of Python, I can recommend to read this article.

Local HAR viewer on Mac OS X

There are several HAR file viewers online but sometimes you need the HAR viewer offline. It is very simple for Mac OS X user to get a local instance running.

Precondition

Preparation

The first step is generating HAR file.

# create HAR log file
$ phantomjs netsniff.js "http://google.com" > ~/Desktop/result.har

Now download the latest Harviewer.zip and unzip into the user “Sites” folder. Rename the folder and setting up the permissions.

# go into Downloads
$ cd ~/Downloads/

# create new folder
$ mkdir harviewer

# unzip into new folder
$ unzip harviewer-2.0-15.zip -d harviewer

# move folder into user sites
$ mv harviewer ~/Sites/

# go into sites and change access rights
$ cd ~/Sites/
$ chmod +x harviewer/

Result

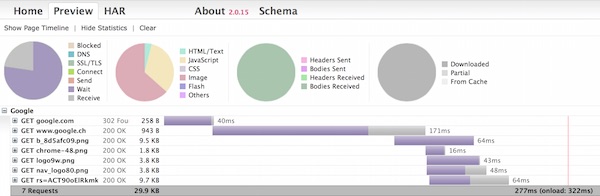
Now open a browser and call URL like: “http://localhost/~<user>/harviewer/“. As last step drag the generated HAR file into the browser. You should see something like this:

HAR viewer result

Full webpage screenshot

For various reasons screenshots for webpages are needed. If automated test scripts fail, documentations must be created or in some other situations. With PhantomJS it is very easy to create these screenshots very fast by command-line. All what is needed a small JavaScript like this.

JavaScript

var phantom;
var console;
var system = require('system');
var fs = require('fs');
var page = require('webpage').create();

var Info = {
	isDate: function () {
		'use strict';
		var mydate = new Date().toDateString();
		return mydate;
	},
	isTime: function () {
		'use strict';
		var mytime = new Date().getTime();
		return mytime;
	}
};

var Target = {
	isLocation: function () {
		'use strict';
		var args = system.args,
		    mylocation = 'http://google.com';
		if (args.length > 1) {
			mylocation = system.args[1];
			console.log('[LOG] use argument location');
		} else {
			console.log('[LOG] use default location');
		}
		return mylocation;
	},
	isSaveFolder: function () {
		'use strict';
		var folder = 'log';
		if (!fs.exists(folder)) {
			console.log('[LOG] creat directory ' + folder);
			fs.makeDirectory(folder);
		}
		if (!fs.isWritable(folder)) {
			console.error('[LOG] ' + folder + ' is not writable!');
			phantom.exit(1);
		}
		return folder;
	}
};

page.open(Target.isLocation(), function (status) {
	'use strict';
	switch (status) {
	case 'success':
		console.log('[LOG] page open successfully' + Info.isDate());
		var folder = Target.isSaveFolder();
		page.render(folder + fs.separator + Info.isTime() + '.png');
		phantom.exit(0);
		break;
	case 'fail':
		console.error('[LOG] page not open successfully');
		phantom.exit(1);
		break;
	default:
		console.error('[LOG] fail to open with unknown status:' + status);
		phantom.exit(1);
		break;
	}
});

After save the script you can run it like:

# screenshot of softwaretester.info
$ phantomjs screenshot.js "http://softwaretester.info"