Simple Jenkins pipeline on AWS (Part 3)

Okay,… The pipeline has already two steps “Build” and “Deploy” running, but the last step “Test” is missing. In this part I will show a simple example with Python, Selenium and Docker (standalone-chrome) for test step.

Preconditions

Install additional packages on AWS EC2

There is a need to install additional packages on AWS EC2 Linux instance (Jenkins).

# start ssh connection
$ ssh -i ~/.ssh/ExampleKeyPair.pem ec2-user@<EC2 IP|DNS>

# change to root user
$ sudo su -

# install python pip
$ easy_install pip

# install virtualenv
$ pip install virtualenv

# exit root and go back to ec2-user
$ exit

# exit ec2-user (ssh connection)
$ exit

Create new files and folder (Project/Repository)

You need to create a new directory called “test”. Inside that directory you will create a file “example.py” with following content.

#!/usr/bin/env python
import unittest
from selenium import webdriver


class ExampleTest(unittest.TestCase):

    def setUp(self):
        """Start web driver"""
        options = webdriver.ChromeOptions()
        options.add_argument('--no-sandbox')
        options.add_argument('--headless')
        options.add_argument('--disable-gpu')

        self.driver = webdriver.Remote('http://0.0.0.0:4444/wd/hub', options.to_capabilities())
        self.driver.get("APPLICATION_URL")

    def test_search_headline(self):
        """TestCase 1"""
        title = 'DemoPipeline'
        assert title in self.driver.title

    def test_search_text(self):
        """TestCase 2"""
        element = self.driver.find_element_by_tag_name('body')
        assert element.text == 'Hello world...'

    def tearDown(self):
        """Stop web driver"""
        self.driver.quit()

if __name__ == "__main__":
    unittest.main(verbosity=2)

When you are done you have to modify the “Jenkinsfile” and the bash script “test.sh”.

pipeline {
  agent any
  parameters {
    string(name: 'REPONAME', defaultValue: 'example/nginx', description: 'AWS ECR Repository Name')
    string(name: 'ECR', defaultValue: '237724776192.dkr.ecr.eu-central-1.amazonaws.com/example/nginx', description: 'AWS ECR Registry URI')
    string(name: 'REGION', defaultValue: 'eu-central-1', description: 'AWS Region code')
    string(name: 'CLUSTER', defaultValue: 'ExampleCluster', description: 'AWS ECS Cluster name')
    string(name: 'TASK', defaultValue: 'ExampleTask', description: 'AWS ECS Task name')
  }
  stages {
    stage('BuildStage') {
      steps {
        sh "./cicd/build.sh -b ${env.BUILD_ID} -n ${params.REPONAME} -e ${params.ECR} -r ${params.REGION}"
      }
    }
    stage('DeployStage') {
      steps {
        sh "./cicd/deploy.sh -b ${env.BUILD_ID} -e ${params.ECR} -c ${params.CLUSTER} -t ${params.TASK}"
      }
    }
    stage('TestStage') {
      steps {
        sh "./cicd/test.sh -c ${params.CLUSTER} -t ${params.TASK}"
      }
    }
  }
}
#!/usr/bin/env bash

## shell options
set -e
set -u
set -f

## magic variables
declare CLUSTER
declare TASK
declare TEST_URL
declare -r -i SUCCESS=0
declare -r -i NO_ARGS=85
declare -r -i BAD_ARGS=86
declare -r -i MISSING_ARGS=87

## script functions
function usage() {
  local FILE_NAME

  FILE_NAME=$(basename "$0")

  printf "Usage: %s [options...]\n" "$FILE_NAME"
  printf " -h\tprint help\n"
  printf " -c\tset esc cluster name uri\n"
  printf " -t\tset esc task name\n"
}

function no_args() {
  printf "Error: No arguments were passed\n"
  usage
  exit "$NO_ARGS"
}

function bad_args() {
  printf "Error: Wrong arguments supplied\n"
  usage
  exit "$BAD_ARGS"
}

function missing_args() {
  printf "Error: Missing argument for: %s\n" "$1"
  usage
  exit "$MISSING_ARGS"
}

function get_test_url() {
  local TASK_ARN
  local TASK_ID
  local STATUS
  local HOST_PORT
  local CONTAINER_ARN
  local CONTAINER_ID
  local INSTANCE_ID
  local PUBLIC_IP

  # list running task
  TASK_ARN="$(aws ecs list-tasks --cluster "$CLUSTER" --desired-status RUNNING --family "$TASK" | jq -r .taskArns[0])"
  TASK_ID="${TASK_ARN#*:task/}"

  # wait for specific container status
  STATUS="PENDING"
  while [ "$STATUS" != "RUNNING" ]; do
    STATUS="$(aws ecs describe-tasks --cluster "$CLUSTER" --task "$TASK_ID" | jq -r .tasks[0].containers[0].lastStatus)"
  done

  # get container id
  CONTAINER_ARN="$(aws ecs describe-tasks --cluster "$CLUSTER" --tasks "$TASK_ID" | jq -r .tasks[0].containerInstanceArn)"
  CONTAINER_ID="${CONTAINER_ARN#*:container-instance/}"

  # get host port
  HOST_PORT="$(aws ecs describe-tasks --cluster "$CLUSTER" --tasks "$TASK_ID" | jq -r .tasks[0].containers[0].networkBindings[0].hostPort)"

  # get instance id
  INSTANCE_ID="$(aws ecs describe-container-instances --cluster "$CLUSTER" --container-instances "$CONTAINER_ID" | jq -r .containerInstances[0].ec2InstanceId)"

  # get public IP
  PUBLIC_IP="$(aws ec2 describe-instances --instance-ids "$INSTANCE_ID" | jq -r .Reservations[0].Instances[0].PublicIpAddress)"

  TEST_URL="$(printf "http://%s:%d" "$PUBLIC_IP" "$HOST_PORT")"
}

function clean_up() {
  # stop container
  if [ "$(docker inspect -f {{.State.Running}} ChromeBrowser)" == "true" ]; then
    docker rm -f ChromeBrowser
  fi

  # delete virtualenv
  if [ -d .env ]; then
    rm -fr .env
  fi
}

function run_selenium_test() {
  local TEST_TEMPLATE
  local TEST_FILE

  # clean up
  clean_up

  # pull image (standalone-chrome)
  docker pull selenium/standalone-chrome

  # run docker container (standalone-chrome)
  docker run -d -p 4444:4444 --name ChromeBrowser selenium/standalone-chrome

  # create and activate virtualenv
  virtualenv .env && source .env/bin/activate

  # install Selenium
  pip install -U selenium

  # read test template into variable
  TEST_TEMPLATE=$(cat ./test/example.py)

  # replace string with URL
  TEST_FILE="${TEST_TEMPLATE/APPLICATION_URL/$TEST_URL}"

  # save into final test file
  echo "$TEST_FILE" > ./test/suite.py

  # execute test
  python -B ./test/suite.py

  # deactivate virtualenv
  deactivate
}

## check script arguments
while getopts "hc:t:" OPTION; do
  case "$OPTION" in
    h) usage
       exit "$SUCCESS";;
    c) CLUSTER="$OPTARG";;
    t) TASK="$OPTARG";;
    *) bad_args;;
  esac
done

if [ "$OPTIND" -eq 1 ]; then
  no_args
fi

if [ -z "$CLUSTER" ]; then
  missing_args '-c'
fi

if [ -z "$TASK" ]; then
  missing_args '-t'
fi

## run main function
function main() {
  get_test_url
  printf "Test Application URL: %s\n" "$TEST_URL"

  run_selenium_test
}

main

# exit
exit "$SUCCESS"

Ensure that “example.py” has all needed permission rights. $ chmod +x example.py Commit all changes now and wait that the Jenkins job gets triggered (or trigger manually).
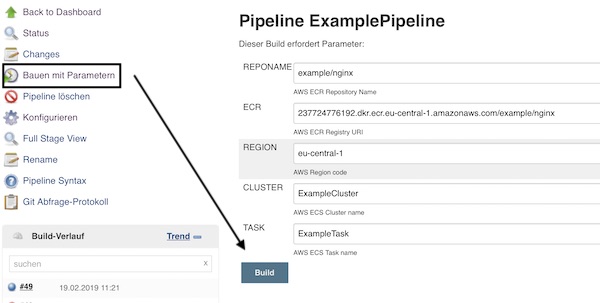
jenkins trigger with parameters

That’s already all… your job should execute all steps. This part is done super fast. 😉

Some last words

There is a lot of space for improvements here, but I think you learned already much and had some fun. Some hints now:

  • you can add any other test methods by your self on this step (eq. Performance- and Security tests)
  • Unit tests and Static Code Analysis could executed on build step (before create image)
  • check out AWS ECS Services
  • use a proxy for Jenkins and enable SSL
  • create other pipelines and ECS clusters to enable staging
  • create “Lifecycle policy rules” on ECR
  • use Git Webhook’s to trigger the Jenkins jobs
  • add a post step in your Jenkins pipeline to store metrics and/or inform about build status
Python, Selenium Grid and Docker

With Docker you can quickly and easily install, configure and use Selenium Grid. This tutorial shows the respective steps that you need as a software tester (or Developer). Instead of Python you can also use other languages, which are supported by Selenium​.

Preconditions

Preparation of files

# create new project
$ mkdir -p ~/Project/SeleniumTutorial && cd ~/Project/SeleniumTutorial

# create docker-compose.yml (version 1)
$ vim v1-docker-compose.yml

# or create docker-compose.yml (version 2)
$ vim v2-docker-compose.yml

# create python example.py
$ vim example.py

Note: You can opt for a version of docker-compose.yml!

Version: 1

---
selenium_hub:
  image: selenium/hub
  ports:
    - 4444:4444
node_1:
  image: selenium/node-chrome
  links:
    - selenium_hub:hub
node_2:
  image: selenium/node-firefox
  links:
    - selenium_hub:hub

Version: 2

---
version: '2'
services:
  selenium_hub:
    image: selenium/hub
    ports:
      - 4444:4444
  node_1:
    image: selenium/node-chrome
    depends_on:
      - selenium_hub
    environment:
      - HUB_PORT_4444_TCP_ADDR=selenium_hub
  node_2:
    image: selenium/node-firefox
    environment:
      - HUB_PORT_4444_TCP_ADDR=selenium_hub
    depends_on:
      - selenium_hub
import os
import datetime
import time
import unittest
from selenium import webdriver


class Example(unittest.TestCase):

    def setUp(self):

        self.driver = webdriver.Remote(
            command_executor='http://192.168.99.100:4444/wd/hub',
            desired_capabilities={
                'browserName': 'firefox',
                'javascriptEnabled': True
            }
        )

        self.driver.get('http://softwaretester.info/')

    def test_something(self):

        dt_format = '%Y%m%d_%H%M%S'
        cdt = datetime.datetime.fromtimestamp(time.time()).strftime(dt_format)
        current_location = os.getcwd()
        img_folder = current_location + '/images/'

        if not os.path.exists(img_folder):
            os.mkdir(img_folder)

        picture = img_folder + cdt + '.png'
        self.driver.save_screenshot(picture)

    def tearDown(self):

        self.driver.quit()


if __name__ == "__main__":

    unittest.main(verbosity=1)

Create environment

# create new VM
$ docker-machine create -d virtualbox Grid

# pointing shell
$ eval $(docker-machine env Grid)

# show status (optional)
$ docker-machine ls
...
NAME   ACTIVE   DRIVER       STATE     URL                         SWARM   DOCKER    ERRORS
Grid   *        virtualbox   Running   tcp://192.168.99.100:2376           v1.11.1 

# run docker-compose (Version: 1)
$ docker-compose -f v1-docker-compose.yml up -d

# run docker-compose (Version: 2)
$ docker-compose -f v2-docker-compose.yml up -d

# show status (Version: 1)
$ docker-compose -f v1-docker-compose.yml ps
...
             Name                         Command           State           Ports          
------------------------------------------------------------------------------------------
seleniumtutorial_node_1_1         /opt/bin/entry_point.sh   Up                           
seleniumtutorial_node_2_1         /opt/bin/entry_point.sh   Up                           
seleniumtutorial_selenium_hub_1   /opt/bin/entry_point.sh   Up      0.0.0.0:4444->4444/tcp

# show status (Version: 2)
$ docker-compose -f v2-docker-compose.yml ps
...
             Name                         Command           State           Ports          
------------------------------------------------------------------------------------------
seleniumtutorial_node_1_1         /opt/bin/entry_point.sh   Up                           
seleniumtutorial_node_2_1         /opt/bin/entry_point.sh   Up                           
seleniumtutorial_selenium_hub_1   /opt/bin/entry_point.sh   Up      0.0.0.0:4444->4444/tcp

Open Browser

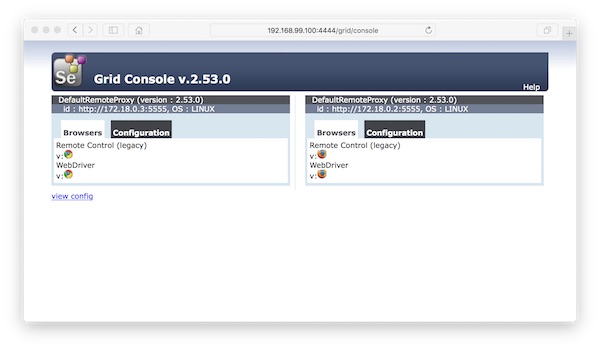
Selenium Grid Console

Run Python script

# run python selenium script
$ python -B ~/Projects/Selenium/example.py

Note: Via browserName (example.py) you can choose the respective browser (firefox or chrome)!

Note: Via docker-compose scale you can add/remove node instances!

# create 2 instances (Version: 1)
$ docker-compose -f v1-docker-compose.yml scale node_1=2

# create 3 instances (Version: 2)
$ docker-compose -f v2-docker-compose.yml scale node_2=3

Monitor running docker containers with cAdvisor

As a software tester, you have several containers run in your environment. Here is an example how easily and quickly you can monitor your test-environment with cAdvisor.

Preconditions

Preparation

# create project (local)
$ mkdir -p ~/Projects/Monitoring && cd ~/Projects/Monitoring

# create shell script (local)
$ vim start-demo.sh
#!/usr/bin/env sh

docker run -d --name cadvisor -P -v /:/rootfs:ro -v /var/run:/var/run:rw -v /sys:/sys:ro -v /var/lib/docker/:/var/lib/docker:ro google/cadvisor:latest
docker run -d --name jenkins -P jenkins
docker run -d --name selenium-hub -P selenium/hub:2.53.0
docker run -d --name selenium-node_1 --link selenium-hub:hub selenium/node-chrome:2.53.0
docker run -d --name selenium-node_2 --link selenium-hub:hub selenium/node-firefox:2.53.0

Note: You can also assign the respective ports!

Run docker containers

# create new VM (local)
$ docker-machine create -d virtualbox monitor

# show status (local)
$ docker-machine ls
...
NAME      ACTIVE   DRIVER       STATE     URL                         SWARM   DOCKER    ERRORS
monitor   -        virtualbox   Running   tcp://192.168.99.100:2376           v1.11.1  

# copy into VM (local) 
$ docker-machine scp ~/Projects/Monitoring/start-demo.sh monitor:/home/docker/

# ssh into VM (local into VM)
$ docker-machine ssh monitor

# change rights (VM)
$ chmod +x start-demo.sh && ls -la

# run shell script (VM)
$ ./start-demo.sh

# list running docker container (VM)
$ docker ps -a
...
CONTAINER ID        IMAGE                          COMMAND                  CREATED              STATUS              PORTS                                               NAMES
57c2598b4261        selenium/node-firefox:2.53.0   "/opt/bin/entry_point"   4 seconds ago        Up 4 seconds                                                            selenium-node_2
d79a5123bcfc        selenium/node-chrome:2.53.0    "/opt/bin/entry_point"   29 seconds ago       Up 29 seconds                                                           selenium-node_1
095f9844346d        selenium/hub:2.53.0            "/opt/bin/entry_point"   About a minute ago   Up About a minute   0.0.0.0:32771->4444/tcp                             selenium-hub
8db3ad58d8ce        jenkins                        "/bin/tini -- /usr/lo"   About a minute ago   Up About a minute   0.0.0.0:32770->8080/tcp, 0.0.0.0:32769->50000/tcp   jenkins
d1e1e1c36d6d        google/cadvisor:latest         "/usr/bin/cadvisor -l"   2 minutes ago        Up 2 minutes        0.0.0.0:32768->8080/tcp                             cadvisor

Open browser

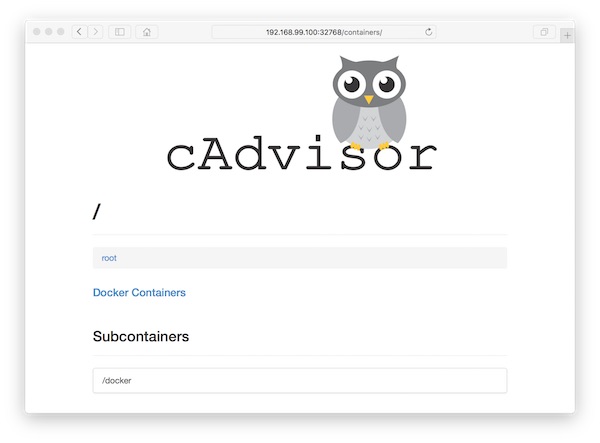
cAdvisor

Create screenshot with Python Selenium Webdriver

The following example show how easy you could make screenshots with Python Selenium Webdriver.

Precondition

Example

# -*- coding: utf-8 -*-

import unittest
from selenium import webdriver
from selenium.common.exceptions import NoSuchElementException

from MyLibrary import MyLibrary


class Example(unittest.TestCase):
    """Example class for screen shot"""

    def setUp(self):
        self.driver = webdriver.Firefox()
        self.driver.implicitly_wait(1)
        self.driver.get('http://softwaretester.info')

    def test_something(self):

        elem_id = 'is_not_there'

        try:
            elem = self.driver.find_element_by_id(elem_id)
            elem.click()
        except NoSuchElementException:
            MyLibrary.save_screenshot_picture(self.driver, elem_id)
            raise

    def tearDown(self):
        self.driver.close()

if __name__ == '__main__':
    unittest.main(verbosity=1)

The MyLibrary.py could be used on different places.

# -*- coding: utf-8 -*-

import os
import datetime
import time


class MyLibrary(object):
    """Simple screenshot class"""

    @staticmethod
    def get_date_time():
        """Return date_time"""
        dt_format = '%Y%m%d_%H%M%S'
        return datetime.datetime.fromtimestamp(time.time()).strftime(dt_format)

    @staticmethod
    def save_screenshot_picture(driver, file_name):
        """Make screenshot and save"""

        date_time = MyLibrary.get_date_time()
        current_location = os.getcwd()
        screenshot_folder = current_location + '/screenshot/'

        if not os.path.exists(screenshot_folder):
            os.mkdir(screenshot_folder)

        picture = screenshot_folder + file_name + ' ' + date_time + '.png'
        driver.save_screenshot(picture)

After running the test you should see the folder “/screenshot” with the picture.

JUnit report with Python Webdriver

To create JUnit reports, you just need the python library xmlrunner. This is needed for the integration with build server like Jenkins.

Installation

# example installation with pip
$ sudo pip install xmlrunner

Usage

Just replace for example:

unittest.TextTestRunner(verbosity=2).run(test_suite)

with

from xmlrunner import xmlrunner

""" code for test suite ... """

xmlrunner.XMLTestRunner(verbosity=2, output='reports').run(test_suite)

Jenkins

On Jenkins add a new “post-build” action and select the Publish JUnit test result report. Add now the string “reports/*.xml” into the “Test report XMLs” field.

DDT with Python Selenium

DDT (Data-driven Testing) with Python Selenium Webdriver is very easy! DDT becomes very useful if you have test cases that contains the same test steps. All values could outsourced into files or databases. This tutorial use CSV files.

Precondition

  • Python installed
  • selenium and ddt library installed

Example

The folder structure for this tutorial looks like:

├── data
│   └── scenario_a.csv
├── library
│   ├── GetData.py
│   └── __init__.py
├── scenarios
│   ├── __init__.py
│   └── scenario_a.py
└── testsuite.py

Into folder “data” we store the csv files. The packages “library” include a function to read the specific csv files and the package “scenarios” include the test cases. The test suite is on root folder.

#!/usr/bin/env python
# -*- coding: utf8 -*-

import unittest

from scenarios.scenario_a import TestScenarioA


# load test cases
scenario_a = unittest.TestLoader().loadTestsFromTestCase(TestScenarioA)

# create test suite
test_suite = unittest.TestSuite([scenario_a])

# execute test suite
unittest.TextTestRunner(verbosity=2).run(test_suite)

Into the “testsuite.py” we add all test cases provided by scenario package.

data folder

target_url,elem_name,search_value
http://softwaretester.info,s,python
http://softwaretester.info,s,selenium
http://softwaretester.info,s,webdriver
http://softwaretester.info,s,automation

The CSV stores the test data that we supplied to the @data decorator of test case.

library package

#!/usr/bin/env python
# -*- coding: utf8 -*-

__author__ = 'lupin'
#!/usr/bin/env python
# -*- coding: utf8 -*-

import csv


def get_csv_data(csv_path):
    """
    read test data from csv and return as list

    @type csv_path: string
    @param csv_path: some csv path string
    @return list
    """
    rows = []
    csv_data = open(str(csv_path), "rb")
    content = csv.reader(csv_data)

    # skip header line
    next(content, None)

    # add rows to list
    for row in content:
        rows.append(row)

    return rows

Just for read the csv and return the values as a list.

scenarios package

#!/usr/bin/env python
# -*- coding: utf8 -*-

__author__ = 'lupin'
#!/usr/bin/env python
# -*- coding: utf8 -*-

import unittest

from selenium import webdriver
from ddt import ddt, data, unpack

from library.GetData import get_csv_data


@ddt
class TestScenarioA(unittest.TestCase):
    """ inheriting the TestCase class"""

    @classmethod
    def setUpClass(cls):
        """test preparation"""
        cls.driver = webdriver.Firefox()
        cls.driver.implicitly_wait(3)
        cls.driver.set_window_size(450, 500)

    @data(*get_csv_data('./data/scenario_a.csv'))
    @unpack
    def test_search(self, target_url, elem_name, search_value):
        """test case for scenario a"""
        driver = self.driver
        driver.get(target_url)

        btn_elem = driver.find_element_by_id('search-toggle')
        btn_elem.click()

        input_elem = driver.find_element_by_name(elem_name)
        input_elem.clear()
        input_elem.send_keys(search_value)
        input_elem.submit()

    @classmethod
    def tearDownClass(cls):
        """clean up"""
        cls.driver.close()

Test case with @ddt (for classes), @data and @unpack (for methods) decorators.

  • @data take the arguments from csv file
  • @unpack unpacks tuples or lists into multiple arguments

The test_search() method accepts the arguments, which will be mapped to the tuple values by ddt.

Run

$ python -B testsuite.py

Python, Selenium and PhantomJS – ignore certificate errors

Background

You are done with your work and push all into Git. The Build-Server starts his work and all test scripts are failing. Short look and it is clear – certificate errors. The next example shows, how to ignore certificate errors on PhantomJS.

@classmethod
def setUpClass(cls):
    """starting point for test cases"""

    cls.driver = webdriver.PhantomJS(service_args=['--ignore-ssl-errors=true'])
    cls.driver.implicitly_wait(30)
    cls.driver.set_window_size(1024, 768)
    cls.driver.get(cls.url)

Now it should work….

Run your Python Selenium tests headless

This time i show you the headless testing with Selenium WebDriver and PhantomJS. This method can be used for example on continuous integration systems.

Install PhantomJS

Follow the documentation on PhantomJS website or as Mac OS X user simply use Mac Ports.

# on Mac OS X
$ sudo port install PhantomJS

# check version
$ phantomjs --version

Create a tiny test script

#!/usr/bin/env python
import unittest
from selenium import webdriver


class SearchContentOnWebsite(unittest.TestCase):

    def setUp(self):
        # create a new PhantomJS session
        self.driver = webdriver.PhantomJS()
        self.driver.set_window_size(800, 600)
        self.driver.get("http://softwaretester.info")

    def test_search_headline(self):
        title = 'This will fail | - Softwaretester -'
        assert title in self.driver.title

    def tearDown(self):
        self.driver.close()

if __name__ == "__main__":
    unittest.main(verbosity=2)

Just create a instance of PhantomJS WebDriver and run you tests. That is all! 😉