Publish continuous integration status on Desktop

In one of my last tutorials, i show how to develop test tools for software tester with Python. Now i will show you, how to publish continuous integration status information for other team members like Scrum master, Product owner or Test manager.

Preconditions

Note

If you don`t have Jenkins or Hudson running, search some public services with Google!

Example: inurl:8080 intitle:”Dashboard [Jenkins]”

Steps

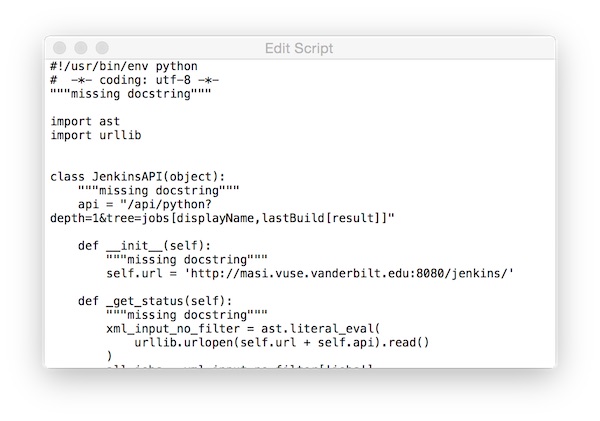
Create a python script like this:

#!/usr/bin/env python
#  -*- coding: utf-8 -*-

import ast
import urllib


class JenkinsAPI(object):

    api = "/api/python?depth=1&tree=jobs[displayName,lastBuild[result]]"

    def __init__(self):
        self.url = 'http://masi.vuse.vanderbilt.edu:8080/jenkins/'

    def _get_status(self):
        xml_input_no_filter = ast.literal_eval(
            urllib.urlopen(self.url + self.api).read()
        )
        all_jobs = xml_input_no_filter['jobs']
        return all_jobs

    def show_results(self):
        job = self._get_status()
        fail = [row for row in job if 'SUCCESS' != row['lastBuild']['result']]
        passed = len(job) - len(fail)
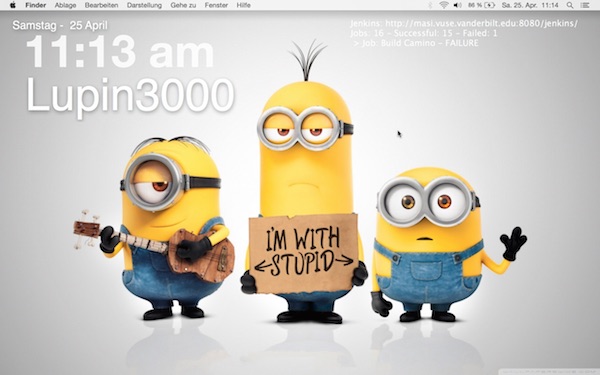
        print "Jenkins: %s" % self.url
        print "Jobs: %s - Successful: %s - Failed: %s" % (
            len(job), passed, len(fail)
        )
        if len(fail) > 0:
            for (i, item) in enumerate(fail):
                print " > Job: %s - %s" % (
                    item['displayName'], item['lastBuild']['result']
                )
            del i


if __name__ == '__main__':
    RUN = JenkinsAPI()
    RUN.show_results()

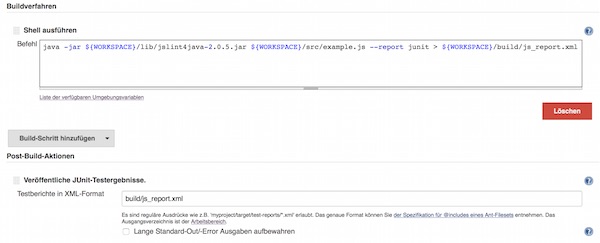
Now start GeekTool and create a new Geeklet. Drag a Shell Geeklet on you Desktop. Now insert values for name, size, set colors and so on and add the python script on “Command”.
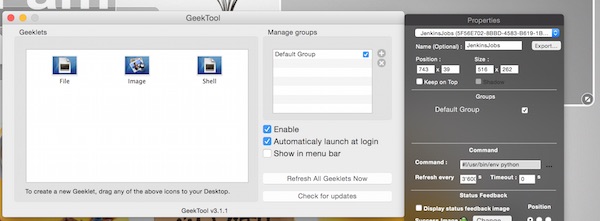
Create Geeklet

… the script.

Geeklet Command

Thats it! Now you can export the Geeklet and share it with you team members. My current screen looks like:

Geeklet result

Install Jenkins with Puppet

As a software tester you need a test environment! The test environment should be soon as possible and without outside resources deployable. This guide shows you how to install Jenkins on Debian/Ubuntu with Puppet (Version 2.7.x).

Preparation

# get puppet version
$ puppet --version

# get puppet-lint version
$ puppet-lint --version

If Puppet and Puppet-Lint are not installed:

# update and upgrade
$ apt-get update && apt-get upgrade

# install puppet and puppet-lint
$ apt-get install puppet && apt-get install puppet-lint

The project looks like the following:

testenvironment
├── manifests
│   ├── nodes.pp
│   └── site.pp
└── modules
    └── jenkins
        └── manifests
            └── init.pp

Steps

# create folders
$ mkdir -p testenvironment/manifests
$ mkdir -p testenvironment/modules/jenkins/manifests

# create files
$ touch testenvironment/manifests/site.pp
$ touch testenvironment/manifests/nodes.pp
$ touch testenvironment/modules/jenkins/manifests/init.pp

The first content we add is for “site.pp”. Here we include the “nodes.pp” and setup basic paths.

import 'nodes.pp'

Exec {
    path => ['/bin', '/usr/bin'],
}

The next content is for second file “nodes.pp”. Here we create the case statement with the include for Jenkins class and a message (if OS is not supported).

node default {
    case $::operatingsystem {
        'Debian', 'Ubuntu' : { include jenkins }
        default  : { notify {"$::operatingsystem is not supported yet":} }
    }
}

As last step we create the content for “init.pp”.

class jenkins {
    # get key
    exec { 'install_jenkins_key':
        command => 'wget -q -O - http://pkg.jenkins-ci.org/debian/jenkins-ci.org.key | apt-key add - ',
    }

    # update
    exec { 'apt-get update':
        command => 'apt-get update',
        require => File['/etc /apt/sources.list.d/jenkins.list'],
    }

    # source file
    file { '/etc /apt/sources.list.d/jenkins.list':
        content => "deb http://pkg.jenkins-ci.org/debian binary/\n",
        mode    => '0644',
        owner   => root,
        group   => root,
        require => Exec['install_jenkins_key'],
    }

    # jenkins package
    package { 'jenkins':
        ensure  => latest,
        require => Exec['apt-get update'],
    }

    # jenkins service
    service { 'jenkins':
        ensure  => running,
        require => Package['jenkins'],
    }
}

Note: The space after “/etc /apt” on “update” and “source file” should removed! I made this just because of the security policies of my provider. They do not allow! 🙁

Continue

First we check the syntax with the puppet-lint. As software tester i think you always lint! 😉

# example project-wide
$ puppet-lint testenvironment/

# example specific files
$ puppet-lint testenvironment/manifests/site.pp
$ puppet-lint testenvironment/manifests/nodes.pp
$ puppet-lint testenvironment/modules/jenkins/manifests/init.pp

Now we make some different “Dry-runs”.

# simple Dry-run with noop
$ puppet apply testenvironment/manifests/site.pp --modulepath=/root/testenvironment/modules/ $* --noop

# Dry-run with noop and summarize
$ puppet apply testenvironment/manifests/site.pp --modulepath=/root/testenvironment/modules/ $* --noop --summarize

# Dry-run with noop, summarize and debug
$ puppet apply testenvironment/manifests/site.pp --modulepath=/root/testenvironment/modules/ $* --noop --summarize --debug

With “–noop” nothing is really executed. The “–modulepath”, “–summarize” and “–debug” speaks for themselves.

the Final

Now the final, after the Puppet is ready you should able to connect to Jenkins.

# run puppet
$ puppet apply testenvironment/manifests/site.pp --modulepath=/root/testenvironment/modules/ $*


Jenkins and jslint4java

This tutorial shows a very simple Jenkins – jslint4java integration over Shell.

Preconditions

Jenkins is installed

Steps

Start Jenkins, open the browser (http://<host>:8080) and setup a new “Free Style Project” (JS-Lint-Example).

# start jenkins
$ service jenkins start

Back to Jenkins… here you create a “Freestyle-Project”

Jenkins Freestyle Project

The tutorial does not use any VCS, so we press the “Build Now” button to create the project “workspace” folder. After successful creation, we create 3 new folders (src, lib, build) inside the workspace folder.

# create new folders inside the workspace
$ cd /var/lib/jenkins/workspace/JS-Lint-Example/
$ mkdir {src,lib,build}

# change owner of folders
$ chown jenkins:jenkins src/ lib/ build/

Now upload the jslint4java into the “lib” folder.

# upload jar to lib folder
$ scp jslint4java-2.0.5.jar <user>@<host>:/var/lib/jenkins/workspace/JS-Lint-Example/lib

# change owner and make executable
$ chown jenkins:jenkins jslint4java-2.0.5.jar
$ chmod u+x jslint4java-2.0.5.jar

It`s time to test if jslint4java is running. The 1st test can be done inside the terminal self.

$ java -jar jslint4java-2.0.5.jar --help

The 2nd test direct on Jenkins. Open the “JS-Lint-Example” job in browser – press link “Configure” and we create a “Build-Step” with “Execute Shell”.

Jenkins JSLint Test

After save and build the “Console Output” of the respective build should show the help. If there is a problem here, please check if Java is installed and the file permissions are correct. If everything works fine we create a simple JavaScript file and upload this into the “src” folder.

function myFunction(p1, p2) {
  return p1 * p2;
}

var person = {
  firstName:"John",
  lastName:"Doe",
  age:50,
  eyeColor:"blue"
};

test = myFunction(10, 10);

document.write('Hello World');
document.write(test);
document.write(person.firstName);
# upload example.js to src folder
$ scp example.js <user>@<host>:/var/lib/jenkins/workspace/JS-Lint-Example/src

Now we change the “Execute Shell” command and add the “Post-Build-Action” – “Publish JUnit Test Results” with value “build/js_report.xml”.

Jslint Jenkins Configuration
java -jar ${WORKSPACE}/lib/jslint4java-2.0.5.jar ${WORKSPACE}/src/example.js --report junit > ${WORKSPACE}/build/js_report.xml

Ready,… after save and new build we can see the file “js_report.xml” into “build” folder and the jUnit  report into our project.

Jslint Jenkins jUnit Report

Embed SLOCCount into Jenkins jobs

Preparation

Install SLOCCount and cloc on system.

$ aptitude install sloccount cloc

Search and install the “SLOCCount Plugin”.

jenkins sloccount plugin
Search SLOCCount Plugin

Configure

Now search your job and start configuration and insert the command “Build > Execute Shell”.

sloccount --duplicates --wide --details ${WORKSPACE}/<file|folder> > sloccount_report.sc

As last step add the Post-Build-Action – “View SLOCCount results” and insert the generated report “sloccount_report.sc”.

sloccount result path
Configure Post-Build-Action

The plugin just show the number of lines per file, file type and folder. No estimated project value or other informations! This information you can see direct on generated report. After running the build, your screen should look similar like this:

sloccount report
SLOCCount report

Markup validation with Jenkins

Preparation

Search and install the “Unicorn Validation Plugin” and “Plot Plugin”

jenkins unicorn plugin
Search for Plugin

Configure

Within the build section, add a build step “Unicorn Validator”. For the Site to validate add a URL to a site that you want to test. Before you configure the Post-build Actions you should save and run. After 1st run the workspace should look similar.

unicorn results
Workspace files

Now start configuration again. On Post-build Actions section add “Plot build data”, and add the following details:

unicorn configuration
Plot configuration

Now you can run the build again and on job navigation you see the item “Plots”. Repeat the last step for plotting of css results. As value for “Plot title” use “CSS Validation errors” and for “Data series file” use “css3-validator_errors.properties”.

Agile view for Jenkins

Preparation

Search and install the “Radiator View” plugin.

radiator plugin jenkins
Select Radiator View Plugin

Configuration

After installation create a new view, similar to configuring the more conventional list views.

radiator view jenkins
Select Radiator view

Now select all desired jobs and press “Save” button.

radiator agil view
Agile view

The build radiator view displays a box for each build with the job name and some other details, depending on build steps and test methods.

Backup and restore Jenkins

Preparation

Create a new folder with read/write permission for Jenkins.

Example

# create directory
$ mkdir backup_jenkins

# change user
$ chown jenkins:jenkins backup_jenkins/

Now install the Jenkins Plugin “ThinBackup”.

thinbackup plugin for jenkins

Backup configuration

After installation and restart, you can start with backup configuration “Manage Jenkins > ThinBackup > Settings”. For Backup directory insert the path for directory that you created. Complete the configuration by your needs and press “Save” button.

thinbackup settings

Backup

Now you could wait for 1st automated backup or press the “Backup Now” button “Manage Jenkins > ThinBackup”.

Restore

For restore simply select Restore “Manage Jenkins > ThinBackup”. Select backup from list and press “Restore” button.