Start with Python and Selenium WebDriver

This introduction should give you some hints about Python and Selenium WebDriver. I will use this in following tutorials as a base.

Preconditions

  • Python installed
  • pip (package manager) installed
  • Editor or IDE installed

Preparation

As first step simply install or upgrade the Selenium package.

# install or upgrade selenium
$ pip install -U selenium

# get information about package
$ pip show selenium

This is a fairly simple process. After the successful command execution you will have the Selenium WebDriver client library on your machine with all that is needed to create automated scripts.

The first script

Now start using the unittest library. The script comments help to describe the code.

#!/usr/bin/env python
import unittest
from selenium import webdriver


class SearchContentOnWebsite(unittest.TestCase):
    """define a class that inherits the TestCase class"""

    def setUp(self):
        """perform some tasks at the start of each test"""
        # create a new Firefox session
        self.driver = webdriver.Firefox()
        # wait for a certain amount of time
        self.driver.implicitly_wait(30)
        # maximize browser window
        self.driver.maximize_window()
        # navigate to the start URL
        self.driver.get("http://softwaretester.info")

    def test_search_headline(self):
        """a very simple test case"""
        link_text = 'Modern Status Plugin'
        title = 'Jenkins - Modern Status Plugin | - Softwaretester -'
        # find a element with partial text
        elem = self.driver.find_element_by_partial_link_text(link_text)
        # click element
        elem.click()
        # assert that title have value
        assert title in self.driver.title

    def tearDown(self):
        """method to clean up any initialized values after the test"""
        # close the browser window
        self.driver.close()

if __name__ == "__main__":
    unittest.main(verbosity=2)

Run Test

To run the test simple call your script.

./my_first_test.py

# or
python my_first_test.py

CSSLint with Grunt on Debian

This tutorial gives an tiny insight into CSSLint with Grunt on Debian. After that you should be able, to implement more Grunt tasks for your project.

Installation

As root or sudo user install needed packages!

# update your system
$ apt-get update && apt-get upgrade

# install nodejs and npm
$ apt-get install -y nodejs-legacy npm

# install grunt-cli (global)
$ npm install -g grunt-cli

Check the installation of all needed tools.

# show different versions
$ nodejs --version
$ npm --version
$ grunt --version

Create a new project

As “normal” user create a new project and install the needed plugin.

# create new folder
$ mkdir TestProject

# change directory
$ cd TestProject/

# interactively create a package.json file
$ npm init

# install the csslint plugin
$ npm install grunt-contrib-csslint --save-dev

If no problems occurred, the package.json file should look like:

{
  "name": "TestProject",
  "version": "0.0.1",
  "description": "my example project",
  "main": "index.js",
  "scripts": {
    "test": "echo \"Error: no test specified\" && exit 1"
  },
  "author": "lupin3000",
  "license": "ISC",
  "devDependencies": {
    "grunt": "^0.4.5", "grunt-contrib-csslint": "^0.4.0"
  }
}

Create a css folder and a css file with some mistakes like:

$ mkdir css
$ vim css/example.css

The example.css file contains some issues!

html, body {
  margin: 0;
  padding: 0 
  borde: 0;
}

In the last step we create the Gruntfile.js

# create Gruntfile.js
$ vim Gruntfile.js
module.exports = function(grunt) {
  grunt.initConfig({
    csslint: {
      // define the files to lint
      files: ['css/*.css'],
      strict: {
        options: {
          "import": 2
        }
      }
    }
  });
  grunt.loadNpmTasks("grunt-contrib-csslint");
};

Thats all, now run just the command and see the results.

# run csslinter
$ grunt csslint

Sass, Compass and Jenkins

This tutorial shows how Sass, Compass and Jenkins working together in very easy way. The goal is that Jenkins created the CSS from SCSS files.

Precondition

  • Jenkins installed
  • Ruby installed

Steps

In first step we need to install Sass and Compass on the clients (Developer engines) and build server (Jenkins).

# check for installed libraries
$ gem list

# update gem`s
$ sudo gem update --system

# install sass and compass libraries
$ sudo gem install sass
$ sudo gem install compass

Now we create on one client the project.

# change to specific folder
$ cd ~/path/to/folder

# create compass project
$ compass create --bare --sass-dir "sass" --css-dir "css" --javascripts-dir "js" --images-dir "img"

# create folders
$ mkdir img js css sass/partials

# create files
$ touch index.html js/main.js sass/style.scss sass/partials/_reset.scss sass/partials/_content.scss

Now add and edit some content to the files with your favorite editor and commit all to your repository. The content for the tutorial looks like this:

require 'compass/import-once/activate'
# Require any additional compass plugins here.

# Set this to the root of your project when deployed:
http_path = "/"
css_dir = "css"
sass_dir = "sass"
images_dir = "img"
javascripts_dir = "js"

# You can select your preferred output style here (can be overridden via the command line):
output_style = :compressed

# To enable relative paths to assets via compass helper functions. Uncomment:
# relative_assets = true

# To disable debugging comments that display the original location of your selectors. Uncomment:
line_comments = false


# If you prefer the indented syntax, you might want to regenerate this
# project again passing --syntax sass, or you can uncomment this:
# preferred_syntax = :sass
# and then run:
# sass-convert -R --from scss --to sass sass scss && rm -rf sass && mv scss sass
<!doctype html>
<head>
	<title>Lorem ipsum</title>
	<meta charset="utf-8">
	<meta name="viewport" content="width=device-width">
	<link rel="stylesheet" href="css/styles.css">
</head>
<body>
	<header>
		Header Content
	</header>
	<div id="wrapper">
		<h1>Lorem ipsum</h1>
		<article>
			<section>
				<h2>Lorem ipsum</h2>
				<p>Lorem ipsum dolor sit amet</p>
			</section>
			<section>
				<h2>Lorem ipsum</h2>
				<p>Lorem ipsum dolor sit amet</p>
			</section>
		</article>
	</div>
	<footer>
		Footer Content
	</footer>
	<script src="js/main.js"></script>
</body>
</html>
@import "compass";
@import "partials/reset";
@import "partials/content";
html, body, div, span, applet, object, iframe, h1, h2, h3, h4, h5, h6, p, blockquote, pre, a, abbr, acronym, address, big, cite, code, del, dfn, em, img, ins, kbd, q, s, samp, small, strike, strong, sub, sup, tt, var, b, u, i, center, dl, dt, dd, ol, ul, li, fieldset, form, label, legend, table, caption, tbody, tfoot, thead, tr, th, td, article, aside, canvas, details, embed, figure, figcaption, footer, header, hgroup, menu, nav, output, ruby, section, summary, time, mark, audio, video {
	margin: 0;
	padding: 0;
	border: 0;
	font-size: 100%;
	font: inherit;
	vertical-align: baseline;
}
article, aside, details, figcaption, figure, footer, header, hgroup, menu, nav, section {
	display: block;
}
body {
	line-height: 1;
}
ol, ul {
	list-style: none;
}
blockquote, q {
	quotes: none;
}
blockquote:before, blockquote:after, q:before, q:after {
	content: '';
	content: none;
}
table {
	border-collapse: collapse;
	border-spacing: 0;
}
$color_001: #000000; // Black
$color_002: #FFFFFF; // White
$color_003: #FF0000; // Red

body {
	color: $color_002;
	background-color: $color_001;
}

Okay… now lets go to Jenkins. Here we create a new “Freestyle Job” and configure the Source-Code-Management and insert the following command into “Execute Shell”

rm -fr ${WORKSPACE}/css
compass compile

Thats it… after running the build into the workspace you should see the folder “css” and a file “style.css” the content should look like:

html,body,div,span,applet,object,iframe,h1,h2,h3,h4,h5,h6,p,blockquote,pre,a,abbr,acronym,address,big,cite,code,del,dfn,em,img,ins,kbd,q,s,samp,small,strike,strong,sub,sup,tt,var,b,u,i,center,dl,dt,dd,ol,ul,li,fieldset,form,label,legend,table,caption,tbody,tfoot,thead,tr,th,td,article,aside,canvas,details,embed,figure,figcaption,footer,header,hgroup,menu,nav,output,ruby,section,summary,time,mark,audio,video{margin:0;padding:0;border:0;font-size:100%;font:inherit;vertical-align:baseline}article,aside,details,figcaption,figure,footer,header,hgroup,menu,nav,section{display:block}body{line-height:1}ol,ul{list-style:none}blockquote,q{quotes:none}blockquote:before,blockquote:after,q:before,q:after{content:'';content:none}table{border-collapse:collapse;border-spacing:0}body{color:#fff;background-color:#000}
 

Create your own test application

A lot of software testers do have no or less development skills. They also have less skills to use commandline tools and need GUI applications. In addition, the test applications for the respective claims should be easy to use. This guide will show you how to easily deploy software testers the needed test tools. This is just an example, please feel free to expand it!

Precondition

Let`s go

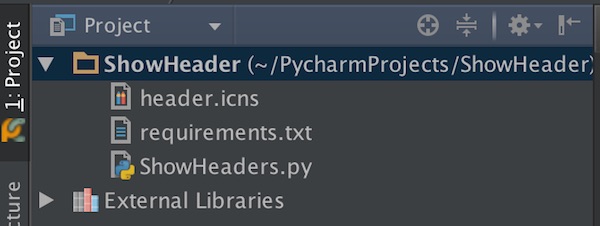
After create a new PyCharm project (with virtualenv), create 2 new empty files (requirements.txt, ShowHeaders.py) and import a icon. You can found icons (*.icns) on iconarchive for free.

application project files

Open the “requirements.txt” file and add Requests library.

requests==2.6.0

Open the “ShowHeader.py” and add the following content.

#!/usr/bin/env python
#  -*- coding: utf-8 -*-
"""
This is a main script

Usage:
    python ShowHeaders.py
"""
import requests
from Tkinter import (Tk, Frame, StringVar, OptionMenu, Button, Entry, Text,
                     END, DISABLED, NORMAL, SUNKEN, E, W)


class ShowHeaders(object):
    """
    ShowHeaders class
    """

    OPTIONS = ["GET", "POST", "PUT", "DELETE"]

    def __init__(self):
        """
        Constructor for Tk GUI
        """
        self.root = Tk()
        self.root.title('Show Headers')
        self.root.configure(bg="light blue")
        self.option = StringVar(self.root)
        self.option.set(self.OPTIONS[0])
        self.methods = None
        self.url = None
        self.response = None
        self.copy = None

    def create_gui(self):
        """
        Create Tk GUI
        """
        self._create_top_frame()
        self._create_middle_frame()
        self._create_bottom_frame()
        self.root.mainloop()

    def close_app(self):
        """
        Close & Quit Application
        """
        self.root.quit()

    def _print_response(self, response_txt):
        """
        Print response
        """
        self.response.config(state=NORMAL)
        self.response.delete(1.0, END)
        self.response.insert(END, response_txt)
        self.response.config(state=DISABLED)

    def _copy_to_clipboard(self):
        """
        Copy to text clipboard
        """
        text = self.response.get("1.0", END)
        self.root.clipboard_clear()
        self.root.clipboard_append(text)

    def _make_request(self):
        """
        Run http request and print
        """
        self.copy.config(state="normal")
        methods = self.option.get()
        url = self.url.get()
        if methods == 'GET':
            req = requests.get(url)
        elif methods == 'POST':
            req = requests.post(url)
        elif methods == 'PUT':
            req = requests.put(url)
        elif methods == 'DELETE':
            req = requests.delete(url)
        else:
            req = dict()
        header = req.headers
        self._print_response(header)

    def _create_top_frame(self):
        """
        Create top frame
        """
        top_frame = Frame(self.root)
        top_frame.grid(row=0, column=0, padx=5, pady=5, sticky=W+E)

        self.methods = OptionMenu(top_frame, self.option, *self.OPTIONS)
        self.methods.config(width=15)
        self.methods.grid(row=0, column=0)

        self.url = Entry(top_frame, width=50)
        self.url.insert(0, "http://")
        self.url.grid(row=0, column=1)

        Button(top_frame, text='Request', command=self._make_request).grid(
            row=0, column=2)

    def _create_middle_frame(self):
        """
        Create middle frame
        """
        middle_frame = Frame(self.root, height=75, bd=1, relief=SUNKEN)
        middle_frame.grid(row=1, column=0, padx=5, pady=5)

        self.response = Text(middle_frame, height=10)
        self.response.config(state=DISABLED)
        self.response.grid(row=1)

    def _create_bottom_frame(self):
        """
        Create bottom frame
        """
        bottom_frame = Frame(self.root)
        bottom_frame.grid(row=2, column=0, padx=5, pady=5, sticky=W+E)

        self.copy = Button(bottom_frame, text="Copy", state=DISABLED,
                           command=self._copy_to_clipboard)
        self.copy.grid(row=0, column=0)

        Button(bottom_frame, text='Quit', command=self.close_app).grid(
            row=0, column=1)


if __name__ == '__main__':
    APP = ShowHeaders()
    APP.create_gui()

For first test, run the application. If there are no issues – open the PyCharm terminal and run the following command.

$ py2applet --make-setup ShowHeaders.py

# or if you use virtualenv
$ /Users/<username>/ShowHeaderEnv/bin/py2applet --make-setup ShowHeaders.py

Now you should see the generated file “setup.py” in the Project. Open the file and add the icon. The content should look like this:

"""
This is a setup.py script generated by py2applet

Usage:
    python setup.py py2app
"""

from setuptools import setup

APP = ['ShowHeaders.py']
DATA_FILES = []
OPTIONS = {'argv_emulation': True, 'iconfile':'header.icns'}

setup(
    app=APP,
    data_files=DATA_FILES,
    options={'py2app': OPTIONS},
    setup_requires=['py2app'],
)

Now execute the following command to build, for first test.

$ python setup.py py2app -A

After some messages in terminal, your Project should show 2 new folders (build, dist). The alias mode (-A / –alias) instructs py2app to build an application, but it is not portable to other machines! You can open the Application in Finder or from terminal for your tests. If there are changes, just run the build-command again.

$ open dist/ShowHeaders.app

If everything is fine and your Application is ready for ship, run the following command.

# remove build and dist folder
$ rm -fr build/ dist/

# build application
$ python setup.py py2app

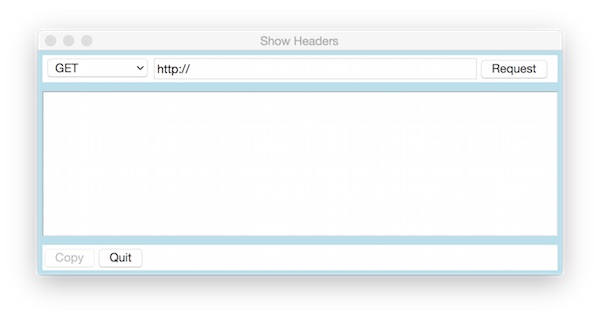
Again the Application can be found on folder “dist”. The result should look like this:

example application

Have fun and be creative! Too ship the test application for Windows users, look at py2exe.

Install Jenkins with Puppet

As a software tester you need a test environment! The test environment should be soon as possible and without outside resources deployable. This guide shows you how to install Jenkins on Debian/Ubuntu with Puppet (Version 2.7.x).

Preparation

# get puppet version
$ puppet --version

# get puppet-lint version
$ puppet-lint --version

If Puppet and Puppet-Lint are not installed:

# update and upgrade
$ apt-get update && apt-get upgrade

# install puppet and puppet-lint
$ apt-get install puppet && apt-get install puppet-lint

The project looks like the following:

testenvironment
├── manifests
│   ├── nodes.pp
│   └── site.pp
└── modules
    └── jenkins
        └── manifests
            └── init.pp

Steps

# create folders
$ mkdir -p testenvironment/manifests
$ mkdir -p testenvironment/modules/jenkins/manifests

# create files
$ touch testenvironment/manifests/site.pp
$ touch testenvironment/manifests/nodes.pp
$ touch testenvironment/modules/jenkins/manifests/init.pp

The first content we add is for “site.pp”. Here we include the “nodes.pp” and setup basic paths.

import 'nodes.pp'

Exec {
    path => ['/bin', '/usr/bin'],
}

The next content is for second file “nodes.pp”. Here we create the case statement with the include for Jenkins class and a message (if OS is not supported).

node default {
    case $::operatingsystem {
        'Debian', 'Ubuntu' : { include jenkins }
        default  : { notify {"$::operatingsystem is not supported yet":} }
    }
}

As last step we create the content for “init.pp”.

class jenkins {
    # get key
    exec { 'install_jenkins_key':
        command => 'wget -q -O - http://pkg.jenkins-ci.org/debian/jenkins-ci.org.key | apt-key add - ',
    }

    # update
    exec { 'apt-get update':
        command => 'apt-get update',
        require => File['/etc /apt/sources.list.d/jenkins.list'],
    }

    # source file
    file { '/etc /apt/sources.list.d/jenkins.list':
        content => "deb http://pkg.jenkins-ci.org/debian binary/\n",
        mode    => '0644',
        owner   => root,
        group   => root,
        require => Exec['install_jenkins_key'],
    }

    # jenkins package
    package { 'jenkins':
        ensure  => latest,
        require => Exec['apt-get update'],
    }

    # jenkins service
    service { 'jenkins':
        ensure  => running,
        require => Package['jenkins'],
    }
}

Note: The space after “/etc /apt” on “update” and “source file” should removed! I made this just because of the security policies of my provider. They do not allow! 🙁

Continue

First we check the syntax with the puppet-lint. As software tester i think you always lint! 😉

# example project-wide
$ puppet-lint testenvironment/

# example specific files
$ puppet-lint testenvironment/manifests/site.pp
$ puppet-lint testenvironment/manifests/nodes.pp
$ puppet-lint testenvironment/modules/jenkins/manifests/init.pp

Now we make some different “Dry-runs”.

# simple Dry-run with noop
$ puppet apply testenvironment/manifests/site.pp --modulepath=/root/testenvironment/modules/ $* --noop

# Dry-run with noop and summarize
$ puppet apply testenvironment/manifests/site.pp --modulepath=/root/testenvironment/modules/ $* --noop --summarize

# Dry-run with noop, summarize and debug
$ puppet apply testenvironment/manifests/site.pp --modulepath=/root/testenvironment/modules/ $* --noop --summarize --debug

With “–noop” nothing is really executed. The “–modulepath”, “–summarize” and “–debug” speaks for themselves.

the Final

Now the final, after the Puppet is ready you should able to connect to Jenkins.

# run puppet
$ puppet apply testenvironment/manifests/site.pp --modulepath=/root/testenvironment/modules/ $*


Textmate with Puppet syntax highlighting

To enable syntax highlighting for puppet in textmate, follow this guide.

Preconditions

  • Textmate installed
  • Git installed (available with command line developer tools)

Steps

Create new folder somewhere on your directories. I do directly on Desktop.

# create new directory
$ mkdir ~/Desktop/Bundles

Go inside created folder and clone from Git repository.

# change directory
$ cd ~/Desktop/Bundles

# run git clone
$ git clone https://github.com/masterzen/puppet-textmate-bundle.git Puppet.tmbundle

Move the “Puppet.tmbundle” file into specific folder and delete created folder on desktop.

# move file
$ mv ~/Desktop/Bundles/Puppet.tmbundle ~/Library/Application\ Support/TextMate/Bundles/

# delete created directory
$ rm -fr ~/Desktop/Bundles

Now select a *.pp file and open with Textmate. In the Textmate dialog, select “Puppet” and “Install Bundle”.

Robot Framework and Apache Ant

This tutorial is meant to show how easy you can use Robot Framework with Apache Ant. You can use later the build file for example with Jenkins.

Preconditions

Instructions

My folder structure looks like this:

Project structure

Within the folder “report” all logs and reports should be stored. Inside the folder “testsuite” are all Robot Framework files. The “build.xml” looks like this:

<?xml version="1.0"?>
<project name="RobotFramework" basedir="." default="run">
	<description>
		Simple Apache Ant example for running RobotFramework
	</description>
	
	<property name="suite.dir" location="testsuite" />
	<property name="docs.dir" location="report" />
	
	<!-- set time -->
	<target name="init">
		<tstamp>
			<format property="TODAY_DE" pattern="dd.MMMM.yyyy" locale="de" />
		</tstamp>
	</target>
	
	<!-- delete docs.dir -->
	<target name="clean" depends="init">
		<delete dir="${docs.dir}" />
	</target>
	
	<!-- create docs.dir -->
	<target name="setup" depends="clean">
		<mkdir dir="${docs.dir}" />
	</target>
	
	<!-- running testsuite -->
	<target name="run" depends="setup">
		<echo message="${TODAY_DE}" />
		<exec executable="pybot">
			<arg line="-d ${docs.dir}" />
			<arg value="${suite.dir}" />
		</exec>
	</target>
	
</project>

The content of the build.xml is self-explanatory. Now opening a terminal and run Apache Ant.

# direct on folder simple type ant
$ ant

# you can specify the build file
$ ant -buildfile build.xml

# you can specify the target
$ ant run


Minimize CSS and JavaScript files

To speed up the performance of your website, all CSS and JavaScript files should be minimized. That means, all CSS and JavaScript should delivered without unnecessary comments, spaces, line breaks and tabs. It should of course take place in the build process, otherwise your developers work is much harder! This tutorial shows how easily you can  minimize files, by using the YUI Compressor.

Precondition

Minimize one file

# Syntax to minimize CSS
$ java -jar yuicompressor-x.y.z.jar style.css -o style-min.css

# Syntax to minimize JavaScript
$ java -jar yuicompressor-x.y.z.jar script.js -o script-min.js

Minimize multiple files

# Syntax to minimize CSS
$ java -jar yuicompressor-x.y.z.jar -o '.css$:-min.css' *.css

# Syntax to minimize JavaScript
$ java -jar yuicompressor-x.y.z.jar -o '.js$:-min.js' *.js

For more options show the help!

# show help
$ java -jar yuicompressor-x.y.z.jar --help