Create a simple video test environment

In this series I would like to clarify the following questions. How can you test local videos and videos provided by a server? What tools are there? How could the test environment look like? … So these tutorials should provide an entry into the subject of video testing. In this part, we will provide the test environment.

Specification

additional Software

Files

# create project
$ mkdir -p ~/Projects/ && cd ~/Projects/

# clone all files from repository
$ git clone https://github.com/Lupin3000/VideoTest.git

# change directory
$ cd ~/Projects/VideoTest

Project Structure

$ tree .
├── src
│   ├── directstream.html
│   ├── index.html
│   ├── livestream.html
│   ├── nginx.conf
│   └── simplevideo.html
└── Vagrantfile

Prepare and run your test environment

The test environment will created by Vagrant. The Vagrant Base box needs to be provided with Debian 9. Therefore you have now 2 options. You can use a Debian 9 Base box from Vagrant cloud or you create your own. To create your own Debian 9 Base box you can use my Packer Git repository.

Please ensure, that the  Vagrantfile is properly configured (config.vm.box_url, config.vm.box) before start-up environment.

# modify Vagrantfile (box name)
$ vim Vagrantfile

# start new environment
$ vagrant up --provision-with install,prepare,start

# open in browser
$ open -a Safari http://localhost:8080/

After successful start you will find some informations on start page about How-to create, modify, upload and stream videos. In second tutorial we will have a detailed look on it.
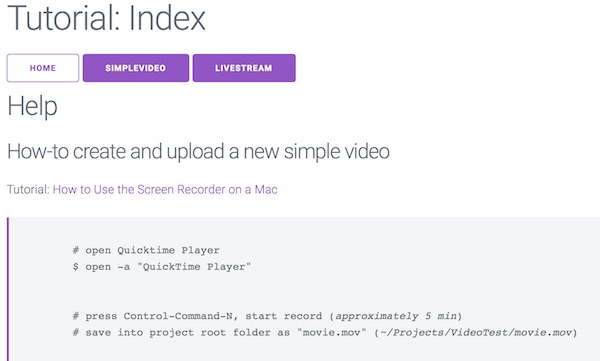
StartPage Video Test Environment

To understand the background somewhat better, take a look!

# tail nginx log files (optional)
$ vagrant ssh -c 'sudo tail -f /usr/local/nginx/logs/*.log'

# show content of directory (optional)
$ vagrant ssh -c 'sudo ls -la /tmp/hls/'

Develop some more

There are even more ways to publish video files (Media Streaming Server). You can easily expand the environment. Just customize/create the configurations and files in the “src” folder as well as the Vagrantfile. For Dynamic Adaptive Streaming over HTTP (DASH) support take a look here. This link opens the commercial software solution.

Note: You simply link the IDE with the “src” folder. To change the images and videos, just run vagant provisioner.

# run specific SHELL provisioner (video)
$ vagrant provision --provision-with video

# restart after configuration
$ vagrant up --provision-with stop,prepare,start

Download and install ffmpeg binaries on macOS

Currently official ffmpeg packages are available for Windows, Linux (Debian, Ubuntu, Fedora, RedHat) and macOS. You can download latest versions here.

Here now a solution for macOS users, if you don’t like to install many additional software on your system (static FFmpeg binaries).

# download ffmpeg
$ curl -C - -k https://evermeet.cx/ffmpeg/ffmpeg-3.3.3.7z -o ~/Downloads/ffmpeg-3.3.3.7z

# install debian package
$ vagrant ssh -c 'sudo apt install -y p7zip-full'

# copy archive (into shared folder)
$ cp ~/Downloads/ffmpeg-3.3.3.7z ~/Projects/VideoTest/src/

# unzip archive
$ vagrant ssh -c '7z x /home/vagrant/src/ffmpeg-3.3.3.7z'

# mv binary into src
$ vagrant ssh -c 'mv /home/vagrant/ffmpeg /home/vagrant/src/ffmpeg'

# delete archive (on shared folder)
$ rm ~/Projects/VideoTest/src/ffmpeg-3.3.3.7z

# mv binary into project folder (from shared folder)
$ mv ~/Projects/VideoTest/src/ffmpeg ~/Projects/VideoTest/

# ensure binary is executable
$ chmod +x ffmpeg

Now some basic ffmpeg commands, which should work now. If you like,you can move the binary into directory “/usr/local/”.

# show version
$ ~/Projects/VideoTest/ffmpeg -version

# show help
$ ~/Projects/VideoTest/ffmpeg -help

# list codecs
$ ~/Projects/VideoTest/ffmpeg -codecs

# list formats
$ ~/Projects/VideoTest/ffmpeg -formats

Okay, that’s it for first tutorial.
Jenkins, InfluxDB and Grafana

Today an basic introduction to Jenkins, InfluxDB and Grafana. Docker is used to save some time. Okay,… let’s start.

Preparation

# create project and change directory
$ mkdir ~/Projects/JIG/influxdb && cd ~/Projects/JIG/

# download official jenkins image (latest)
$ docker pull jenkins

# download official influxdb image (latest)
$ docker pull influxdb

# download official grafana image (latest)
$ docker pull grafana/grafana

# list docker images
$ docker images
...
REPOSITORY          TAG                 IMAGE ID            CREATED             SIZE
jenkins             latest              59b08e8f6e37        4 days ago          704 MB
grafana/grafana     latest              2cdb407c0fa4        7 days ago          286 MB
influxdb            latest              fad81160f2de        13 days ago         224 MB
...

Jenkins preparation

# start Jenkins
$ docker run --name jenkins -p 8080:8080 jenkins

# copy password from cli
...
*************************************************************

Jenkins initial setup is required. An admin user has been created and a password generated.
Please use the following password to proceed to installation:

b49ffa5749724d61b43d3a159b181133
...

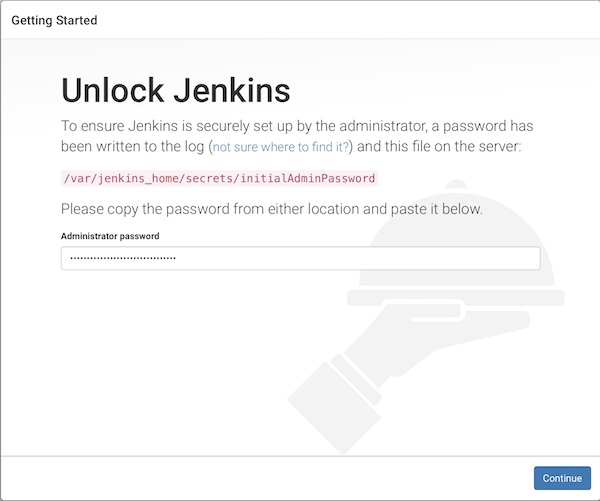
Now open your favorite browser with URL http://localhost:8080 and unlook Jenkins with following steps.

unlook jenkins

  1. unlook with password from cli
  2. install suggested plugins
  3. create your admin user
  4. start using jenkins

Next, the InfluxDB plug-in must be installed.

influxdb plugin jenkins

InfluxDB preparation

# start InfluxDB
$ docker run --name influxdb -p 8086:8086 -v $PWD/influxdb:/var/lib/influxdb influxdb

# check current configuration (optional)
$ docker exec -i influxdb influxd config

# create new user
$ curl -G http://localhost:8086/query --data-urlencode "q=CREATE USER jenkins WITH PASSWORD 'password123' WITH ALL PRIVILEGES"

# create database for jenkins
$ curl -G http://localhost:8086/query -u jenkins:password123 --data-urlencode "q=CREATE DATABASE jenkins_db"

# show users (optional)
$ curl -G http://localhost:8086/query -u jenkins:password123 --data-urlencode "q=SHOW USERS"
...
{"results":[{"statement_id":0,"series":[{"columns":["user","admin"],"values":[["jenkins",true]]}]}]}
...

# show databases (optional)
$ curl -G http://localhost:8086/query -u jenkins:password123 --data-urlencode "q=SHOW DATABASES"
...
{"results":[{"statement_id":0,"series":[{"name":"databases","columns":["name"],"values":[["_internal"],["jenkins_db"]]}]}]}
...

# show measurements
$ curl -G http://localhost:8086/query -u jenkins:password123 --data-urlencode "db=jenkins_db" --data-urlencode "q=SHOW MEASUREMENTS"
...
{"results":[{"statement_id":0}]}
...

Connect Jenkins with InfluxDB

# start jenkins container (if stopped)
$ docker start jenkins

# show ip of influxdb container
$ docker inspect --format '{{ .NetworkSettings.IPAddress }}' influxdb
...
172.17.0.2
...

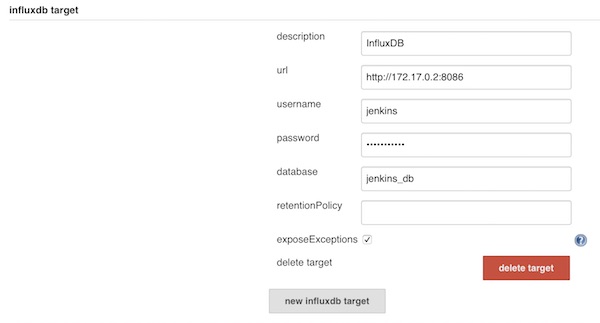
Add new InfluxDB target on Jenkins

jenkins influxdb settings

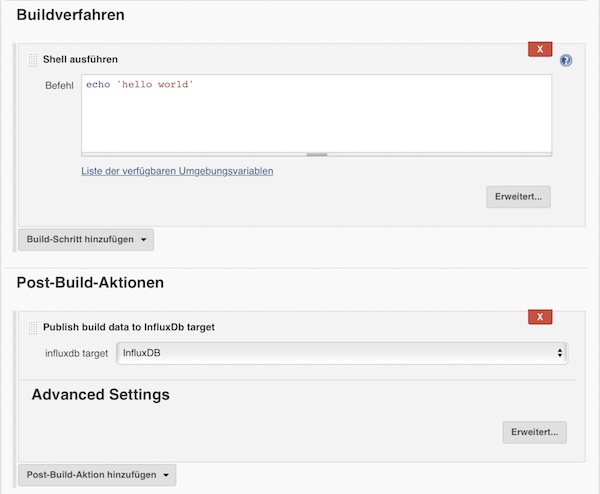
Save and create a new freestyle job. For example with following configuration.

jenkins job influxdb

When you are done, run the job.

# show measurements
$ curl -G http://localhost:8086/query -u jenkins:password123 --data-urlencode "db=jenkins_db" --data-urlencode "q=SHOW MEASUREMENTS"
...
{"results":[{"statement_id":0,"series":[{"name":"measurements","columns":["name"],"values":[["jenkins_data"]]}]}]}
...

# run select statement (optional)
$ curl -G http://localhost:8086/query -u jenkins:password123 --data-urlencode "db=jenkins_db" --data-urlencode "q=SELECT * FROM jenkins_data"
...
{"results":[{"statement_id":0,"series":[{"name":"jenkins_data","columns":["time","build_number","build_result","build_result_ordinal","build_status_message","build_successful","build_time","last_stable_build","last_successful_build","project_build_health","project_name","project_name_1"],"values":[["2017-06-08T17:27:24.487Z",9,"SUCCESS",0,"stable",true,16,9,9,100,"test","test"]]}]}]}
...

Add Grafana

# start containers (if stopped)
$ docker start influxdb && docker start jenkins

# run grafana container
$ docker run --name grafana -i -p 3000:3000 grafana/grafana

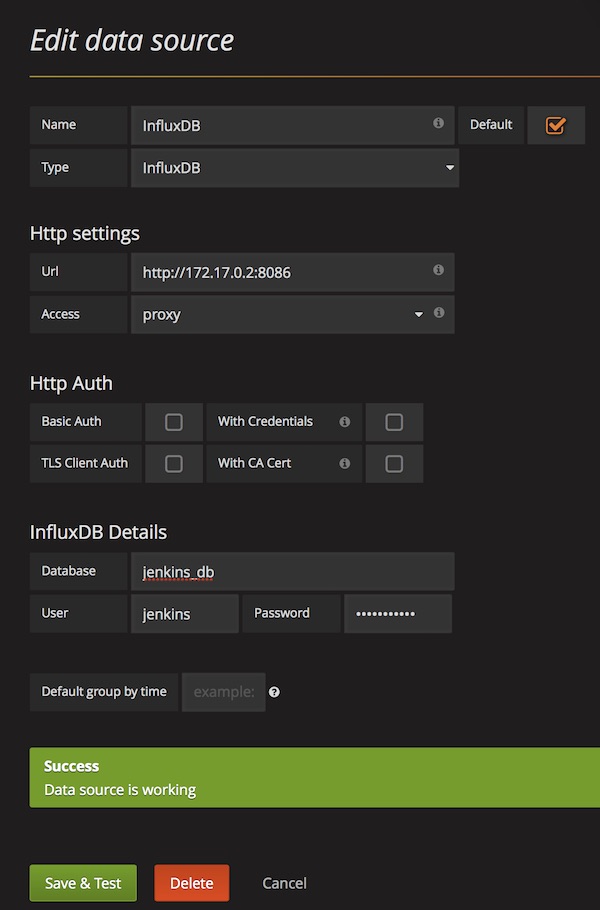
Open you browser with URL http://localhost:3000, login with credentials (admin/admin) and add a new InfluxDB data source.

grafana data source

From now on, you can create and share dashboards in Grafana, which shows all Jenkins metrics.

Test your infrastructure

Infrastructures can be very big. Luckily, there are provisioner like Chef, Salt, Ansible and etc. These provisioners can be very complex and possibly the developer has done something wrong. Therefore the infrastructure has to be tested! Tools like goss, Serverspec and Testinfra helps testers to validate. This tutorial show the first steps with Testinfra.

Testinfra is written in Python very small and easy to understand. Here is the GitHub repository.

Precondition

  • Vagrant (min. 1.9.3) installed
  • Python (min. 2.7) installed
  • pip (min. 9.0.1) and virtualenv (min. 15.1.0) installed
  • make (min. 3.81) installed

Project structure

To get used to it – i prepared some files for you. You only need to change the box name/url in Vagrantfile.

$ tree
.
├── Makefile
├── requirements.txt
├── Vagrantfile
└── tests.py
ENV_DIR = .env
CURRENT_DIR := $(shell pwd)
INTERPRETER = $(CURRENT_DIR)/$(ENV_DIR)/bin/
PATH := ${PATH}:$(INTERPRETER)

help:
	@echo "run make <target> with:"
	@echo " > env       : create virtualenv directory $(ENV_DIR)"
	@echo " > deps      : install dependencies from requirements.txt"
	@echo " > clean_env : delete virtualenv directory $(ENV_DIR)"
	@echo " > up        : run vagrant up"
	@echo " > destroy   : run vagrant destroy"
	@echo " > test      : run testinfra on vagrant environment"
	@echo " > clean_all : delete all files and directories"

env:
	@echo "[RUN]: create virtualenv"
	virtualenv $(ENV_DIR) && \
	. $(ENV_DIR)/bin/activate && \
	make deps

deps:
	@echo "[RUN]: install dependencies"
	$(INTERPRETER)/pip install -r requirements.txt

up:
	@echo "[RUN]: vagrant up"
	vagrant up

destroy:
	@echo "[RUN]: vagrant destroy -f"
	vagrant destroy -f
	rm -fr $(CURRENT_DIR)/.vagrant

test:
	@echo "[RUN]: run testinfr on vagrant environment"
	vagrant ssh-config > $(CURRENT_DIR)/ssh-config
	$(INTERPRETER)/pytest -v --hosts=default --ssh-config=$(CURRENT_DIR)/ssh-config tests.py

clean_all:
	@echo "[RUN]: delete all files and directories"
	rm -fr $(CURRENT_DIR)/.cache $(CURRENT_DIR)/__pycache__
	rm -f $(CURRENT_DIR)/ssh-config
	make destroy
	make clean_env

clean_env:
	@echo "[RUN]: delete virtualenv"
	rm -fr $(ENV_DIR)
testinfra==1.5.4
paramiko==2.1.2
#!/usr/bin/env python

def test_system_type(SystemInfo):
    '''Check OS type'''
    type = SystemInfo.type
    assert type == 'linux'

def test_user_exists(User):
    '''Check user exists'''
    user = User('vagrant')
    assert user.exists

def test_firewalld_is_installed(Package):
    '''Check firewalld is installed'''
    package = Package('firewalld')
    assert package.is_installed

def test_firewalld_running_and_enabled(Service):
    '''Check firewalld service is running and enabled'''
    service = Service('firewalld')
    assert service.is_running
    assert service.is_enabled
# -*- mode: ruby -*-
# vi: set ft=ruby :

Vagrant.configure("2") do |config|

  # disable ssh key update
  config.ssh.insert_key = false

  # vagrant box name
  config.vm.box = ""

  # vagrant box url
  config.vm.box_url = ""

  # disable box update
  config.vm.box_check_update = false

  # disable synced_folder
  config.vm.synced_folder ".", "/vagrant", disabled: true

  # 2nd network interface (public)
  # config.vm.network "public_network"

  # virtualbox settings
  config.vm.provider "virtualbox" do |vb|
    vb.name = "example_vm"
    vb.cpus = "2"
    vb.memory = "2048"
    vb.gui = false
  end

end

Usage

# create virtualenv and install dependencies
$ make env

# create vagrant environment
$ make up

# run tests
$ make test

# delete all generated files and directories
$ make clean_all

Testinfra offers several connections backends for remote command execution and can be used with python standard unit test framework: unittest. So the integration with build servers is easily possible.

Simple Doctests with PyCharm CE

Python Doctests with PyCharm are very easy to configure! This tutorial will show you – how easy you can configure and run your Doctests inside PyCharm CE. You can use the following pyton script.

#!/usr/bin/env python
# -*- coding: utf-8 -*-
"""
This is an example for python doctest inside module docstring

>>> add('i', 'i')
Traceback (most recent call last):
    ...
TypeError: can't multiply sequence by non-int of type 'str'

"""


def add(a, b):
    """
    This is an example for python doctest inside function docstring

    >>> add(2, 3)
    6
    >>> add('a', 3)
    'aaa'
    """
    return a * b


class SomeTest(object):
    """
    This is an example for python doctest inside class docstring

    >>> t = SomeTest(); t.add(2, 'b'); t.sum
    'bb'
    """

    def __init__(self):
        """
        This is an example for python doctest inside constructor docstring

        >>> t = SomeTest(); type(t.sum)
        <type 'int'>
        """
        self.sum = int()

    def add(self, a, b):
        """
        This is an example for python doctest inside method docstring

        >>> t = SomeTest(); t.add(5, 5); t.sum
        25
        >>> t = SomeTest(); t.add('a', 5); t.sum
        'aaaaa'
        """
        self.sum = a * b

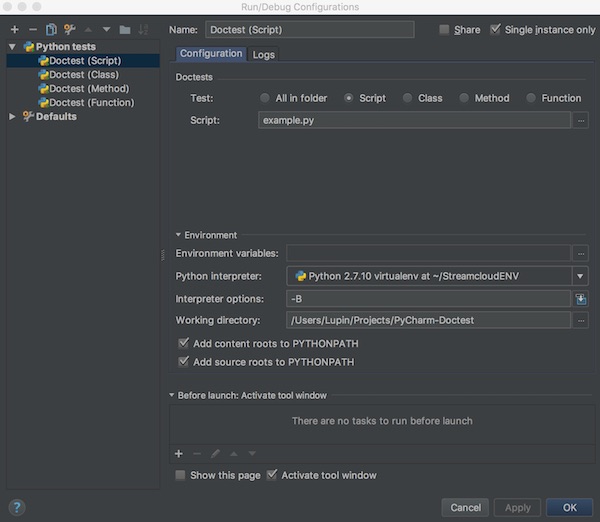
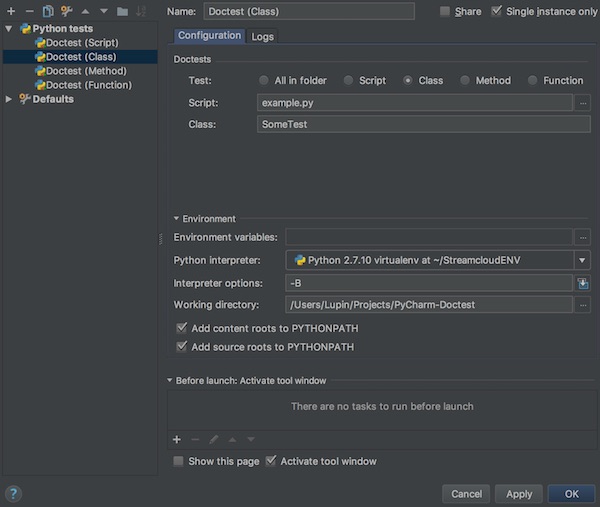
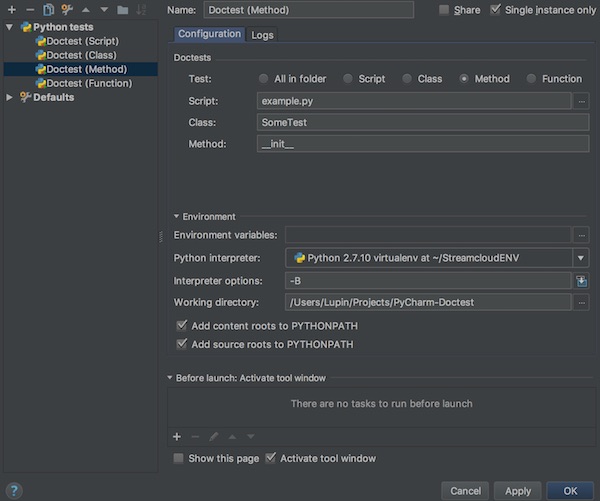
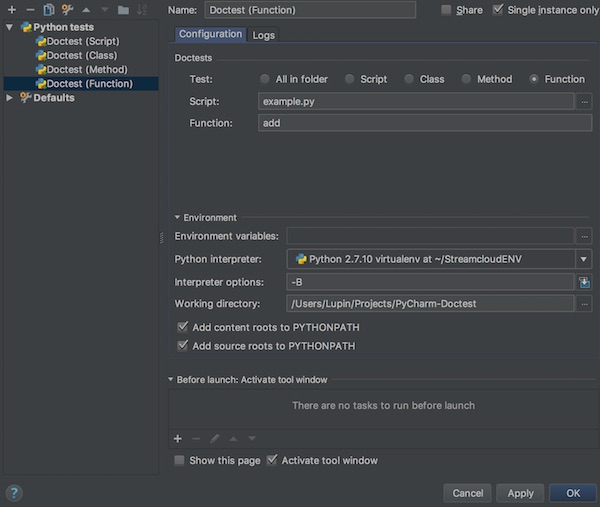
Now create following Doctests for Script, Class, Method and Function.

Script

pycharm doctest for script

Class

pycharm doctest for class

Method

pycharm doctest for method

Function

pycharm doctest for function

Now you can run your different doctests and look on results.

pycharm doctest results example

Automate Bash testing with Bats

With Bats (Bash Automated Testing System) it is easy to automate Bash and command line testing. It is an awesome open source framework written in Bash by Sam Stephenson. In combination with Jenkins you are able to use it via build.

Installation

# clone from github
$ git clone https://github.com/sstephenson/bats.git

# change directory
$ cd bats

# start installation
$ sudo ./install.sh /usr/local

Usage

# create new project
$ mkdir ~/Project/Bats && cd ~/Projects/Bats

# create Bats file
$ vim test.bats

# execute test
$ bats test.bats
...
✓ Simple check for date command
✓ Check for current user
- Test for something that does not exist (skipped: This test is skipped)
✓ Test for something that should not exist
✓ Check for individual line of output

5 tests, 0 failures, 1 skipped

# execute test with TAP output
$ bats --tap test.bats
...
1..5
ok 1 Simple check for date command
ok 2 Check for current user
ok 3 # skip (This test is skipped) Test for something that does not exist
ok 4 Test for something that should not exist
ok 5 Check for individual line of output

Example Bats file

#!/usr/bin/env bats

@test "Simple check for date command" {
  date
}

@test "Check for current user" {
  result="$(whoami)"
  [ "$result" == "lupin" ]
}

@test "Test for something that does not exist" {
  skip "This test is skipped"
  ls /test/no/test
}

@test "Test for something that should not exist" {
  run ls /test/no
  [ "$status" -eq 1 ]
}

@test "Check for individual line of output" {
  run ping -c 1 google.com
  [ "$status" -eq 0 ]
  [ "${lines[3]}" = "1 packets transmitted, 1 packets received, 0.0% packet loss" ]
}

Note: There is much more! Read documentation and have a look on projects which are using it!

Docker Audit

This tutorial shows software testers some simple examples for Docker audit. Here now we will make some audits on Docker environment and Dockerfiles.

Docker environment audit

# check Docker environment with docker-bench-security
$ docker run -it --net host --pid host --cap-add audit_control \
    -v /var/lib:/var/lib \
    -v /var/run/docker.sock:/var/run/docker.sock \
    -v /usr/lib/systemd:/usr/lib/systemd \
    -v /etc :/etc --label docker_bench_security \
    docker/docker-bench-security

Note: 1st the space after /etc is only because of security settings from my provider! 2nd create os specific docker-bench-security (example CentOS)

Dockerfile audit

# install on RedHat, CentOS, Fedora ...
$ yum install epel-release && yum install lynis

# install on Debian, Ubuntu ...
$ apt-get install lynis

# Suse
$ zypper install lynis

# install via Homebrew
$ brew install lynis

# audit Dockerfile
$ lynis audit dockerfile Dockerfile

# check log file
$ cat /var/log/lynis.log
$ cat /var/log/lynis-report.dat

Lint Dockerfile with Haskell Dockerfile Linter

# simply run Container again Dockerfile
$ docker run --rm -i lukasmartinelli/hadolint < Dockerfile

Minimal CentOS 7 base box with Packer

The title says it, … this tutorial is about Packer, CentOS 7 and Vagrant. After that, you should be able to integrate the creation of Vagrant base boxes into your Build-server. There is on small exception to other – the VirtualBox Guest Additions will be provided via PlugIn! Because other users could may have different versions.

Preconditions

Project structure

$ tree
.
├── Makefile
├── packer.json
├── src
│   ├── Vagrantfile.tpl
│   └── ks.cfg
└── target

File contents

CURRENT_DIR := $(shell pwd)

.PHONY: clean

help:
	@echo "Run make with:"
	@echo " > validate       ...to run packer validation"
	@echo " > build          ...to start packer build"
	@echo " > up             ...to start vagrant"
	@echo " > reload         ...to reload vagrant"
	@echo " > ssh            ...to ssh into vm"
	@echo " > clean          ...to cleanup for next build"

validate:
	packer validate $(CURRENT_DIR)/packer.json

build:
	packer build $(CURRENT_DIR)/packer.json
	cp $(CURRENT_DIR)/src/Vagrantfile.tpl $(CURRENT_DIR)/target/Vagrantfile

up:
	vagrant box add packer/centos7 $(CURRENT_DIR)/target/virtualbox-CentOS-7.box
	cd $(CURRENT_DIR)/target && vagrant up

reload:
	cd $(CURRENT_DIR)/target && vagrant reload

ssh:
	cd $(CURRENT_DIR)/target && vagrant ssh

clean:
	cd $(CURRENT_DIR)/target && vagrant halt
	cd $(CURRENT_DIR)/target && vagrant destroy -f
	rm -fr $(CURRENT_DIR)/builds/
	rm -fr $(CURRENT_DIR)/target/* $(CURRENT_DIR)/target/.* 2> /dev/null
	vagrant box remove packer/centos7
{
  "variables": {
    "file": "http://linuxsoft.cern.ch/centos/7/isos/x86_64/CentOS-7-x86_64-Minimal-1511.iso",
    "checksum": "88c0437f0a14c6e2c94426df9d43cd67",
    "type": "md5",
    "non_gui": "false"
  },
  "builders": [
    {
      "type": "virtualbox-iso",
      "iso_url": "{{ user `file` }}",
      "iso_checksum": "{{ user `checksum` }}",
      "iso_checksum_type": "md5",
      "headless": "{{ user `non_gui` }}",
      "output_directory": "builds",
      "vm_name": "CentOS7_to_Vagrant",
      "guest_os_type": "RedHat_64",
      "disk_size": "10240",
      "vboxmanage": [
        ["modifyvm", "{{.Name}}", "--memory", "2048"],
        ["modifyvm", "{{.Name}}", "--cpus", "2"],
        ["modifyvm", "{{.Name}}", "--audio", "none"],
        ["modifyvm", "{{.Name}}", "--usb", "off"]
      ],
      "http_directory": "src",
      "boot_wait": "5s",
      "boot_command": [
        "<tab> text ks=http://{{ .HTTPIP }}:{{ .HTTPPort }}/ks.cfg<enter><wait>"
      ],
      "ssh_username": "vagrant",
      "ssh_password": "vagrant",
      "ssh_port": 22,
      "ssh_wait_timeout": "600s",
      "guest_additions_path": "disable",
      "shutdown_command": "sudo shutdown -h 0"
    }
  ],
  "provisioners": [
    {
      "type": "shell",
      "inline": [
        "sudo yum update -y",
        "sudo rm -rf /tmp/*",
        "sudo rm -f /var/log/wtmp /var/log/btmp ",
        "sudo yum clean all",
        "sudo rm -rf /var/cache/* /usr/share/doc/*",
        "rm -f .bash_history",
        "history -c"
      ]
    }
  ],
  "post-processors": [
    {
      "type": "vagrant",
      "keep_input_artifact": false,
      "compression_level": 9,
      "output": "target/{{.Provider}}-CentOS-7.box"
    }
  ]
}
install
cdrom

lang en_US.UTF-8
keyboard us
timezone UTC

network --bootproto=dhcp
firewall --disabled

rootpw --plaintext packer
user --name=vagrant --password=vagrant
auth --enableshadow --passalgo=sha512 --kickstart
selinux --permissive

text
skipx

clearpart --all --initlabel
zerombr
autopart
bootloader --location=mbr

firstboot --disable
reboot

%packages --instLangs=en_US.utf8 --nobase --ignoremissing --excludedocs
@^minimal
@core

-aic94xx-firmware
-atmel-firmware
-b43-openfwwf
-bfa-firmware
-ipw2100-firmware
-ipw2200-firmware
-ivtv-firmware
-iwl100-firmware
-iwl105-firmware
-iwl135-firmware
-iwl1000-firmware
-iwl2000-firmware
-iwl2030-firmware
-iwl3160-firmware
-iwl3945-firmware
-iwl4965-firmware
-iwl5000-firmware
-iwl5150-firmware
-iwl6000-firmware
-iwl6000g2a-firmware
-iwl6000g2b-firmware
-iwl6050-firmware
-iwl7260-firmware
-libertas-usb8388-firmware
-ql2100-firmware
-ql2200-firmware
-ql23xx-firmware
-ql2400-firmware
-ql2500-firmware
-rt61pci-firmware
-rt73usb-firmware
-xorg-x11-drv-ati-firmware
-zd1211-firmware
%end

%post --log=/root/ks.log
SEE NEXT PICTURE!!!! The security settings of my provider does not allow this content!
%end

ks content

# -*- mode: ruby -*-

Vagrant.require_version ">= 1.8.1"

Vagrant.configure("2") do |config|

  config.vm.box = "packer/centos7"
  config.vm.box_url = "target/virtualbox-CentOS-7.box"
  config.vm.synced_folder ".", "/vagrant", disabled: true

  config.vm.provider "virtualbox" do |vb|
    vb.name = "CentOS-7"
    vb.cpus = "2"
    vb.memory = "2048"
    vb.gui = false
  end

end

Usage

# run packer build (via make)
$ make build

# run vagrant up (via make)
$ make run

# run vagrant reload (via make)
$ make reload

# run vagrant ssh (via make)
$ make ssh

# destroy everything (via make)
$ make clean

Create simple CentOS 7 Virtualbox with Packer

As a software tester you need many virtual machines, the creating can be very time consuming. Of course tools like Vagrant helps a lot but the creation for BaseBoxes starts most with installation from ISO`s. Exact here helps Packer! This tutorial shows an example for CentOS7 – VirtualBox.

Preconditions

Preparation

1st you need to install Packer. The following example shows one way that works well with Mac OS X (El Capitan).

# change into Downloads
$ cd ~/Downloads/

# download packer archive (Mac OS X)
$ curl -O https://releases.hashicorp.com/packer/0.10.1/packer_0.10.1_darwin_amd64.zip

# unzip packer archive
$ unzip packer_0.10.1_darwin_amd64.zip

# move packer binary
$ sudo mv packer /usr/local/bin

# check packer version
$ packer --version

Other OS? Take a look here.

Instructions

# create new project
$ mkdir ~/Projects/PackerExample && cd ~/Projects/PackerExample

# create kickstart directory and configuration
$ mkdir ~/Projects/PackerExample/http && touch ~/Projects/PackerExample/http/ks.cfg

# create new Packer JSON file
$ touch ~/Projects/PackerExample/example.json

# how it looks (before running)
$ tree .
.
├── example.json
└── http
    └── ks.cfg
{
  "variables": {
    "iso": "http://linuxsoft.cern.ch/centos/7/isos/x86_64/CentOS-7-x86_64-Minimal-1511.iso",
    "checksum": "88c0437f0a14c6e2c94426df9d43cd67"
  },
  "builders": [
    {
      "type": "virtualbox-iso",
      "iso_url": "{{ user `iso` }}",
      "iso_checksum": "{{ user `checksum` }}",
      "iso_checksum_type": "md5",
      "vm_name": "MyCentOS7",
      "guest_os_type": "RedHat_64",
      "ssh_username": "root",
      "ssh_password": "packer",
      "ssh_port": 22,
      "ssh_wait_timeout": "600s",
      "vboxmanage": [
        ["modifyvm", "{{.Name}}", "--memory", "2048"],
        ["modifyvm", "{{.Name}}", "--cpus", "2"],
        ["modifyvm", "{{.Name}}", "--audio", "none"]
      ],
      "disk_size": "10240",
      "http_directory": "http",
      "boot_command": [
        "<tab> text ks=http://{{ .HTTPIP }}:{{ .HTTPPort }}/ks.cfg<enter><wait>"
      ],
      "shutdown_command": "/sbin/halt -p"
    }
  ]
}

More about Packer – VirtualBox? Take a look here.

install
cdrom
lang en_US.UTF-8
keyboard us
timezone UTC
network --bootproto=dhcp
rootpw --plaintext packer
user --name=frank --password=Test123
auth --enableshadow --passalgo=sha512 --kickstart
firewall --disabled
selinux --permissive
bootloader --location=mbr

text
skipx
zerombr

clearpart --all --initlabel
autopart

firstboot --disable
reboot

%packages --instLangs=en_US.utf8 --nobase --ignoremissing --excludedocs
@core
%end

%post --log=/root/ks.log
yum -y update
%end

More about CentOS 7 – Kickstart? Take a look here.

Validation and Build

# validate JSON
$ packer validate example.json

# run the build
$ packer build example.json

Result

$ tree .
.
├── example.json
├── http
│   └── ks.cfg
├── output-virtualbox-iso
│   ├── MyCentOS7-disk1.vmdk
│   └── MyCentOS7.ovf
└── packer_cache
    └── 4bbec2cca90f761e144becb1a24c2914eddd21d06292d6dfb415beb51ef9e69f.iso