Something awesome for your Docker pipelines

While my constant research for pipeline tools, I have found a fantastic security scanner for Docker images. Something you could use quickly under the topic of CI/CD and DevSecOps for your development. It’s named anchore/grype and the best it’s Open source, really fast and delivers many nice options for reports.

Requirements

  • Docker installed (to pull images)

Hint: You also can load and scan *.tar archives.

Objective

Short introduction in installation and usage of Grype (locally to evaluate).

Note: The later integration into your pipelines shouldn’t be a problem. I will add the Grype repository to my watchlist and for sure try it out in my pipelines.

Installation and default configuration

This first step should only take a few minutes.

# install the latest version to /usr/local/bin
$ curl -sSfL https://raw.githubusercontent.com/anchore/grype/main/install.sh | sh -s -- -b /usr/local/bin

# install the latest version to ~/Downloads
$ curl -sSfL https://raw.githubusercontent.com/anchore/grype/main/install.sh | sh -s -- -b ~/Downloads

# move binary to /usr/local/bin/grype (if you define different location)
$ mv ~/Downloads/grype /usr/local/bin/grype

# create configuration file
$ vim ~/.grype.yaml

# show help
$ grype --help

I copied the content in short form from the official GitHub repository. You can adapt this to your needs at any time.

check-for-app-update: true
fail-on-severity: ''
output: "table"
scope: "squashed"
quiet: false
db:
  auto-update: true
  cache-dir: "~/.grype/db"
  update-url: "https://toolbox-data.anchore.io/grype/databases/listing.json"
log:
  file: ""
  level: "error"
  structured: false

Prepare the database

The Anchore Feed Service provides regular updates about publicly available vulnerabilities. In this section I will guide you to derive the updates manually.

# check database status (optional)
$ grype db status

# check feed service for new updates
$ grype db check

# run database update
$ grype db update

# verify db files (optional)
$ ls -la ~/.grype/db/

Usage examples

Even as the usage of Grype is very simple, here some short examples.

# scan image with configuration settings
$ grype node

# scans for vulnerabilities on all image layer and set output format
$ grype --scope all-layers -o cyclonedx node

# stop if a severity high is found with exit code 1
$ grype --fail-on high node

# show last exit status (optional)
$ echo $?

To stop your validation/pipeline on certain severities of security risks (exit code 1), you can choose between following options: negligible, low, medium, high & critical.

Hint: To save the reports you could use the redirect, to the output stream to a file.

Clean up

Don’t forget to clean up your system!

# list all Docker images (optional)
$ docker images

# delete specific Docker image by name
$ docker rmi node

Little SonarQube tutorial

In this tiny tutorial, I would like to introduce SonarQube usage. I will show the usage of SonarQube Server via Docker and will give some hints about the SonarQube Scanner. Therefore we create three very simple example files (html, css and javascript).

Requirements

Prepare your project

Okay,… first we start the Docker container for SoanrQube and create all necessary folders and files for our project.

# pull Docker image (optional)
$ docker pull sonarqube

# run Docker container
$ docker run -d --name sonarqube -p 9000:9000 sonarqube

# list all plugins (optional)
$ docker exec -it sonarqube ls extensions/plugins
...
sonar-css-plugin-1.0.3.724.jar
sonar-html-plugin-3.1.0.1615.jar
sonar-javascript-plugin-5.1.1.7506.jar
...

# show SonarQube configuration (optional)
$ docker exec -it sonarqube cat conf/sonar.properties

# open url in browser (admin/admin)
$ open http://localhost:9000

# create project directory
$ mkdir -p ~/Projects/SonarQubeExample/src && cd ~/Projects/SonarQubeExample

# create files for project
$ touch {src/index.html,src/styles.css,src/scripts.js,sonar-project.properties}

Content of created files:

# Default SonarQube server
sonar.host.url=http://localhost:9000

# Default SonarQube key
sonar.projectKey=SonarQube:Example

# Encoding of the source code (optional)
sonar.sourceEncoding=UTF-8

# Relative path to source code (optional)
sonar.sources=src

# Disable collection of SCM information (optional)
sonar.scm.disabled=True
<!doctype html>
<html lang="en">
<head>
  <meta charset="utf-8">
  <title>SonarQube Example</title>
  <link rel="stylesheet" href="styles.css">
</head>
<body>
  <h1>Hello world...</h1>
  <p id="demo">lorem <b>ipsum</b> dolor <i>sit</i> amet...</p>
  <button onclick="displayDate()">The time is?</button><br>
  <script src="scripts.js" type="text/javascript"></script>
</body>
</html>
function displayDate() {
  alert(Date());
}
@charset "UTF-8";

h1 {
  color: #c74;
}
p {
  margin-top: 5px;
}
demo {
  font-weight: bold;
}

Download sonar-scanner

You need to download the SonarQube Scanner by your self. You will find it here incl. all important informations.

# download macos version
$ curl -LOJ https://binaries.sonarsource.com/Distribution/sonar-scanner-cli/sonar-scanner-cli-3.3.0.1492-macosx.zip

# unzip and delete
$ unzip sonar-scanner-cli-3.3.0.1492-macosx.zip && rm sonar-scanner-cli-3.3.0.1492-macosx.zip

Note: At this point you could also move the scanner files to the right place and create a symbolic link. I will skip that step and use the path to binary.

Execute sonar-scanner

If not done till now, open SonarQube in your browser (http://localhost:9000) and login with admin/admin.

# create variable with timestamp
$ SCAN_VERSION="$(date +'%s')"

# execute sonar-scanner run
$ sonar-scanner-3.3.0.1492-macosx/bin/sonar-scanner -D sonar.version="$SCAN_VERSION" > sonar_log.txt

You should now be able to see the result of the scan in SonarQube.

SonarQube Scan Results

Analyzing the scan from command line

To see the results in SonarQube is perfect but now we will try to get them in our command-line.

# show content of sonar_log.txt (optional)
$ cat sonar_log.txt

# create variable with taskid
$ TASK_ID="$(cat < sonar_log.txt | grep "task?id=" | awk -F "id=" '/id=/{print $2}')"

# show detailed task status (optional)
$ curl -s "http://localhost:9000/api/ce/task?id=$TASK_ID" | jq -r .

# show task status
$ curl -s "http://localhost:9000/api/ce/task?id=$TASK_ID" | jq -r .task.status

# create variable with analysisid
$ ANALYSIS_ID="$(curl -s "http://localhost:9000/api/ce/task?id=$TASK_ID" | jq -r .task.analysisId)"

# show detailed quality gate status (optional)
$ curl -s "http://localhost:9000/api/qualitygates/project_status?analysisId=$ANALYSIS_ID" | jq -r .

# show quality gate status
$ curl -s "http://localhost:9000/api/qualitygates/project_status?analysisId=$ANALYSIS_ID" | jq -r .projectStatus.status

Jenkins and Sitespeed.io

While surfing the internet I stumbled across Sitespeed.io. It’s a amazing collection of Open Source Tools, which make performance measuring for developers and testers super easy. I tried it out and was immediately impressed. Here’s a little tutorial on how to use Jenkins and Sitespeed.

Requirements

Docker (latest)

Environment setup

With minimal 2 commands the environment (via Docker) is already created. Most of the time will be needed for the plugins installation.

# create Project
$ mkdir -p ~/Projects/Sitespeed/target && cd ~/Projects/Sitespeed

# pull latest sitespeed image (optional)
$ docker pull sitespeedio/sitespeed.io:latest

# start Jenkins container
$ docker run -e JAVA_OPTS="-Dhudson.model.DirectoryBrowserSupport.CSP=\"sandbox allow-scripts; style-src 'unsafe-inline' *;script-src 'unsafe-inline' *;\"" --name jenkins -v $(pwd)/target:/var/jenkins_home -v /var/run/docker.sock:/var/run/docker.sock -v $(which docker):$(which docker) -p 8080:8080 -p 9000:9000 jenkins/jenkins:lts

# open Jenkins in browser (be patient)
$ open http://localhost:8080

On setup wizard finish: unlock Jenkins, install the suggested plugins, create an account and finish the instance configuration.

Jenkins permissions to /var/run/docker.sock

Before you start with Jenkins job configuration, ensure that user jenkins has permissions to /var/run/docker.sock.

# test permissions
$ docker exec -ti jenkins docker info Got permission denied...

# create group docker
$ docker exec -ti -u 0 jenkins groupadd -for -g 0 docker

# add jenkins to group
$ docker exec -ti -u 0 jenkins usermod -aG docker jenkins

# restart jenkins container
$ docker restart jenkins

Jenkins job configuration

When Jenkins is ready (restarted), install the HTML Publisher PlugIn (no restart after installation of plugin required).

Jenkins HTML Publisher Plugin

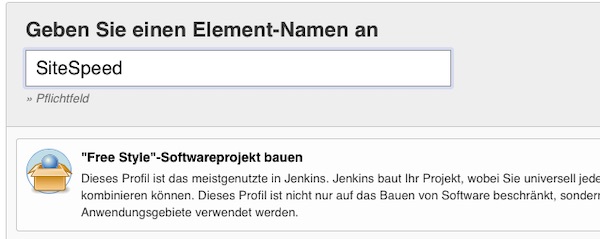
Create a new free-style project named SiteSpeed.

Jenkins SiteSpeed Project

Attention: You need to specify later the absolute path to the local directory /target/workspace/SiteSpeed. If you do not know how, press save and start the build without any job information (empty job configuration) and follow the optional instructions.

# change directory (optional)
$ cd ~/Projects/Sitespeed/target/workspace/SiteSpeed

# get absolute path (optional)
$ pwd

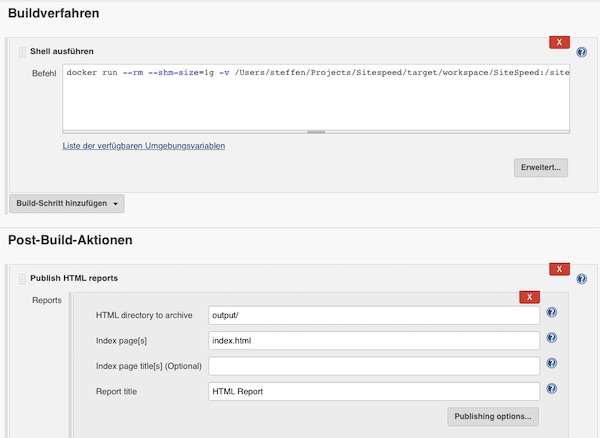
In my case the path is: “/Users/steffen/Projects/Sitespeed/target/workspace/SiteSpeed”. Under job configuration section “Build” enable “Execute shell” and paste following command.

docker run --rm --shm-size=1g -v /Users/steffen/Projects/Sitespeed/target/workspace/SiteSpeed:/sitespeed.io sitespeedio/sitespeed.io --visualMetrics --video --outputFolder output https://www.sitespeed.io/ -n 1

Via Post-Build-Action: Publish HTML reports you can enter the report very simple from the job project page.

Jenkins SiteSpeed Job Configuration

Save everything and run the job. After a short time you can look at the HTML report. See “Pages” > “https://www.sitespeed.io/” for screenshots, HAR and video files. On the website of sitespeed.io is a very detailed documentation and many more examples. Have fun!

PHP QA Tools and Docker Jenkins

This Tutorial is about some simple PHP QA Tools and Docker Jenkins. I will show near how to install PHP and PHP Composer in an Jenkins Alpine Linux Docker inclusive some needed Jenkins PlugIns.

Note

If you have an running Docker Container already which you cannot stop, you can install needed packages directly via:

# list containers (optional)
$ docker ps -a

# access running container as root
$ docker exec -u 0 -it <Container Name> sh

# install packages and exit container
...

Now you can use the same commented commands as provided via Dockerfile. Otherwise follow next steps.

Let’s go

# create new project
$ mkdir -p ~/Projects/DockerJenkins && cd ~/Projects/DockerJenkins/

# create Dockerfile and plugins.txt
$ touch Dockerfile plugins.xt

# modify Dockerfile
$ vim Dockerfile

# modify plugins.txt
$ vim plugins.txt
FROM jenkins/jenkins:lts-alpine

USER root

RUN apk update && apk upgrade

# install needed libary packages
RUN apk --no-cache add libssh2 libpng freetype libjpeg-turbo libgcc \
libxml2 libstdc++ icu-libs libltdl libmcrypt

# install needed PHP packages
RUN apk --no-cache add php7 php7-fpm php7-opcache php7-gd php7-pdo_mysql \
php7-mysqli php7-mysqlnd php7-mysqli php7-zlib php7-curl php7-phar \
php7-iconv php7-pear php7-xml php7-pdo php7-ctype php7-mbstring \
php7-soap php7-intl php7-bcmath php7-dom php7-xmlreader php7-openssl \
php7-tokenizer php7-simplexml php7-json

# Download and install composer installer
RUN php -r "copy('https://getcomposer.org/installer', 'composer-setup.php');"
RUN php -r "if (hash_file('SHA384', 'composer-setup.php') === '544e09ee996cdf60ece3804abc52599c22b1f40f4323403c44d44fdfdd586475ca9813a858088ffbc1f233e9b180f061') { echo 'Installer verified'; } else { echo 'Installer corrupt'; unlink('composer-setup.php'); } echo PHP_EOL;"
RUN php composer-setup.php
RUN mv composer.phar /usr/local/bin/composer
RUN chmod +x /usr/local/bin/composer
RUN rm -f composer-setup.php

USER jenkins

# install plugins from plugins.txt
COPY plugins.txt /usr/share/jenkins/ref/plugins.txt
RUN /usr/local/bin/install-plugins.sh < /usr/share/jenkins/ref/plugins.txt
checkstyle:3.50
analysis-core:1.95
dry:2.50
pmd:3.50
violations:0.7.11

That was it! Now build the image, start and work with jenkins.

# build image from Dockerfile
$ docker build -t lupin/jenkins:lts-alpine .

# list images (optional)
$ docker images

# start container
$ docker run --name JenkinsPHP -p 8080:8080 lupin/jenkins:lts-alpine

Test

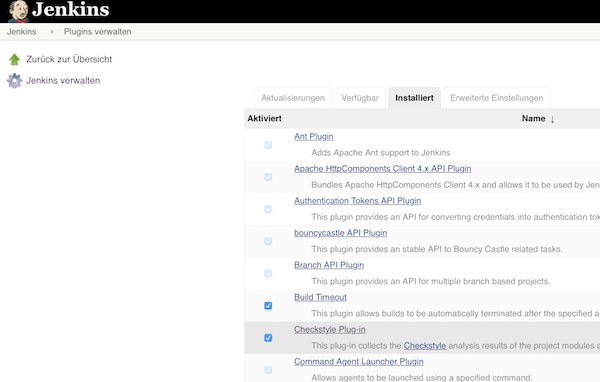
After starting, configuring and logging, you can see the already installed plugins in the Jenkins PlugIns!

Jenkins PlugIns

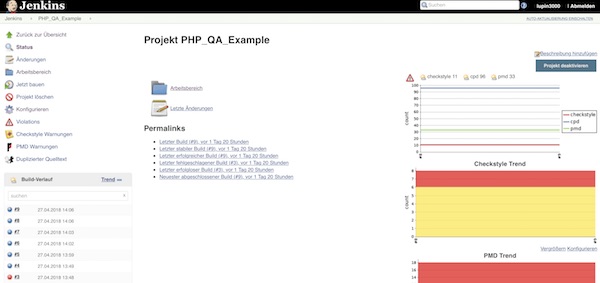
To test, you can create a simple freestyle job. Here you configure the repository, build steps and post-build actions. After a few runs, the results should be visible on the project side.

Jenkins Build Results

Setup learning environment for security testing

In a previous tutorial, I showed you how to set up a security learning environment quickly. Since there are some changes now (ex: Webswing), I’ll do the tutorial again. By the way i use macOS, some commands could be different but similar for Linux or Windows.

Requirements

  • Docker (17.12.0-ce)
  • Safari (11.02)
  • Firefox (58.0)

Search and download needed docker images

# search DVWA image (optional)
$ docker search dvwa

# pull DVWA image
$ docker pull citizenstig/dvwa

# search ZAP image (optional)
$ docker search zap

# pull ZAP image
$ docker pull owasp/zap2docker-stable

# search ThreadFix image (optional)
$ docker search threadfix

# pull ThreadFix image
$ docker pull jmbmxer/threadfix

# list images (optional)
$ docker images
...
REPOSITORY                 TAG       IMAGE ID        CREATED         SIZE
owasp/zap2docker-stable    latest    40848e80b7fb    2 months ago    1.33GB
jmbmxer/threadfix          latest    b6f1907a61cd    22 months ago   941MB
citizenstig/dvwa           latest    c8312743bc09    3 years ago     478MB
...

Run DVWA container

# run DVWA container
$ docker run -d -p 8081:80 --name dvwa citizenstig/dvwa

# check DVWA logs for startup (optional)
$ docker logs -f dvwa

# get local ip
$ ipconfig getifaddr en0
...
192.168.192.39
...

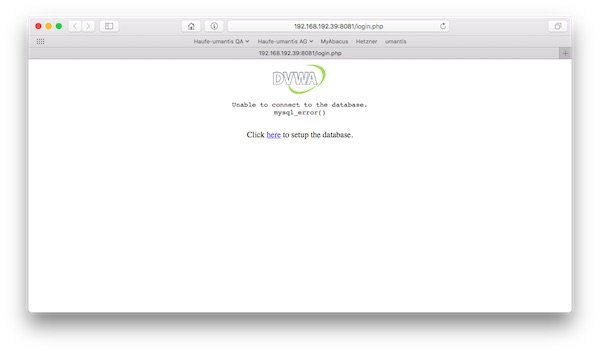
# start DVWA in browser
$ open -a Safari http://192.168.192.39:8081/

DVWA inside Browser

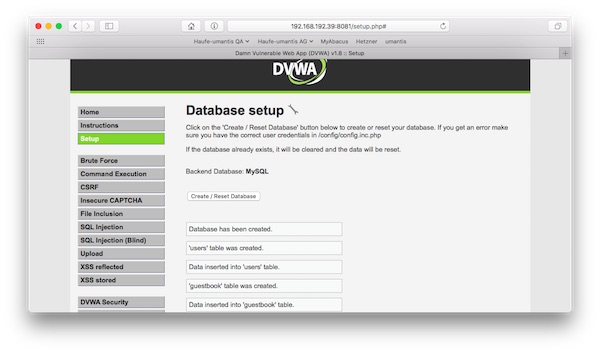
…Setup/create new database…

setup dvwa

Run ZAP container

# create folder
$ mkdir -p /tmp/reports

# run ZAP container
$ docker run -u zap -i -p 8080:8080 -p 8090:8090 -v /tmp/reports:/home/zap/reports --name zap owasp/zap2docker-stable zap-webswing.sh

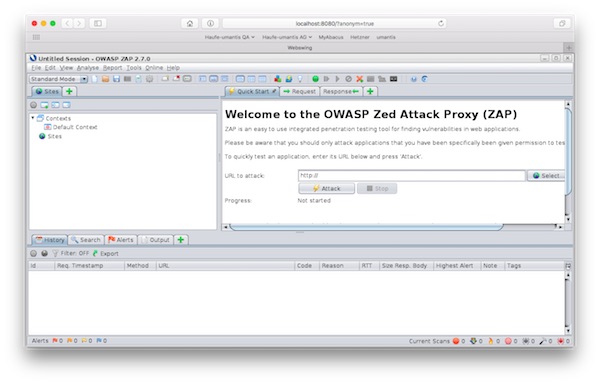
# start ZAP in Browser
$ open -a Safari http://localhost:8080/?anonym=true&app=ZAP

ZAP inside browser

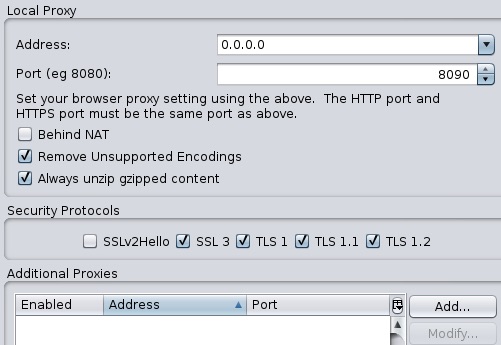
Please check via “Tools” -> “Options” -> “Local Proxies” the right configuration!

ZAP Proxy configuration

You need do use the non-routable meta address (0.0.0.0)!

Run ThreadFix container

# run ThreadFix container
$ docker run -d -p 8443:8443 --name threadfix jmbmxer/threadfix start

# check ThreadFix logs for startup (optional)
$ docker logs -f threadfix
...
Jan 30, 2018 8:56:40 AM org.apache.catalina.startup.Catalina start
INFO: Server startup in 49986 ms
...

# start ThreadFix in Browser
$ open -a Safari https://localhost:8443/threadfix/

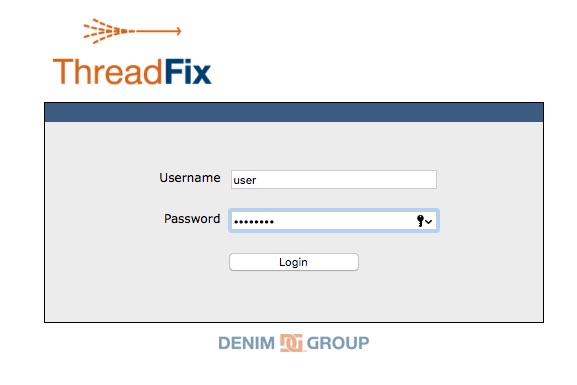
Login into ThreadFix with “user/password

ThreadFix login

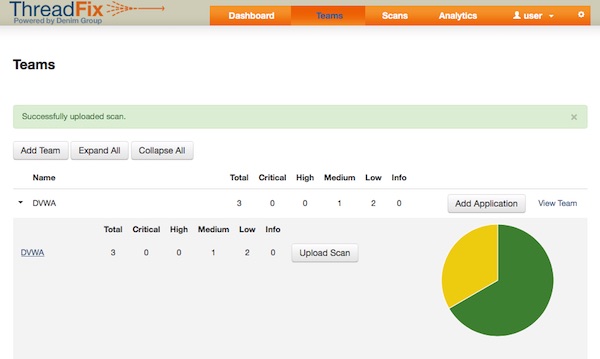
Create new team with application.

Configure Firefox

# get local ip
$ ipconfig getifaddr en0
...
192.168.192.39
...

# open Firefox preferences
$ /Applications/Firefox.app/Contents/MacOS/firefox --preferences

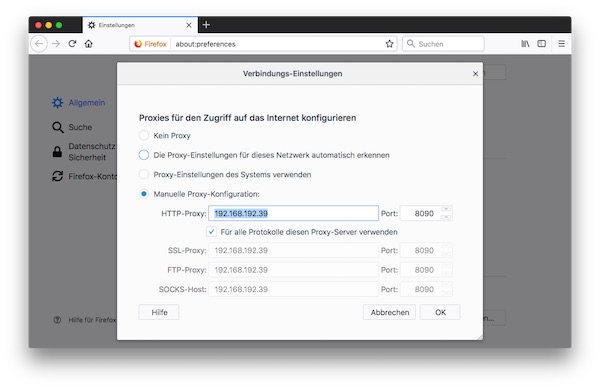
Configure manual proxy with your local IP and 2nd ZAP port (8090). Afterwards you enable checkbox “Use this proxy server for all protocols” and press OK button.

Firefox proxy configuration

When all the configurations have been made, you can temporarily quit Firefox.

Use environment

# list all containers (optional)
$ docker ps -a

# open DVWA via Proxy
$ open -a firefox http://192.168.192.39:8081

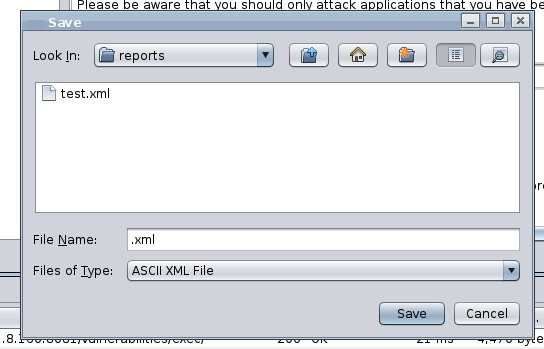
Start recording and save your XML report “Report -> Generate XML Report”.

Save ZAP XML report

# open reports directory in finder
$ open /tmp/reports

Import XML report

Next steps

Now it’s time to study! If you need help, you can found a lot of training materials on Youtube.

Shell linter evaluation and usage

Tomorrow, the 1st of August is a national holiday in Switzerland … So I do one day off and have some time. For a long time I wanted to deal with Shell lint. After some research, i found a few open-source tools. By the way … linters are being written for many programming languages and document formats.

Preparation

For evaluation i will not install the tools on my local system,… so Vagrant (with CentOS 7) is my choice.

# create project
$ mkdir -p ~/Projects/ShellLint && cd ~/Projects/ShellLint

# create example.sh
$ vim example.sh

# create Vagrantfile
$ vim Vagrantfile
#!/bin/bash

declare -r VERSION="1.0.0"
declare -r FILE_NAME=$(basename "$0")

function fc_usage()
{
 printf "Usage: %s" "$FILE_NAME"
 printf " [-h] [-V]\n"
}

function failure()
{
 print "here is a error"

syntax() {
 print "this line has simply to many chars ... with a simple shell lint you should see"
}

function fc_bashism()
{
 echo -e "hello world"
}

function main()
{
 fc_usage
 fc_bashism
}

exit 0
# -*- mode: ruby -*-
# vi: set ft=ruby :

Vagrant.configure("2") do |config|
  config.vm.box = "lupin/centos7"
  config.vm.box_check_update = false
  config.vm.synced_folder '.', '/vagrant', disabled: true

  config.vm.provision "file", source: "example.sh", destination: "example.sh"

  config.vm.provider "virtualbox" do |vb|
    vb.gui = false
    vb.name = "ShellLint"
    vb.memory = "1024"
    vb.cpus = 1
  end

end

Note: I created the Vagrant box “lupin/centos” via Packer … here my GitHub repository.

# create environment
$ vagrant up

# SSH into VM
$ vagrant ssh

Shell option -n

Many shell’s already offer a very simple script analysis. The option -n read commands in script, but do not execute them (syntax check).

# example bash
$ bash -n example.sh

# example shell
$ sh -n example.sh

Okay … but not really what I want… (more details are welcome)

shlint and checkbashisms

I found the repository here.

# install ruby (optional)
$ yum install -y ruby

# install json_pure (optional)
$ gem install json_pure

# install shlint
$ gem install shlint

# create config
$ echo -e 'shlint_shells="bash sh"\nshlint_debug=1' > .shlintrc

# run shlint
$ shlint example.sh

# run checkbashisms
$ checkbashisms -f example.sh

Note: for both tools you should change the shebang to “#!/bin/sh”

For shlint… I don’t get it. For checkbashisms … good if will write portable Shell scripts.

bashate

I found it here on Pypi.

# install epel repository
$ yum install -y epel-release

# install pip (python 2.x)
$ yum install -y python2-pip

# install bashate
$ pip install bashate

# run bashate
$ bashate example.sh

Nice … but not really all Standards.

Shellsheck

Shellcheck is known! Here the online service and here the repository.

# install epel repository
$ yum install -y epel-release

# update (optional)
$ yum update -y

# install ShellCheck
$ yum install -y ShellCheck

# run ShellCheck
$ shellcheck example.sh

I stay with that tool. Currently there are packages for almost every known OS.

Additional

Who knows me … knows that I do not like Installer and prefer Docker use. Here’s some fun.

# exit Vagrant and destroy
$ vagrant halt && vagrant destroy -f

# create Dockerfile
$ vim Dockerfile

# create Applescript
$ vim linter.scpt

# build Docker image
$ docker build -t alpine/shellcheck .

# change permission
$ chmod +x linter.scpt

# run Applescript
$ osascript linter.scpt
FROM alpine:latest

# install needed packages
RUN apk --update add wget

# download archive
RUN wget -q --no-check-certificate https://storage.googleapis.com/shellcheck/shellcheck-latest.linux.x86_64.tar.xz

# unzip archive
RUN tar xvfJ shellcheck-latest.linux.x86_64.tar.xz

# move binary
RUN mv /shellcheck-latest/shellcheck /usr/local/bin/shellcheck

# cleanup
RUN apk del wget
RUN rm -f shellcheck-latest.linux.x86_64.tar.xz
RUN rm -fr shellcheck-latest/

# change to mount directory
WORKDIR /mnt

# set entrypoint
ENTRYPOINT ["/usr/local/bin/shellcheck"]
#!/usr/bin/osascript

-- define global variables
global appName
global imageName

-- set magic values
set appName to "Docker"
set imageName to "alpine/shellcheck "

-- run docker linters
on LintShell(macPath)
	set posixPath to quoted form of POSIX path of macPath
	set fileName to do shell script "basename " & posixPath
	set dirName to do shell script "dirname " & posixPath
	set shellCmd to "docker run --rm -i -v " & dirName & ":/mnt " & imageName & fileName

	tell application "Terminal"
		set shell to do script shellCmd in front window
	end tell
end LintShell

-- display select box
on SelectFile()
	set dlTitle to "Nothing selected..."
	set dlMsg to "Process is terminated."

	try
		set macPath to choose file
	on error
		display dialog dlMsg buttons ["OK"] with title dlTitle
		return dlMsg
	end try

	LintShell(macPath)
end SelectFile

-- start Docker
on StartDocker()
	set dlTitle to "Docker cannot started"
	set dlMsg to "Something went wrong, could not start Docker!"

	try
		tell application appName
			activate
		end tell
	on error
		display dialog dlMsg buttons ["OK"] with title dlTitle
	end try
end StartDocker

-- check if Docker is running
on RunScript()
	set dlTitle to "Docker not running"
	set dlMsg to "Should Docker started?"

	if application appName is running then
		SelectFile()
	else
		display dialog dlMsg buttons ["OK", "No"] with title dlTitle
		if button returned of result is "OK" then
			StartDocker()
		end if
	end if
end RunScript

RunScript()

😉 just for fun…

Test your infrastructure

Infrastructures can be very big. Luckily, there are provisioner like Chef, Salt, Ansible and etc. These provisioners can be very complex and possibly the developer has done something wrong. Therefore the infrastructure has to be tested! Tools like goss, Serverspec and Testinfra helps testers to validate. This tutorial show the first steps with Testinfra.

Testinfra is written in Python very small and easy to understand. Here is the GitHub repository.

Precondition

  • Vagrant (min. 1.9.3) installed
  • Python (min. 2.7) installed
  • pip (min. 9.0.1) and virtualenv (min. 15.1.0) installed
  • make (min. 3.81) installed

Project structure

To get used to it – i prepared some files for you. You only need to change the box name/url in Vagrantfile.

$ tree
.
├── Makefile
├── requirements.txt
├── Vagrantfile
└── tests.py
ENV_DIR = .env
CURRENT_DIR := $(shell pwd)
INTERPRETER = $(CURRENT_DIR)/$(ENV_DIR)/bin/
PATH := ${PATH}:$(INTERPRETER)

help:
	@echo "run make <target> with:"
	@echo " > env       : create virtualenv directory $(ENV_DIR)"
	@echo " > deps      : install dependencies from requirements.txt"
	@echo " > clean_env : delete virtualenv directory $(ENV_DIR)"
	@echo " > up        : run vagrant up"
	@echo " > destroy   : run vagrant destroy"
	@echo " > test      : run testinfra on vagrant environment"
	@echo " > clean_all : delete all files and directories"

env:
	@echo "[RUN]: create virtualenv"
	virtualenv $(ENV_DIR) && \
	. $(ENV_DIR)/bin/activate && \
	make deps

deps:
	@echo "[RUN]: install dependencies"
	$(INTERPRETER)/pip install -r requirements.txt

up:
	@echo "[RUN]: vagrant up"
	vagrant up

destroy:
	@echo "[RUN]: vagrant destroy -f"
	vagrant destroy -f
	rm -fr $(CURRENT_DIR)/.vagrant

test:
	@echo "[RUN]: run testinfr on vagrant environment"
	vagrant ssh-config > $(CURRENT_DIR)/ssh-config
	$(INTERPRETER)/pytest -v --hosts=default --ssh-config=$(CURRENT_DIR)/ssh-config tests.py

clean_all:
	@echo "[RUN]: delete all files and directories"
	rm -fr $(CURRENT_DIR)/.cache $(CURRENT_DIR)/__pycache__
	rm -f $(CURRENT_DIR)/ssh-config
	make destroy
	make clean_env

clean_env:
	@echo "[RUN]: delete virtualenv"
	rm -fr $(ENV_DIR)
testinfra==1.5.4
paramiko==2.1.2
#!/usr/bin/env python

def test_system_type(SystemInfo):
    '''Check OS type'''
    type = SystemInfo.type
    assert type == 'linux'

def test_user_exists(User):
    '''Check user exists'''
    user = User('vagrant')
    assert user.exists

def test_firewalld_is_installed(Package):
    '''Check firewalld is installed'''
    package = Package('firewalld')
    assert package.is_installed

def test_firewalld_running_and_enabled(Service):
    '''Check firewalld service is running and enabled'''
    service = Service('firewalld')
    assert service.is_running
    assert service.is_enabled
# -*- mode: ruby -*-
# vi: set ft=ruby :

Vagrant.configure("2") do |config|

  # disable ssh key update
  config.ssh.insert_key = false

  # vagrant box name
  config.vm.box = ""

  # vagrant box url
  config.vm.box_url = ""

  # disable box update
  config.vm.box_check_update = false

  # disable synced_folder
  config.vm.synced_folder ".", "/vagrant", disabled: true

  # 2nd network interface (public)
  # config.vm.network "public_network"

  # virtualbox settings
  config.vm.provider "virtualbox" do |vb|
    vb.name = "example_vm"
    vb.cpus = "2"
    vb.memory = "2048"
    vb.gui = false
  end

end

Usage

# create virtualenv and install dependencies
$ make env

# create vagrant environment
$ make up

# run tests
$ make test

# delete all generated files and directories
$ make clean_all

Testinfra offers several connections backends for remote command execution and can be used with python standard unit test framework: unittest. So the integration with build servers is easily possible.

Simple Doctests with PyCharm CE

Python Doctests with PyCharm are very easy to configure! This tutorial will show you – how easy you can configure and run your Doctests inside PyCharm CE. You can use the following pyton script.

#!/usr/bin/env python
# -*- coding: utf-8 -*-
"""
This is an example for python doctest inside module docstring

>>> add('i', 'i')
Traceback (most recent call last):
    ...
TypeError: can't multiply sequence by non-int of type 'str'

"""


def add(a, b):
    """
    This is an example for python doctest inside function docstring

    >>> add(2, 3)
    6
    >>> add('a', 3)
    'aaa'
    """
    return a * b


class SomeTest(object):
    """
    This is an example for python doctest inside class docstring

    >>> t = SomeTest(); t.add(2, 'b'); t.sum
    'bb'
    """

    def __init__(self):
        """
        This is an example for python doctest inside constructor docstring

        >>> t = SomeTest(); type(t.sum)
        <type 'int'>
        """
        self.sum = int()

    def add(self, a, b):
        """
        This is an example for python doctest inside method docstring

        >>> t = SomeTest(); t.add(5, 5); t.sum
        25
        >>> t = SomeTest(); t.add('a', 5); t.sum
        'aaaaa'
        """
        self.sum = a * b

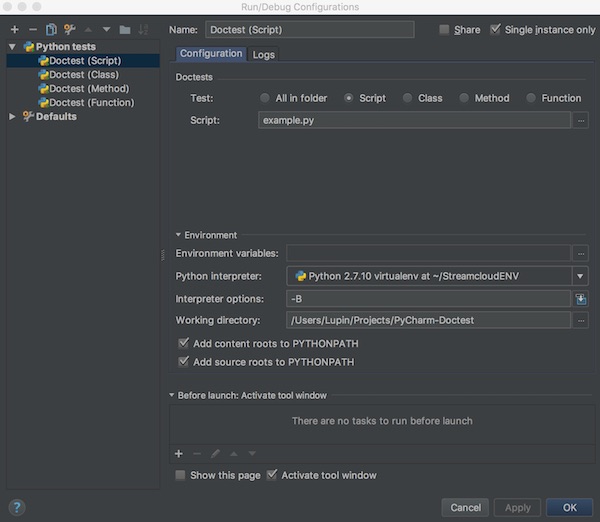
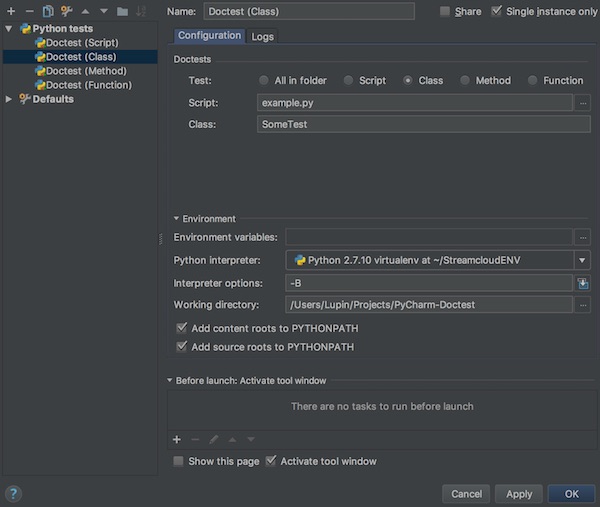
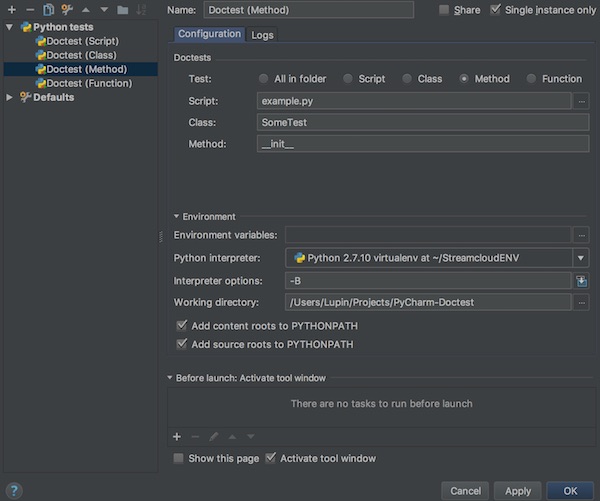
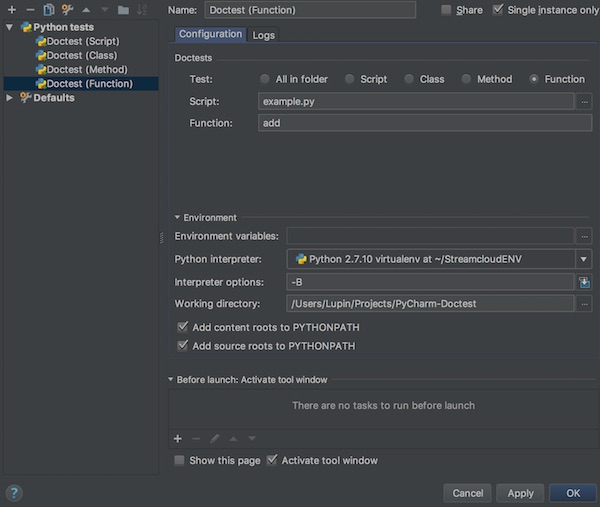
Now create following Doctests for Script, Class, Method and Function.

Script

pycharm doctest for script

Class

pycharm doctest for class

Method

pycharm doctest for method

Function

pycharm doctest for function

Now you can run your different doctests and look on results.

pycharm doctest results example