Real-time log monitoring

You may need to watch different log files on automated test runs. With log.io you can simply monitoring log files via browser! This tutorial shows how easy it is.

Preconditions

Preparation

Create new project with following structure and files.

# create new project LogIO
$ mkdir -p ~/Projects/LogIO/data

# go into new Project
$ cd ~/Projects/LogIO

# create needed files in data
$ touch data/{harvester.conf,log_server.conf,web_server.conf,log.io}

# create Vagrantfile
$ touch Vagrantfile

# show files
$ tree .
.
├── Vagrantfile
└── data
    ├── harvester.conf
    ├── log.io
    ├── log_server.conf
    └── web_server.conf

File contents

# -*- mode: ruby -*-
# vi: set ft=ruby :
Vagrant.require_version ">= 1.8.1"
VAGRANTFILE_API_VERSION = "2"

Vagrant.configure(VAGRANTFILE_API_VERSION) do |config|

  config.vm.box = "centos/7"
  config.vm.network "public_network"
  config.vm.synced_folder "./data", "/vagrant", disabled: false

  config.vm.provider "virtualbox" do |vb|
    vb.name = "LogIO"
    vb.cpus = "2"
    vb.memory = "2048"
    vb.gui = false
  end

  config.vm.provision "shell", inline: <<-SHELL
    # install needed packages
    sudo yum update -y && sudo yum install -y epel-release
    sudo yum install -y vim net-tools npm nodejs
    sudo yum clean all
    # install log.io for user <root>
    sudo npm install -g log.io --user "root"
    # provide custom files for user <root>
    sudo rm -f /root/.log.io/*
    sudo cp /vagrant/*.conf /root/.log.io/
    sudo chown root:root /root/.log.io/*.conf
    # provide init.d for log.io
    sudo cp /vagrant/log.io /usr/local/bin/log.io
    sudo chmod +x /usr/local/bin/log.io
    sudo chown root:root /usr/local/bin/log.io
  SHELL

end

Configure your Harvesters…

exports.config = {
  nodeName: "application_server",
  logStreams: {
    apache: [
      "/var/log/apache2/access.log",
      "/var/log/apache2/error.log"
    ]
  },
  server: {
    // connect to log.io server
    host: '127.0.0.1',
    port: 28777
  }
}

Configure your log server…

exports.config = {
  host: '0.0.0.0',
  port: 28777
}

Configure your web server…

exports.config = {
  host: '0.0.0.0',
  port: 28778,

  /*
  // Enable HTTP Basic Authentication
  auth: {
    user: "admin",
    pass: "1234"
  },
  */

  /*
  // Enable HTTPS/SSL
  ssl: {
    key: '/path/to/privatekey.pem',
    cert: '/path/to/certificate.pem'
  },
  */

  /*
  // Restrict access to websocket (socket.io)
  // Uses socket.io 'origins' syntax
  restrictSocket: '*:*',
  */

  /*
  // Restrict access to http server (express)
  restrictHTTP: [
    "192.168.29.39",
    "10.0.*"
  ]
  */

}

Create simple init script…

#!/bin/bash

start() {
  echo "Starting log.io process..."
  /usr/bin/log.io-server &
  /usr/bin/log.io-harvester &
}

stop() {
  echo "Stopping io-log process..."
  pkill node
}

status() {
  echo "Status io-log process..."
  netstat -tlp | grep node
}

case "$1" in
  start) start;;
  stop) stop;;
  status) status;;
  *) echo "Usage: start|stop|status";;
esac

Usage

# start VM via vagrant
$ vagrant up

# SSH into VM
$ vagrant ssh

# become root
$ sudo su -

# start log.io
$ log.io start

# get ip
$ ip addr

Now open your browser with URL http://<ip>:28778
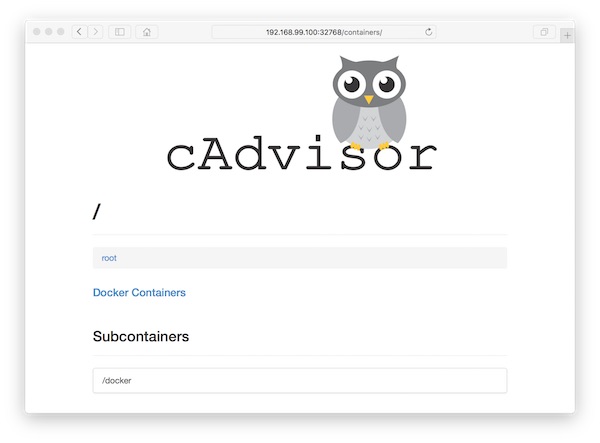
Monitor running docker containers with cAdvisor

As a software tester, you have several containers run in your environment. Here is an example how easily and quickly you can monitor your test-environment with cAdvisor.

Preconditions

Preparation

# create project (local)
$ mkdir -p ~/Projects/Monitoring && cd ~/Projects/Monitoring

# create shell script (local)
$ vim start-demo.sh
#!/usr/bin/env sh

docker run -d --name cadvisor -P -v /:/rootfs:ro -v /var/run:/var/run:rw -v /sys:/sys:ro -v /var/lib/docker/:/var/lib/docker:ro google/cadvisor:latest
docker run -d --name jenkins -P jenkins
docker run -d --name selenium-hub -P selenium/hub:2.53.0
docker run -d --name selenium-node_1 --link selenium-hub:hub selenium/node-chrome:2.53.0
docker run -d --name selenium-node_2 --link selenium-hub:hub selenium/node-firefox:2.53.0

Note: You can also assign the respective ports!

Run docker containers

# create new VM (local)
$ docker-machine create -d virtualbox monitor

# show status (local)
$ docker-machine ls
...
NAME      ACTIVE   DRIVER       STATE     URL                         SWARM   DOCKER    ERRORS
monitor   -        virtualbox   Running   tcp://192.168.99.100:2376           v1.11.1  

# copy into VM (local) 
$ docker-machine scp ~/Projects/Monitoring/start-demo.sh monitor:/home/docker/

# ssh into VM (local into VM)
$ docker-machine ssh monitor

# change rights (VM)
$ chmod +x start-demo.sh && ls -la

# run shell script (VM)
$ ./start-demo.sh

# list running docker container (VM)
$ docker ps -a
...
CONTAINER ID        IMAGE                          COMMAND                  CREATED              STATUS              PORTS                                               NAMES
57c2598b4261        selenium/node-firefox:2.53.0   "/opt/bin/entry_point"   4 seconds ago        Up 4 seconds                                                            selenium-node_2
d79a5123bcfc        selenium/node-chrome:2.53.0    "/opt/bin/entry_point"   29 seconds ago       Up 29 seconds                                                           selenium-node_1
095f9844346d        selenium/hub:2.53.0            "/opt/bin/entry_point"   About a minute ago   Up About a minute   0.0.0.0:32771->4444/tcp                             selenium-hub
8db3ad58d8ce        jenkins                        "/bin/tini -- /usr/lo"   About a minute ago   Up About a minute   0.0.0.0:32770->8080/tcp, 0.0.0.0:32769->50000/tcp   jenkins
d1e1e1c36d6d        google/cadvisor:latest         "/usr/bin/cadvisor -l"   2 minutes ago        Up 2 minutes        0.0.0.0:32768->8080/tcp                             cadvisor

Open browser

cAdvisor

htop the process viewer

htop is a interactive process viewer like top. The installing and using on different systems is super simple. The advantages over standard top are:

  • fast view on performance statistics
  • process scrolling (vertically)
  • much easier to understand
  • no need to type the process number to kill a process
  • tree view (optional)

Installation

# install on Mac OS via MacPorts
$ sudo port install htop

# install on Debian/Ubuntu/Mint
$ sudo aptitude update
$ sudo aptitude install htop

# install on RHEL/CentOS/Fedora
$ yum update -y
$ yum install -y htop

Usage

# 10 seconds between updates
$ htop -d 10

# show only processes of a given user
$ htop -u <USERNAME>

# sort by this column
$ htop --sort-key <COLUMN>

In the terminal, the use is self-explanatory.

Monitor multiple remote log files with MultiTail

With MultiTail you are able to view one or multiple log files (on remote engines). Therefore it creates multiple split-windows on your console. You can configure these! To see all features look here.

Installation

# install on Mac OS via Mac Ports
$ sudo port install multitail

# install on Mac OS via Homebrew
$ sudo brew install multitail

# install on RHEL/CentOS/Fedora
$ yum install -y multitail

# install on Debian/Ubuntu/Mint
$ sudo apt-get install multitail

Examples

# example for two log-files
$ multitail log-file_a log-file_b

# example for two log-files and two columns
$ multitail -s 2 log-file_a log-file_a

# example for two log-files and different colors
$ multitail -ci green log-file_a -ci yellow -I log-file_a

# example for one log file on remote
$ multitail -l "ssh -t <user>@<host> tail -f log-file"

# example for four log files on remote
$ multitail -l "ssh -l <user> <host> tail -f log-file_a" -l "ssh -l <user> <host> tail -f log-file_b" -l "ssh -l <user> <host> tail -f log-file_c" -l "ssh -l <user> <host> tail -f log-file_d"

Note

If you look on multiple files at same time with MultiTail – just hit the “b” key to select the window, with up/down keys you can scroll.

Network diagnostic with mtr

MTR is a network diagnostic tool which combine the best from Ping and Traceroute. It helps software tester to diagnose network performance and create helpful reports. By mtr, you could also monitor the network. It sends ICMP ECHO requests to a destination and listens for the answers. Mtr works on both command-line and GUI (depending to installation method).

Installation

# Debian/Ubuntu (text-version only)
$ apt-get install mtr-tiny

# Debian/Ubuntu (gui and text-version)
$ apt-get install mtr

# RedHat/CentOS/Fedora (text-version only)
$ yum install mtr-tiny

# RedHat/CentOS/Fedora (gui and text-version)
$ yum install mtr

# Mac OS X (Homebrew)
$ brew install mtr

# Mac OS X (MacPorts)
$ port install mtr

The mtr project is on GitHub. If you like to compile mtr by your self.

Command-line examples

# basic syntax
$ mtr [options] [target]

# example host
$ mtr google.com

# example IP
$ mtr 173.194.40.70

# force text-mode (-t | --curses)
$ mtr -t google.com

# do not resolve host names (-n | --no-dns)
$ mtr -n google.com

# limit to 5 (-c | --report-cycles)
$ mtr -c 5 173.194.40.70

# report mode (-r | --report)
$ mtr -r -c 5 173.194.40.70

# do not cut long names (-w | --report-wide)
$ mtr -r -w -c 5 173.194.40.70

Note: Read the man page for more options!

Report analysis

  • Loss% – Shows packets loss at each hop
  • Snt – Number of packets being sent
  • Last – Latency of the last packet
  • Avg – Average latency of all packets
  • Best – Best round trip time
  • Wrst – Worst round trip time
  • StDev – Standard deviation of the latencies to each host

Jenkins – Modern Status Plugin

Who the original symbols of Jenkins do not like, should try the Modern Status Plugin. The tiny plugin of Oliver Vinn provide a new and very cool set of icons for the continuous integration server. The installation is very simple!

Example

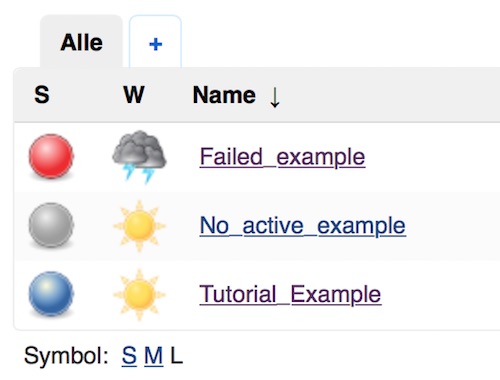
This is a example of original icons for Jenkins/Hudson:

jenkins original status icons

Yes they might lead to confusion and don’t look awesome.

Steps

Open the Plugin Manager and search for “Modern Status Plugin”.

jenkins modern status plugin

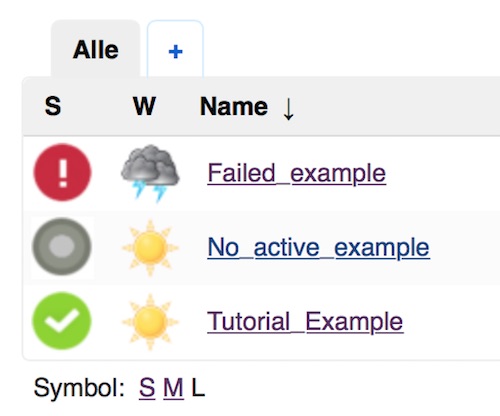
After restart Jenkins/Hudson the new iconset should be available and look like:

jenkins modern status

This looks quite nice and speaks much better, already on first view, about the status.

Agile view for Jenkins

Preparation

Search and install the “Radiator View” plugin.

radiator plugin jenkins
Select Radiator View Plugin

Configuration

After installation create a new view, similar to configuring the more conventional list views.

radiator view jenkins
Select Radiator view

Now select all desired jobs and press “Save” button.

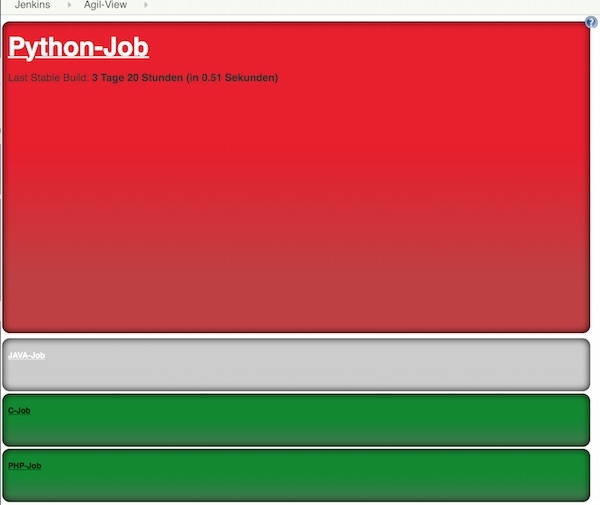
radiator agil view
Agile view

The build radiator view displays a box for each build with the job name and some other details, depending on build steps and test methods.