VirtualBox USB passthrough

Yes, this topic is very easy via VirtualBox UI and many people would not have in mind to do these actions with command line. But as I do mostly all tasks while development via terminal, I thought some other persons are interested in the solution, too. So here now a short tutorial to attach/detach USB devices on VirtualBox machines.

Requirements

Objective

Learn and understand the basics for command line USB passthrough for VirtualBox.

Gather informations of USB devices

In a first step it’s important to gather all informations about possible USB devices. There are 3 important values ​​to be determined.

  • UUID
  • VendorId
  • ProductId

In order to better understand which devices are involved, the product name is also an advantage.

# list all usb devices
$ VBoxManage list usbhost

# list all usb devices with specific information
$ VBoxManage list usbhost | grep -i "UUID\|VendorId\|ProductId\|Product\|Current State"

The value of “Current State” can provide you the information if a USB device is in usage or captured by a VM already.

Analysis of VM’s

In the second step, it is advisable to check whether the respective USB standard is configured in the target VM (and whether USB is turned on). There are currently 3 options that VirtualBox supports.

  • USB 1.1: OHCI
  • USB 2.0: OHCI + EHCI
  • USB 3.0: xHCI

Note: My VM is named Debian in all examples, please change this value for your specific needs!

# show all informations for specific vm
$ VBoxManage showvminfo "Debian"

# show usb status for specific vm
$ VBoxManage showvminfo "Debian" | grep -i "ohci\|ehci\|xhci"

Add/remove USB devices

In many cases, USB 1.1 is enabled by default and deactivation leads to a misconfiguration. But there are, as almost always, exceptions.

  • USB 1.1: --usb on|off
  • USB 2.0: --usbehci on|off
  • USB 3.0: --usbxhci on|off

Note: For these kind of configurations the VM should be stopped (turned off).

# enable USB 2.0 for specific vm
$ VBoxManage modifyvm "Debian" --usbehci on

# disable USB 2.0 for specific vm
$ VBoxManage modifyvm "Debian" --usbehci off

# enable USB 3.0 for specific vm
$ VBoxManage modifyvm "Debian" --usbxhci on

# disable USB 3.0 for specific vm
$ VBoxManage modifyvm "Debian" --usbxhci off

If you know the UUID (see first step), you can now attach/detach the respective USB devices.

Note: You can make the following changes during the VM is running. Don’t forget to change the UUID value from my examples.

# attach specifc usb device to specifc vm
$ VBoxManage controlvm "Debian" usbattach "076866d4-436e-424d-be64-660c23248f37"

# detach specifc usb device to specifc vm
$ VBoxManage controlvm "Debian" usbdetach "076866d4-436e-424d-be64-660c23248f37"

Nothing more is needed for this very simple task. But you can save some time and automate these steps with the following section!

Usage of USB filters

VirtualBox USB filters will help you to automatically assign USB devices to your VM. With other words – As soon as the VM starts (or is started) and the USB device is recognized by VirtualBox (and it’s not in use by the host), it will be made available to the guest.

Additionally it’s important to understand that there are two kind of filters (global and machine specifc). Global filters (IHostUSBDeviceFilter) are applied before any machine specific filter (IUSBDeviceFilter).

  • --target <uuid|vmname>|global
  • --action ignore|hold (global filters only)
  • --active yes|no

In this tutorial I focus only on machine specific filters.

# verify for filter on specific vm
$ VBoxManage showvminfo "Debian" | awk '/^USB Device Filters:/,/^Available remote USB devices:/'

Important is the value “index” from 0 to n! If you create the first filter – the index starts with an 0, the second filter with an 1 and so on. To add a filter you must provide the VendorId and ProductId (as minimum) from first section (values inside the brackets), the name is can be chosen free.

Note: you have to adjust the following values in my examples ​​for your environment.

# show help for usb filters
$ VBoxManage usbfilter --help

# create usb filter for specifc vm
$ VBoxManage usbfilter add 0 --target "Debian" --name 'YARD Stick One' --vendorid 1d50 --productid 605b --remote no

# modify usb filter for specifc vm
$ VBoxManage usbfilter modify 0 --target "Debian" --name 'YARD Stick One' --vendorid 1d50 --productid 605b --remote no --manufacturer 'great scott gadgets'

# delete usb filter for specifc vm
$ VBoxManage usbfilter remove 0 --target "Debian"

USB filters are a very nice feature of VirtualBox, just play around and do some further research on it – I’m sure you will love it!
Something awesome for your Docker pipelines

While my constant research for pipeline tools, I have found a fantastic security scanner for Docker images. Something you could use quickly under the topic of CI/CD and DevSecOps for your development. It’s named anchore/grype and the best it’s Open source, really fast and delivers many nice options for reports.

Requirements

  • Docker installed (to pull images)

Hint: You also can load and scan *.tar archives.

Objective

Short introduction in installation and usage of Grype (locally to evaluate).

Note: The later integration into your pipelines shouldn’t be a problem. I will add the Grype repository to my watchlist and for sure try it out in my pipelines.

Installation and default configuration

This first step should only take a few minutes.

# install the latest version to /usr/local/bin
$ curl -sSfL https://raw.githubusercontent.com/anchore/grype/main/install.sh | sh -s -- -b /usr/local/bin

# install the latest version to ~/Downloads
$ curl -sSfL https://raw.githubusercontent.com/anchore/grype/main/install.sh | sh -s -- -b ~/Downloads

# move binary to /usr/local/bin/grype (if you define different location)
$ mv ~/Downloads/grype /usr/local/bin/grype

# create configuration file
$ vim ~/.grype.yaml

# show help
$ grype --help

I copied the content in short form from the official GitHub repository. You can adapt this to your needs at any time.

check-for-app-update: true
fail-on-severity: ''
output: "table"
scope: "squashed"
quiet: false
db:
  auto-update: true
  cache-dir: "~/.grype/db"
  update-url: "https://toolbox-data.anchore.io/grype/databases/listing.json"
log:
  file: ""
  level: "error"
  structured: false

Prepare the database

The Anchore Feed Service provides regular updates about publicly available vulnerabilities. In this section I will guide you to derive the updates manually.

# check database status (optional)
$ grype db status

# check feed service for new updates
$ grype db check

# run database update
$ grype db update

# verify db files (optional)
$ ls -la ~/.grype/db/

Usage examples

Even as the usage of Grype is very simple, here some short examples.

# scan image with configuration settings
$ grype node

# scans for vulnerabilities on all image layer and set output format
$ grype --scope all-layers -o cyclonedx node

# stop if a severity high is found with exit code 1
$ grype --fail-on high node

# show last exit status (optional)
$ echo $?

To stop your validation/pipeline on certain severities of security risks (exit code 1), you can choose between following options: negligible, low, medium, high & critical.

Hint: To save the reports you could use the redirect, to the output stream to a file.

Clean up

Don’t forget to clean up your system!

# list all Docker images (optional)
$ docker images

# delete specific Docker image by name
$ docker rmi node

PyCharm CE remote execution

Since I’m back to develop more in Python and need to execute my Python scripts also on remote machines – I asked my self: “How can I do with PyCharm CE and without any Plugin?” The solution was very easy and this tutorial is about.

Requirements

  • VirtualBox VM (e.g. Linux Debian incl. user and ssh server configured)
  • PyCharm CE installed

Note: Of course you could also use any other option then a Debian vm. Just adapt the tutorial steps for your specific needs.

Objective

Use terminal and external tools of PyCharm CE to execute Python scripts on remote machines.

Introduction

For this tutorial I’m using a VirtualBox VM (Debian Linux) which do have only a NAT interface configured. So I need to enable Port-forwarding for SSH. If this is not the case for you – you can jump over to the section where I explain the important steps in PyCharm.

Analysis of stopped VM’s

As a first step I check my VM settings (just to verify).

# list all vm's (optional)
$ VBoxManage list vms

# list all vm's and grep for name & nic rules
$ VBoxManage list -l vms | grep -i "Name:\|NIC 1 Rule"

Analysis of running VM’s

I don’t know the IP – so I do start the VM and check their all settings.

# start specific vm
$ VBoxManage startvm "Debian" --type headless

# list all running vm's (optional)
$ VBoxManage list runningvms

# list all running vm's and grep for name & nic rules (optional)
$ VBoxManage list runningvms -l | grep -i "Name:\|NIC Rule"

# list specific vm Nic informations (optional)
$ VBoxManage showvminfo "Debian" | grep -i "NIC"

# get IPv4 information of specific vm
$ VBoxManage guestproperty get "Debian" "/VirtualBox/GuestInfo/Net/0/V4/IP"

Add Port-forwarding

Now I know the IP (which in my case will not change) and can enable the Port-forwarding for SSH easily.

# shutdown specific vm
$ VBoxManage controlvm "Debian" poweroff

# add port-forwarding rule to specific vm
$ VBoxManage modifyvm "Debian" --natpf1 "SSH-PW,tcp,127.0.0.1,2222,10.0.2.15,22"

# list specific vm Nic informations (optional)
$ VBoxManage showvminfo "Debian" | grep -i "NIC 1 Rule"

# start specific vm
$ VBoxManage startvm "Debian" --type headless

# test ssh connection (optional)
$ ssh -p 2222 lupin@127.0.0.1 -v -C 'whoami && exit'

Note: On my VM (Debian) the user is named “lupin” this will be different for you! Also Openssh-server is enabled and I added my public ssh key on VM (authorized_keys).

PyCharm remote execution

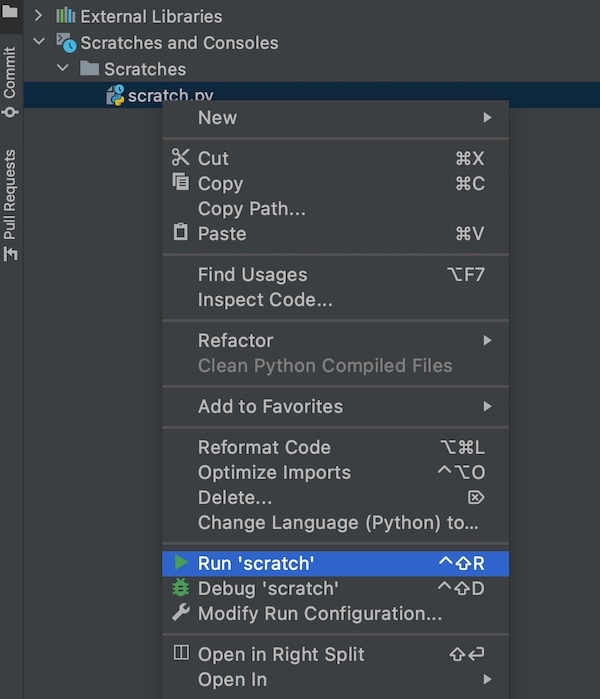
As I also like and use the feature “scratches” of PyCharm, I will show first the remote execution of these files.

Prepare a scratch

I prepare a simple Python script scratch, which just prints out environment variables (same code I use later inside project example).

import os

print('hello world', os.environ)

To find the absolute path for my scratch.py – I run it. On terminal the path will be visible.

PyCharm run scratches

After I know the path I run some simple commands in PyCharm Terminal.

# execute local script via SSH on remote system
$ ssh -p 2222 user@127.0.0.1 -C "/usr/bin/python" < "path/to/scratches/scratch.py"

# same as above but with unbuffered binary stdout and stderr
$ ssh -p 2222 user@localhost -C "/usr/bin/python" -u - < "./test_remote.py"

It works perfectly fine.

Note: Please replace the value “user” in all ssh examples!

PyCharm CE remote scratch execution

Project files

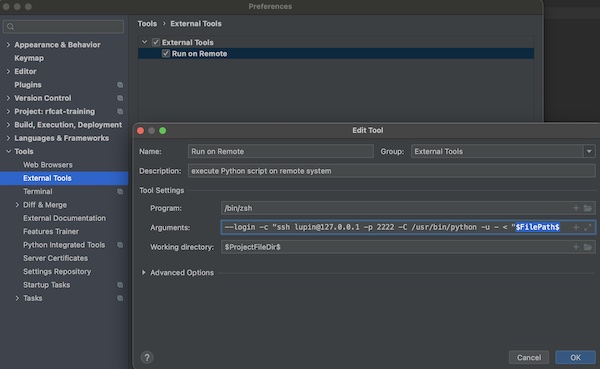
For all other scripts in the PyCharm project I don’t want to type the terminal commands always! So I’m using the feature “External Tools”. To do so, I add a new item and use the built-in variables (Macros) of PyCharm.

PyCharm CE add external tool

You simply give a Name Run on Remote, optional a short description, for Program your shell /bin/zsh and on Arguments --login -c "ssh user@localhost -p 2222 -C /usr/bin/python -u - < "$FilePah$. If you press button “OK” the input will be saved. The value for Working Directory $ProjectFileDir$ will be set (normally) automatically.

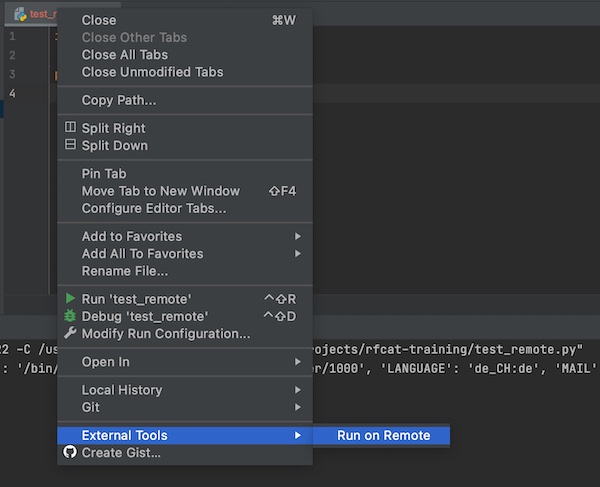
Now you can use the context menu to execute your script over SSH on remote machine.

PyCharm CE external tool remote execution