Troubleshoot SELinux Centos7 Apache

On my test environment, I had an permission denied issue with a simple HTML file. Shit all permissions looking good … but wait a minute SELinux was activated and I did not want to disable it. Here is the simple solution.

Example

# check SELinux status
$ sestatus

# check SELinux security context
$ ls -lahZ /var/www/html/
...
-rw-r--r--. root root unconfined_u:object_r:user_tmp_t:s0 demo.html
-rw-r--r--. root root unconfined_u:object_r:httpd_sys_content_t:s0 index.html
...

# change the SELinux security context (use RFILE's security context)
$ chcon --reference /var/www/html/index.html /var/www/html/demo.html

Cool … the problem is solved. All pages are visible without permission issues. It also works recursively if several files are affected.

# change security context recursive
$ chcon -Rv --type=httpd_sys_content_t /var/www/html

Lunar – a UNIX security auditing tool

LUNAR is a open source UNIX security auditing tool written in Shell script. It offers the audit for various operating systems like Linux (RHEL, CentOS, Debian, Ubuntu), Solaris and Mac OS with less requirements. Services like Docker and AWS are also supported.

Download

Clone repository

# git clone
$ git clone https://github.com/lateralblast/lunar.git

Download via curl

# download via curl
$ curl -L -C - -o lunar.zip https://github.com/lateralblast/lunar/archive/master.zip

# extract archive
$ unzip lunar.zip

Usage

The use is very easy… but the outcome brings much values.

# show help
$ sh lunar.sh -h

# list functions
$ sh lunar.sh -S

# run ssh audit
$ sh lunar.sh -s audit_ssh_config

# run selinux audit in verbose mode
$ sh lunar.sh -s audit_selinux -v

# run all audits
$ sh lunar.sh -a

Firewalld Rich Rules basics

This tutorial will help you to get started with the firewalld configuration. Basics on zones and rich rules are presented.

What we do

The shell provisioner will ensure that on all hosts firewalld and curl are installed. For “host_protected” the provisioner will install nginx for demo purposes, too. Furthermore, the firewall will configured on “host_protected”.

Every host has two interfaces NAT (enp0s3) and host-only (enp0s8). The provisioner will not touch the NAT interface (zone: public) rules! Only the host-only interface (zone: home) rules will modified!

# show result configuration public (local)
$ vagrant ssh host_protected -c 'sudo firewall-cmd --list-all --zone=public'
...
public (active)
  target: default
  icmp-block-inversion: no
  interfaces: enp0s3
  sources:
  services: dhcpv6-client ssh
  ports:
  protocols:
  masquerade: no
  forward-ports:
  sourceports:
  icmp-blocks:
  rich rules:

# show result configuration home (local)
$ vagrant ssh host_protected -c 'sudo firewall-cmd --list-all --zone=home'
...
home (active)
  target: default
  icmp-block-inversion: no
  interfaces: enp0s8
  sources:
  services:
  ports:
  protocols:
  masquerade: no
  forward-ports:
  sourceports:
  icmp-blocks:
  rich rules:
    rule family="ipv4" source address="192.168.33.10" service name="http" accept
    rule family="ipv4" source address="192.168.33.20" service name="ssh" accept

Project

Here are all needed files…

---
- name: host_http_access
  ip: 192.168.33.10
  hostname: http.local
- name: host_ssh_access
  ip: 192.168.33.20
  hostname: ssh.local
- name: host_protected
  ip: 192.168.33.30
  hostname: protected.local

Please add your values for box name/url!

# -*- mode: ruby -*-
# vi: set ft=ruby :

require 'yaml'

Vagrant.require_version ">= 1.9.3"
machines = YAML.load_file('hosts.yml')

Vagrant.configure("2") do |config|

  machines.each do |machines|

    config.vm.define machines["name"] do |machine|

      # disable ssh key update
      machine.ssh.insert_key = false

      # vagrant box name
      machine.vm.box = ""

      # vagrant box url
      machine.vm.box_url = ""

      # disable box update
      machine.vm.box_check_update = false

      # set hostname
      machine.vm.hostname = machines["hostname"]

      # disable synced_folder
      machine.vm.synced_folder ".", "/vagrant", disabled: true

      # 2nd network interface (private)
      machine.vm.network "private_network", ip: machines["ip"]

      # virtualbox settings
      machine.vm.provider :virtualbox do |vb|
        vb.name = machines["name"]
        vb.cpus = 1
        vb.memory = '1024'
        vb.gui = false
      end

      # run shell provisioner
      if machines["name"] == 'host_protected'
        machine.vm.provision "shell", path: "provisioner.sh", :args => "protected"
      else
        machine.vm.provision "shell", path: "provisioner.sh"
      end

    end

  end

end
#! /usr/bin/env bash

# install firewalld and curl
sudo yum install -y firewalld curl

# enable firewalld
sudo systemctl enable firewalld

# start firewalld
sudo systemctl start firewalld

# configure firewalld rich rules
if [ "${1}" == "protected" ]; then
  # install epel-release
  sudo yum install -y epel-release

  # install nginx
  sudo yum install -y nginx

  # enable nginx
  sudo systemctl enable nginx

  # start nginx
  sudo systemctl start nginx

  # change enp0s8 to home zone
  sudo firewall-cmd --zone=home --change-interface=enp0s8 --permanent

  # restart firewalld service
  sudo systemctl restart firewalld

  # remove all services form zone home
  sudo firewall-cmd --zone=home --remove-service dhcpv6-client --permanent
  sudo firewall-cmd --zone=home --remove-service mdns --permanent
  sudo firewall-cmd --zone=home --remove-service samba-client --permanent
  sudo firewall-cmd --zone=home --remove-service ssh --permanent

  # add rich rules
  sudo firewall-cmd --zone=home --add-rich-rule='rule family="ipv4" service name="http" source address="192.168.33.10" accept' --permanent
  sudo firewall-cmd --zone=home --add-rich-rule='rule family="ipv4" service name="ssh" source address="192.168.33.20" accept' --permanent

  # reload firewall
  sudo firewall-cmd --reload
fi

Usage

# start vagrant environment (local)
$ vagrant up

# show status (optional - local)
$ vagrant status
...
Current machine states:

host_http_access          running (virtualbox)
host_ssh_access           running (virtualbox)
host_protected            running (virtualbox)

# ssh into host_http_access (local)
$ vagrant ssh host_http_access

# try http via curl (host_http_access)
$ curl -I http://192.168.33.30

# try ssh (host_http_access)
$ ssh vagrant@192.168.33.30

# ssh into host_ssh_access (local)
$ vagrant ssh host_ssh_access

# try http via curl (host_ssh_access)
$ curl -I http://192.168.33.30

# try ssh (host_ssh_access)
$ ssh vagrant@192.168.33.30

# destroy vagrant environment
$ vagrant destroy -f

Note: before you destroy the vagrant environment, have a look on zones xml files for “host_protected”!

# ssh into host_protected (local)
$ vagrant ssh host_protected

# change to root (host_protected)
$ sudo su -

# change directory
$ cd /etc

# cat actual zone xml files
$ cat firewalld/zones/*.xml

Kickstart Configurator

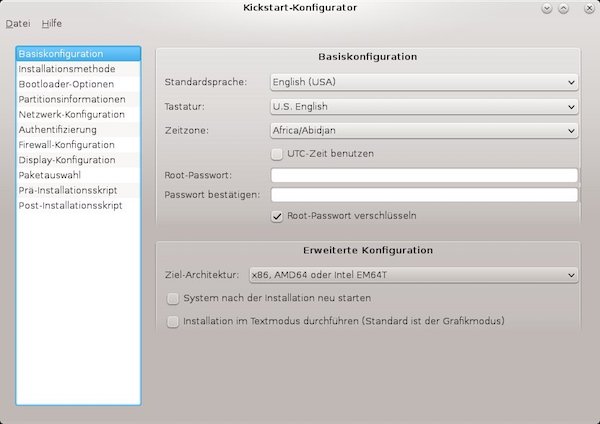
With kickstart configurator you don`t need to remember the correct syntax of kickstart files. An graphical user interface helps to create or to edit kickstart files on the fly.

Preparation

# install KDE
$ yum groupinstall -y "KDE Plasma Workspaces"

# install kickstart configurator
$ yum install -y system-config-kickstart

# start KDE
$ startx

Note: Of course you can also use Gnome, Cinnamon, MATE or Xfce!

Usage

To start the kickstart configurator search the application “Kickstart” [Applications => System Tools => Kickstart] or run terminal command:

# start kickstart configurator
$ system-config-kickstart
Kickstart-Konfigurator

Note: Via [File => Preview] you can review your current selections before saving.

Validation

After the creation, you should check the kickstart file!

# install pykickstart
$ yum install -y pykickstart

# start validate a kickstart file
$ ksvalidator </path/to/kickstart file>

Explain Shell direct from terminal

Explainshell.com rocks! Nevertheless, you lose time to leave the terminal (open browser, copy-paste). But there is a cool solution from ManKier. All what you need is curl.

Usage

# curl request for whoami
$ curl -Gs "https://www.mankier.com/api/explain/?cols="$(tput cols) --data-urlencode "q=whoami"

# curl request for df -h
$ curl -Gs "https://www.mankier.com/api/explain/?cols="$(tput cols) --data-urlencode "q=df -h"

Simpler usage

With a tiny script it will be more comfortable! Add the following to your .bashrc or .bash_profile (MAC OS X).

# explain.sh begins
explain () {
	if [ "$#" -eq 0 ]; then
		while read  -p "Command: " cmd; do
			curl -Gs "https://www.mankier.com/api/explain/?cols="$(tput cols) --data-urlencode "q=$cmd"
		done
		echo "Bye!"
	elif [ "$#" -eq 1 ]; then
		curl -Gs "https://www.mankier.com/api/explain/?cols="$(tput cols) --data-urlencode "q=$1"
	else
		echo "Usage"
		echo "explain                  interactive mode."
		echo "explain 'cmd -o | ...'   one quoted command to explain it."
	fi
}

Now you can do …

# explain one command
$ explain 'df -h'
...
df(1)
  df displays the amount of disk space available on the file system containing each file name
  argument. If no file name is given, the space available on all currently mounted file systems is
  shown. Disk space is shown in 1K blocks by default, unless the environment variable
  POSIXLY_CORRECT is set, in which case 512-byte blocks are used. If an argument is the absolute
  file name of a disk device node containing a mounted file system, df shows the space available on
  that file system rather than on the file system containing the device node. This version of df
  cannot show the space available on unmounted file systems, because on most kinds of systems doing
  so requires very nonportable intimate knowledge of file system structures.

  -h (-H, --HUMAN-READABLE)
    print sizes in powers of 1024 (e.g., 1023M)

… if you insert only “explain” an interactive mode will started!

Create private vagrant box repository

For various reasons it may happen that the public Vagrant box repository should not be used. But Vagrant boxes should be available on the internal network. In addition, these boxes are to be versioned. With a few steps, this can be realized by Nginx.

Preparation

Nginx

# install epel-release
$ yum install -y epel-release && yum update -y

# install nginx, and additional tools
$ yum install -y nginx vim tree

# configure nginx to be automatically started at boot 
$ systemctl enable nginx

# start nginx
$ systemctl start nginx

# create new folders
$ mkdir -p /usr/share/nginx/html/devops/vagrant/boxes

# set access rights
$ chmod 755 -R /usr/share/nginx/html/devops/

# create JSON file
$ touch /usr/share/nginx/html/devops/vagrant/centos.json

# show current state
$ tree /usr/share/nginx/html/devops/
/usr/share/nginx/html/devops/
└── vagrant
    ├── boxes
    │ └── CentOS7.box
    └── centos.json

# get sha1 checksum from box
$ sha1sum /usr/share/nginx/html/devops/vagrant/boxes/CentOS7.box

# edit JSON file
$ vim /usr/share/nginx/html/devops/vagrant/centos.json

# edit nginx conf
$ vim /etc /nginx/nginx.conf

# check nginx config
$ nginx -t

# restart nginx
$ systemctl restart nginx

# enter permissive mode
$ setenforce 0
{
    "name": "demo/centos7",
    "description": "This box contains CentOS 7 64-bit.",
    "versions": [{
        "version": "0.1.0",
        "providers": [{
                "name": "virtualbox",
                "url": "http://<target>/devops/vagrant/boxes/CentOS7.box",
                "checksum_type": "sha1",
                "checksum": "99e6d7fc44cccabdfc6ed9ce178ca65fd9dcbac8"
        }]
    }]
}
...

# resolve vagrant json file(s)
location ~ ^/devops/vagrant/$ {
    index $1.json;
    try_files $uri $uri/ $1.json =404;
    autoindex off;
}
# enable auto indexing for boxes
location ~ ^/devops/vagrant/boxes/$ {
    try_files $uri $uri/ =404;
    autoindex on;
    autoindex_exact_size on;
    autoindex_localtime on;
}
# serve json with specific header
    location ~ \.json$ {
    add_header Content-Type application/json;
}
# serve box(s) with specific header
location ~ \.box$ {
    add_header Content-Type application/octet-stream;
}

...

Client

On your browser check following URL`s before proceeding: http://<target>/devops/vagrant/centos.json and http://<target>/devops/vagrant/boxes/

# create project directory
$ mkdir ~/tutorial && cd ~/tutorial

# add base box repository
$ vagrant box add demo/centos7 http://<target>/devops/vagrant/centos.json

# list all boxes
$ vagrant box list
demo/centos7  (virtualbox, 0.1.0)

# create Vagrant project
$ vagrant init demo/centos7

Nginx (Part 2)

# edit JSON file
$ vim /usr/share/nginx/html/devops/vagrant/centos.json

Attention! I use for this demonstration the same box!

{
    "name": "demo/centos7",
    "description": "This box contains CentOS 7 64-bit.",
    "versions": [{
        "version": "0.1.0",
        "providers": [{
                "name": "virtualbox",
                "url": "http://<target>/devops/vagrant/boxes/CentOS7.box",
                "checksum_type": "sha1",
                "checksum": "99e6d7fc44cccabdfc6ed9ce178ca65fd9dcbac8"
        }]
    },{
        "version": "0.1.1",
        "providers": [{
                "name": "virtualbox",
                "url": "http://<target>/devops/vagrant/boxes/CentOS7.box",
                "checksum_type": "sha1",
                "checksum": "99e6d7fc44cccabdfc6ed9ce178ca65fd9dcbac8"
        }]
    }]
}

Client (Part 2)

# check box version
$ vagrant box outdated
A newer version of the box 'demo/centos7' is available! You currently
have version '0.1.0'. The latest is version '0.1.1'. Run
`vagrant box update` to update.

You can add now more boxes with different JSON files!
Reaver, Wash and CentOS 7

In part 3, I show how to install Reaver/Wash on CentOS 7.

Preparation

Installation

# download reaver and wash
$ wget https://reaver-wps.googlecode.com/files/reaver-1.4.tar.gz

# unzip
$ tar -zxvf reaver-1.4.tar.gz

# install reaver and wash
$ cd /reaver-1.4/src
$ ./configure
$ make install

# optional read docs
$ cat /reaver-1.4/docs/README.REAVER
$ cat /reaver-1.4/docs/README.WASH

Usage

# kill interfering processes
$ airmon-ng check kill

# set interface into monitor mode (my interface is wlp0s11u1)
$ airmon-ng start wlp0s11u1

# find WPS routers via wash
$ wash -I wlp0s11u1mon

# start reaver running
$ reaver -i wlp0s11u1mon -b <ESSID> -t 2 -vv

Create vagrant box from CentOS 7 VirtualBox

This time I will show you, how to create a basic Vagrant box from a CentOS 7 VirtualBox. Caution, use only for educational purposes and not for productive environments!

Preparation

Network configuration

On VirtualBox select mode “NAT” or “Bridged”.

$ vi /etc /sysconfig/network-scripts/ifcfg-enp0s3
$ service network restart

Install virtualbox guest additions 

# Update
$ yum update -y

# Install development tools
$ yum groupinstall -y "Development Tools"

# restart vm
$ reboot

# insert cd
# Devices -> Install Guest Additions

# mount cd
$ mount /dev/cdrom /mnt

# start guest additions installation
$ sh /mnt/VBoxLinuxAdditions.run --nox11

Prepare Vagrant SSH access

# Edit sudoers file to disable requiretty
$ visudo

# Defaults    requiretty

# add user vagrant 
$ useradd vagrant

# set password for user vagrant (vagrant)
$ passwd vagrant

# create vagrant sudoers file 
$ visudo -f /etc /sudoers.d/vagrant

vagrant ALL=(ALL) NOPASSWD:ALL

# change to user vagrant
$ su - vagrant

# create ssh folder with access rights
$ mkdir .ssh && chmod 0700 .ssh && cd .ssh

# create authorized_keys file
$ echo "ssh-rsa AAAAB3NzaC1yc2EAAAABIwAAAQEA6NF8iallvQVp22WDkTkyrtvp9eWW6A8YVr+kz4TjGYe7gHzIw+niNltGEFHzD8+v1I2YJ6oXevct1YeS0o9HZyN1Q9qgCgzUFtdOKLv6IedplqoPkcmF0aYet2PkEDo3MlTBckFXPITAMzF8dJSIFo9D8HfdOV0IAdx4O7PtixWKn5y2hMNG0zQPyUecp4pzC6kivAIhyfHilFR61RGL+GPXQ2MWZWFYbAGjyiYJnAmCP3NOTd0jMZEnDkbUvxhMmBYSdETk1rRgm+R4LOzFUGaHqHDLKLX+FIPKcF96hrucXzcWyLbIbEgE98OHlnVYCzRdK8jlqm8tehUc9c9WhQ== vagrant insecure public key" > authorized_keys

# set access rights for authorized_keys file
$ chmod 0600 authorized_keys

# clear history and switch back to root user
$ history -c && exit

# clear history and shutdown
$ history -c && shutdown -h 0

Create Vagrant box

# create new folder for Vagrant project and change into VM folder
$ mkdir ~/VagrantProject && cd ~/VirtualBox\ VMs/

# create base box from VM
$ vagrant package --base CentOS7 --output ~/VagrantProject/CentOS7.box

# change back to Vagrant project folder
$ cd ~/VagrantProject

# add box
$ vagrant box add lupin/centos7 CentOS7.box

# check vagrant boxes
$ vagrant box list

Create project and start with work

# create project
$ vagrant init lupin/centos7

# edit vagrantfile 
$ vim Vagrantfile

  config.vm.provision "shell", inline: <<-SHELL
     sudo yum update -y
     sudo yum install -y vim tree
  SHELL

# creates and configures guest machine 
$ vagrant up

# SSH into a running Vagrant machine
$ vagrant ssh

# ... do your stuff ...

# stop Vagrant machine
$ vagrant halt