Create your own test application

A lot of software testers do have no or less development skills. They also have less skills to use commandline tools and need GUI applications. In addition, the test applications for the respective claims should be easy to use. This guide will show you how to easily deploy software testers the needed test tools. This is just an example, please feel free to expand it!

Precondition

Let`s go

After create a new PyCharm project (with virtualenv), create 2 new empty files (requirements.txt, ShowHeaders.py) and import a icon. You can found icons (*.icns) on iconarchive for free.
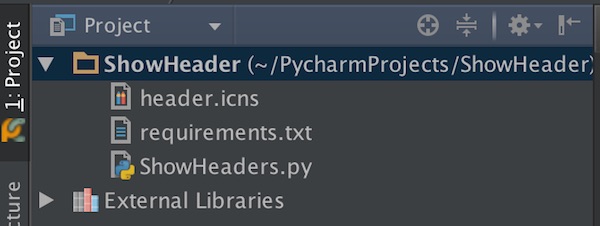
application project files

Open the “requirements.txt” file and add Requests library.

requests==2.6.0

Open the “ShowHeader.py” and add the following content.

#!/usr/bin/env python
#  -*- coding: utf-8 -*-
"""
This is a main script

Usage:
    python ShowHeaders.py
"""
import requests
from Tkinter import (Tk, Frame, StringVar, OptionMenu, Button, Entry, Text,
                     END, DISABLED, NORMAL, SUNKEN, E, W)


class ShowHeaders(object):
    """
    ShowHeaders class
    """

    OPTIONS = ["GET", "POST", "PUT", "DELETE"]

    def __init__(self):
        """
        Constructor for Tk GUI
        """
        self.root = Tk()
        self.root.title('Show Headers')
        self.root.configure(bg="light blue")
        self.option = StringVar(self.root)
        self.option.set(self.OPTIONS[0])
        self.methods = None
        self.url = None
        self.response = None
        self.copy = None

    def create_gui(self):
        """
        Create Tk GUI
        """
        self._create_top_frame()
        self._create_middle_frame()
        self._create_bottom_frame()
        self.root.mainloop()

    def close_app(self):
        """
        Close & Quit Application
        """
        self.root.quit()

    def _print_response(self, response_txt):
        """
        Print response
        """
        self.response.config(state=NORMAL)
        self.response.delete(1.0, END)
        self.response.insert(END, response_txt)
        self.response.config(state=DISABLED)

    def _copy_to_clipboard(self):
        """
        Copy to text clipboard
        """
        text = self.response.get("1.0", END)
        self.root.clipboard_clear()
        self.root.clipboard_append(text)

    def _make_request(self):
        """
        Run http request and print
        """
        self.copy.config(state="normal")
        methods = self.option.get()
        url = self.url.get()
        if methods == 'GET':
            req = requests.get(url)
        elif methods == 'POST':
            req = requests.post(url)
        elif methods == 'PUT':
            req = requests.put(url)
        elif methods == 'DELETE':
            req = requests.delete(url)
        else:
            req = dict()
        header = req.headers
        self._print_response(header)

    def _create_top_frame(self):
        """
        Create top frame
        """
        top_frame = Frame(self.root)
        top_frame.grid(row=0, column=0, padx=5, pady=5, sticky=W+E)

        self.methods = OptionMenu(top_frame, self.option, *self.OPTIONS)
        self.methods.config(width=15)
        self.methods.grid(row=0, column=0)

        self.url = Entry(top_frame, width=50)
        self.url.insert(0, "http://")
        self.url.grid(row=0, column=1)

        Button(top_frame, text='Request', command=self._make_request).grid(
            row=0, column=2)

    def _create_middle_frame(self):
        """
        Create middle frame
        """
        middle_frame = Frame(self.root, height=75, bd=1, relief=SUNKEN)
        middle_frame.grid(row=1, column=0, padx=5, pady=5)

        self.response = Text(middle_frame, height=10)
        self.response.config(state=DISABLED)
        self.response.grid(row=1)

    def _create_bottom_frame(self):
        """
        Create bottom frame
        """
        bottom_frame = Frame(self.root)
        bottom_frame.grid(row=2, column=0, padx=5, pady=5, sticky=W+E)

        self.copy = Button(bottom_frame, text="Copy", state=DISABLED,
                           command=self._copy_to_clipboard)
        self.copy.grid(row=0, column=0)

        Button(bottom_frame, text='Quit', command=self.close_app).grid(
            row=0, column=1)


if __name__ == '__main__':
    APP = ShowHeaders()
    APP.create_gui()

For first test, run the application. If there are no issues – open the PyCharm terminal and run the following command.

$ py2applet --make-setup ShowHeaders.py

# or if you use virtualenv
$ /Users/<username>/ShowHeaderEnv/bin/py2applet --make-setup ShowHeaders.py

Now you should see the generated file “setup.py” in the Project. Open the file and add the icon. The content should look like this:

"""
This is a setup.py script generated by py2applet

Usage:
    python setup.py py2app
"""

from setuptools import setup

APP = ['ShowHeaders.py']
DATA_FILES = []
OPTIONS = {'argv_emulation': True, 'iconfile':'header.icns'}

setup(
    app=APP,
    data_files=DATA_FILES,
    options={'py2app': OPTIONS},
    setup_requires=['py2app'],
)

Now execute the following command to build, for first test.

$ python setup.py py2app -A

After some messages in terminal, your Project should show 2 new folders (build, dist). The alias mode (-A / –alias) instructs py2app to build an application, but it is not portable to other machines! You can open the Application in Finder or from terminal for your tests. If there are changes, just run the build-command again.

$ open dist/ShowHeaders.app

If everything is fine and your Application is ready for ship, run the following command.

# remove build and dist folder
$ rm -fr build/ dist/

# build application
$ python setup.py py2app

Again the Application can be found on folder “dist”. The result should look like this:
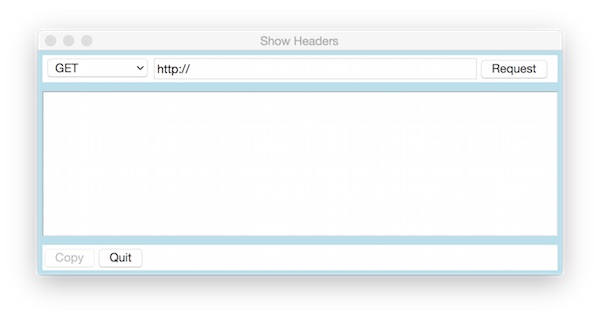
example application

Have fun and be creative! Too ship the test application for Windows users, look at py2exe.

PyCharm with Virtualenv on Mac OS X

This guide shows you how to use PyCharm with virtualenv on Mac OS X.

Preconditions

PyCharm installed

Steps

First install we install Virtualenv and Virtualenvwrapper.

# if pip not installed
$ sudo easy_install pip

# install virtualenv
$ sudo pip install virtualenv

# install virtualenvwrapper
$ sudo pip install virtualenvwrapper

Now we start PyCharm to create new project.

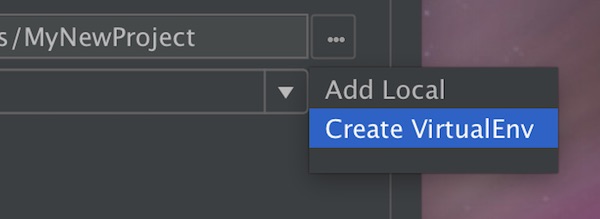
PyCharm Virtualenv

After given the new name for the project on Location, select for Interpreter “Create VirtualEnv”.

PyCharm Create Virtualenv

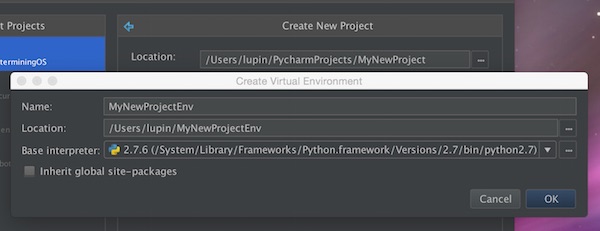
Create Virtual Environment dialog box opens. Here type the name of the new virtual environment and specify the target directory for he new virtual environment on Location. Select one “Base interpreter” and if needed, select the check box “Inherit global site-packages”.

PyCharm Virtualenv Setup

Press “OK” button to apply changes and close the dialog box. After press the  “Create” button – PyCharm create the new project.

PyCharm Community Edition and Database Navigator

For the Community Editition there is a plugin that allows to edit or query databases directly from PyCharm. Currently MySQL, Oracle and Postgres are supported. The benefit, You as a tester (or developer) need to use no other tools.

Preparation

  • PyCharm is installed
  • Running Postgres server
  • Download latest JDBC driver (PostgreSQL)

Instructions

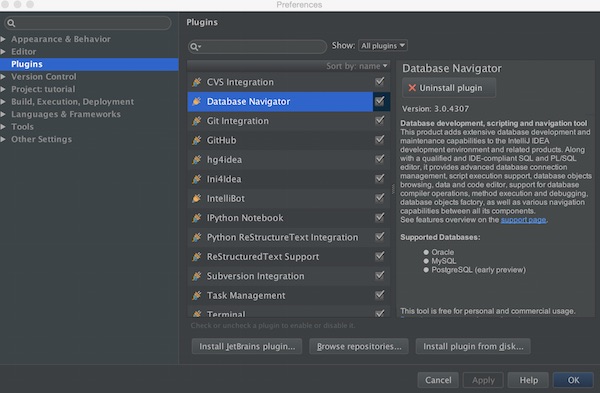
Search and install the “Database Navigator”. Restart PyCharm after installation.

PyCharm Database Navigator

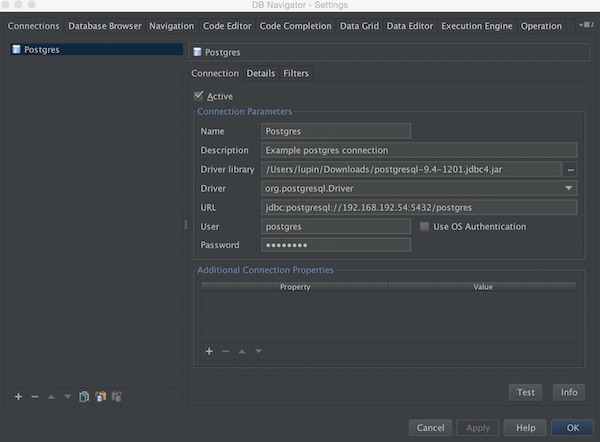
Setup the connection. The following example shows a connection to Postgres.

Postgres connection

Insert all needed values. As driver library select the JDBC jar file. The URL should follow the syntax like:

jdbc:postgresql://host:port/database

To verify your settings, use the test button.

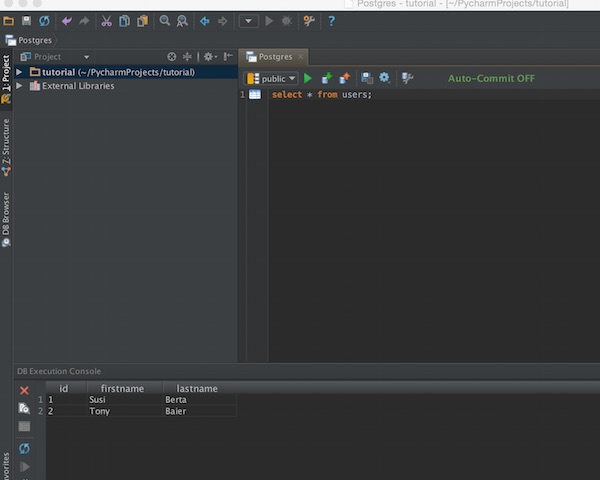
Now you can query, just select the schema and insert your SQL statements.

Database Navigator usage

PyCharm and Robot Framework

This tutorial should show, how easy it is to use the Robot Framework with PyCharm. After this small setup you can use PyCharm for your test automation with Robot Framework.

Preparation

Install PyCharm and the Robot Framework.

# check installed modules
$ pip list

# install Robot Framework (if not listed)
$ sudo pip install robotframework

# upgrade to the latest version
$ sudo pip install --upgrade robotframework

# verify installation
$ pybot --version

Configuration of PyCharm

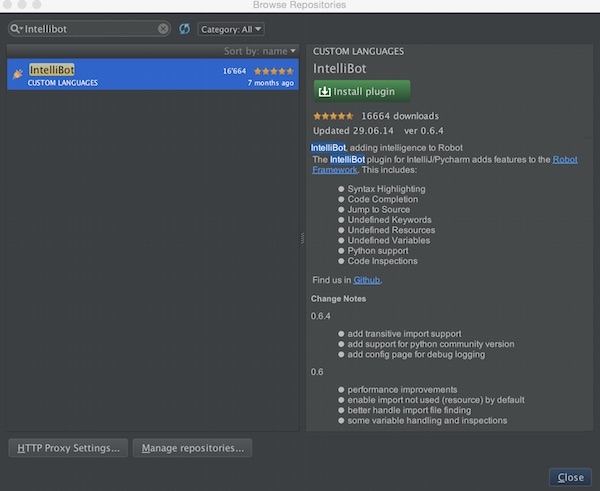
Now start PyCharm and open “Preferences” – “Plugins”. Press “Browse repositories…” button and search for “Intellibot”. Press “Install plugin” button and restart PyCharm.

pycharm intellibot

Now create a new directory “testsuite” with new file named “example.robot” inside and insert the following content.

*** Test Cases ***

Example action log         this is a test

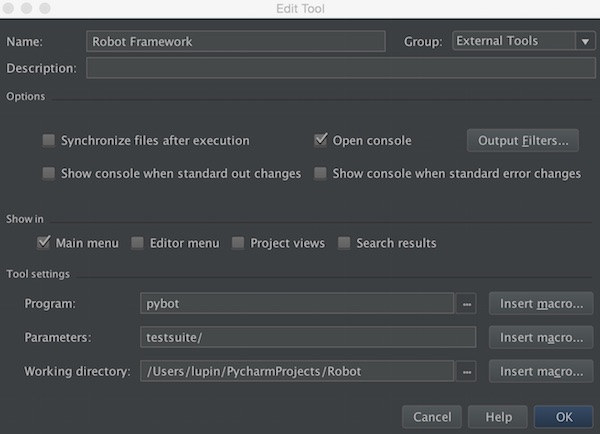
Open “Preferences” – “Tools” – “External Tools” and press “+” button. Insert a value for “Name”, enable checkbox “Open console”, insert “pybot” into Program, “test suite/” into Parameters and select you specific Working directory.

pycharm robotframework

After press “OK” buttons, go to menu “Tools” – “External Tools” and select your given name. The output should show something like this:

/usr/local/bin/pybot testsuite/
=============================================================
Testsuite
=============================================================
Testsuite.Example
=============================================================
Example action                                       | PASS |
-------------------------------------------------------------
Testsuite.Example                                    | PASS |
1 critical test, 1 passed, 0 failed
1 test total, 1 passed, 0 failed
=============================================================
Testsuite                                            | PASS |
1 critical test, 1 passed, 0 failed
1 test total, 1 passed, 0 failed
=============================================================
Output: /output.xml
Log: /log.html
Report: /report.html

Process finished with exit code 0

Extended

In the next steps we create a first very simple test automation. For this we need to install the “selenium2library”.

# install package
$ sudo pip install robotframework-selenium2library

Now we create inside the “testsuite” directory a file called “1st_test.robot” with following content.

*** Settings ***
Documentation           This is a simple test with Robot Framework
Library                 Selenium2Library

*** Variables ***
${SERVER}               http://google.com
${BROWSER}              Firefox
${DELAY}                0

*** Keywords ***
Open Browser To Login Page
   Open Browser         ${SERVER}   ${BROWSER}
   Maximize Browser Window
   Set Selenium Speed   ${DELAY}

*** Test Cases ***
Valid Login Open Browser To Login Page
[Teardown].             Close Browser

After running the output should look like this:

/usr/local/bin/pybot testsuite/
=============================================================
Testsuite
=============================================================
Testsuite.1St Test :: This is a simple test with Robot Framework
=============================================================
Valid Login                                          | PASS |
-------------------------------------------------------------
Testsuite.1St Test :: This is a simple test with Robot Framework      | PASS |
1 critical test, 1 passed, 0 failed
1 test total, 1 passed, 0 failed
=============================================================
Testsuite.Example
=============================================================
Example action                                       | PASS |
-------------------------------------------------------------
Testsuite.Example                                    | PASS |
1 critical test, 1 passed, 0 failed
1 test total, 1 passed, 0 failed
=============================================================
Testsuite                                            | PASS |
2 critical tests, 2 passed, 0 failed
2 tests total, 2 passed, 0 failed
=============================================================
Output: /output.xml
Log: /log.html
Report: /report.html

Process finished with exit code 0

Integrate pylint in PyCharm

This tutorial shows, how to add pylint into PyCharm.

Preparation

# install pylint via pip
$ sudo pip install pylint

That was the easy way to install pylint…

Steps

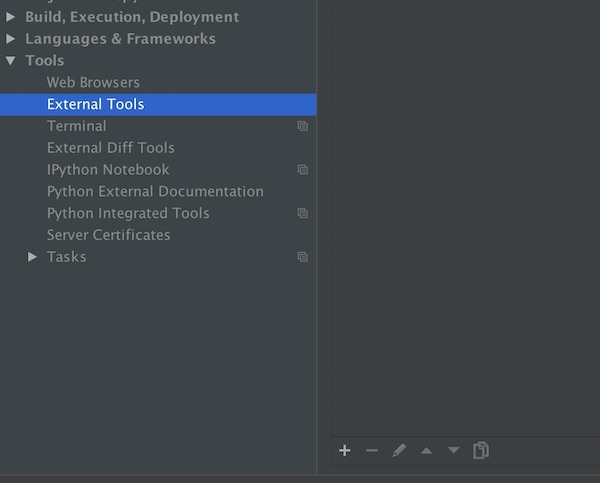
Open “Settings > Tools > External Tools” and press the “+” button.

pycharm external tools

Insert values

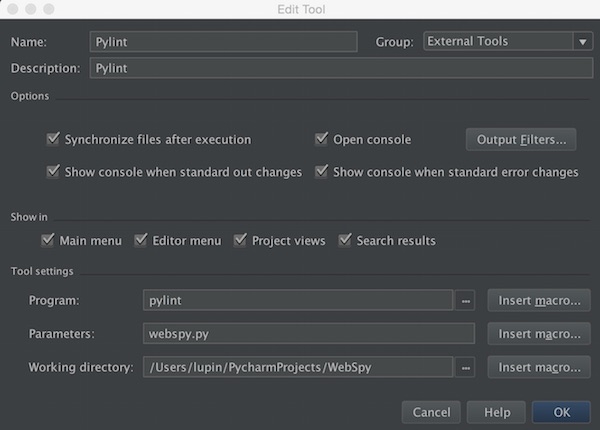
Inserts good values on name, description and select your favorite group. Enable more or less all checkboxes. Down the “Tool settings” insert program “pylint”, your specific parameters and working directory.

pycharm pylint

After press “OK” pylint integration is ready.

Extended

To be a little more flexible, you can use PyCharm macros. As an example use the value “$FilePath$” for Working directory and “$Promt$” for Parameters. This allows the use in other projects, too.

pycharm macros

Running PyCharm on Yosemite

Your current Java version is greater than 6 and you get after starting PyCharm an error dialog, the following solution helps.

Check your Java Version

# show Java version
$ java -version
java version "1.8.0_25" Java(TM) SE Runtime Environment (build 1.8.0_25-b17)
Java HotSpot(TM) 64-Bit Server VM (build 25.25-b02, mixed mode)

Open PyCharm settings

# edit file with Vim
$ vim /Applications/PyCharm\ CE.app/Contents/Info.plist

Change following lines on XML

<key>JVMVersion</key>
<string>1.6*</string>

# change into
<key>JVMVersion</key>
<string>1.8*</string>

Now you can start PyCharm