macOS, Docker, Prometheus and Grafana

I like Grafana … the dashboards are just cool! Here (again) a tutorial about docker monitoring. In less minutes you should be done. As a comment … for Linux and Windows you can do that too! There are only partial changes.

Prepare Project

# create project
$ mkdir -p ~/Projects/DPG && cd ~/Projects/DPG

# show current IP
$ ifconfig | grep "inet " | grep -v 127.0.0.1

# create and edit prometheus.yml
$ vim prometheus.yml

Replace <yourLocalIP> with your IP. On Docker website you can find templates for Linux and Windows, too!

# my global config
global:
  scrape_interval:     15s # Set the scrape interval to every 15 seconds. Default is every 1 minute.
  evaluation_interval: 15s # Evaluate rules every 15 seconds. The default is every 1 minute.
  # scrape_timeout is set to the global default (10s).

  # Attach these labels to any time series or alerts when communicating with
  # external systems (federation, remote storage, Alertmanager).
  external_labels:
      monitor: 'codelab-monitor'

# Load rules once and periodically evaluate them according to the global 'evaluation_interval'.
rule_files:
  # - "first.rules"
  # - "second.rules"

# A scrape configuration containing exactly one endpoint to scrape:
# Here it's Prometheus itself.
scrape_configs:
  # The job name is added as a label `job=<job_name>` to any timeseries scraped from this config.
  - job_name: 'prometheus'

    # metrics_path defaults to '/metrics'
    # scheme defaults to 'http'.

    static_configs:
      - targets: ['localhost:9090']

  - job_name: 'docker'
         # metrics_path defaults to '/metrics'
         # scheme defaults to 'http'.

    static_configs:
      - targets: ['<yourLocalIP>:9323']

Configure Docker

This step is very easy. Just open Docker “Preferences” and specify in section “Daemon” -> “Advanced” the metrics-address. Just ensure that you use valid JSON!
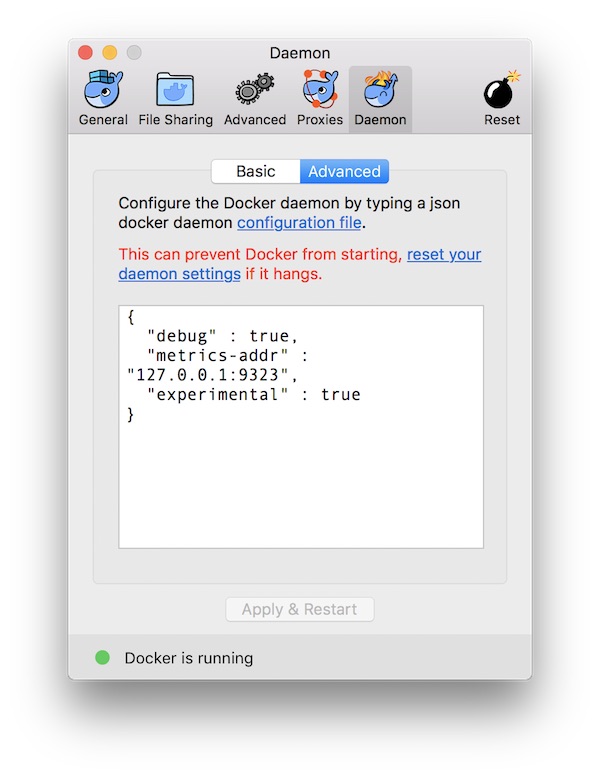
macOS Docker Metrics

When you are done, press “Apply and Restart” button.

# view Docker metrics in browser
$ open -a Safari http://127.0.0.1:9323/metrics

Prepare Prometheus

# run Prometheus
$ docker run --name prometheus -p 9090:9090 -v $PWD/prometheus.yml:/etc /prometheus/prometheus.yml prom/prometheus

# open Prometheus WebUI
$ open -a Safari http://localhost:9090/targets

# get Prometheus IP
$ docker inspect --format '{{ .NetworkSettings.IPAddress }}' prometheus

Note: The space after /etc is just because of security settings of my provider! Please remove the space.

prometheus WebUI

Just for fun you can create already some graphs in Prometheus.
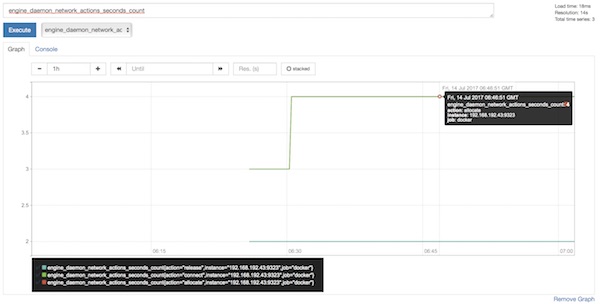
prometheus Graph

Prepare and run Grafana

# run Grafana
$ docker run --name grafana -i -p 3000:3000 grafana/grafana

# open Grafana WebUI and login (admin:admin)
$ open -a Safari http://localhost:3000

After login (admin:admin) configure new DataSource for Prometheus.
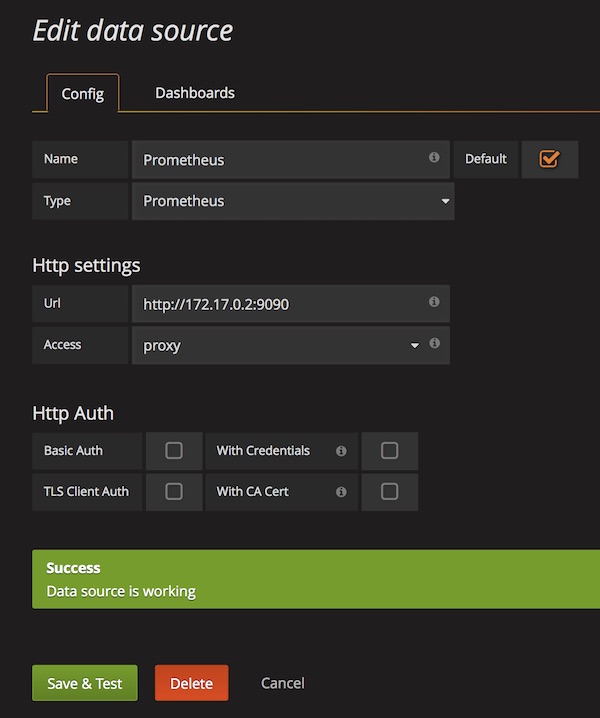
Grafana DataSource Prometheus

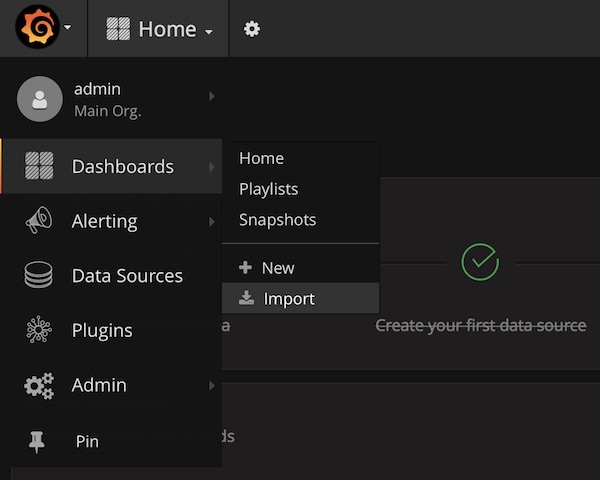
Import Dashboard (ID: 1229)

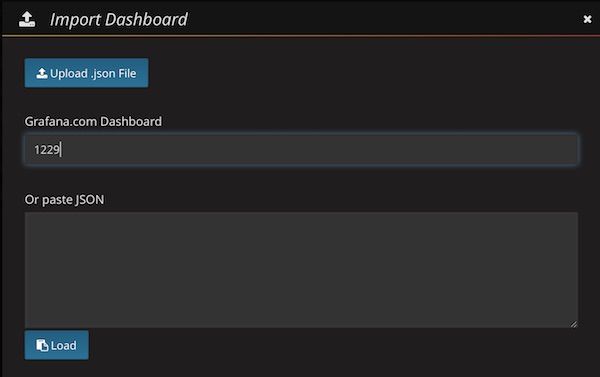
Grafana Import Dashboard

… enter ID 1229 …

Grafana Dashboard Search

… be patient (don’t press any button) …
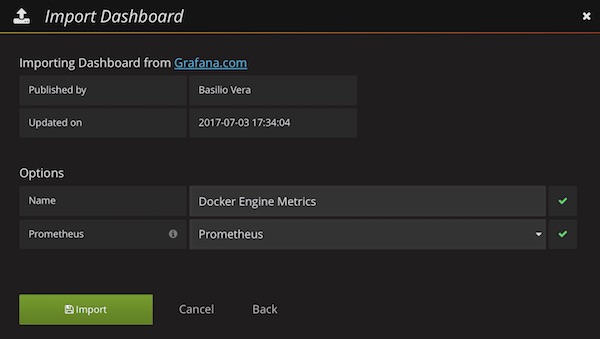
Docker Engine Metrics Dashboard

Select already created DataSource (Prometheus) and press “Import” button. Now you should see the awesome Grafana Dashboard.
Build notifications with CatLight

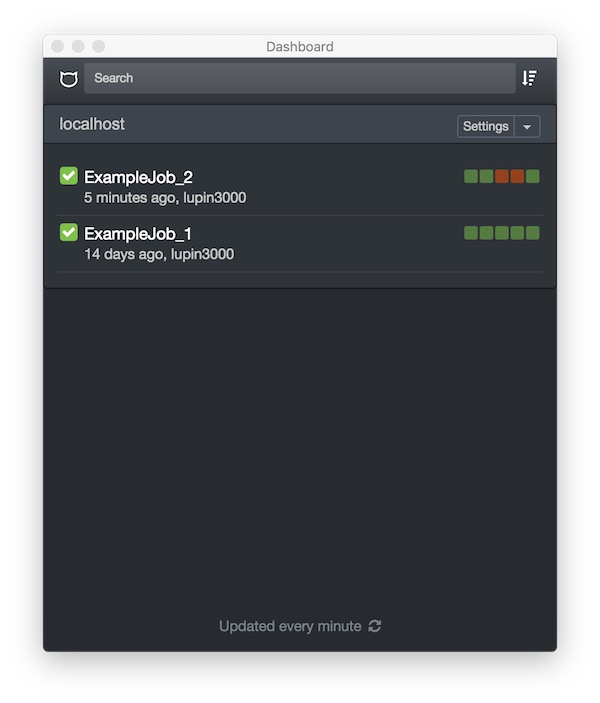
CatLight is the the perfect app if you would like to know the current status of your continuous delivery pipelines, tasks and bugs. Without looking on E-Mails or visit build servers you know when attention is needed. It’s available for Debian, Ubuntu, Windows and MacOS.

CatLight works with Jenkins, TFS, Travis CI and many more.

catlight setup

After successful installation and configuration, CatLight offers a lot of cool features.

catlight jobs

For personal usage it’s free, you only have to register.

Visualisation of Docker and Kubernetes

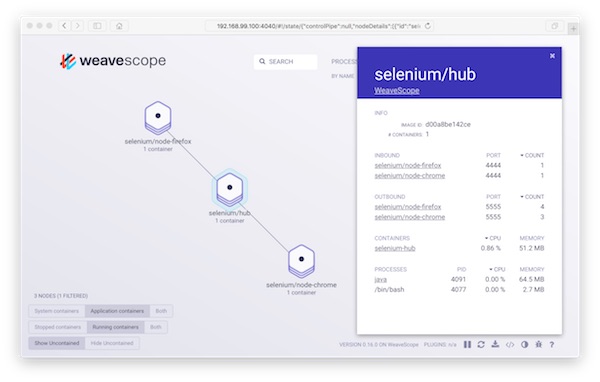
With Weave Scope you have in seconds a beautiful monitoring, visualisation & management for Docker and Kubernetes via your browser. I show with Docker-Selenium a simple example.

Preconditions

Lets go…

# create new Docker VM (local)
$ docker-machine create -d virtualbox WeaveScope

# pointing shell to WeaveScope VM (local)
$ eval $(docker-machine env WeaveScope)

# SSH into WeaveScope VM (local -> VM)
$ docker-machine ssh WeaveScope

# become root (VM)
$ sudo su -

# download scope (VM)
$ wget -O /usr/local/bin/scope https://git.io/scope

# change access rights of scope (VM)
$ chmod a+x /usr/local/bin/scope

# launch scope (VM)
# Do not forget the shown URL!!!
$ scope launch

# exit root and ssh (VM -> local)
$ exit

# create Selenium Hub (local)
$ docker run -d -p 4444:4444 --name selenium-hub selenium/hub:2.53.0

# create Selenium Chrome Node (local)
$ docker run -d --link selenium-hub:hub selenium/node-chrome:2.53.0

# create Selenium Firefox Node (local)
$ docker run -d --link selenium-hub:hub selenium/node-firefox:2.53.0

# show running containers (optional)
$ docker ps -a
...
CONTAINER ID        IMAGE                          COMMAND                  CREATED             STATUS              PORTS                    NAMES
a3e7b11c5a5f        selenium/node-firefox:2.53.0   "/opt/bin/entry_point"   9 seconds ago       Up 8 seconds                                 cocky_wing
699bf05681e8        selenium/node-chrome:2.53.0    "/opt/bin/entry_point"   42 seconds ago      Up 42 seconds                                distracted_darwin
bbc5f545261b        selenium/hub:2.53.0            "/opt/bin/entry_point"   2 minutes ago       Up 2 minutes        0.0.0.0:4444->4444/tcp   selenium-hub
9fe4e406fb50        weaveworks/scope:0.16.0        "/home/weave/entrypoi"   5 minutes ago       Up 5 minutes                                 weavescope

That’s it! Now start your browser and open the URL.

weavescope browser

Real-time log monitoring

You may need to watch different log files on automated test runs. With log.io you can simply monitoring log files via browser! This tutorial shows how easy it is.

Preconditions

Preparation

Create new project with following structure and files.

# create new project LogIO
$ mkdir -p ~/Projects/LogIO/data

# go into new Project
$ cd ~/Projects/LogIO

# create needed files in data
$ touch data/{harvester.conf,log_server.conf,web_server.conf,log.io}

# create Vagrantfile
$ touch Vagrantfile

# show files
$ tree .
.
├── Vagrantfile
└── data
    ├── harvester.conf
    ├── log.io
    ├── log_server.conf
    └── web_server.conf

File contents

# -*- mode: ruby -*-
# vi: set ft=ruby :
Vagrant.require_version ">= 1.8.1"
VAGRANTFILE_API_VERSION = "2"

Vagrant.configure(VAGRANTFILE_API_VERSION) do |config|

  config.vm.box = "centos/7"
  config.vm.network "public_network"
  config.vm.synced_folder "./data", "/vagrant", disabled: false

  config.vm.provider "virtualbox" do |vb|
    vb.name = "LogIO"
    vb.cpus = "2"
    vb.memory = "2048"
    vb.gui = false
  end

  config.vm.provision "shell", inline: <<-SHELL
    # install needed packages
    sudo yum update -y && sudo yum install -y epel-release
    sudo yum install -y vim net-tools npm nodejs
    sudo yum clean all
    # install log.io for user <root>
    sudo npm install -g log.io --user "root"
    # provide custom files for user <root>
    sudo rm -f /root/.log.io/*
    sudo cp /vagrant/*.conf /root/.log.io/
    sudo chown root:root /root/.log.io/*.conf
    # provide init.d for log.io
    sudo cp /vagrant/log.io /usr/local/bin/log.io
    sudo chmod +x /usr/local/bin/log.io
    sudo chown root:root /usr/local/bin/log.io
  SHELL

end

Configure your Harvesters…

exports.config = {
  nodeName: "application_server",
  logStreams: {
    apache: [
      "/var/log/apache2/access.log",
      "/var/log/apache2/error.log"
    ]
  },
  server: {
    // connect to log.io server
    host: '127.0.0.1',
    port: 28777
  }
}

Configure your log server…

exports.config = {
  host: '0.0.0.0',
  port: 28777
}

Configure your web server…

exports.config = {
  host: '0.0.0.0',
  port: 28778,

  /*
  // Enable HTTP Basic Authentication
  auth: {
    user: "admin",
    pass: "1234"
  },
  */

  /*
  // Enable HTTPS/SSL
  ssl: {
    key: '/path/to/privatekey.pem',
    cert: '/path/to/certificate.pem'
  },
  */

  /*
  // Restrict access to websocket (socket.io)
  // Uses socket.io 'origins' syntax
  restrictSocket: '*:*',
  */

  /*
  // Restrict access to http server (express)
  restrictHTTP: [
    "192.168.29.39",
    "10.0.*"
  ]
  */

}

Create simple init script…

#!/bin/bash

start() {
  echo "Starting log.io process..."
  /usr/bin/log.io-server &
  /usr/bin/log.io-harvester &
}

stop() {
  echo "Stopping io-log process..."
  pkill node
}

status() {
  echo "Status io-log process..."
  netstat -tlp | grep node
}

case "$1" in
  start) start;;
  stop) stop;;
  status) status;;
  *) echo "Usage: start|stop|status";;
esac

Usage

# start VM via vagrant
$ vagrant up

# SSH into VM
$ vagrant ssh

# become root
$ sudo su -

# start log.io
$ log.io start

# get ip
$ ip addr

Now open your browser with URL http://<ip>:28778