CURL visualization via httpstat

CURL is awesome … but sometimes the feature for visualization of statistics is missing. Exactly here helps httpstat as an wrapper.

httpstat is available for different languages:

Prepare project

Since I am a Python lover I will also work with my favorite language provided by Xiao Meng. It’s a single file with no dependencies and compatible to Python 2.7 and 3.

# create project folder
$ mkdir -p ~/Projects/httpstat && cd ~/Projects/httpstat

# download python script
$ curl -C - -O https://raw.githubusercontent.com/reorx/httpstat/master/httpstat.py

# change file permission
$ chmod u+x httpstat.py

Usage examples

# show help
$ python httpstat.py --help

# show simple GET statistics
$ python httpstat.py -k https://softwaretester.info/

# show html body (truncated)
$ export HTTPSTAT_SHOW_BODY=true
$ python httpstat.py -k https://softwaretester.info/

# show download and upload speed
$ export HTTPSTAT_SHOW_SPEED=true
$ python httpstat.py -k https://softwaretester.info/

Note: httpstat has a bunch of environment variables, please use help!
TCP port scanner Brutescan

Brutescan is a fast and noisy TCP port scanner written in go.

Preparation

# install git and curl packages
$ sudo apt install -y curl git

# download go (do not install from Debian)
$ curl -O https://storage.googleapis.com/golang/go1.8.linux-amd64.tar.gz

# unzip archive
$ tar xvf go1.8.linux-amd64.tar.gz

# set owner and group (recursive)
$ sudo chown -R root:root go

# move all into target directory
$ sudo mv go /usr/local/

Configure go (for user)

# create hidden go directory
$ mkdir ~/.go

# configure needed paths (inside .bashrc)
$ echo "GOPATH=$HOME/.go" >> ~/.bashrc
$ echo "export GOPATH" >> ~/.bashrc
$ echo "PATH=\$PATH:/usr/local/go/bin:\$GOPATH/bin" >> ~/.bashrc

# reload
$ source ~/.bashrc

# check go version
$ go version
go version go1.8 linux/amd64

Install brutescan

# install packages from github
$ go get github.com/asciimoo/brutescan

# show bombardier help
$ brutescan --help

Usage/Examples

# scan all ports on localhost
$ brutescan localhost
...
Scanning localhost (127.0.0.1)
Port range: 1-65535 (65534 ports)
Concurrent connections: 65512

port 22    open
port 25    open
port 111   open
port 42619 open

Scan finished in 2.970551852s
...

# scan port range with specific concurrent pool size
$ brutescan -pmin 22 -pmax 2000 -pool 100 heise.de
...
Scanning heise.de (193.99.144.80)
Port range: 22-2000 (1978 ports)
Concurrent connections: 100

no open ports found

Scan finished in 1m0.087341111s ...

HTTP benchmarking with Bombardier

Bombardier is a nice HTTP(S) benchmarking tool, written in Go language, for software performance testers.

Preparation

# install git and curl packages
$ sudo apt install -y curl git

# download go (do not install from Debian)
$ curl -O https://storage.googleapis.com/golang/go1.8.linux-amd64.tar.gz

# unzip archive
$ tar xvf go1.8.linux-amd64.tar.gz

# set owner and group (recursive)
$ sudo chown -R root:root go

# move all into target directory
$ sudo mv go /usr/local/

Configure go (for user)

# create hidden go directory
$ mkdir ~/.go

# configure needed paths (inside .bashrc)
$ echo "GOPATH=$HOME/.go" >> ~/.bashrc
$ echo "export GOPATH" >> ~/.bashrc
$ echo "PATH=\$PATH:/usr/local/go/bin:\$GOPATH/bin" >> ~/.bashrc

# reload
$ source ~/.bashrc

# check go version
$ go version
go version go1.8 linux/amd64

Install bombardier

# install packages from github
$ go get -u github.com/codesenberg/bombardier

# show bombardier help
$ bombardier --help

Usage/Examples

# run with 5 connections on 10 sec.
$ bombardier -c 5 -k https://www.heise.de
...
Statistics        Avg      Stdev        Max
  Reqs/sec        32.44      37.83        201
  Latency      152.35ms    72.93ms      1.24s
  HTTP codes:
    1xx - 0, 2xx - 329, 3xx - 0, 4xx - 0, 5xx - 0
    others - 0
  Throughput:     6.18MB/s
...

# run with 10 connections on 5 sec and show latency statistics.
$ bombardier -d 5s -c 10 -l -k https://www.heise.de
...
Statistics        Avg      Stdev        Max
  Reqs/sec        56.51      59.10        251
  Latency      173.10ms   102.95ms      1.32s
  Latency Distribution
     50%   155.83ms
     75%   164.06ms
     90%   174.99ms
     99%   542.91ms
  HTTP codes:
    1xx - 0, 2xx - 294, 3xx - 0, 4xx - 0, 5xx - 0
    others - 0
  Throughput:    10.63MB/s
...


HTTP inspection with Wuzz

Wuzz is a very easy command line tool for HTTP(S) inspection with very much potential. In this tutorial I will show the installation on Debian 8.7 (jessie).

Preparation

# install git and curl packages
$ sudo apt install -y curl git

# download go (do not install from Debian)
$ curl -O https://storage.googleapis.com/golang/go1.8.linux-amd64.tar.gz

# unzip archive
$ tar xvf go1.8.linux-amd64.tar.gz

# set owner and group (recursive)
$ sudo chown -R root:root go

# move all into target directory
$ sudo mv go /usr/local/

Configure go (for user)

# create hidden go directory
$ mkdir ~/.go

# configure needed paths (inside .bashrc)
$ echo "GOPATH=$HOME/.go" >> ~/.bashrc
$ echo "export GOPATH" >> ~/.bashrc
$ echo "PATH=\$PATH:/usr/local/go/bin:\$GOPATH/bin" >> ~/.bashrc

# reload
$ source ~/.bashrc

# check go version
$ go version
go version go1.8 linux/amd64

Install wuzz

# install packages from github
$ go get github.com/asciimoo/wuzz

# check wuzz version
$ wuzz --version wuzz 0.2.0

# show wuzz help
$ wuzz --help

# simple run
$ wuzz

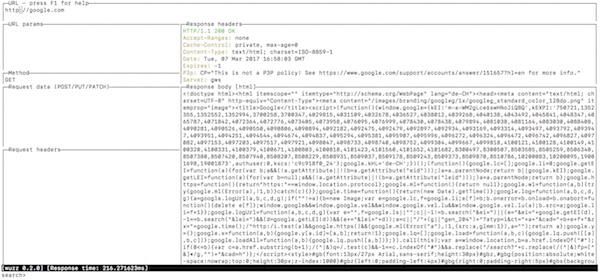
If everything is going well, the terminal should look like this and you can start.

example wuzz cli

Command-line fake data generator

In my search for a command-line fake data generator I’ve found phony. What can I say, the tool does exactly what it should! After installation, you no longer need to leave the terminal.

Installation

# install go and git (Debian 8)
$ apt-get install -y golang git

# set GOPATH environment variable for workspace
$ mkdir ~/.go
$ echo "GOPATH=$HOME/.go" >> ~/.bashrc
$ echo "export GOPATH" >> ~/.bashrc
$ echo "PATH=\$PATH:\$GOPATH/bin" >> ~/.bashrc
$ source ~/.bashrc

# install phony
$ go get github.com/yields/phony

# verfiy installation
$ phony --version

Usage

# show help
$ phony --help

# list phony generators
$ phony --list

# generate 10 e-mails
$ echo '{{email}}' | phony --max 10

# generate 5 users (first name, last name)
$ echo 'User: {{name.first}} {{name.last}}' | phony --max 5

There is more! Look at the examples!