Kickstart Configurator

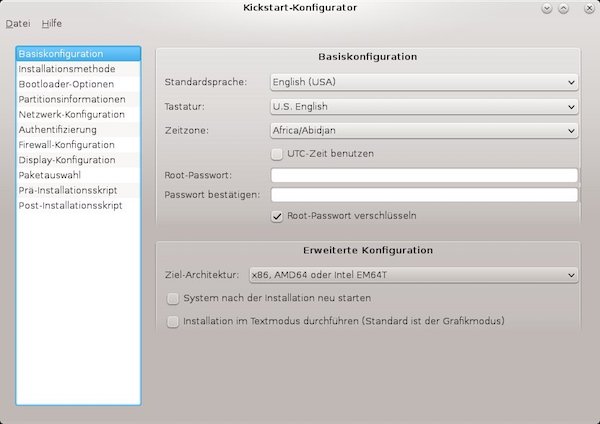
With kickstart configurator you don`t need to remember the correct syntax of kickstart files. An graphical user interface helps to create or to edit kickstart files on the fly.

Preparation

# install KDE
$ yum groupinstall -y "KDE Plasma Workspaces"

# install kickstart configurator
$ yum install -y system-config-kickstart

# start KDE
$ startx

Note: Of course you can also use Gnome, Cinnamon, MATE or Xfce!

Usage

To start the kickstart configurator search the application “Kickstart” [Applications => System Tools => Kickstart] or run terminal command:

# start kickstart configurator
$ system-config-kickstart
Kickstart-Konfigurator

Note: Via [File => Preview] you can review your current selections before saving.

Validation

After the creation, you should check the kickstart file!

# install pykickstart
$ yum install -y pykickstart

# start validate a kickstart file
$ ksvalidator </path/to/kickstart file>

Explain Shell direct from terminal

Explainshell.com rocks! Nevertheless, you lose time to leave the terminal (open browser, copy-paste). But there is a cool solution from ManKier. All what you need is curl.

Usage

# curl request for whoami
$ curl -Gs "https://www.mankier.com/api/explain/?cols="$(tput cols) --data-urlencode "q=whoami"

# curl request for df -h
$ curl -Gs "https://www.mankier.com/api/explain/?cols="$(tput cols) --data-urlencode "q=df -h"

Simpler usage

With a tiny script it will be more comfortable! Add the following to your .bashrc or .bash_profile (MAC OS X).

# explain.sh begins
explain () {
	if [ "$#" -eq 0 ]; then
		while read  -p "Command: " cmd; do
			curl -Gs "https://www.mankier.com/api/explain/?cols="$(tput cols) --data-urlencode "q=$cmd"
		done
		echo "Bye!"
	elif [ "$#" -eq 1 ]; then
		curl -Gs "https://www.mankier.com/api/explain/?cols="$(tput cols) --data-urlencode "q=$1"
	else
		echo "Usage"
		echo "explain                  interactive mode."
		echo "explain 'cmd -o | ...'   one quoted command to explain it."
	fi
}

Now you can do …

# explain one command
$ explain 'df -h'
...
df(1)
  df displays the amount of disk space available on the file system containing each file name
  argument. If no file name is given, the space available on all currently mounted file systems is
  shown. Disk space is shown in 1K blocks by default, unless the environment variable
  POSIXLY_CORRECT is set, in which case 512-byte blocks are used. If an argument is the absolute
  file name of a disk device node containing a mounted file system, df shows the space available on
  that file system rather than on the file system containing the device node. This version of df
  cannot show the space available on unmounted file systems, because on most kinds of systems doing
  so requires very nonportable intimate knowledge of file system structures.

  -h (-H, --HUMAN-READABLE)
    print sizes in powers of 1024 (e.g., 1023M)

… if you insert only “explain” an interactive mode will started!

Create private vagrant box repository

For various reasons it may happen that the public Vagrant box repository should not be used. But Vagrant boxes should be available on the internal network. In addition, these boxes are to be versioned. With a few steps, this can be realized by Nginx.

Preparation

Nginx

# install epel-release
$ yum install -y epel-release && yum update -y

# install nginx, and additional tools
$ yum install -y nginx vim tree

# configure nginx to be automatically started at boot 
$ systemctl enable nginx

# start nginx
$ systemctl start nginx

# create new folders
$ mkdir -p /usr/share/nginx/html/devops/vagrant/boxes

# set access rights
$ chmod 755 -R /usr/share/nginx/html/devops/

# create JSON file
$ touch /usr/share/nginx/html/devops/vagrant/centos.json

# show current state
$ tree /usr/share/nginx/html/devops/
/usr/share/nginx/html/devops/
└── vagrant
    ├── boxes
    │ └── CentOS7.box
    └── centos.json

# get sha1 checksum from box
$ sha1sum /usr/share/nginx/html/devops/vagrant/boxes/CentOS7.box

# edit JSON file
$ vim /usr/share/nginx/html/devops/vagrant/centos.json

# edit nginx conf
$ vim /etc /nginx/nginx.conf

# check nginx config
$ nginx -t

# restart nginx
$ systemctl restart nginx

# enter permissive mode
$ setenforce 0
{
    "name": "demo/centos7",
    "description": "This box contains CentOS 7 64-bit.",
    "versions": [{
        "version": "0.1.0",
        "providers": [{
                "name": "virtualbox",
                "url": "http://<target>/devops/vagrant/boxes/CentOS7.box",
                "checksum_type": "sha1",
                "checksum": "99e6d7fc44cccabdfc6ed9ce178ca65fd9dcbac8"
        }]
    }]
}
...

# resolve vagrant json file(s)
location ~ ^/devops/vagrant/$ {
    index $1.json;
    try_files $uri $uri/ $1.json =404;
    autoindex off;
}
# enable auto indexing for boxes
location ~ ^/devops/vagrant/boxes/$ {
    try_files $uri $uri/ =404;
    autoindex on;
    autoindex_exact_size on;
    autoindex_localtime on;
}
# serve json with specific header
    location ~ \.json$ {
    add_header Content-Type application/json;
}
# serve box(s) with specific header
location ~ \.box$ {
    add_header Content-Type application/octet-stream;
}

...

Client

On your browser check following URL`s before proceeding: http://<target>/devops/vagrant/centos.json and http://<target>/devops/vagrant/boxes/

# create project directory
$ mkdir ~/tutorial && cd ~/tutorial

# add base box repository
$ vagrant box add demo/centos7 http://<target>/devops/vagrant/centos.json

# list all boxes
$ vagrant box list
demo/centos7  (virtualbox, 0.1.0)

# create Vagrant project
$ vagrant init demo/centos7

Nginx (Part 2)

# edit JSON file
$ vim /usr/share/nginx/html/devops/vagrant/centos.json

Attention! I use for this demonstration the same box!

{
    "name": "demo/centos7",
    "description": "This box contains CentOS 7 64-bit.",
    "versions": [{
        "version": "0.1.0",
        "providers": [{
                "name": "virtualbox",
                "url": "http://<target>/devops/vagrant/boxes/CentOS7.box",
                "checksum_type": "sha1",
                "checksum": "99e6d7fc44cccabdfc6ed9ce178ca65fd9dcbac8"
        }]
    },{
        "version": "0.1.1",
        "providers": [{
                "name": "virtualbox",
                "url": "http://<target>/devops/vagrant/boxes/CentOS7.box",
                "checksum_type": "sha1",
                "checksum": "99e6d7fc44cccabdfc6ed9ce178ca65fd9dcbac8"
        }]
    }]
}

Client (Part 2)

# check box version
$ vagrant box outdated
A newer version of the box 'demo/centos7' is available! You currently
have version '0.1.0'. The latest is version '0.1.1'. Run
`vagrant box update` to update.

You can add now more boxes with different JSON files!
Limit kernels on RHEL, CentOS and Fedora

As a software tester or developer you are using operating systems such as RHEL, CentOS and Fedora. It may happen that the hard disk space is running at the limit and a further update is no longer possible. An easy way to create free space is to delete the kernel(s) of older versions.

Steps

# check for all (old) kernels
$ rpm -q kernel

By default 5 kernels will be stored.

Change configuration

# change configuration
$ vim yum.conf

# limit value and save
installonly_limit=2

# update
$ yum -y update

Delete unused (old) kernels

# install yum-utils
$ yum install yum-utils

# cleanup with value for old kernels you want left
$ package-cleanup --oldkernels --count=2