macOS internet connection and service order

Many times I’v got asked (directly, via messages or forums) why the macOS internet connection does not work anymore, while using devices like Shark Jack, O.MG Cable and so on. In my tutorials I also did not mention this in detail, because I assumed this should be clear. A big mistake from my side. Therefore now this article. I will now do my best to explain, using a few examples, how to prioritize the services so that you do not lose your internet connection from your macOS. I will use the internet connection via Wifi hotspot.

Note: I show here an specific example for Shark Jack now. But main target is that you understand and can reuse your knowledge also for different other situations.

Network locations

The first part is about macOS network locations. To not destroy your current settings, we will create a new network location (all via command line).

Warning: The following steps will disconnect your internet connection (briefly), because the new created network location is not populated. Read the tutorial carefully before you execute any command!

# list all network locations
$ networksetup -listlocations

# show name of the current location
$ networksetup -getcurrentlocation

# create new location (SharkJackNetwork)
$ networksetup -createlocation SharkJackNetwork

# change location
$ networksetup -switchtolocation SharkJackNetwork

# lists network interfaces (should be empty)
$ networksetup -listallnetworkservices

Services

The newly created network location does not contain any service now. In the next second part we create two (Wifi and Bluetooth), set own DNS server and test. If you have stored your Wifi credentials (see Keychain Access.app), the internet connection will automatically established again.

# list all hardware ports with corresponding device name and port
$ networksetup -listallhardwareports

# create WI-FI service (named WLAN)
$ networksetup -createnetworkservice WLAN "WI-FI"

# create Bluetooth PAN service (named Bluetooth)
$ networksetup -createnetworkservice Bluetooth "Bluetooth PAN"

# lists network interfaces (WLAN and Bluetooth)
$ networksetup -listallnetworkservices

# add dns server (to WLAN)
$ networksetup -setdnsservers WLAN 8.8.8.8 8.8.4.4

# verify DNS settings (optional)
$ dig +all example.com

My MacBook Pro does not provide an RJ45 interface (only USB-C). Therefore I buyed a Multi-Port-Adapter from Satechi. After plug in, I add this device now to my services. There are many other vendors as well, for such please choose your own name.

# list all hardware ports with corresponding device name and port
$ networksetup -listallhardwareports

# create adapter service (named Satechi)
$ networksetup -createnetworkservice Satechi "USB 10/100/1000 LAN"

Now it’s time to use Shark Jack. Turn it on (arming mode), plug into adapter, wait for IP and test. If you haven’t changed it, the default IP is “172.16..24.1”, the user is “root” and password is “hak5shark”.

# wait for IP
$ ifconfig en8

# run command over SSH
$ ssh -C4 root@172.16.24.1 -C 'pwd'

# ping google dns
$ ping -c 1 google.com

The internet connection is not working anymore but Wifi seems working correctly!

Service order

Now it comes to the order of all services (prioritization). Here we ensure that internet connection works again.

# show services in the order they are contacted for a connection
$ networksetup -listnetworkserviceorder

# command to designate the order network services are contacted
$ networksetup -ordernetworkservices WLAN Satechi Bluetooth

# ping google dns
$ ping -c 1 google.com

All good now … The newly created network location (incl. services) can be used as soon you develop your Shark Jack payloads. Specific to your environment needs, you can create and use many of these network locations (to quickly switch between).
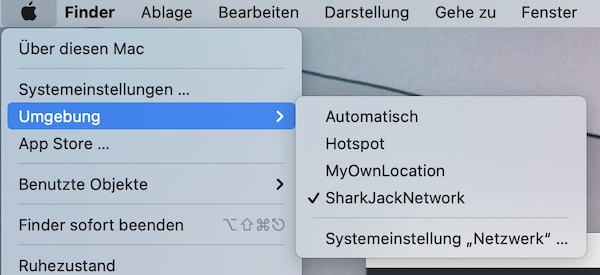
macOS network locations via gui

First steps with Shark Jack

After you receive your new Shark Jack device from Hak5, you need to upgrade the Firmware. This tiny tutorial will guide you through the process. You should plan a maximum of 10 minutes of your life for this action.

Preparation

Enable the Arming mode (middle switch position) and connect with your RJ45 interface, also connect USB-C for charging. Do not stop charging while the whole upgrade process! In case your local device does not provide such interface, I have really good experience with the multiport adapter from SATECHI.

Download and install latest Firmware

The default settings for your new Shark Jack are:

  • IP: 172.16.24.1 (Arming mode)
  • User: root
  • Password: hak5shark

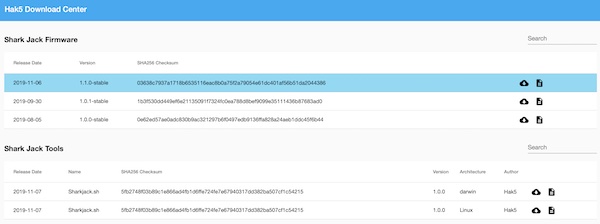
Download latest Shark Jack Firmware from here.

Hak5  Download Center - SharkJack
# download Firmware (via command line)
$ curl -L -C - https://downloads.hak5.org/api/devices/sharkjack/firmwares/1.1.0-stable -o ~/Downloads/upgrade-1.1.0.bin

# verify SHA256 checksum (optional)
$ shasum -a 256 ~/Downloads/upgrade-1.1.0.bin

# copy Firmware from local to Shark Jack device
$ scp -C4 ~/Downloads/upgrade-1.1.0.bin root@172.16.24.1:/tmp/

# SSH into SharkJack device
$ ssh -C4 root@172.16.24.1

# list directory content (optional)
root@shark:~# ls -la

# show current version
root@shark:~# cat VERSION
1.0

# start update
root@shark:~# sysupgrade -n /tmp/upgrade-1.1.0.bin

Now be patient and do not remove the Shark Jack from RJ45 or the USB-C for charging! The device installs the new firmware and reboots. For me it was around 3 – 4 minutes.

# check interface status (optional)
$ ifconfig

# SSH into Shark Jack device
$ ssh -C4 root@172.16.24.1

# show current version
root@shark:~# cat VERSION
1.1.0

That’s it … have fun and success.

Wifi Pineapple and SSLsplit

Many people complain about that they are not able to run SSLsplit on Wifi Pineapple. As you may know from my previous Pineapple tutorials, I will try to explain the solution now, without the usage of any additional module. All needed steps for installation, configuration and execution need the enabled internet sharing!

Objectives

In this example you will learn how to setup and run SSLsplit on Wifi Pineapple.

Step 1: install needed packages

SSH into Wifi Pineapple device and install all needed software with Opkg Package Manager.

# update list of available packages
$ opkg update

# install needed packages
$ opkg install sslsplit
$ opkg install openssl-util
$ opkg install libevent2
$ opkg install libevent2-core
$ opkg install libevent2-extra
$ opkg install libevent2-openssl
$ opkg install libevent2-pthreads

Step 2: create directories and configurations

Like the module would create directories and configuration files, we do exactly the same. So we could install the module later, too.

# create need folders
$ mkdir -p /pineapple/modules/SSLsplit/cert
$ mkdir -p /pineapple/modules/SSLsplit/rules
$ mkdir -p /pineapple/modules/SSLsplit/log

# create iptables and openssl.cnf files
$ vi /pineapple/modules/SSLsplit/rules/iptables
$ vi /pineapple/modules/SSLsplit/cert/openssl.cnf

# create sslsplit configuration
$ touch /etc/config/sslsplit

# add content
$ echo "config sslsplit 'module'" > /etc/config/sslsplit

# check if ip4 forward is enabled
$ cat /proc/sys/net/ipv4/ip_forward

# enable ip4 forward (if not enabled)
$ echo '1' > /proc/sys/net/ipv4/ip_forward

# show help (optional)
$ sslsplit -h

The content of iptables

##################################################################
# Certain packets are redirected to the local port 8080 and 8443 #
##################################################################

## Plain text HTTP traffic (80) is redirected to port 8080
iptables -t nat -A PREROUTING -p tcp --dport 80 -j REDIRECT --to-ports 8080

## WhatsApp (5222) is redirected to port 8080
iptables -t nat -A PREROUTING -p tcp --dport 5222 -j REDIRECT --to-ports 8080

## SSL-based HTTPS traffic (443) is redirected to port 8443
iptables -t nat -A PREROUTING -p tcp --dport 443 -j REDIRECT --to-ports 8443

## IMAP over SSL (993), SMTP over SSL (465 and 587) is redirected to port 8443
iptables -t nat -A PREROUTING -p tcp --dport 587 -j REDIRECT --to-ports 8443
iptables -t nat -A PREROUTING -p tcp --dport 465 -j REDIRECT --to-ports 8443
iptables -t nat -A PREROUTING -p tcp --dport 993 -j REDIRECT --to-ports 8443

The content of openssl.cnf

#
# OpenSSL configuration file.
#

dir						= .

[ req ]
distinguished_name = reqdn

[ reqdn ]

[ v3_ca ]
basicConstraints        = CA:TRUE
subjectKeyIdentifier    = hash
authorityKeyIdentifier  = keyid:always,issuer:always

Step 3: generate needed certificates

# generate an RSA private key
$ openssl genrsa -out /pineapple/modules/SSLsplit/cert/certificate.key 1024

# generat PKCS#10 certificate
$ openssl req -new -nodes -x509 -sha1 -out /pineapple/modules/SSLsplit/cert/certificate.crt -key /pineapple/modules/SSLsplit/cert/certificate.key -config /pineapple/modules/SSLsplit/cert/openssl.cnf -extensions v3_ca -subj '/O=SSLsplit Root CA/CN=SSLsplit Root CA/' -set_serial 0 -days 3650

# verify files generated (optional)
$ ls -la /pineapple/modules/SSLsplit/cert/

Step 4: finalize installation and configuration

These steps are optional but are recommended.

# set UCI values
$ uci set sslsplit.module.installed=1

# write UCI changes
$ uci commit sslsplit.module.installed

# show UCI configuration (optional)
$ uci show sslsplit

# reboot wifi pineapple device
$ reboot

Step 5: set iptables

The following content describes how you need to configure the iptables before you start SSLsplit.

# save current iptables rules
$ iptables-save > /pineapple/modules/SSLsplit/rules/saved

# clean iptables
$ iptables -X
$ iptables -F
$ iptables -t nat -F
$ iptables -P INPUT ACCEPT
$ iptables -P FORWARD ACCEPT
$ iptables -P OUTPUT ACCEPT

# add rules
$ sh /pineapple/modules/SSLsplit/rules/iptables

$ iptables -t nat -A POSTROUTING -j MASQUERADE

Step 6: run SSLsplit

# execute sslsplit
$ sslsplit -D -l /pineapple/modules/SSLsplit/connections.log -L /pineapple/modules/SSLsplit/log/output.log -k /pineapple/modules/SSLsplit/cert/certificate.key -c /pineapple/modules/SSLsplit/cert/certificate.crt ssl 0.0.0.0 8443 tcp 0.0.0.0 8080

# tail log files (optional)
$ tail -f /pineapple/modules/SSLsplit/connections.log /pineapple/modules/SSLsplit/log/output.log

Step 7: restore iptables

After you’r done, the following content show how to restore the iptables.

# clean iptables
$ iptables -F
$ iptables -X
$ iptables -t nat -F
$ iptables -t nat -X
$ iptables -t mangle -F
$ iptables -t mangle -X
$ iptables -P INPUT ACCEPT
$ iptables -P FORWARD ACCEPT
$ iptables -P OUTPUT ACCEPT

# restore iptables rules
$ iptables-restore < /pineapple/modules/SSLsplit/rules/saved

Share internet from macOS to Wifi Pineapple

I have been using the Wifi Pineapple Nano by Hak5 for a long time. What can I say – very, very cool tiny device. Since I am also a macOS user, I would like to show in this tutorial how I share my internet (Wifi to USB). There are various options but with this I have currently achieved the best results.

Important: You should carry out all firmware upgrades beforehand, since the settings (which I will show you soon) will be overwritten again.

Objectives

I would like to connect my Macbook to the Internet via WiFi and then make it available to the Wifi Pineapple via USB. So here both devices should be able to use the Internet without network conflicts.

Change Wifi Pineapple network

# show interface configuration (optional)
$ ifconfig

# connect to Pineapple device via SSH
$ ssh root@172.16.42.1

# backup network file
$ cp /etc/config/network /etc/config/network.bak

# show all settings (optional)
$ uci show

# show network settings (optional)
$ uci show network

# change ip with UCI configuration tool
$ uci set network.lan.ipaddr='192.168.2.10'

# change gateway with UCI configuration tool
$ uci set network.lan.gateway='192.168.2.1'

# save changes
$ uci commit

# reboot device
$ reboot

The first steps of the configuration have been carried out. However, you still cannot connect to the device or share the internet!

Modify macOS network configuration

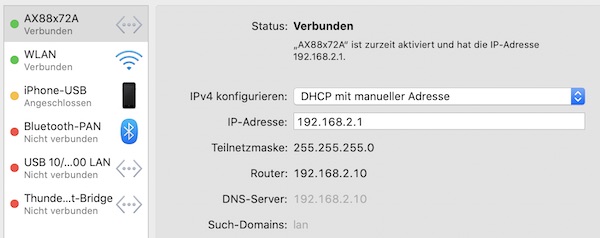
Now you have to configure the macos network dhcp with manual address (network.lan.gateway 192.168.2.1). To do this, open the network settings and select the Wifi Pineapple (AX88x72A). Select “DHCP with manual address” in the dropdown and assign the IP (next to Configure IPv4).

Configure device as DHCP with manual address.

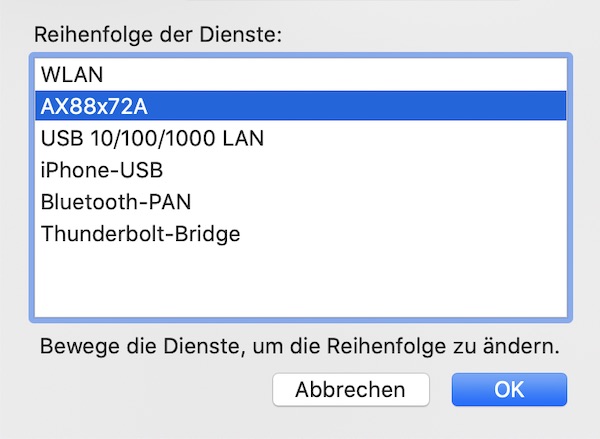
You should also change the arrangement of your available network connections (devices). Click the gear icon and select “Set Service Order”. At the top should be the standard wifi followed by Wifi Pineapple.

set service order

After a short time, the settings should have been accepted.

Wifi to USB internet sharing

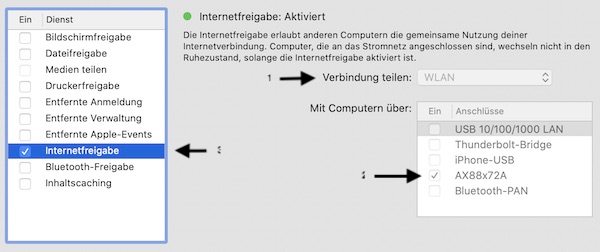
Now we are making the internet available from Wifi to Wifi Pineapple (USB). Launch Internet Sharing under System Preferences. On “Share your connection from” select the Wifi and on “To computers using” select the Wifi Pineapple.

share internet from Wifi to USB

Done … let’s verify all configurations.

# show interface configuration (optional)
$ ifconfig

# connect to Pineapple via SSH
$ ssh root@192.168.2.10

# run simple ping (optional)
$ ping -c 1 google.com

# exit SSH connection to Pineapple
$ exit

# open browser
$ open http://192.168.2.10:1471

Note: The Browser URL is now http://192.168.2.10:1471 (network.lan.ipaddr 192.168.2.10)!

After login you can go to the Dashboard and check “Bulletins” which should show the latest news from wifipineapple.com.