Vagrant and YAML

Ruby`s stdlib provides an YAML module for data serialization. By using this module, we can create only one Vagrantfile which reads the configuration from YAML files. If you are thinking of build servers – so only YAML files are needed for generating complete environments.

Preconditions

Preparation

# create new directory
$ mkdir ~/Projects/Tutorial && cd ~/Projects/Tutorial

# create new files
$ touch Vagrantfile && touch server-config.yml

# list available BaseBoxes (optional)
$ vagrant box list

# edit Vagrantfile
$ vim Vagrantfile

# edit server-config.yml
$ vim server-config.yml
# -*- mode: ruby -*-

require 'yaml'
servers = YAML.load_file('server-config.yml')
API_VERSION = "2"

Vagrant.configure(API_VERSION) do |config|

  servers.each do |servers|

    config.vm.define servers["name"] do |machine|

      machine.vm.box = servers["box"]
      machine.vm.network :forwarded_port, guest: 22, host: servers["ssh"], id: 'ssh'
      
      machine.vm.provider :virtualbox do |vb|
        vb.name = servers["name"]
        vb.memory = servers["memory"]
        vb.cpus = servers["cpus"]
      end

    end

  end

end
---
- name: box_centos7_a
  box: lupin/centos7
  ssh: 2221
  memory: 1024
  cpus: 2
- name: box_centos7_b
  box: lupin/centos7
  ssh: 2222
  memory: 1024
  cpus: 2

Usage

# start run
$ vagrant up

# check status
$ vagrant status

# SSH example
$ vagrant ssh [name]
Create desktop environments on the fly

In this tutorial we will create desktop environments via docker on the fly. This environments could be used for development and/or testing purposes. For example you could expand it with Selenium-Grid nodes or provide manual testers all they need.

Preconditions

Steps

# create new VM
$ docker-machine create -d virtualbox xserver

# ssh into VM
$ docker-machine ssh xserver

# create Dockerfile
$ vi Dockerfile
FROM centos:centos7

MAINTAINER Lupin3000

RUN yum update -y
RUN yum install -y epel-release
RUN yum install -y x2goserver x2goserver-xsession
RUN yum groupinstall -y Xfce
RUN yum install -y firefox

RUN /usr/bin/ssh-keygen -t rsa -f /etc /ssh/ssh_host_rsa_key -N ''
RUN /usr/bin/ssh-keygen -t ecdsa -f /etc /ssh/ssh_host_ecdsa_key -N ''
RUN /usr/bin/ssh-keygen -t ed25519 -f /etc /ssh/ssh_host_ed25519_key -N ''

RUN adduser testuser
RUN echo 'testuser:test123' | chpasswd
RUN echo 'root:test123' | chpasswd

EXPOSE 22

CMD ["/usr/sbin/sshd", "-D"]

* Note: the space after etc is because of the security settings of my provider!

# build Docker image from Dockerfile
$ docker build -t centos7/xserver .

# run Docker container from image
$ docker run -p 2222:22 -d --name centos7-xserver centos7/xserver

Connect with x2go client

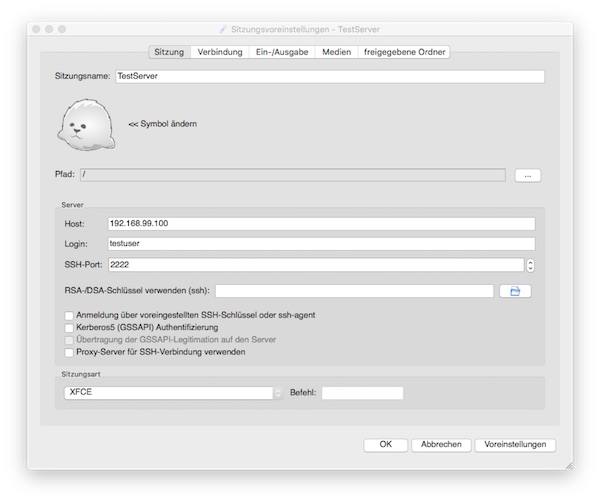
The following example shows the client configuration. Important are values ​​for host (192.168.99.100), port (2222) and session type (XFCE).

x2go client settings

Now it’s up to you to add more users, tools etc. – or to integrate everything into a build process.

Multiple hosts provisioning with Vagrant, Ansible and virtualenv

In this tutorial we use Ansible (installed in virtualenv) and Vagrant. Furthermore, we have different machines (Debian, CentOS). For all hosts we want to have Provisioning on startup and via command.

Precondition

Folder structure

.
├── Makefile
├── Vagrantfile
├── playbook.yml
├── requirements.txt
└── roles
    └── common
        └── tasks
            └── main.yml

Files

ansible
ansible-lint
VAGRANTFILE_API_VERSION = "2"
 
Vagrant.configure(VAGRANTFILE_API_VERSION) do |config|

  # CentOS 7 VM
  config.vm.define "centos" do |centos|
    centos.vm.box = "lupin/centos7"
    centos.vm.network :forwarded_port, guest: 22, host: 2221, id: 'ssh'
    centos.vm.provider "virtualbox" do |vb|
       vb.name = "CentOS7-Vagrant-Ansible"
    end
    centos.vm.provision "ansible" do |ansible|
        # ansible.verbose = "v"
        ansible.playbook = "playbook.yml"
    end
  end

  # Debian 8 VM
  config.vm.define "debian" do |debian|
    debian.vm.box = "lupin/debian8"
    debian.vm.network :forwarded_port, guest: 22, host: 2222, id: 'ssh'
    debian.vm.provider "virtualbox" do |vb|
       vb.name = "Debian-Vagrant-Ansible"
    end
    debian.vm.provision "ansible" do |ansible|
        # ansible.verbose = "v"
        ansible.playbook = "playbook.yml"
    end
  end

end
---
- hosts: all
  become: yes
  gather_facts: yes
  roles:
    - common
---
- debug: msg="System {{ ansible_distribution }}"
ENV_DIR = env
CURRENT_DIR := $(shell pwd)
INTERPRETER = $(CURRENT_DIR)/$(ENV_DIR)/bin/
PATH := ${PATH}:$(INTERPRETER)

help:
	@echo "Run make <target> with:"
	@echo " > env           : create virtualenv on folder $(ENV_DIR)"
	@echo " > deps          : install dependentcies"
	@echo " > cleanenv      : delete virtualenv"
	@echo " > start         : run vagrant up"
	@echo " > provisioning  : start ansible provisioning"
	@echo " > kill          : run vagrant destroy"

debug:
	@echo " > ansible location is     : $(INTERPRETER)"
	@echo " > environment variable is : $(PATH)"
	vagrant status

env:
	virtualenv $(ENV_DIR) && \
	. $(ENV_DIR)/bin/activate && \
	make deps

deps:
	$(ENV_DIR)/bin/pip install -r requirements.txt

cleanenv:
	rm -fr $(ENV_DIR)

start:
	vagrant up

provisioning:
	vagrant provision

kill:
	vagrant destroy -f

Usage

# create environment
$ make env

# start vagrant (create VM`s and run provisioning)
$ make start

# run provisioning (on started VM`s)
$ make provisioning

# stop vagrant (delete VM`s)
$ make kill

# delete environment
$ make cleanenv

Hint

Check out the by Vagrant generated inventory file!

$ cat .vagrant/provisioners/ansible/inventory/vagrant_ansible_inventory

PyCharm, Vagrant and Ansible

This tutorial is about the interaction of PyCharm (Community Edition), Vagrant and Ansible. I want to show how you can simplify your daily work.

Preconditions

The disclosures in the brackets are my current versions. Mac OS X user need to have Command Line Tools installed!

Folder and file structure

.
├── Makefile
├── Vagrantfile
├── inventory
├── playbook.yml
└── roles
    └── common
        └── tasks
            └── main.yml

File contents

help:
	@echo "Run make <target> with:"
	@echo " > start         : to create vm via vagrant"
	@echo " > provisioning  : to start ansible on vm"
	@echo " > kill          : to stop and destroy vm"

start:
	vagrant up

provisioning:
	ansible-playbook -i inventory playbook.yml

kill:
	vagrant destroy -f
VAGRANTFILE_API_VERSION = "2"

Vagrant.configure(VAGRANTFILE_API_VERSION) do |config|
  config.vm.box = "demo/centos7"
  config.vm.provider "virtualbox" do |vb|
     vb.name = "Vagrant-Ansible"
  end
  config.vm.provision "ansible" do |ansible|
      # ansible.verbose = "v"
      ansible.playbook = "playbook.yml"
  end
end
[vagrant-example]
127.0.0.1 ansible_ssh_user=vagrant ansible_ssh_port=2222 ansible_ssh_private_key_file=.vagrant/machines/default/virtualbox/private_key
---
- hosts: all
  become: yes
  gather_facts: yes
  roles:
    - common
---
- name: upgrade all packages via yum
  yum: name=* state=latest
  when: (ansible_distribution == 'CentOS') or
        (ansible_distribution == 'Red Hat Enterprise Linux')
  tags:
    - common

- name: upgrade all packages via apt
  apt: upgrade=dist
  when: (ansible_distribution == 'Debian') or
        (ansible_distribution == 'Ubuntu')
  tags:
    - common

Little hint

If you do not know the path for ansible_ssh_private_key_file, just type $ vagrant ssh-config!

PyCharm – External Tools

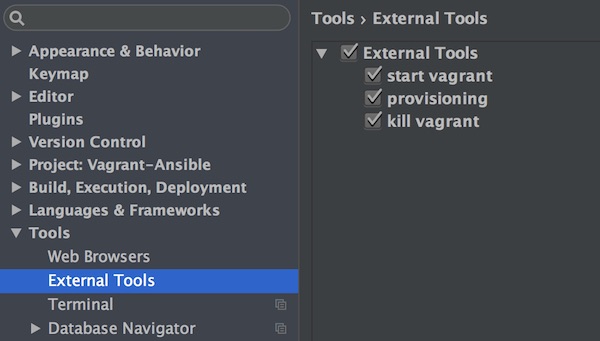
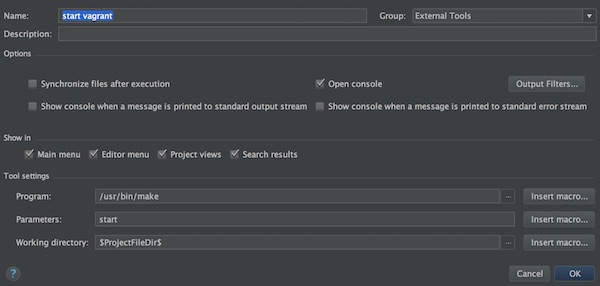
In the last step we configure the PyCharm (External Tools). We do this for every command from Makefile exept help.

PyCharm-ExternalTool Configuration

PyCharm Make Commands

Create vagrant box from CentOS 7 VirtualBox

This time I will show you, how to create a basic Vagrant box from a CentOS 7 VirtualBox. Caution, use only for educational purposes and not for productive environments!

Preparation

Network configuration

On VirtualBox select mode “NAT” or “Bridged”.

$ vi /etc /sysconfig/network-scripts/ifcfg-enp0s3
$ service network restart

Install virtualbox guest additions 

# Update
$ yum update -y

# Install development tools
$ yum groupinstall -y "Development Tools"

# restart vm
$ reboot

# insert cd
# Devices -> Install Guest Additions

# mount cd
$ mount /dev/cdrom /mnt

# start guest additions installation
$ sh /mnt/VBoxLinuxAdditions.run --nox11

Prepare Vagrant SSH access

# Edit sudoers file to disable requiretty
$ visudo

# Defaults    requiretty

# add user vagrant 
$ useradd vagrant

# set password for user vagrant (vagrant)
$ passwd vagrant

# create vagrant sudoers file 
$ visudo -f /etc /sudoers.d/vagrant

vagrant ALL=(ALL) NOPASSWD:ALL

# change to user vagrant
$ su - vagrant

# create ssh folder with access rights
$ mkdir .ssh && chmod 0700 .ssh && cd .ssh

# create authorized_keys file
$ echo "ssh-rsa AAAAB3NzaC1yc2EAAAABIwAAAQEA6NF8iallvQVp22WDkTkyrtvp9eWW6A8YVr+kz4TjGYe7gHzIw+niNltGEFHzD8+v1I2YJ6oXevct1YeS0o9HZyN1Q9qgCgzUFtdOKLv6IedplqoPkcmF0aYet2PkEDo3MlTBckFXPITAMzF8dJSIFo9D8HfdOV0IAdx4O7PtixWKn5y2hMNG0zQPyUecp4pzC6kivAIhyfHilFR61RGL+GPXQ2MWZWFYbAGjyiYJnAmCP3NOTd0jMZEnDkbUvxhMmBYSdETk1rRgm+R4LOzFUGaHqHDLKLX+FIPKcF96hrucXzcWyLbIbEgE98OHlnVYCzRdK8jlqm8tehUc9c9WhQ== vagrant insecure public key" > authorized_keys

# set access rights for authorized_keys file
$ chmod 0600 authorized_keys

# clear history and switch back to root user
$ history -c && exit

# clear history and shutdown
$ history -c && shutdown -h 0

Create Vagrant box

# create new folder for Vagrant project and change into VM folder
$ mkdir ~/VagrantProject && cd ~/VirtualBox\ VMs/

# create base box from VM
$ vagrant package --base CentOS7 --output ~/VagrantProject/CentOS7.box

# change back to Vagrant project folder
$ cd ~/VagrantProject

# add box
$ vagrant box add lupin/centos7 CentOS7.box

# check vagrant boxes
$ vagrant box list

Create project and start with work

# create project
$ vagrant init lupin/centos7

# edit vagrantfile 
$ vim Vagrantfile

  config.vm.provision "shell", inline: <<-SHELL
     sudo yum update -y
     sudo yum install -y vim tree
  SHELL

# creates and configures guest machine 
$ vagrant up

# SSH into a running Vagrant machine
$ vagrant ssh

# ... do your stuff ...

# stop Vagrant machine
$ vagrant halt

MDK3 and CentOS 7

Last time i showed you, how to install Aircrack-ng. This time we will install MDK3 on CentOS 7.

Preparation

Installation

# install needed software
$ yum install -y wget bzip2

# download mdk3
$ wget http://aspj.aircrack-ng.org/mdk3-v6.tar.bz2

# unzip mdk3
$ bzip2 -cd mdk3-v6.tar.bz2 | tar xvd -

# compiling
$ cd d mdk3-v6/
$ make
$ mv mdk3 /usr/local/bin/
$ make clean

Usage

# create text-file with fake AP`s
$ echo -e "the force is with you\ncheck me\nhave fun" > fakeAP

# kill interfering processes
$ airmon-ng check kill

# set interface into monitor mode (my interface is wlp0s11u1)
$ airmon-ng start wlp0s11u1

# start mdk3 to create fake AP`s
$ mdk3 wlp0s11u1mon b -f fakeAP

pylint and lxml

If you use Python virtualenv, pylint and lxml together, you may see error messages in pylint test results. It`s because only trusted C extension resources (the standard library) should be used. Here is an opportunity to improve the pylint test results.

Generate a .pylintrc file

# generate .pylintrc file
$ pylint --generate-rcfile > .pylintrc

Open the .pylintrc file to edit

# open with vim editor
$ vim .pylintrc

Add lxml to extension-pkg-whitelist

# A comma-separated list of package or module names from where C extensions may
# be loaded. Extensions are loading into the active Python interpreter and may
# run arbitrary code
extension-pkg-whitelist=lxml

If you now perform the pylint test again, no error relating to lxml should appear.

Simple lint for Markdown

With Markdownlint you can quickly check your own *.md files. You can use that tool for automation in your build environment.

Installation

# install via gem
$ sudo gem install mdl

# install via gem (Mac OS 10.11 - El Capitan)
$ sudo gem install -n /usr/local/bin mdl

# check version
$ mdl --version

Usage

The use of Markdownlint is very easy.

# scan a markdown file
$ mdl path/to/file.md

# scan a folder with different markdown files
$ mdl path/to/folder