pylint and lxml

If you use Python virtualenv, pylint and lxml together, you may see error messages in pylint test results. It`s because only trusted C extension resources (the standard library) should be used. Here is an opportunity to improve the pylint test results.

Generate a .pylintrc file

# generate .pylintrc file
$ pylint --generate-rcfile > .pylintrc

Open the .pylintrc file to edit

# open with vim editor
$ vim .pylintrc

Add lxml to extension-pkg-whitelist

# A comma-separated list of package or module names from where C extensions may
# be loaded. Extensions are loading into the active Python interpreter and may
# run arbitrary code
extension-pkg-whitelist=lxml

If you now perform the pylint test again, no error relating to lxml should appear.

Create PDF test-reports with Python

With only two python libraries and some line of codes, you are able to create very nice test-reports in PDF format. This tutorial should give you a hint. Feel free to improve with your requirements.

Preconditions

Example

matplotlib==1.4.3
reportlab==3.2.0
# -*- coding: utf-8 -*-

import time
import matplotlib.pyplot as plt

from reportlab.platypus import SimpleDocTemplate, Paragraph, Spacer, Image
from reportlab.lib.styles import getSampleStyleSheet, ParagraphStyle
from reportlab.lib.enums import TA_JUSTIFY
from reportlab.lib.pagesizes import letter
from reportlab.lib.units import inch


class CreateTestReport(object):
    """Example test report class"""

    def __init__(self, test_results, file_name):
        """Constructor method"""
        self.data = test_results
        self.file_name = file_name

        self.story = list()

        self.styles = getSampleStyleSheet()
        self.styles.add(ParagraphStyle(name='Justify', alignment=TA_JUSTIFY))

    def __create_overview(self):
        """Create overview graphic and pdf content"""
        requests = list()
        duration = list()

        for lists in self.data:
            requests.append(lists[0])
            duration.append(lists[1])

        plt.plot(duration)

        plt.xlabel('http requests')
        plt.ylabel('response time')
        plt.xticks(range(len(duration)), requests)

        plt.grid(True)
        plt.savefig('overview.png')

        text = '<font size=18>Overview</font>'
        self.story.append(Paragraph(text, self.styles["Heading2"]))
        picture = Image('overview.png', 6*inch, 4*inch, hAlign='LEFT')
        self.story.append(picture)

        text = '<font size=12>Lorem ipsum dolor sit amet, <br/>\
        consetetur sadipscing elitr, sed diam nonumy eirmod tempor invidunt \
        ut labore et dolore magna aliquyam erat, sed diam voluptua.<br/>\
        At vero eos et accusam et justo duo dolores et ea rebum. <br/>\
        Stet clita kasd gubergren, no sea takimata sanctus est Lorem ipsum \
        dolor sit amet. Lorem ipsum dolor sit amet, consetetur sadipscing \
        elitr, sed diam nonumy eirmod tempor invidunt ut labore et dolore \
        magna aliquyam erat, sed diam voluptua. <br/>\
        At vero eos et accusam et justo duo dolores et ea rebum. <br/>\
        Stet clita kasd gubergren, no sea takimata sanctus est Lorem ipsum \
        dolor sit amet.</font>'
        self.story.append(Paragraph(text, self.styles["Normal"]))

        self.story.append(Spacer(1, 192))

    def __create_round_trips(self):
        """Create round trip graphics and pdf content"""

        for lists in self.data:
            text = '<font size=18>%s: %s HTTP/1.1</font>' % (lists[3],
                                                             lists[4])
            self.story.append(Paragraph(text, self.styles["Heading2"]))

            text = '<font size=12>Status Code: %s</font>' % lists[2]
            self.story.append(Paragraph(text, self.styles["Normal"]))
            self.story.append(Spacer(1, 12))

            file_name = 'request_' + str(lists[0]) + '.png'
            title = 'Request Circle (' + str(lists[1]) + ' sec.)'
            plt.figure(figsize=(4, 4))
            plt.title(title)
            values = lists[5]
            labels = ['Request', 'Server', 'Response']
            plt.pie(values, labels=labels)
            plt.savefig(file_name)

            picture = Image(file_name, 2.5*inch, 2.5*inch, hAlign='LEFT')
            self.story.append(picture)

            self.story.append(Spacer(1, 24))

    def create_pdf(self, report_title, author, base_url, margins):
        """Create PDF document"""

        formatted_time = time.ctime()
        pdf = SimpleDocTemplate(self.file_name,
                                pagesize=letter,
                                title=report_title,
                                author=author,
                                topMargin=margins[0],
                                leftMargin=margins[1],
                                rightMargin=margins[2],
                                bottomMargin=margins[3])

        # Add headline, created date/time and author
        text = '<font size=24>%s</font>' % report_title
        self.story.append(Paragraph(text, self.styles["Heading1"]))
        self.story.append(Spacer(1, 12))

        text = '<font size=10>%s<br/>by %s<br/>%s</font>' % (formatted_time,
                                                             author,
                                                             base_url)
        self.story.append(Paragraph(text, self.styles["Italic"]))
        self.story.append(Spacer(1, 24))

        # Add overview
        self.__create_overview()

        # Add results
        self.__create_round_trips()

        # Create and store report
        pdf.build(self.story)


if __name__ == '__main__':
    # some test result data
    data = ([1, 0.5, 200, 'GET', '/api/getUser', [40, 40, 20]],
            [2, 0.75, 200, 'POST', '/api/createUser', [50, 30, 20]],
            [3, 0.25, 404, 'PUT', '/api/updateUser', [50, 25, 25]],
            [4, 2, 301, 'GET', '/api/Logout', [25, 50, 25]],
            [5, 0.25, 200, 'POST', '/api/Login', [45, 35, 20]])

    # create report
    CREATE = CreateTestReport(data, 'TestReport.pdf')
    CREATE.create_pdf('Example Test Report',
                      'Lupin3000',
                      'http://example.com',
                      [20, 20, 20, 10])

You can call it simply by

# execute without compile
$ python -B ExampleReport.py

JUnit report with Python Webdriver

To create JUnit reports, you just need the python library xmlrunner. This is needed for the integration with build server like Jenkins.

Installation

# example installation with pip
$ sudo pip install xmlrunner

Usage

Just replace for example:

unittest.TextTestRunner(verbosity=2).run(test_suite)

with

from xmlrunner import xmlrunner

""" code for test suite ... """

xmlrunner.XMLTestRunner(verbosity=2, output='reports').run(test_suite)

Jenkins

On Jenkins add a new “post-build” action and select the Publish JUnit test result report. Add now the string “reports/*.xml” into the “Test report XMLs” field.

HAR with Python WebDriver and BrowserMob Proxy

This time is shown how to automate performance test for web sites. Tools in usage are Python Selenium WebDriver and BrowserMob proxy. The results are HAR files which can be viewed in HAR Viewer.

Precondition

  • JAVA installed
  • Python Packages for selenium and browsermob-proxy
selenium
browsermob-proxy

Preparation

Download BrowserMob Proxy and check if proxy can started by command-line.

# change to 
$ cd browsermob-proxy-2.1.0-beta-1/bin/

# start proxy on port 9090
$ ./browsermob-proxy -port 9090

Create Python Class

#!/usr/bin/env python
# -*- coding: utf-8 -*-
"""Python - BrowserMob - WebDriver"""
from browsermobproxy import Server
from selenium import webdriver
import json


class CreateHar(object):
    """create HTTP archive file"""

    def __init__(self, mob_path):
        """initial setup"""
        self.browser_mob = mob_path
        self.server = self.driver = self.proxy = None

    @staticmethod
    def __store_into_file(title, result):
        """store result"""
        har_file = open(title + '.har', 'w')
        har_file.write(str(result))
        har_file.close()

    def __start_server(self):
        """prepare and start server"""
        self.server = Server(self.browser_mob)
        self.server.start()
        self.proxy = self.server.create_proxy()

    def __start_driver(self):
        """prepare and start driver"""
        profile = webdriver.FirefoxProfile()
        profile.set_proxy(self.proxy.selenium_proxy())
        self.driver = webdriver.Firefox(firefox_profile=profile)

    def start_all(self):
        """start server and driver"""
        self.__start_server()
        self.__start_driver()

    def create_har(self, title, url):
        """start request and parse response"""
        self.proxy.new_har(title)
        self.driver.get(url)
        result = json.dumps(self.proxy.har, ensure_ascii=False)
        self.__store_into_file(title, result)

    def stop_all(self):
        """stop server and driver"""
        self.server.stop()
        self.driver.quit()


if __name__ == '__main__':
    path = "browsermob-proxy-2.1.0-beta-1/bin/browsermob-proxy"
    RUN = CreateHar(path)
    RUN.start_all()
    RUN.create_har('google', 'http://google.com')
    RUN.create_har('stackoverflow', 'http://stackoverflow.com')
    RUN.stop_all()

Note: The highlighted line must contain the path to BrowserMob Proxy!
Happy testing! If you use PhantomJS instead of Firefox, you can use this on Build server like Jenkins/Hudson and so on, too.

UI testing with DalekJS and PhantomJS on CentOS

With DalekJS you can automate your functional GUI tests very easy. This article describe how to prepare the test environment on CentOS.

Setup

First, the necessary packages are installed.

# install EPEL (Extra Packages for Enterprise Linux)
$ yum install -y epel-release

# check repositories
$ yum repolist

# update all
$ yum -y update

# install packages
$ yum install -y vim nodejs npm bzip2 freetype fontconfig

# check versions of nodejs and npm
$ node --version
$ npm --version

# change to tmp folder
$ cd /tmp/

# download PhantomJS and unzip
$ curl -O https://phantomjs.googlecode.com/files/phantomjs-1.9.2-linux-x86_64.tar.bz2
$ tar xvf phantomjs-1.9.2-linux-x86_64.tar.bz2

# copy binary, delete unneeded files and check version
$ cp phantomjs-1.9.2-linux-x86_64/bin/phantomjs /usr/local/bin/
$ rm -fr phantomjs-1.9.2-linux-x86_64
$ rm -f phantomjs-1.9.2-linux-x86_64.tar.bz2
$ phantomjs --version

# install dalek-cli (global) and check version
$ npm install dalek-cli -g
$ dalek --version

It is also possible to compile PhantomJS itself, but this takes a lot of time.

Prepare test project

Once all is installed without any issues you can start to create the test project.

# change to home folder
$ cd ~/

# create project folder and change into
$ mkdir DalekTest && cd DalekTest

# create package.json interactively
$ npm init

# install dalekjs on project
$ npm install dalekjs --save-dev

Create test case

Now it is time for the first Test Case. I have used the example from Dalek website.

# create test case file
$ touch test_title.js

# insert content
$ vim test_title.js
module.exports = {'Page title is correct': function (test) {
  test
    .open('http://google.com')
    .assert.title().is('Google', 'It has title')
    .done();
  }
};

Run test

By default DalekJS use PhantomJS as browser. For running the test case simple use dalek command and as argument the test case file (*.js).

# run test case
$ dalek test_title.js

Local HAR viewer on Mac OS X

There are several HAR file viewers online but sometimes you need the HAR viewer offline. It is very simple for Mac OS X user to get a local instance running.

Precondition

Preparation

The first step is generating HAR file.

# create HAR log file
$ phantomjs netsniff.js "http://google.com" > ~/Desktop/result.har

Now download the latest Harviewer.zip and unzip into the user “Sites” folder. Rename the folder and setting up the permissions.

# go into Downloads
$ cd ~/Downloads/

# create new folder
$ mkdir harviewer

# unzip into new folder
$ unzip harviewer-2.0-15.zip -d harviewer

# move folder into user sites
$ mv harviewer ~/Sites/

# go into sites and change access rights
$ cd ~/Sites/
$ chmod +x harviewer/

Result

Now open a browser and call URL like: “http://localhost/~<user>/harviewer/“. As last step drag the generated HAR file into the browser. You should see something like this:

HAR viewer result

Full webpage screenshot

For various reasons screenshots for webpages are needed. If automated test scripts fail, documentations must be created or in some other situations. With PhantomJS it is very easy to create these screenshots very fast by command-line. All what is needed a small JavaScript like this.

JavaScript

var phantom;
var console;
var system = require('system');
var fs = require('fs');
var page = require('webpage').create();

var Info = {
	isDate: function () {
		'use strict';
		var mydate = new Date().toDateString();
		return mydate;
	},
	isTime: function () {
		'use strict';
		var mytime = new Date().getTime();
		return mytime;
	}
};

var Target = {
	isLocation: function () {
		'use strict';
		var args = system.args,
		    mylocation = 'http://google.com';
		if (args.length > 1) {
			mylocation = system.args[1];
			console.log('[LOG] use argument location');
		} else {
			console.log('[LOG] use default location');
		}
		return mylocation;
	},
	isSaveFolder: function () {
		'use strict';
		var folder = 'log';
		if (!fs.exists(folder)) {
			console.log('[LOG] creat directory ' + folder);
			fs.makeDirectory(folder);
		}
		if (!fs.isWritable(folder)) {
			console.error('[LOG] ' + folder + ' is not writable!');
			phantom.exit(1);
		}
		return folder;
	}
};

page.open(Target.isLocation(), function (status) {
	'use strict';
	switch (status) {
	case 'success':
		console.log('[LOG] page open successfully' + Info.isDate());
		var folder = Target.isSaveFolder();
		page.render(folder + fs.separator + Info.isTime() + '.png');
		phantom.exit(0);
		break;
	case 'fail':
		console.error('[LOG] page not open successfully');
		phantom.exit(1);
		break;
	default:
		console.error('[LOG] fail to open with unknown status:' + status);
		phantom.exit(1);
		break;
	}
});

After save the script you can run it like:

# screenshot of softwaretester.info
$ phantomjs screenshot.js "http://softwaretester.info"

Jenkins – Modern Status Plugin

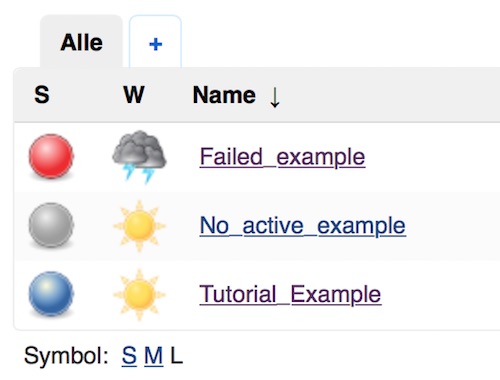
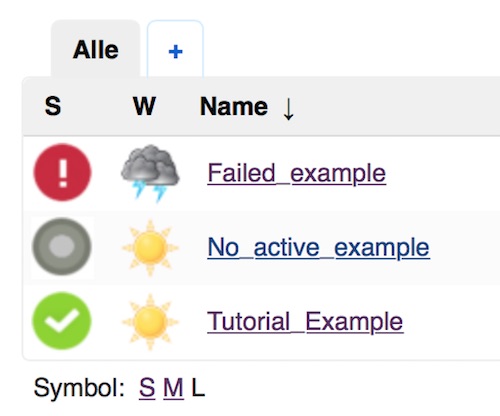
Who the original symbols of Jenkins do not like, should try the Modern Status Plugin. The tiny plugin of Oliver Vinn provide a new and very cool set of icons for the continuous integration server. The installation is very simple!

Example

This is a example of original icons for Jenkins/Hudson:

jenkins original status icons

Yes they might lead to confusion and don’t look awesome.

Steps

Open the Plugin Manager and search for “Modern Status Plugin”.

jenkins modern status plugin

After restart Jenkins/Hudson the new iconset should be available and look like:

jenkins modern status

This looks quite nice and speaks much better, already on first view, about the status.