This tutorial will show how to setup a simple test environment via Vagrant and to install, configure and use WireGuard VPN software. In this tutorial Debian 10 is used, you can find the documentation about other OS on WireGuard website.
Preparation
First make sure VirtualBox and Vagrant are installed in latest versions. Now create needed project and files.
# -*- mode: ruby -*-
# vi: set ft=ruby :

require 'yaml'
machines = YAML.load_file('machines.yml')

Vagrant.configure("2") do |config|
  machines.each do |machines|
    config.vm.define machines["name"] do |machine|
      # box settings
      machine.vm.hostname = machines["name"]
      machine.vm.box = machines["box"]
      machine.vm.synced_folder ".", "/vagrant", disabled: true
      machine.vm.network "private_network", ip: machines["ip"]

      # virtualbox settings
      machine.vm.provider :virtualbox do |vb|
        vb.name = machines["name"]
        vb.cpus = machines["cpus"]
        vb.memory = machines["memory"]
        vb.gui = false
      end

      # provision all
      machine.vm.provision "shell", name: "all", inline: <<-SHELL
        sudo echo "deb http://deb.debian.org/debian/ unstable main" > /etc/apt/sources.list.d/unstable.list
        sudo printf 'Package: *\nPin: release a=unstable\nPin-Priority: 90\n' > /etc/apt/preferences.d/limit-unstable
        sudo apt update -y && sudo apt install -y wireguard
      SHELL

      # provision only host-a
      if machines["name"] == 'host-a'
        machine.vm.provision "shell", name: "host-a only", inline: <<-SHELL
          sudo su -
          cd ~
          wg genkey > private
          ip link add wg0 type wireguard
          ip addr add 10.0.0.1/24 dev wg0
          wg set wg0 private-key ./private
          ip link set wg0 up
          ip addr
          wg
        SHELL
      end

      # provision only host-b
      if machines["name"] == 'host-b'
        machine.vm.provision "shell", name: "host-b only", inline: <<-SHELL
          sudo su -
          cd ~
          wg genkey > private
          wg pubkey < private
          ip link add wg0 type wireguard
          ip addr add 10.0.0.2/24 dev wg0
          wg set wg0 private-key ./private
          ip link set wg0 up
          ip addr
          wg
        SHELL
      end
    end
  end
end
Usage
All files are created and we can start to start the environment.
Okay,… The pipeline has already two steps “Build” and “Deploy” running, but the last step “Test” is missing. In this part I will show a simple example with Python, Selenium and Docker (standalone-chrome) for test step.
#!/usr/bin/env bash

## shell options
set -e
set -u
set -f

## magic variables
declare CLUSTER
declare TASK
declare TEST_URL
declare -r -i SUCCESS=0
declare -r -i NO_ARGS=85
declare -r -i BAD_ARGS=86
declare -r -i MISSING_ARGS=87

## script functions
function usage() {
  local FILE_NAME

  FILE_NAME=$(basename "$0")

  printf "Usage: %s [options...]\n" "$FILE_NAME"
  printf " -h\tprint help\n"
  printf " -c\tset esc cluster name uri\n"
  printf " -t\tset esc task name\n"
}

function no_args() {
  printf "Error: No arguments were passed\n"
  usage
  exit "$NO_ARGS"
}

function bad_args() {
  printf "Error: Wrong arguments supplied\n"
  usage
  exit "$BAD_ARGS"
}

function missing_args() {
  printf "Error: Missing argument for: %s\n" "$1"
  usage
  exit "$MISSING_ARGS"
}

function get_test_url() {
  local TASK_ARN
  local TASK_ID
  local STATUS
  local HOST_PORT
  local CONTAINER_ARN
  local CONTAINER_ID
  local INSTANCE_ID
  local PUBLIC_IP

  # list running task
  TASK_ARN="$(aws ecs list-tasks --cluster "$CLUSTER" --desired-status RUNNING --family "$TASK" | jq -r .taskArns[0])"
  TASK_ID="${TASK_ARN#*:task/}"

  # wait for specific container status
  STATUS="PENDING"
  while [ "$STATUS" != "RUNNING" ]; do
    STATUS="$(aws ecs describe-tasks --cluster "$CLUSTER" --task "$TASK_ID" | jq -r .tasks[0].containers[0].lastStatus)"
  done

  # get container id
  CONTAINER_ARN="$(aws ecs describe-tasks --cluster "$CLUSTER" --tasks "$TASK_ID" | jq -r .tasks[0].containerInstanceArn)"
  CONTAINER_ID="${CONTAINER_ARN#*:container-instance/}"

  # get host port
  HOST_PORT="$(aws ecs describe-tasks --cluster "$CLUSTER" --tasks "$TASK_ID" | jq -r .tasks[0].containers[0].networkBindings[0].hostPort)"

  # get instance id
  INSTANCE_ID="$(aws ecs describe-container-instances --cluster "$CLUSTER" --container-instances "$CONTAINER_ID" | jq -r .containerInstances[0].ec2InstanceId)"

  # get public IP
  PUBLIC_IP="$(aws ec2 describe-instances --instance-ids "$INSTANCE_ID" | jq -r .Reservations[0].Instances[0].PublicIpAddress)"

  TEST_URL="$(printf "http://%s:%d" "$PUBLIC_IP" "$HOST_PORT")"
}

function clean_up() {
  # stop container
  if [ "$(docker inspect -f {{.State.Running}} ChromeBrowser)" == "true" ]; then
    docker rm -f ChromeBrowser
  fi

  # delete virtualenv
  if [ -d .env ]; then
    rm -fr .env
  fi
}

function run_selenium_test() {
  local TEST_TEMPLATE
  local TEST_FILE

  # clean up
  clean_up

  # pull image (standalone-chrome)
  docker pull selenium/standalone-chrome

  # run docker container (standalone-chrome)
  docker run -d -p 4444:4444 --name ChromeBrowser selenium/standalone-chrome

  # create and activate virtualenv
  virtualenv .env && source .env/bin/activate

  # install Selenium
  pip install -U selenium

  # read test template into variable
  TEST_TEMPLATE=$(cat ./test/example.py)

  # replace string with URL
  TEST_FILE="${TEST_TEMPLATE/APPLICATION_URL/$TEST_URL}"

  # save into final test file
  echo "$TEST_FILE" > ./test/suite.py

  # execute test
  python -B ./test/suite.py

  # deactivate virtualenv
  deactivate
}

## check script arguments
while getopts "hc:t:" OPTION; do
  case "$OPTION" in
    h) usage
       exit "$SUCCESS";;
    c) CLUSTER="$OPTARG";;
    t) TASK="$OPTARG";;
    *) bad_args;;
  esac
done

if [ "$OPTIND" -eq 1 ]; then
  no_args
fi

if [ -z "$CLUSTER" ]; then
  missing_args '-c'
fi

if [ -z "$TASK" ]; then
  missing_args '-t'
fi

## run main function
function main() {
  get_test_url
  printf "Test Application URL: %s\n" "$TEST_URL"

  run_selenium_test
}

main

# exit
exit "$SUCCESS"
Ensure that “example.py” has all needed permission rights. $ chmod +x example.py Commit all changes now and wait that the Jenkins job gets triggered (or trigger manually).
That’s already all… your job should execute all steps. This part is done super fast. 😉
Some last words
There is a lot of space for improvements here, but I think you learned already much and had some fun. Some hints now:
you can add any other test methods by your self on this step (eq. Performance- and Security tests)
Unit tests and Static Code Analysis could executed on build step (before create image)
check out AWS ECS Services
use a proxy for Jenkins and enable SSL
create other pipelines and ECS clusters to enable staging
create “Lifecycle policy rules” on ECR
use Git Webhook’s to trigger the Jenkins jobs
add a post step in your Jenkins pipeline to store metrics and/or inform about build status
In previous tutorial I showed you how to create the environment and how to implement the build steps for Jenkins pipeline. Now I will show you to setup the deploy step.
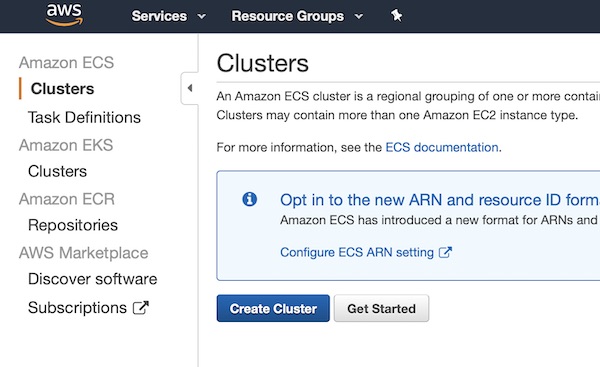
Create a very small AWS ECS cluster in region “Frankfurt” (eu-central-1). Therefore enter Amazon ECS Clusters and press button “Create Cluster”.
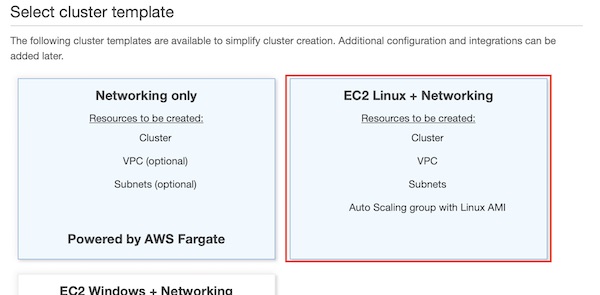
Select template “EC2 Linux + Networking” and continue to next step.
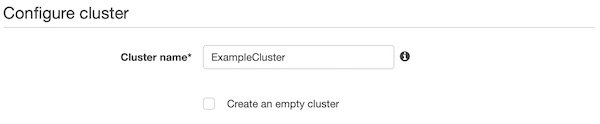
On section “Configure cluster” you give a name like “ExampleCluster”.
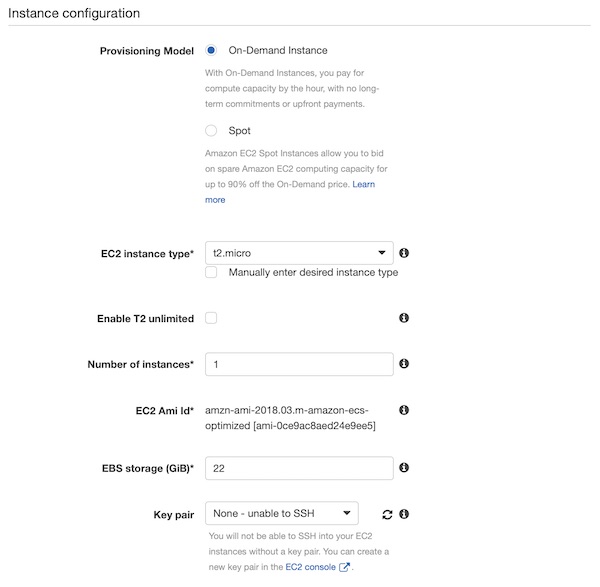
On section “Instance configuration” select “On-Demand Instance”, “t2.micro”, “1”, “22” and “None – unable to SSH”.
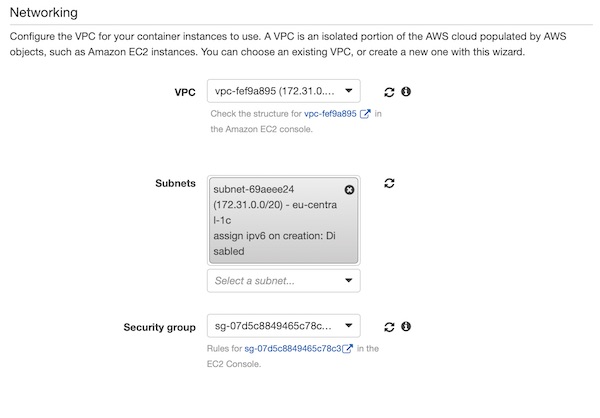
In the section “Networking” you have to be careful now. Your values will be different from mine! Under VPC, select the same value as for the EC2 Jenkins instance (I selected default VPC). Now you can choose one of the subnets. We created the security group together with the EC2 Jenkins instance, so select “ExampleSecurityGroup” here.
Okay, press button “Create” and wait till the cluster is created. The cluster creation can take a while, so please be patient.
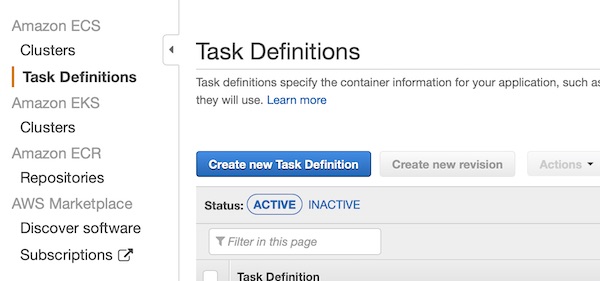
AWS ECS Task Definition
The cluster is running and the “Task Definition” can be created. So press button “Create new Task Definition”.
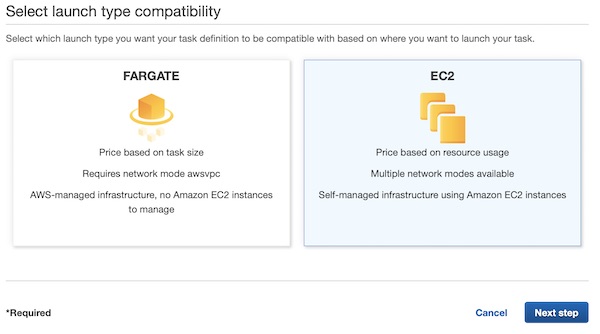
Select “EC2” on page launch type compatibility and press button “Next step”.
On section “Configure task and container definitions” set value “ExampleTask” for input field “Task Definition Name” and for “Network Mode” select “<default>”.
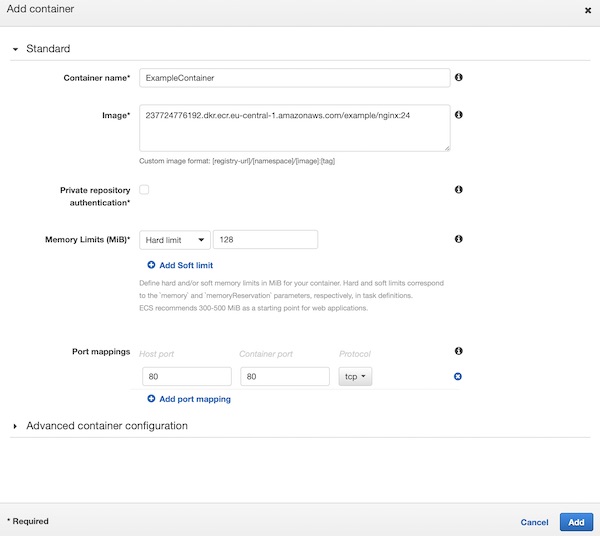
On section “Container Definition” press button “Add Container”. A new window will slide in. Here give the “Container name” value “ExampleContainer”, add under image your latest version from ECR (my latest is 24). Set values “128” for “Memory Limits (MiB)”, “80:80” for “Port mappings” and press button “Add”.
You are done with your task definition configuration, scroll down and press button “Create”.
AWS IAM
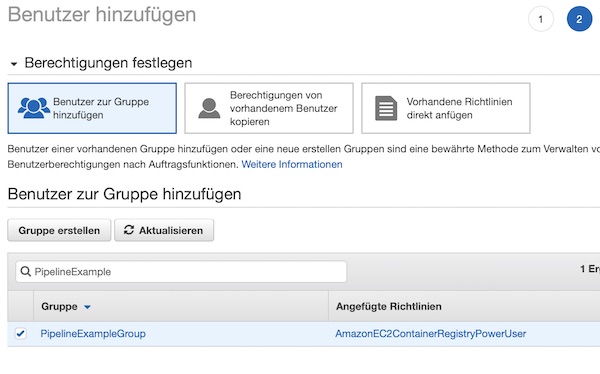
Before we can go through the next steps, we need to adjust the group policy for “PipelineExampleGroup”. You must add the “AmazonECS_FullAccess” policy. _For our example this is okay, but never use this policy in production!_
Run task on ECS cluster (via Jenkins)
Now you only need to modify two files in your repository. Replace the content of “deploy.sh” and “Jenkinsfile” with following contents.
#!/usr/bin/env bash

## shell options
set -e
set -u
set -f

## magic variables
declare ECR
declare CLUSTER
declare TASK
declare BUILD_NUMBER
declare -r -i SUCCESS=0
declare -r -i NO_ARGS=85
declare -r -i BAD_ARGS=86
declare -r -i MISSING_ARGS=87

## script functions
function usage() {
  local FILE_NAME

  FILE_NAME=$(basename "$0")

  printf "Usage: %s [options...]\n" "$FILE_NAME"
  printf " -h\tprint help\n"
  printf " -e\tset ecr repository uri\n"
  printf " -c\tset esc cluster name uri\n"
  printf " -t\tset esc task name\n"
  printf " -b\tset build number\n "
}

function no_args() {
  printf "Error: No arguments were passed\n"
  usage
  exit "$NO_ARGS"
}

function bad_args() {
  printf "Error: Wrong arguments supplied\n"
  usage
  exit "$BAD_ARGS"
}

function missing_args() {
  printf "Error: Missing argument for: %s\n" "$1"
  usage
  exit "$MISSING_ARGS"
}

## check script arguments
while getopts "he:c:t:b:" OPTION; do
  case "$OPTION" in
    h) usage
       exit "$SUCCESS";;
    e) ECR="$OPTARG";;
    c) CLUSTER="$OPTARG";;
    t) TASK="$OPTARG";;
    b) BUILD_NUMBER="$OPTARG";;
    *) bad_args;;
  esac
done

if [ "$OPTIND" -eq 1 ]; then
  no_args
fi

if [ -z "$ECR" ]; then
  missing_args '-e'
fi

if [ -z "$CLUSTER" ]; then
  missing_args '-c'
fi

if [ -z "$TASK" ]; then
  missing_args '-t'
fi

if [ -z "$BUILD_NUMBER" ]; then
  missing_args '-b'
fi

## run main function
function main() {
  local TASK_ARN
  local TASK_ID
  local ACTIVE_TASK_DEF
  local TASK_DEFINITION
  local TASK_DEF_ARN

  # list running task
  TASK_ARN="$(aws ecs list-tasks --cluster "$CLUSTER" --desired-status RUNNING --family "$TASK" | jq -r .taskArns[0])"
  TASK_ID="${TASK_ARN#*:task/}"

  # stop running task
  if [ -n "$TASK_ID" ] && [ "$TASK_ID" != "null" ]; then
    printf "INFO: Stop Task %s\n" "$TASK_ID"
    aws ecs stop-task --cluster "$CLUSTER" --task "$TASK_ID"
  fi

  # list active task definition
  ACTIVE_TASK_DEF="$(aws ecs list-task-definitions --family-prefix "$TASK" --status ACTIVE | jq -r .taskDefinitionArns[0])"

  # derigister task definition
  if [ -n "$ACTIVE_TASK_DEF" ]; then
    printf "INFO: Deregister Task Definition %s\n" "$ACTIVE_TASK_DEF"
    aws ecs deregister-task-definition --task-definition "$ACTIVE_TASK_DEF"
  fi

  # read task definition template
  TASK_DEFINITION=$(cat ./cicd/task_definition.json)

  # create new task definition file
  TASK_DEFINITION="${TASK_DEFINITION/URI/$ECR}"
  echo "${TASK_DEFINITION/NUMBER/$BUILD_NUMBER}" > ecs_task_definition.json

  # register new task definition
  TASK_DEF_ARN="$(aws ecs register-task-definition --cli-input-json file://ecs_task_definition.json | jq -r .taskDefinition.taskDefinitionArn)"

  # run task by task definition
  aws ecs run-task --task-definition "$TASK_DEF_ARN" --cluster "$CLUSTER"
}

main

# exit
exit "$SUCCESS"
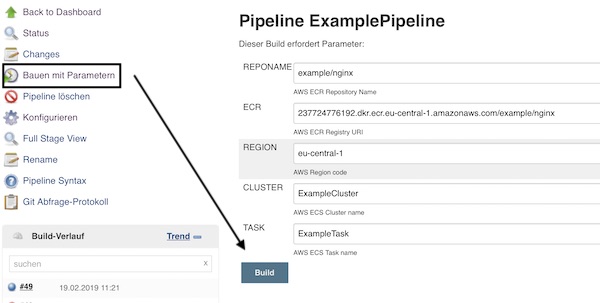
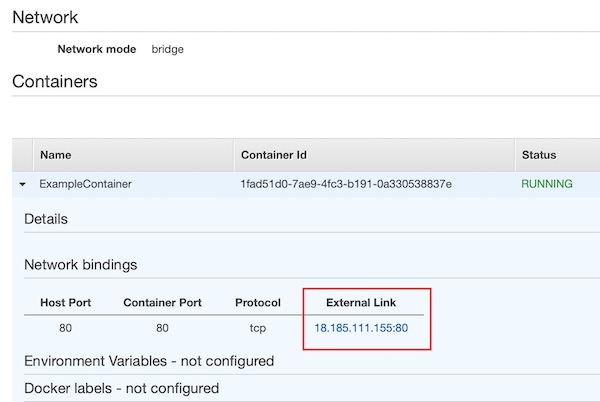
Commit your changes and wait for build trigger (or trigger manually). After successful deployment, your ECS cluster will have a running task now. On section “Container” you can see the link.
Every time when you modify files and commit them into your Git repository, the pipeline will be triggered and latest version will be visible in browser.
That’s it with this part of the series. Cu soon in next part.
This tutorial serie should enable you to create own pipelines via Jenkins on AWS. Therefore we try to catch all needed basics with AWS IAM, EC2, ECR and ECS. Some of our configurations are recommended only for learning purpose, don’t use them on production! Why? Because these lessons are for people who starts on these topics and I will try to make all steps/configuration as easy as possible without focus on security. In this part we will create the environment and setup the “build step”.
Preconditions
AWS account (eq. free tier)
Git account (eq. GitLab, Bitbucket, GitHub, etc.)
AWS IAM
The first preparation you do on AWS IAM Management Console. Here you create and configure a new group. The benefit of this group is that you can reconfigure the policies for assigned users easily at anytime. Please name the group “PipelineExampleGroup”.
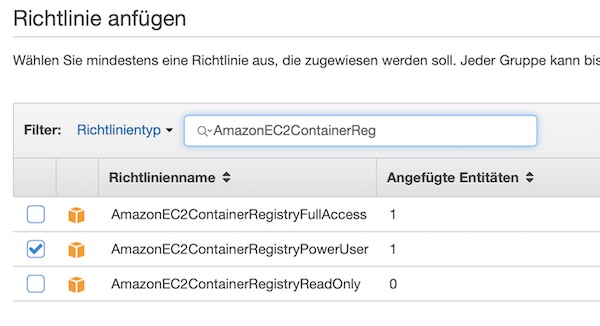
Now search for EC2 Container Registry policies and enable checkbox for “AmazonEC2ContainerRegistryPowerUser”. For our example this policy is enough, but for production please don’t do that!
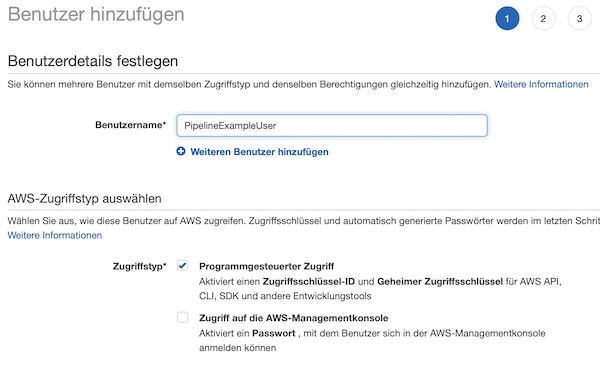
After the group is created, a user needs to be assigned to this group. Name the user “PipelineExampleUser”. Please enable checkbox “Programmatic access” for this user.
Assign the user to group.
Before you finish the process, please choose Download .csv and then save the file to a safe location.
AWS Jenkins EC2 Instance
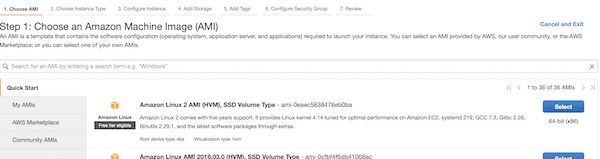
Now you can launch our EC2 instance. Do this on region “Frankfurt” (eu-central-1). Of course you can choose any other region, but please remember your choice later. At very first step select the template “Amazon Linux 2 AMI (HVM), SSD Volume Type”.
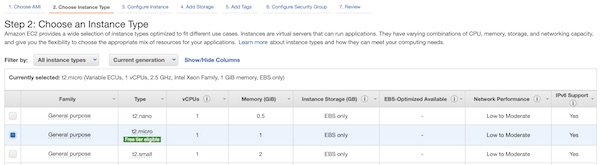
The instance type “t2.micro” is enough for our example. For production you will need something else – depending to your needs.
Now you need to be a little bit careful. On Instance Details step please select “Enable” for “Auto-assign Public IP” and “Stop” for “Shutdown Behavior”. For all other values the defaults should be fine. I select my default VPC and “No preference…” for Subnet.
15 Gb disk space are fine. For production you need to estimate differently.
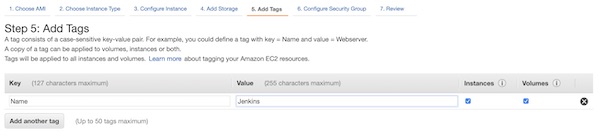
With the tag you will have it easier to identify the instance later on console view. Enter values “Name” for “Key” and “Jenkins” for “Value”.
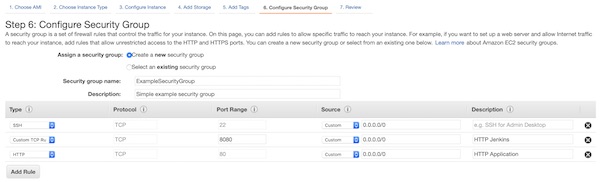
Create a new security group with name “ExampleSecurityGroup” and allow ports 22, 80 and 8080 (IPv4 only). You can change the configuration at any time later. On a production environment you should use other ports like 443 and IP restrictions.
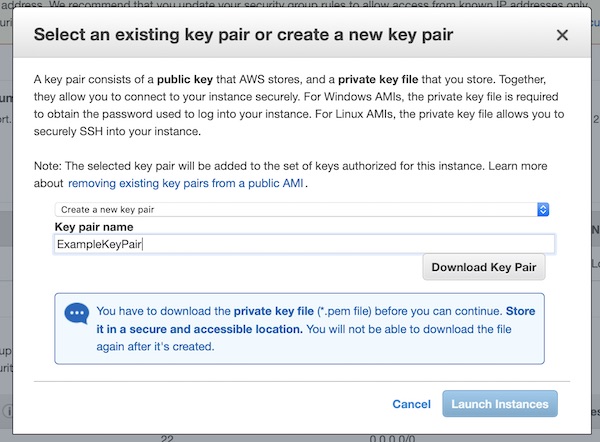
Create a new key pair with name “ExampleKeyPair”. Don’t forget to save the key (“Download Key Pair”) and press “Launch Instances”!
Install and run Jenkins
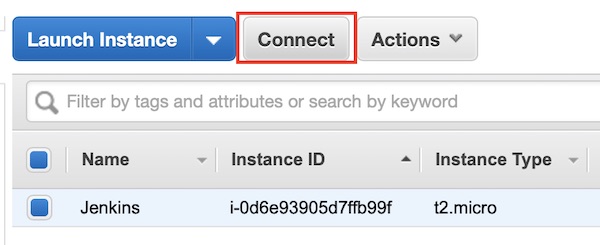
The EC2 instance is running and you can connect via SSH to start all needed installations and configurations. Attention: Your Public IP/DNS will be different (also after every stop/start), via button “Connect” you can easily figure out your configuration. I will just use the term “<EC2 IP|DNS>” in my description.
# move SSH keys (my are downloaded under Downloads)
$ mv ~/Downloads/ExampleKeyPair.pem.txt ~/.ssh/ExampleKeyPair.pem
# change permissions
$ chmod 0400 ~/.ssh/ExampleKeyPair.pem
# start ssh connection
$ ssh -i ~/.ssh/ExampleKeyPair.pem ec2-user@<EC2 IP|DNS>
# change to root user
$ sudo su -
# update system
$ yum update -y
# add latest Jenkins repository
$ wget -O /etc /yum.repos.d/jenkins.repo http://pkg.jenkins.io/redhat/jenkins.repo
# add key from Jenkins
$ rpm --import https://pkg.jenkins.io/redhat/jenkins.io.key
# install docker-ce
$ amazon-linux-extras install -y docker
# install java, git, jenkins and jq
$ yum install -y java git jenkins jq
# add jenkins to docker group
$ usermod -a -G docker jenkins
# enable and start docker
$ systemctl enable docker && systemctl start docker
# enable and start jenkins
$ systemctl enable jenkins && systemctl start jenkins
# get initial password
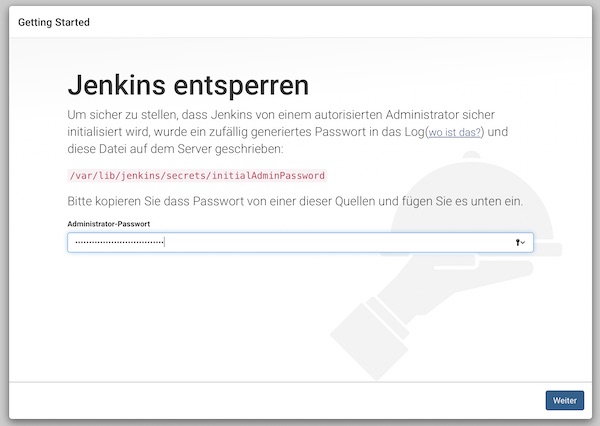
$ cat /var/lib/jenkins/secrets/initialAdminPassword
Note: I have a space after etc, because of security settings of my provider.
Do not close the SSH connection yet. Start your browser and following there the Jenkins installation steps. The URL is similar to your SSH connection – http://<EC2 IP|DNS>:8080. You should see the following screen and paste the initial password there.
On next screen press button “Install suggested plugins” and wait for the screen to create administrator account. Fill in your credentials and finish the installation steps. The remaining configurations (on browser) will be made later.
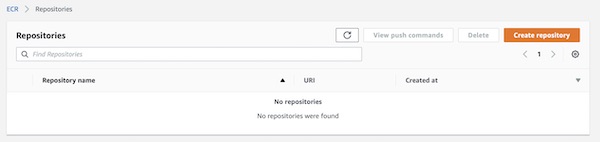
AWS ECR
Before you can push images to ECR, you need to create a new repository. On the ECR page, choose button “Create repository”. Your AWS ECR console screen could look a little bit different.
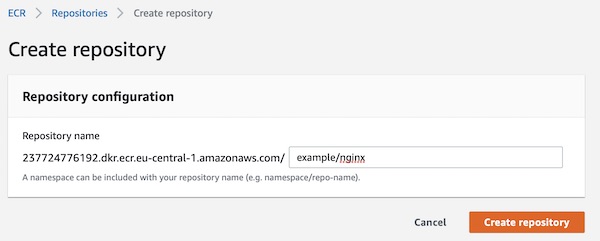
Give a repository name “example/nginx” and press button “Create repository”.
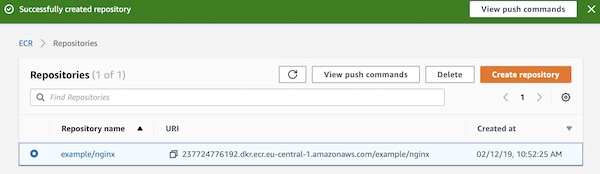
Done, your ECR repository is already created. You can see on overview page all needed informations like Repository name and URI. Your repository URI will be different to my. I will just use the term “<ECR URI>” in my description.
Okay, now enable user jenkins to connect to ECR. Go back to terminal and execute following steps. You need now the credentials from downloaded csv file for “PipelineExampleUser”.
# change to jenkins user
$ su -s /bin/bash jenkins

# show docker info (optional)
$ docker info

# configure AWS-CLI options
$ aws configure
...
AWS Access Key ID [None]: <credentials.csv>
AWS Secret Access Key [None]: <credentials.csv>
Default region name [None]: eu-central-1
Default output format [None]: json
...

# list repositories in registry (optional)
$ aws ecr describe-repositories
Git Repository
I assume that you are familiar with Git. You must now create a Git Repository and create the following folders and files there. I will use my own private GitLab repository.
# show local project tree (optional)
$ tree ~/<path to your project>
|____index.html
|____Dockerfile
|____.gitignore
|____cicd
| |____build.sh
| |____Jenkinsfile
| |____deploy.sh
| |____task_definition.json
| |____test.sh
|____dev_credentials
| |____credentials.csv
|____.git
Note: Please set permission rights for shell scripts like $ chmod +x build.sh deploy.sh test.sh
#!/usr/bin/env bash

## shell options
set -e
set -u
set -f

## magic variables
declare REPONAME
declare ECR
declare REGION
declare BUILD_NUMBER
declare -r -i SUCCESS=0
declare -r -i NO_ARGS=85
declare -r -i BAD_ARGS=86
declare -r -i MISSING_ARGS=87

## script functions
function usage() {
  local FILE_NAME

  FILE_NAME=$(basename "$0")

  printf "Usage: %s [options...]\n" "$FILE_NAME"
  printf " -h\tprint help\n"
  printf " -n\tset ecr repository name\n"
  printf " -e\tset ecr repository uri\n"
  printf " -r\tset aws region\n"
  printf " -b\tset build number\n "
}

function no_args() {
  printf "Error: No arguments were passed\n"
  usage
  exit "$NO_ARGS"
}

function bad_args() {
  printf "Error: Wrong arguments supplied\n"
  usage
  exit "$BAD_ARGS"
}

function missing_args() {
  printf "Error: Missing argument for: %s\n" "$1"
  usage
  exit "$MISSING_ARGS"
}

## check script arguments
while getopts "hn:e:r:b:" OPTION; do
  case "$OPTION" in
    h) usage
       exit "$SUCCESS";;
    n) REPONAME="$OPTARG";;
    e) ECR="$OPTARG";;
    r) REGION="$OPTARG";;
    b) BUILD_NUMBER="$OPTARG";;
    *) bad_args;;
  esac
done

if [ "$OPTIND" -eq 1 ]; then
  no_args
fi

if [ -z "$REPONAME" ]; then
  missing_args '-n'
fi

if [ -z "$ECR" ]; then
  missing_args '-e'
fi

if [ -z "$REGION" ]; then
  missing_args '-r'
fi

if [ -z "$BUILD_NUMBER" ]; then
  missing_args '-b'
fi

## run main function
function main() {
  local LAST_ID

  # delete all previous image(s)
  LAST_ID=$(docker images -q "$REPONAME")
  if [ -n "$LAST_ID" ]; then
    docker rmi -f "$LAST_ID"
  fi

  # build new image
  docker build -t "$REPONAME:$BUILD_NUMBER" --pull=true .

  # tag image for AWS ECR
  docker tag "$REPONAME:$BUILD_NUMBER" "$ECR":"$BUILD_NUMBER"

  # basic auth into ECR
  $(aws ecr get-login --no-include-email --region "$REGION")

  # push image to AWS ECR
  docker push "$ECR":"$BUILD_NUMBER"
}

main

# exit
exit "$SUCCESS"
Inside folder “dev_credentials” I store the credentials.csv from AWS. The content of this folder will be only on my local machine, because via .gitignore I exclude the folder and files from git.
Jenkins job configuration
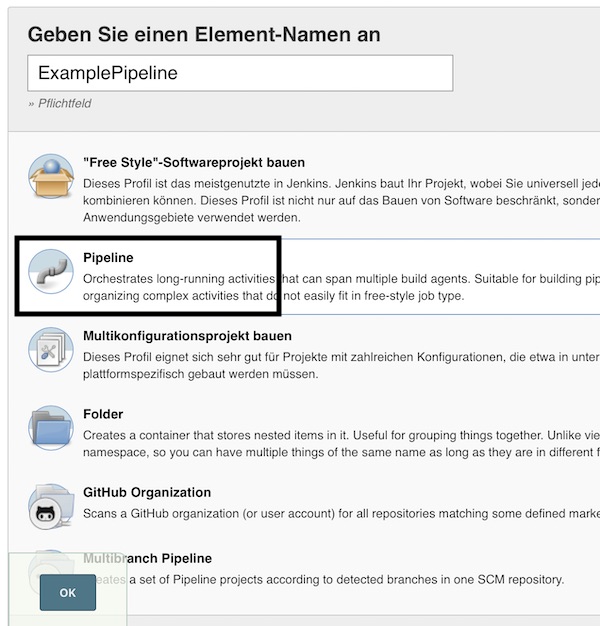
I will not use this tutorial to explain security topics for Jenkins, so we start directly with the configuration of the job (resp. project). On main page press now button “New item” or link “create new jobs”. Insert name “ExamplePipeline”, select “Pipeline” and press button “OK”.
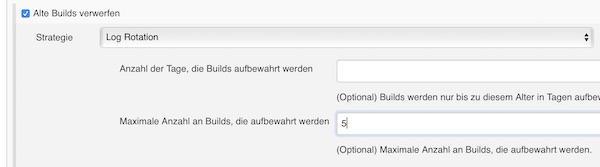
To save some disk space enable checkbox discard old builds (5 builds are enough).
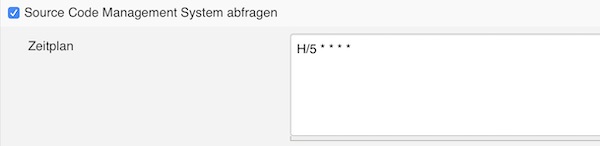
Normally you would create a webhook to trigger the build after commit, but our EC2 instance does change the public IP/DNS on every stop/start. That’s why here we check the revision changes every 5 minutes on git and trigger the job if something has changed.
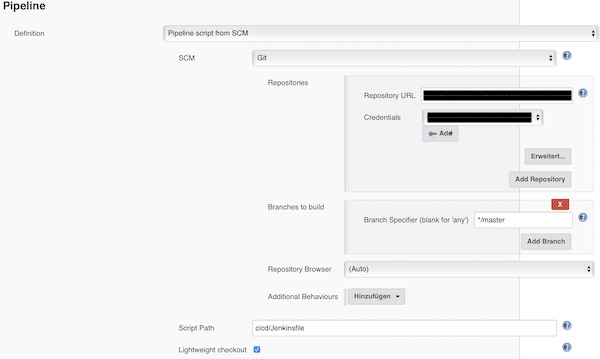
Add the repository (may credentials are needed), configure the branch and Jenkinsfile path.
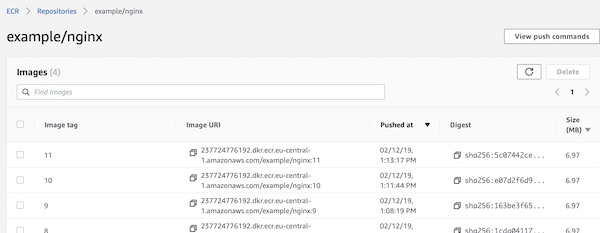
Press button “save”, _cross fingers_ and trigger manual the build. If you did nothing wrong, the job will run without issues and the ECR contains your images (depending how often you trigger the build).
The next part of this tutorial series will be about deployment to ECS.
Using the two browsers (Firefox and Chrome), I’ll show you how to analyze the TLS traffic with Wireshark. If you only want to use one of the browsers, you can, of course.
What you need?
Wireshark (latest version)
Google Chrome (latest version)
Firefox (latest version)
Let’s start
After export do not change or restart you terminal. Or set an environmental variable (global/user specific) for example in .bashrc/.bash_profile/etc. file.
While surfing the internet I stumbled across Sitespeed.io. It’s a amazing collection of Open Source Tools, which make performance measuring for developers and testers super easy. I tried it out and was immediately impressed. Here’s a little tutorial on how to use Jenkins and Sitespeed.
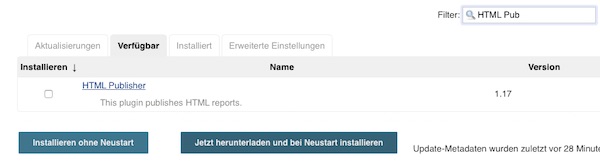
When Jenkins is ready (restarted), install the HTML Publisher PlugIn (no restart after installation of plugin required).
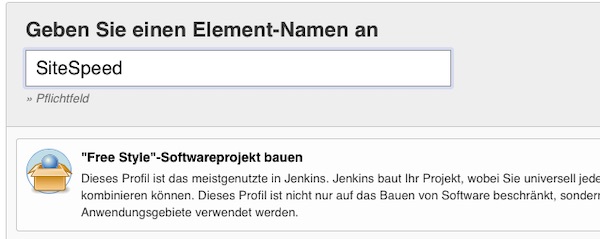
Create a new free-style project named SiteSpeed.
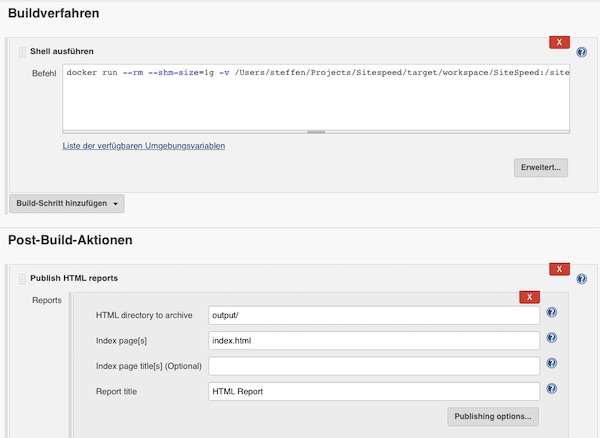
Attention: You need to specify later the absolute path to the local directory /target/workspace/SiteSpeed. If you do not know how, press save and start the build without any job information (empty job configuration) and follow the optional instructions.
# change directory (optional)
$ cd ~/Projects/Sitespeed/target/workspace/SiteSpeed

# get absolute path (optional)
$ pwd
In my case the path is: “/Users/steffen/Projects/Sitespeed/target/workspace/SiteSpeed”. Under job configuration section “Build” enable “Execute shell” and paste following command.
Via Post-Build-Action: Publish HTML reports you can enter the report very simple from the job project page.
Save everything and run the job. After a short time you can look at the HTML report. See “Pages” > “https://www.sitespeed.io/” for screenshots, HAR and video files. On the website of sitespeed.io is a very detailed documentation and many more examples. Have fun!
There are just too many people and organizations who are interested in our data. Thus, the secure transmission of data is important. Through encryption/decryption, data can be protected from access by third parties. There are already very long easy ways for the encryption/decryption but I have to find again and again that these are quite unknown. Herewith a little tutorial where I want to show possibilities by means of GPG.
Requirements
Docker (latest)
Environment preparation
By means of two Docker containers, we now want to simulate 2 persons who exchange the encrypted data.
If you want to use the encryption/decryption without prompt, for example in a bash script, you can use the following options. Depending on the version, it can come to a distinction. Option 1 is by default not available in the Docker containers.
You can also use a simple loop to encrypt/decrypt multiple files. Please note the available GPG version/options. Here now a simple example without prompt.
# create 3 text files from single file
$ split -l 1 -d /share/example.txt -a 1 --additional-suffix=".txt" /share/demo_

# check directory (optional)
$ ls -la /share/

# start symmetric encryption with multiple file
$ for file in /share/demo_{0..2}.txt; do gpg -c --batch --passphrase "PASSWORD" "$file" && rm -f "$file"; done

# check directory (optional)
$ ls -la /share/

# start symmetric decryption with multiple file
$ for file in /share/demo_{0..2}.txt.gpg; do gpg -d --batch --passphrase "PASSWORD" -o "${file::-4}" "$file" && rm -f "$file"; done

# check directory (optional)
$ ls -la /share/
Encryption and Decryption via keys
Container (user_a)
# generate keys
$ gpg --gen-key
...
kind of key: 1
keysize: 2048
valid: 0
Real name: user_a
Email address: user_a@demo.tld
...

# list keys (optional)
$ gpg --list-keys

# export public key
$ gpg --armor --export user_a@demo.tld > /share/user_a.asc
Container (user_b)
# generate keys
$ gpg --gen-key
...
kind of key: 1
keysize: 2048
valid: 0
Real name: user_b
Email address: user_b@demo.tld
...

# list keys (optional)
$ gpg --list-keys

# export public key
$ gpg --armor --export user_b@demo.tld > /share/user_b.asc
Both public keys are available.
# show folder content (optional)
ls -la /share/
...
-rw-r--r-- 1 root root  156 Oct 19 12:19 example.txt
-rw-r--r-- 1 root root 1707 Oct 19 13:22 user_a.asc
-rw-r--r-- 1 root root 1707 Oct 19 13:27 user_b.asc
...
Both clients need to import the public key from other.