Wuzz is a very easy command line tool for HTTP(S) inspection with very much potential. In this tutorial I will show the installation on Debian 8.7 (jessie).
Preparation
# install git and curl packages
$ sudo apt install -y curl git

# download go (do not install from Debian)
$ curl -O https://storage.googleapis.com/golang/go1.8.linux-amd64.tar.gz

# unzip archive
$ tar xvf go1.8.linux-amd64.tar.gz

# set owner and group (recursive)
$ sudo chown -R root:root go

# move all into target directory
$ sudo mv go /usr/local/
Configure go (for user)
# create hidden go directory
$ mkdir ~/.go

# configure needed paths (inside .bashrc)
$ echo "GOPATH=$HOME/.go" >> ~/.bashrc
$ echo "export GOPATH" >> ~/.bashrc
$ echo "PATH=\$PATH:/usr/local/go/bin:\$GOPATH/bin" >> ~/.bashrc

# reload
$ source ~/.bashrc

# check go version
$ go version
go version go1.8 linux/amd64
Install wuzz
# install packages from github
$ go get github.com/asciimoo/wuzz
# check wuzz version
$ wuzz --version wuzz 0.2.0
# show wuzz help
$ wuzz --help
# simple run
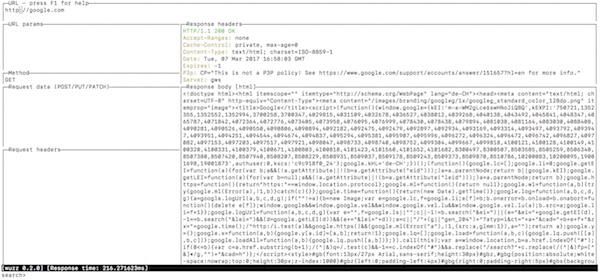
$ wuzzIf everything is going well, the terminal should look like this and you can start.