Robot Framework and Apache Ant

This tutorial is meant to show how easy you can use Robot Framework with Apache Ant. You can use later the build file for example with Jenkins.

Preconditions

Instructions

My folder structure looks like this:

Project structure

Within the folder “report” all logs and reports should be stored. Inside the folder “testsuite” are all Robot Framework files. The “build.xml” looks like this:

<?xml version="1.0"?>
<project name="RobotFramework" basedir="." default="run">
	<description>
		Simple Apache Ant example for running RobotFramework
	</description>
	
	<property name="suite.dir" location="testsuite" />
	<property name="docs.dir" location="report" />
	
	<!-- set time -->
	<target name="init">
		<tstamp>
			<format property="TODAY_DE" pattern="dd.MMMM.yyyy" locale="de" />
		</tstamp>
	</target>
	
	<!-- delete docs.dir -->
	<target name="clean" depends="init">
		<delete dir="${docs.dir}" />
	</target>
	
	<!-- create docs.dir -->
	<target name="setup" depends="clean">
		<mkdir dir="${docs.dir}" />
	</target>
	
	<!-- running testsuite -->
	<target name="run" depends="setup">
		<echo message="${TODAY_DE}" />
		<exec executable="pybot">
			<arg line="-d ${docs.dir}" />
			<arg value="${suite.dir}" />
		</exec>
	</target>
	
</project>

The content of the build.xml is self-explanatory. Now opening a terminal and run Apache Ant.

# direct on folder simple type ant
$ ant

# you can specify the build file
$ ant -buildfile build.xml

# you can specify the target
$ ant run
 

Yosemite – Apache and PHP at user level

Mac OS X include Apache server and PHP, but since some version by default only at root level. To start the Apache on root level simple use the following commands.

# start Apache
$ sudo apachectl start

# restart Apache
$ sudo apachectl restart

# stop Apache
$ sudo apachectl stop

After starting the Apache server, on browser you can use the URL “http://localhost”. You should see something like: “It Works”. The location for files is “/Library/WebServer/Documents/”.

Small note
I have to apologize! The security policies of my provider do not allow the usage or combination for special words. Therefore, at various points images were used.

User level

Now we create the Apache on user level with a few configuration steps.

# Create folder (if not exists)
$ mkdir ~/Sites

Inside this folder create a simple PHP file (index.php)

<?php phpinfo(); ?>

In the third step, the configuration file of the user is created. The name always includes the user name!

$ cd /etc
$ vi /apache2/users/<username>.conf

Add the following content and save

<Directory "/Users/<username>/Sites/">
  AllowOverride All
  Options Indexes MultiViews FollowSymLinks
  Require all granted
</Directory>

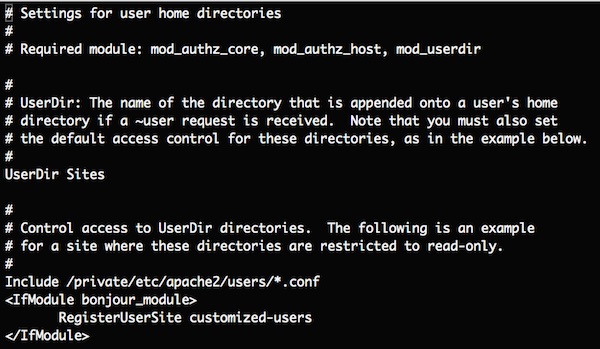
Check the access permissions for “-rw-r–r–” or “664”! To enable the configuration, open the “httpd-userdir.conf” and uncomment one line above <IfModule>.

$ cd /etc
$ sudo vi apache2/extra/httpd-userdir.conf

httpd-userdir.conf

In the last step, only the correct modules must be loaded.

configuration

Now uncomment the LoadModule lines for “mod_userdir.so” and “libphp5.so” and include for user home.

LoadModule userdir_module libexec/apache2/mod_userdir.so
LoadModule php5_module libexec/apache2/libphp5.so

user home include

Thats it! If you now start/restart the Apache and call the URL “http://localhost/~<username>/” in your browser, you should see the parsed content of PHP file.

Minimize CSS and JavaScript files

To speed up the performance of your website, all CSS and JavaScript files should be minimized. That means, all CSS and JavaScript should delivered without unnecessary comments, spaces, line breaks and tabs. It should of course take place in the build process, otherwise your developers work is much harder! This tutorial shows how easily you can  minimize files, by using the YUI Compressor.

Precondition

Minimize one file

# Syntax to minimize CSS
$ java -jar yuicompressor-x.y.z.jar style.css -o style-min.css

# Syntax to minimize JavaScript
$ java -jar yuicompressor-x.y.z.jar script.js -o script-min.js

Minimize multiple files

# Syntax to minimize CSS
$ java -jar yuicompressor-x.y.z.jar -o '.css$:-min.css' *.css

# Syntax to minimize JavaScript
$ java -jar yuicompressor-x.y.z.jar -o '.js$:-min.js' *.js

For more options show the help!

# show help
$ java -jar yuicompressor-x.y.z.jar --help

Run programming languages from finder

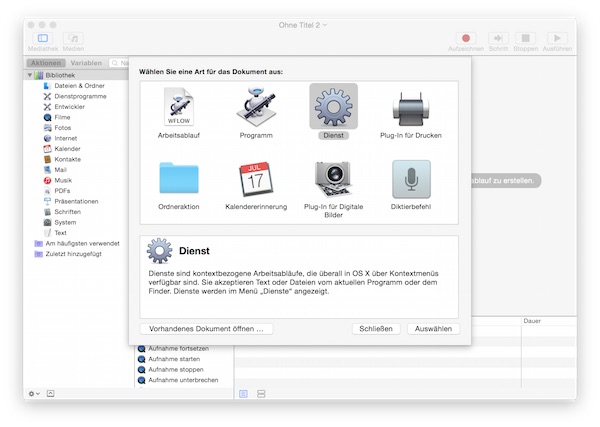
On double-click the Mac OS X finder opens the default editor for script files. With the Automator you can very easy create services, which run these scripts. This example shows how to run python direct from finder.

Steps

Start Automator and select “Service”

automator service

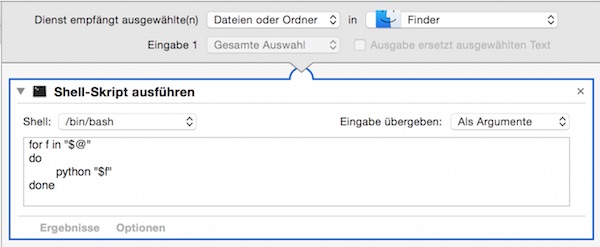
The service should receive “Files and Folder” on “Finder”.

Service receive files and folders

Now add from library “Run as Shellscript” with following content.

Run Shell Script

for f in "$@"
do
    python "$f"
done

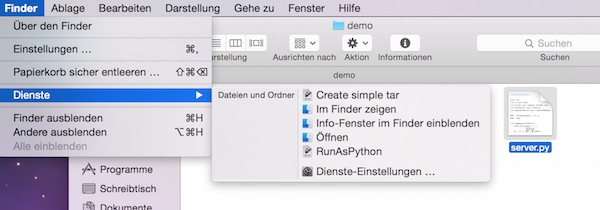
Now save your Automator workflow. The location should be automatically set to: “/Users/<user>/Library/Services”. Now select a python file, over the context menu or navigation item service, you can run it directly. My service is called “RunAsPython.

automator service for python

PyCharm Community Edition and Database Navigator

For the Community Editition there is a plugin that allows to edit or query databases directly from PyCharm. Currently MySQL, Oracle and Postgres are supported. The benefit, You as a tester (or developer) need to use no other tools.

Preparation

  • PyCharm is installed
  • Running Postgres server
  • Download latest JDBC driver (PostgreSQL)

Instructions

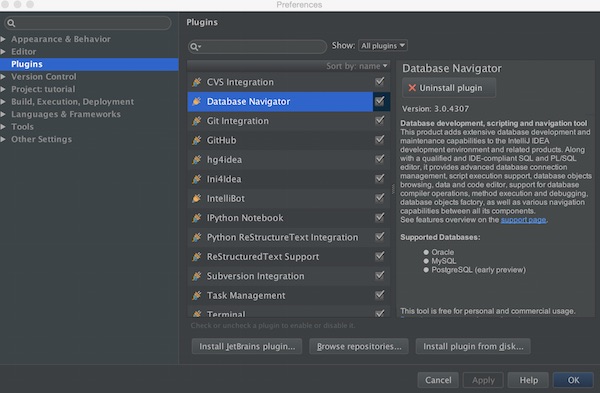
Search and install the “Database Navigator”. Restart PyCharm after installation.

PyCharm Database Navigator

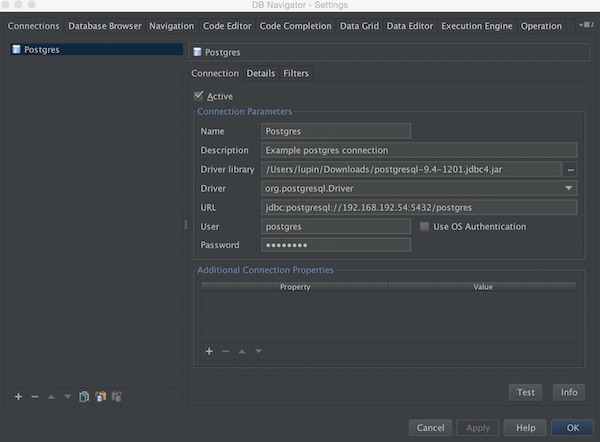
Setup the connection. The following example shows a connection to Postgres.

Postgres connection

Insert all needed values. As driver library select the JDBC jar file. The URL should follow the syntax like:

jdbc:postgresql://host:port/database

To verify your settings, use the test button.

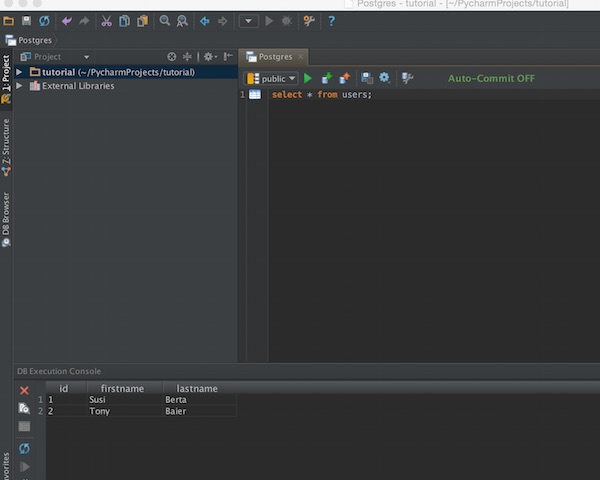
Now you can query, just select the schema and insert your SQL statements.

Database Navigator usage