Invalid MIT-MAGIC-COOKIE-1

Problem

After an OS update including a restart of the system, an error occurs with SSH X11 forwarding. Instead of displaying the windows as usual, “Invalid MIT-MAGIC-COOKIE-1” is displayed in the terminal.

Here is the example. I connect to the Ubuntu with my macOS and get the error message.

┌──[lupin@HackMac]::[~]
└─ % ssh -C4Y lupin@10.0.0.12

lupin@nano4gb:~$ xeyes
Invalid MIT-MAGIC-COOKIE-1 keyError: Can't open display: localhost:10.0
lupin@nano4gb:~$ exit

1st Quick and dirty solution

Since I’m on my own and relatively secure network, I leave XQuartz running in the background, disable access control, reconnect and everything works again.

┌──[lupin@HackMac]::[~]
└─ % xhost +
access control disabled, clients can connect from any host

┌──[lupin@HackMac]::[~]
└─ % ssh -C4Y lupin@10.0.0.12

lupin@nano4gb:~$ xeyes
lupin@nano4gb:~$ exit

This setting is (fortunately) only valid for this one session. As soon as I end the connection, restart XQuartz and establish a new SSH connection, the error message appears again. Anyway a not so nice solution!

2nd Quick and dirty solution

XQuartz offers the possibility to establish the connection without authentication. This solution is permanent and can be set up in the simplest way. Open the XQuartz settings and uncheck the respective checkbox.
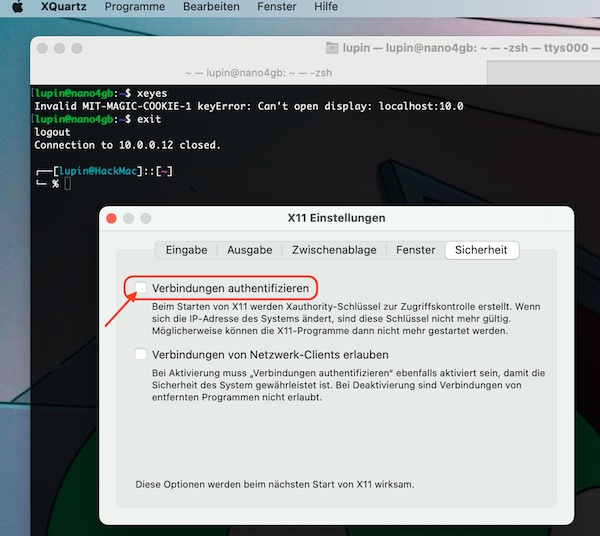
XQuartz X11 Settings

Restart XQuartz, establish a new connection.

┌──[lupin@HackMac]::[~]
└─ % xhost
access control enabled, only authorized clients can connect

┌──[lupin@HackMac]::[~]
└─ % ssh -C4Y lupin@10.0.0.12

lupin@nano4gb:~$ xeyes
lupin@nano4gb:~$ exit
example for xeyes

Now everything works as usual. But even with this solution I have my doubts! So I undo the setting and restart XQuartz.

3rd Quick and dirty solution

As described in the previous step, I undid the setting and restarted XQuartz. Additionally I allowed local connections in the access control.

┌──[lupin@HackMac]::[~]
└─ % xhost
access control enabled, only authorized clients can connect

┌──[lupin@HackMac]::[~]
└─ % xhost +local:
non-network local connections being added to access control list

┌──[lupin@HackMac]::[~]
└─ % ssh -C4Y lupin@10.0.0.12

lupin@nano4gb:~$ xeyes
lupin@nano4gb:~$ exit

This solution also works but is not permanent and not secure.

What now?

Searching the internet didn’t really help me. Some of the suggested solutions are total nonsense (or I completely misunderstand). I’ve also read the man pages where it even says that the environment variable $DISPLAY should not be changed. With me (also due to the ignorance on my part) the first signs of despair are appearing! Trust me, I deleted also all recommended files, what did not change this situation.

My final Solution

In the end my problem was very easy to solve! I still had entries from already deleted macports in the .zprofile file, which set the local environment variable $DISPLAY. With the restart of my macOS, this export of the environment variable became active again, of course.

┌──[lupin@HackMac]::[~]
└─ % echo $DISPLAY
:0

┌──[lupin@HackMac]::[~]
└─ % vim .zprofile

# I deleted all old macports entries

┌──[lupin@HackMac]::[~]
└─ % sudo reboot

The result after the restart.

┌──[lupin@HackMac]::[~]
└─ % echo $DISPLAY           
/private/tmp/com.apple.launchd.ASpxDkLA98/org.xquartz:0

┌──[lupin@HackMac]::[~]
└─ % ssh -C4Y lupin@10.0.0.12

lupin@nano4gb:~$ xeyes

Everything is all right again. Oh yeah… that was troubleshooting. The good thing is I learned a lot about xhost, xauth plus my own systems.

First steps with Jetson Nano 2GB Developer Kit (Part 3)

In the two previous steps you installed the Jetson nano operating system and installed the necessary hardware pereferie. In this part you will learn how to recognize faces in pictures. In addition, it is shown how to use this remote via SSH/X11 Forward (headless).

Note: If you like to use the GUI, you can jump directly to section “Python & OpenCV” and adapt necessary steps.

Preparation

Since I use macOS myself, this tutorial will also be based on this. If you are a user of another operating system, search the Internet for the relevant solution for the “Preparation” section. However, the other sections are independent of the operating system.

If you haven’t done it, install XQuartz on your macOS now. To do this, download the latest version (as DMG) from the official site and run the installation. Of course, if you prefer to use a package manager like Homebrew, that’s also possible! If you do not have to log in again automatically after the installation, carry out this step yourself! That’s pretty much it. It shouldn’t need anything other than starting XQuarts.

Now start the SSH connection to the Jetson Nano (while XQuarts is running in the background).

# connect via SSH
$ ssh -C4Y <user>@<nano ip>

X11 Forwarding

You might want to check your SSH configuration for X11 on the Jetson Nano first.

# verify current SSH configuration
$ sshd -T | grep -i 'x11\|forward'

Important are following setings x11forwarding yes, x11uselocalhost yes and allowtcpforwarding yes. If these values ​​are not set, you must configure them and restart the SSHD service. Normally, however, these are already preconfigured on latest Jetson Nano OS versions.

# edit configuration
$ sudo vim / etc /ssh/sshd_config

# restart service after changes
$ sudo systemctl restart sshd

# check sshd status (optional)
$ sudo systemctl status sshd

Note: The spaces between slashes and etc is wrong! But my provider does not allow the correct information for security reasons.

You may have noticed that you established the SSH connection with “-Y”. You can check that with the environment variable $DISPLAY.

# show value of $DISPLAY (optional)
$ echo $DISPLAY
localhost:10.0

Attention: If the output is empty, check all previous steps carefully again!

Python & OpenCV

Normally Python3.x and OpenCV already exist. If you also want to check this first, proceed as follows.

# verify python OpenCV version (optional)
$ python3
>>> import cv2
>>> cv2.__version__
>>> exit()

Then it finally starts. Now we develop the Python script and test with pictures whether we recognize the faces of people. If you don’t have any pictures of people yet, check this page. The easiest way is to downnload the images into the HOME directory. But you can also create your own pictures with the USB or CSI camera.

# change into home directory
$ cd ~

# create python script file
$ touch face_detection.py

# start file edit
$ vim face_detection.py

Here the content of the Python Script.

#!/usr/bin/env python3

import argparse
from pathlib import Path
import sys
import cv2

# define argparse description/epilog
description = 'Image Face detection'
epilog = 'The author assumes no liability for any damage caused by use.'

# create argparse Object
parser = argparse.ArgumentParser(prog='./face_detection.py', description=description, epilog=epilog)

# set mandatory arguments
parser.add_argument('image', help="Image path", type=str)

# read arguments by user
args = parser.parse_args()

# set all variables
IMG_SRC = args.image
FRONTAL_FACE_XML_SRC = '/usr/share/opencv4/haarcascades/haarcascade_frontalface_default.xml'

# verify files existing
image = Path(IMG_SRC)
if not image.is_file():
    sys.exit('image not found')

haarcascade = Path(FRONTAL_FACE_XML_SRC)
if not haarcascade.is_file():
    sys.exit('haarcascade not found')

# process image
face_cascade = cv2.CascadeClassifier(FRONTAL_FACE_XML_SRC)
img = cv2.imread(cv2.samples.findFile(IMG_SRC))
gray_scale = cv2.cvtColor(img, cv2.COLOR_BGR2GRAY)
detect_face = face_cascade.detectMultiScale(gray_scale, 1.3, 5)

for (x_pos, y_pos, width, height) in detect_face:
    cv2.rectangle(img, (x_pos, y_pos), (x_pos + width, y_pos + height), (10, 10, 255), 2)

# show result
cv2.imshow("Detection result", img)

# close
cv2.waitKey(0)
cv2.destroyAllWindows()

Hint: You may have noticed that we use existing XML files in the script. Have a look under the path, there are more resources.

# list all haarcascade XML files
$ ls -lh /usr/share/opencv4/haarcascades/

When everything is done, start the script include specifying the image arguments.

# run script
$ python3 face_detection.py <image>

# or with executable permissions
$ ./face_detection.py <image>

You should now see the respective results. With this we end the 3rd part. Customize or extend the script as you wish.