JMeter and Taurus

Taurus from Blazemeter seems really to have a potential to be a star. There are new and easy ways to ease the workflow with JMeter. It allows, for example, configuration options and reports which JMeter does not offer by default.

Installation

# install via pip
$ sudo pip install bzt

On error look for installed libxml2 and libxslt libraries!

Usage

├── example.jmx
├── example.yml
└── requirements.txt
bzt==0.5.0

You don`t need jMeter or jMeter PlugIns installed! All will automatically downloaded in given path (see YAML).

---
modules:
  jmeter:
    path: ~/.bzt/jmeter-taurus/bin/jmeter
    download-link: http://apache.claz.org/jmeter/binaries/apache-jmeter-{version}.zip
    version: 2.13

execution:
  scenario:
    script: example.jmx
    variables:
      MY_TARGET_HOST: softwaretester.info

reporting:
  - module: console
  - module: final_stats
    summary: true
    percentiles: true
    test-duration: true
  - module: junit-xml
    filename: report/report.xml
    data-source: sample-labels

example.jmx

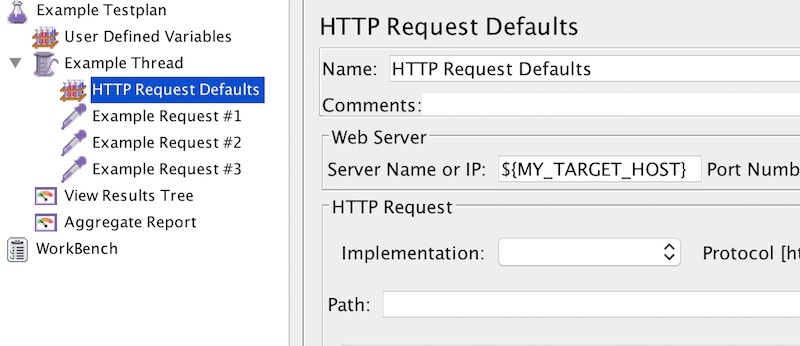
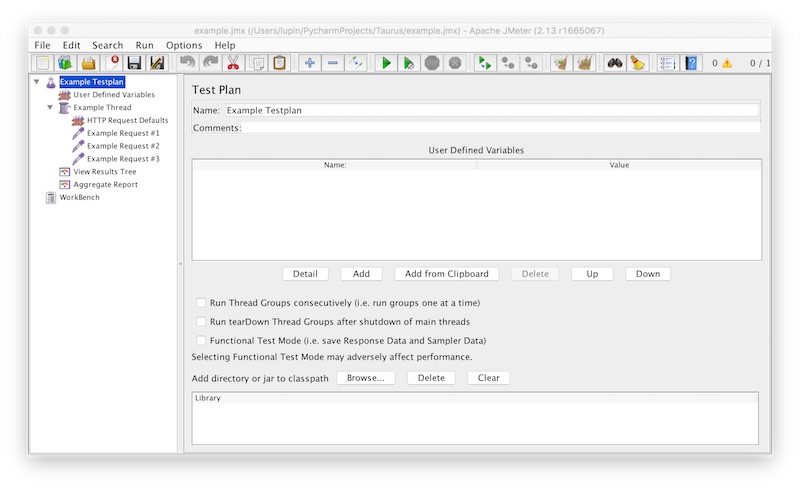
Create a JMeter testplan with “User Defined Variables”, one “Thread” with one “HTTP Request Defaults” and some “HTTP Requests”.

Taurus jMeter Example 1

On “User Defined Variables” – “Name” insert “MY_TARGET_HOST” this value will be set by Taurus YAML file.

Taurus jMeter Example 2

On “HTTP Request Defaults” – “WebServer” use the variable (MY_TARGET_HOST).

Taurus jMeter Example 3

Running JMeter test

# running headless by yaml file
$ bzt example.yml

# running headless by jmx file
$ bzt example.jmx

# running with JMeter GUI by yaml file
$ bzt example.yml -gui

# running with JMeter GUI by jmx file
$ bzt example.jmx -gui

Two folders will created on each test run. “report” (configured in YAML) and “Artifacts” (as Date/Time string). Attention – report.xml will replaced on each run!

Jenkins and Virtualenv

This guide is intended to show how you can use Jenkins/Hudson with Python virtualenv.

Precondition

Preparation

# install on Debian/Ubuntu/Mint
$ sudo aptitude update
$ sudo aptitude install python-pip python-virtualenv

# install on Mac OS
$ sudo easy_install pip
$ sudo pip install virtualenv

Example

Create (if necessary) a new “Freestyle Project” and configure as needed build-paramaters , VCS and etc. On section “Build” – “Execute Shell” insert following script.

# set variable
ExampleENV="${WORKSPACE}"/.ExampleENV

# delete folder and content if exists
if [ -d "$ExampleENV" ]; then
	rm -fr "$ExampleENV"
fi

# create new virtualenv
virtualenv --no-site-packages "$ExampleENV"

# activate virtualenv
. "$ExampleENV"/bin/activate

# CODE FOR VIRTUALENV...

Jenkins – Modern Status Plugin

Who the original symbols of Jenkins do not like, should try the Modern Status Plugin. The tiny plugin of Oliver Vinn provide a new and very cool set of icons for the continuous integration server. The installation is very simple!

Example

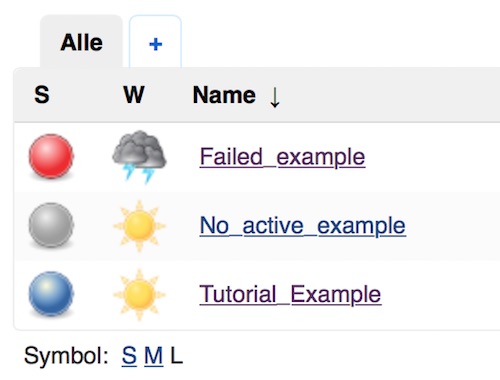
This is a example of original icons for Jenkins/Hudson:

jenkins original status icons

Yes they might lead to confusion and don’t look awesome.

Steps

Open the Plugin Manager and search for “Modern Status Plugin”.

jenkins modern status plugin

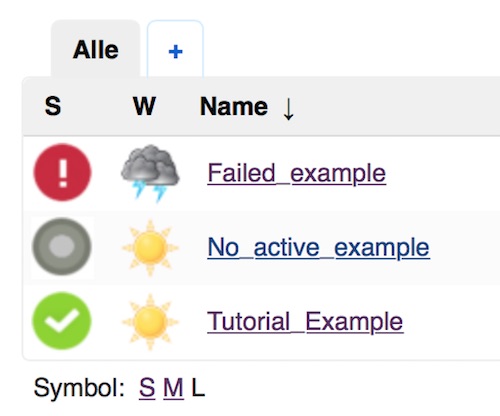
After restart Jenkins/Hudson the new iconset should be available and look like:

jenkins modern status

This looks quite nice and speaks much better, already on first view, about the status.

Sass, Compass and Jenkins

This tutorial shows how Sass, Compass and Jenkins working together in very easy way. The goal is that Jenkins created the CSS from SCSS files.

Precondition

  • Jenkins installed
  • Ruby installed

Steps

In first step we need to install Sass and Compass on the clients (Developer engines) and build server (Jenkins).

# check for installed libraries
$ gem list

# update gem`s
$ sudo gem update --system

# install sass and compass libraries
$ sudo gem install sass
$ sudo gem install compass

Now we create on one client the project.

# change to specific folder
$ cd ~/path/to/folder

# create compass project
$ compass create --bare --sass-dir "sass" --css-dir "css" --javascripts-dir "js" --images-dir "img"

# create folders
$ mkdir img js css sass/partials

# create files
$ touch index.html js/main.js sass/style.scss sass/partials/_reset.scss sass/partials/_content.scss

Now add and edit some content to the files with your favorite editor and commit all to your repository. The content for the tutorial looks like this:

require 'compass/import-once/activate'
# Require any additional compass plugins here.

# Set this to the root of your project when deployed:
http_path = "/"
css_dir = "css"
sass_dir = "sass"
images_dir = "img"
javascripts_dir = "js"

# You can select your preferred output style here (can be overridden via the command line):
output_style = :compressed

# To enable relative paths to assets via compass helper functions. Uncomment:
# relative_assets = true

# To disable debugging comments that display the original location of your selectors. Uncomment:
line_comments = false


# If you prefer the indented syntax, you might want to regenerate this
# project again passing --syntax sass, or you can uncomment this:
# preferred_syntax = :sass
# and then run:
# sass-convert -R --from scss --to sass sass scss && rm -rf sass && mv scss sass
<!doctype html>
<head>
	<title>Lorem ipsum</title>
	<meta charset="utf-8">
	<meta name="viewport" content="width=device-width">
	<link rel="stylesheet" href="css/styles.css">
</head>
<body>
	<header>
		Header Content
	</header>
	<div id="wrapper">
		<h1>Lorem ipsum</h1>
		<article>
			<section>
				<h2>Lorem ipsum</h2>
				<p>Lorem ipsum dolor sit amet</p>
			</section>
			<section>
				<h2>Lorem ipsum</h2>
				<p>Lorem ipsum dolor sit amet</p>
			</section>
		</article>
	</div>
	<footer>
		Footer Content
	</footer>
	<script src="js/main.js"></script>
</body>
</html>
@import "compass";
@import "partials/reset";
@import "partials/content";
html, body, div, span, applet, object, iframe, h1, h2, h3, h4, h5, h6, p, blockquote, pre, a, abbr, acronym, address, big, cite, code, del, dfn, em, img, ins, kbd, q, s, samp, small, strike, strong, sub, sup, tt, var, b, u, i, center, dl, dt, dd, ol, ul, li, fieldset, form, label, legend, table, caption, tbody, tfoot, thead, tr, th, td, article, aside, canvas, details, embed, figure, figcaption, footer, header, hgroup, menu, nav, output, ruby, section, summary, time, mark, audio, video {
	margin: 0;
	padding: 0;
	border: 0;
	font-size: 100%;
	font: inherit;
	vertical-align: baseline;
}
article, aside, details, figcaption, figure, footer, header, hgroup, menu, nav, section {
	display: block;
}
body {
	line-height: 1;
}
ol, ul {
	list-style: none;
}
blockquote, q {
	quotes: none;
}
blockquote:before, blockquote:after, q:before, q:after {
	content: '';
	content: none;
}
table {
	border-collapse: collapse;
	border-spacing: 0;
}
$color_001: #000000; // Black
$color_002: #FFFFFF; // White
$color_003: #FF0000; // Red

body {
	color: $color_002;
	background-color: $color_001;
}

Okay… now lets go to Jenkins. Here we create a new “Freestyle Job” and configure the Source-Code-Management and insert the following command into “Execute Shell”

rm -fr ${WORKSPACE}/css
compass compile

Thats it… after running the build into the workspace you should see the folder “css” and a file “style.css” the content should look like:

html,body,div,span,applet,object,iframe,h1,h2,h3,h4,h5,h6,p,blockquote,pre,a,abbr,acronym,address,big,cite,code,del,dfn,em,img,ins,kbd,q,s,samp,small,strike,strong,sub,sup,tt,var,b,u,i,center,dl,dt,dd,ol,ul,li,fieldset,form,label,legend,table,caption,tbody,tfoot,thead,tr,th,td,article,aside,canvas,details,embed,figure,figcaption,footer,header,hgroup,menu,nav,output,ruby,section,summary,time,mark,audio,video{margin:0;padding:0;border:0;font-size:100%;font:inherit;vertical-align:baseline}article,aside,details,figcaption,figure,footer,header,hgroup,menu,nav,section{display:block}body{line-height:1}ol,ul{list-style:none}blockquote,q{quotes:none}blockquote:before,blockquote:after,q:before,q:after{content:'';content:none}table{border-collapse:collapse;border-spacing:0}body{color:#fff;background-color:#000}
 

Publish continuous integration status on Desktop

In one of my last tutorials, i show how to develop test tools for software tester with Python. Now i will show you, how to publish continuous integration status information for other team members like Scrum master, Product owner or Test manager.

Preconditions

Note

If you don`t have Jenkins or Hudson running, search some public services with Google!

Example: inurl:8080 intitle:”Dashboard [Jenkins]”

Steps

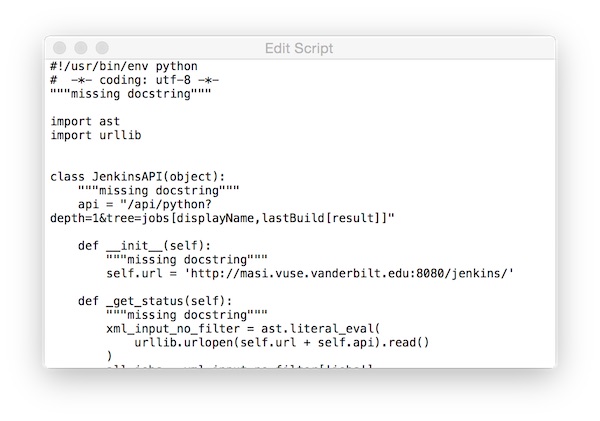
Create a python script like this:

#!/usr/bin/env python
#  -*- coding: utf-8 -*-

import ast
import urllib


class JenkinsAPI(object):

    api = "/api/python?depth=1&tree=jobs[displayName,lastBuild[result]]"

    def __init__(self):
        self.url = 'http://masi.vuse.vanderbilt.edu:8080/jenkins/'

    def _get_status(self):
        xml_input_no_filter = ast.literal_eval(
            urllib.urlopen(self.url + self.api).read()
        )
        all_jobs = xml_input_no_filter['jobs']
        return all_jobs

    def show_results(self):
        job = self._get_status()
        fail = [row for row in job if 'SUCCESS' != row['lastBuild']['result']]
        passed = len(job) - len(fail)
        print "Jenkins: %s" % self.url
        print "Jobs: %s - Successful: %s - Failed: %s" % (
            len(job), passed, len(fail)
        )
        if len(fail) > 0:
            for (i, item) in enumerate(fail):
                print " > Job: %s - %s" % (
                    item['displayName'], item['lastBuild']['result']
                )
            del i


if __name__ == '__main__':
    RUN = JenkinsAPI()
    RUN.show_results()

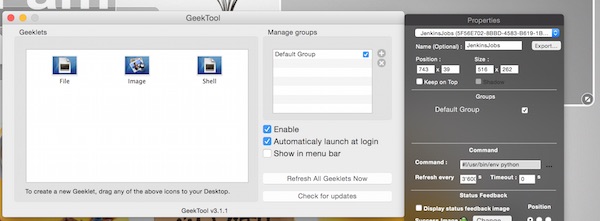
Now start GeekTool and create a new Geeklet. Drag a Shell Geeklet on you Desktop. Now insert values for name, size, set colors and so on and add the python script on “Command”.

Create Geeklet

… the script.

Geeklet Command

Thats it! Now you can export the Geeklet and share it with you team members. My current screen looks like:

Geeklet result

Jenkins and jslint4java

This tutorial shows a very simple Jenkins – jslint4java integration over Shell.

Preconditions

Jenkins is installed

Steps

Start Jenkins, open the browser (http://<host>:8080) and setup a new “Free Style Project” (JS-Lint-Example).

# start jenkins
$ service jenkins start

Back to Jenkins… here you create a “Freestyle-Project”

Jenkins Freestyle Project

The tutorial does not use any VCS, so we press the “Build Now” button to create the project “workspace” folder. After successful creation, we create 3 new folders (src, lib, build) inside the workspace folder.

# create new folders inside the workspace
$ cd /var/lib/jenkins/workspace/JS-Lint-Example/
$ mkdir {src,lib,build}

# change owner of folders
$ chown jenkins:jenkins src/ lib/ build/

Now upload the jslint4java into the “lib” folder.

# upload jar to lib folder
$ scp jslint4java-2.0.5.jar <user>@<host>:/var/lib/jenkins/workspace/JS-Lint-Example/lib

# change owner and make executable
$ chown jenkins:jenkins jslint4java-2.0.5.jar
$ chmod u+x jslint4java-2.0.5.jar

It`s time to test if jslint4java is running. The 1st test can be done inside the terminal self.

$ java -jar jslint4java-2.0.5.jar --help

The 2nd test direct on Jenkins. Open the “JS-Lint-Example” job in browser – press link “Configure” and we create a “Build-Step” with “Execute Shell”.

Jenkins JSLint Test

After save and build the “Console Output” of the respective build should show the help. If there is a problem here, please check if Java is installed and the file permissions are correct. If everything works fine we create a simple JavaScript file and upload this into the “src” folder.

function myFunction(p1, p2) {
  return p1 * p2;
}

var person = {
  firstName:"John",
  lastName:"Doe",
  age:50,
  eyeColor:"blue"
};

test = myFunction(10, 10);

document.write('Hello World');
document.write(test);
document.write(person.firstName);
# upload example.js to src folder
$ scp example.js <user>@<host>:/var/lib/jenkins/workspace/JS-Lint-Example/src

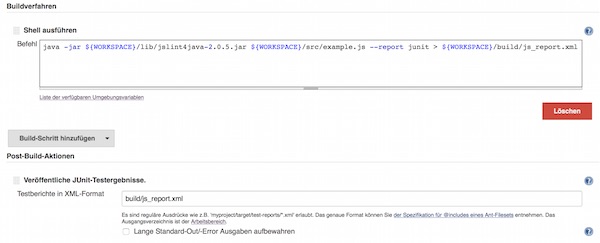
Now we change the “Execute Shell” command and add the “Post-Build-Action” – “Publish JUnit Test Results” with value “build/js_report.xml”.

Jslint Jenkins Configuration
java -jar ${WORKSPACE}/lib/jslint4java-2.0.5.jar ${WORKSPACE}/src/example.js --report junit > ${WORKSPACE}/build/js_report.xml

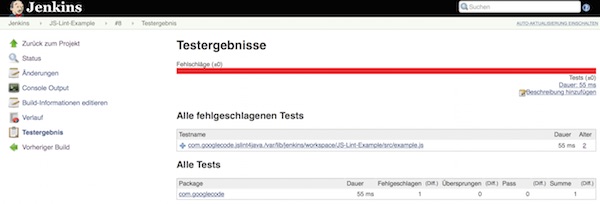
Ready,… after save and new build we can see the file “js_report.xml” into “build” folder and the jUnit  report into our project.

Jslint Jenkins jUnit Report

Embed SLOCCount into Jenkins jobs

Preparation

Install SLOCCount and cloc on system.

$ aptitude install sloccount cloc

Search and install the “SLOCCount Plugin”.

jenkins sloccount plugin
Search SLOCCount Plugin

Configure

Now search your job and start configuration and insert the command “Build > Execute Shell”.

sloccount --duplicates --wide --details ${WORKSPACE}/<file|folder> > sloccount_report.sc

As last step add the Post-Build-Action – “View SLOCCount results” and insert the generated report “sloccount_report.sc”.

sloccount result path
Configure Post-Build-Action

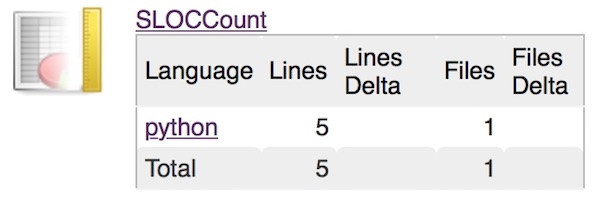
The plugin just show the number of lines per file, file type and folder. No estimated project value or other informations! This information you can see direct on generated report. After running the build, your screen should look similar like this:

sloccount report
SLOCCount report

Markup validation with Jenkins

Preparation

Search and install the “Unicorn Validation Plugin” and “Plot Plugin”

jenkins unicorn plugin
Search for Plugin

Configure

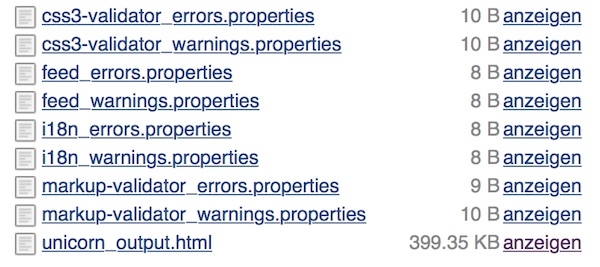
Within the build section, add a build step “Unicorn Validator”. For the Site to validate add a URL to a site that you want to test. Before you configure the Post-build Actions you should save and run. After 1st run the workspace should look similar.

unicorn results
Workspace files

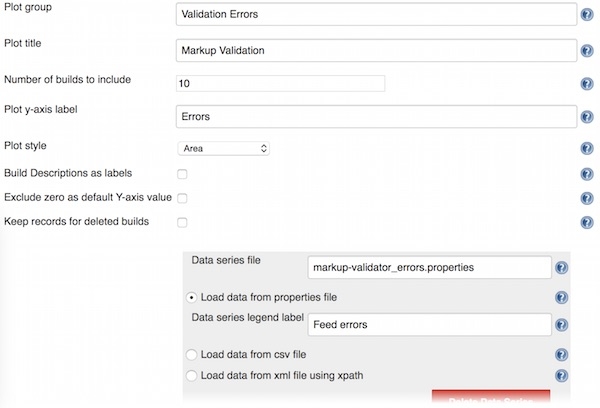
Now start configuration again. On Post-build Actions section add “Plot build data”, and add the following details:

unicorn configuration
Plot configuration

Now you can run the build again and on job navigation you see the item “Plots”. Repeat the last step for plotting of css results. As value for “Plot title” use “CSS Validation errors” and for “Data series file” use “css3-validator_errors.properties”.