Install Jenkins with Puppet

As a software tester you need a test environment! The test environment should be soon as possible and without outside resources deployable. This guide shows you how to install Jenkins on Debian/Ubuntu with Puppet (Version 2.7.x).

Preparation

# get puppet version
$ puppet --version

# get puppet-lint version
$ puppet-lint --version

If Puppet and Puppet-Lint are not installed:

# update and upgrade
$ apt-get update && apt-get upgrade

# install puppet and puppet-lint
$ apt-get install puppet && apt-get install puppet-lint

The project looks like the following:

testenvironment
├── manifests
│   ├── nodes.pp
│   └── site.pp
└── modules
    └── jenkins
        └── manifests
            └── init.pp

Steps

# create folders
$ mkdir -p testenvironment/manifests
$ mkdir -p testenvironment/modules/jenkins/manifests

# create files
$ touch testenvironment/manifests/site.pp
$ touch testenvironment/manifests/nodes.pp
$ touch testenvironment/modules/jenkins/manifests/init.pp

The first content we add is for “site.pp”. Here we include the “nodes.pp” and setup basic paths.

import 'nodes.pp'

Exec {
    path => ['/bin', '/usr/bin'],
}

The next content is for second file “nodes.pp”. Here we create the case statement with the include for Jenkins class and a message (if OS is not supported).

node default {
    case $::operatingsystem {
        'Debian', 'Ubuntu' : { include jenkins }
        default  : { notify {"$::operatingsystem is not supported yet":} }
    }
}

As last step we create the content for “init.pp”.

class jenkins {
    # get key
    exec { 'install_jenkins_key':
        command => 'wget -q -O - http://pkg.jenkins-ci.org/debian/jenkins-ci.org.key | apt-key add - ',
    }

    # update
    exec { 'apt-get update':
        command => 'apt-get update',
        require => File['/etc /apt/sources.list.d/jenkins.list'],
    }

    # source file
    file { '/etc /apt/sources.list.d/jenkins.list':
        content => "deb http://pkg.jenkins-ci.org/debian binary/\n",
        mode    => '0644',
        owner   => root,
        group   => root,
        require => Exec['install_jenkins_key'],
    }

    # jenkins package
    package { 'jenkins':
        ensure  => latest,
        require => Exec['apt-get update'],
    }

    # jenkins service
    service { 'jenkins':
        ensure  => running,
        require => Package['jenkins'],
    }
}

Note: The space after “/etc /apt” on “update” and “source file” should removed! I made this just because of the security policies of my provider. They do not allow! 🙁

Continue

First we check the syntax with the puppet-lint. As software tester i think you always lint! 😉

# example project-wide
$ puppet-lint testenvironment/

# example specific files
$ puppet-lint testenvironment/manifests/site.pp
$ puppet-lint testenvironment/manifests/nodes.pp
$ puppet-lint testenvironment/modules/jenkins/manifests/init.pp

Now we make some different “Dry-runs”.

# simple Dry-run with noop
$ puppet apply testenvironment/manifests/site.pp --modulepath=/root/testenvironment/modules/ $* --noop

# Dry-run with noop and summarize
$ puppet apply testenvironment/manifests/site.pp --modulepath=/root/testenvironment/modules/ $* --noop --summarize

# Dry-run with noop, summarize and debug
$ puppet apply testenvironment/manifests/site.pp --modulepath=/root/testenvironment/modules/ $* --noop --summarize --debug

With “–noop” nothing is really executed. The “–modulepath”, “–summarize” and “–debug” speaks for themselves.

the Final

Now the final, after the Puppet is ready you should able to connect to Jenkins.

# run puppet
$ puppet apply testenvironment/manifests/site.pp --modulepath=/root/testenvironment/modules/ $*


Robot Framework and Apache Ant

This tutorial is meant to show how easy you can use Robot Framework with Apache Ant. You can use later the build file for example with Jenkins.

Preconditions

Instructions

My folder structure looks like this:

Project structure

Within the folder “report” all logs and reports should be stored. Inside the folder “testsuite” are all Robot Framework files. The “build.xml” looks like this:

<?xml version="1.0"?>
<project name="RobotFramework" basedir="." default="run">
	<description>
		Simple Apache Ant example for running RobotFramework
	</description>
	
	<property name="suite.dir" location="testsuite" />
	<property name="docs.dir" location="report" />
	
	<!-- set time -->
	<target name="init">
		<tstamp>
			<format property="TODAY_DE" pattern="dd.MMMM.yyyy" locale="de" />
		</tstamp>
	</target>
	
	<!-- delete docs.dir -->
	<target name="clean" depends="init">
		<delete dir="${docs.dir}" />
	</target>
	
	<!-- create docs.dir -->
	<target name="setup" depends="clean">
		<mkdir dir="${docs.dir}" />
	</target>
	
	<!-- running testsuite -->
	<target name="run" depends="setup">
		<echo message="${TODAY_DE}" />
		<exec executable="pybot">
			<arg line="-d ${docs.dir}" />
			<arg value="${suite.dir}" />
		</exec>
	</target>
	
</project>

The content of the build.xml is self-explanatory. Now opening a terminal and run Apache Ant.

# direct on folder simple type ant
$ ant

# you can specify the build file
$ ant -buildfile build.xml

# you can specify the target
$ ant run


Minimize CSS and JavaScript files

To speed up the performance of your website, all CSS and JavaScript files should be minimized. That means, all CSS and JavaScript should delivered without unnecessary comments, spaces, line breaks and tabs. It should of course take place in the build process, otherwise your developers work is much harder! This tutorial shows how easily you can  minimize files, by using the YUI Compressor.

Precondition

Minimize one file

# Syntax to minimize CSS
$ java -jar yuicompressor-x.y.z.jar style.css -o style-min.css

# Syntax to minimize JavaScript
$ java -jar yuicompressor-x.y.z.jar script.js -o script-min.js

Minimize multiple files

# Syntax to minimize CSS
$ java -jar yuicompressor-x.y.z.jar -o '.css$:-min.css' *.css

# Syntax to minimize JavaScript
$ java -jar yuicompressor-x.y.z.jar -o '.js$:-min.js' *.js

For more options show the help!

# show help
$ java -jar yuicompressor-x.y.z.jar --help

Run programming languages from finder

On double-click the Mac OS X finder opens the default editor for script files. With the Automator you can very easy create services, which run these scripts. This example shows how to run python direct from finder.

Steps

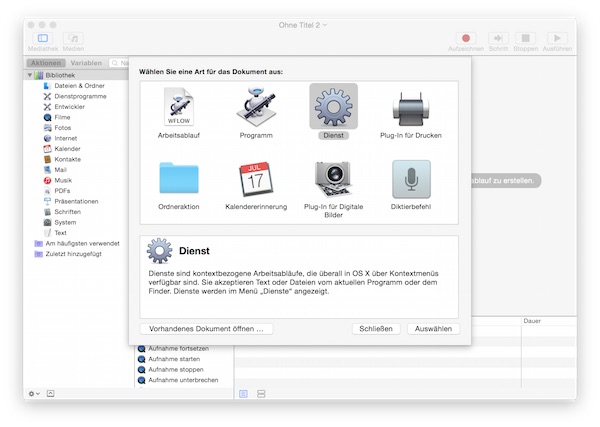
Start Automator and select “Service”

automator service

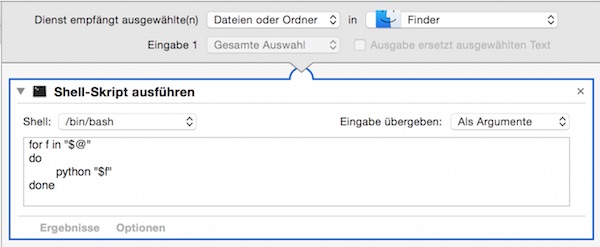
The service should receive “Files and Folder” on “Finder”.

Service receive files and folders

Now add from library “Run as Shellscript” with following content.

Run Shell Script

for f in "$@"
do
    python "$f"
done

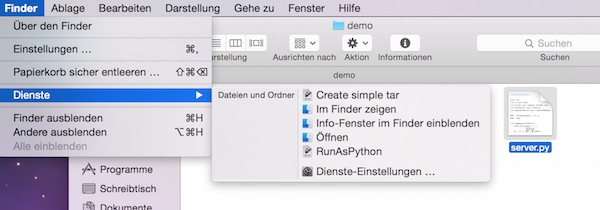
Now save your Automator workflow. The location should be automatically set to: “/Users/<user>/Library/Services”. Now select a python file, over the context menu or navigation item service, you can run it directly. My service is called “RunAsPython.

automator service for python

Create test files on the fly

In many cases test files are needed for software tester. Partially with specified file size. With a small set of commands, it is very easy to create these files. In order to check the generated file(s), you can use the following:

# Check file size
$ ls -lh test-file

# Determine file type
$ file test-file

# Display output one screen
$ less test-file

# or
$ hexdump test-file

Perl

# Example for 1.0K
$ perl -e 'print "a" x 1024' > test-file

# Example for 1.0M
$ perl -e 'print "a" x 1048576' > test-file

mkfile

# Example for 1.0K
$ mkfile 1k test-file

# Example for 1.0M
$ mkfile 1m test-file

dd

# Example for 1.0K
$ dd if=/dev/zero of=test-file bs=1k count=1

# Example for 1.0M
$ dd if=/dev/zero of=test-file bs=1m count=1

base64

# Example for 1.0K
$ base64 /dev/urandom | head -c 1024 > test-file

# Example for 1.0M
$ base64 /dev/urandom | head -c 1048576 > test-file

REST testing with jMeter

Testing RESTful application is very simple with jMeter. In the first part of the tutorial in this series, the basics are shown. As requests can be created and evaluated. The request going to http://httpbin.org.

Preconditions

  • JAVA is installed
  • jMeter is installed

Steps

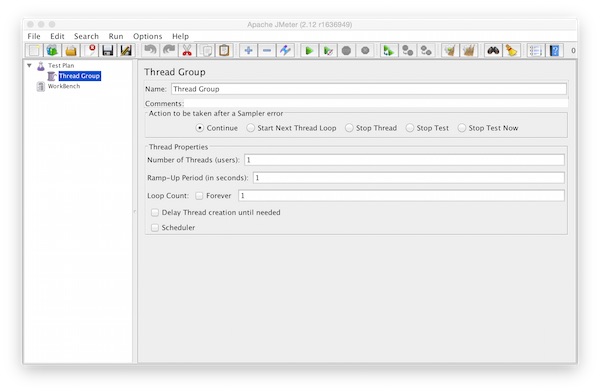
Create new “Thread-Group” on “Test Plan” (Add – Threads (User) – Thread Group)

jmeter thread group

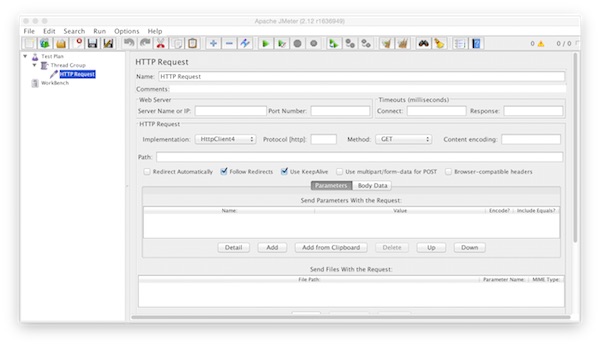
Now add one “HTTP Request” inside the “Thread Group” (Add – Sampler – HTTP Request)

jmeter http request

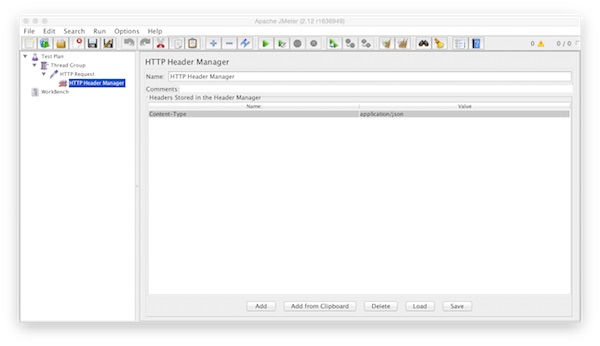
Inside the “HTTP Request” we add now a “HTTP Header Manager” (Add – Config Element – HTTP Header Manager). For configuring we add the Name/Value – “Content-Type”/”application/json”.

jmeter http header manager

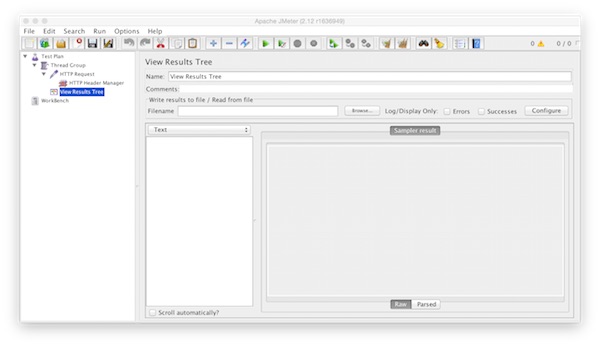
At the end we add the “View Results Tree” on “Thread Group” (Add – Listener – View Results Tree)

jmeter view results tree

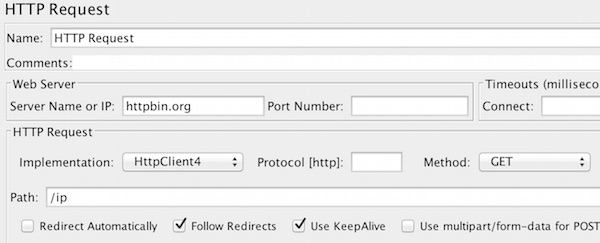
Our first request example will be a “GET”. On HTTP Request we add following values.

  • Server Name or IP: httpbin.org
  • Method: GET
  • Path: /ip
  • Implementation: HttpClient4
  • Follow Redirects: yes
  • Use KeepAlive: yes
jmeter get request

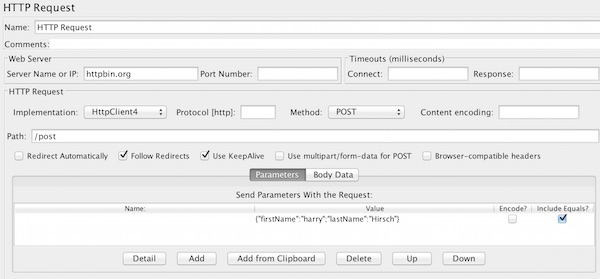
After save we can start the first run. How to see result will show later. Now second request with POST example. For this we modify the HTTP Request with following values.

  • Method: POST
  • Path: /post
  • Send Parameters With the Request: {“firstName”:”harry”;”lastName”:”Hirsch”}
  • Include Equals?: yes
jmeter post request

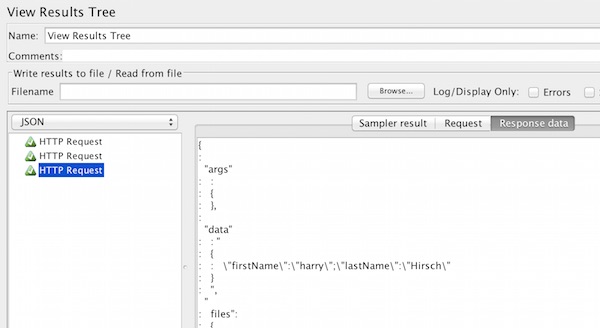
Now save and run again. On View Results Tree we can check the results for every http request (Sampler results, Request, Response data).

jmeter rest results

For the JSON response, switching from Text to JSON view. The same way can used for PUT, DELETE or other requests.

Jenkins and jslint4java

This tutorial shows a very simple Jenkins – jslint4java integration over Shell.

Preconditions

Jenkins is installed

Steps

Start Jenkins, open the browser (http://<host>:8080) and setup a new “Free Style Project” (JS-Lint-Example).

# start jenkins
$ service jenkins start

Back to Jenkins… here you create a “Freestyle-Project”

Jenkins Freestyle Project

The tutorial does not use any VCS, so we press the “Build Now” button to create the project “workspace” folder. After successful creation, we create 3 new folders (src, lib, build) inside the workspace folder.

# create new folders inside the workspace
$ cd /var/lib/jenkins/workspace/JS-Lint-Example/
$ mkdir {src,lib,build}

# change owner of folders
$ chown jenkins:jenkins src/ lib/ build/

Now upload the jslint4java into the “lib” folder.

# upload jar to lib folder
$ scp jslint4java-2.0.5.jar <user>@<host>:/var/lib/jenkins/workspace/JS-Lint-Example/lib

# change owner and make executable
$ chown jenkins:jenkins jslint4java-2.0.5.jar
$ chmod u+x jslint4java-2.0.5.jar

It`s time to test if jslint4java is running. The 1st test can be done inside the terminal self.

$ java -jar jslint4java-2.0.5.jar --help

The 2nd test direct on Jenkins. Open the “JS-Lint-Example” job in browser – press link “Configure” and we create a “Build-Step” with “Execute Shell”.

Jenkins JSLint Test

After save and build the “Console Output” of the respective build should show the help. If there is a problem here, please check if Java is installed and the file permissions are correct. If everything works fine we create a simple JavaScript file and upload this into the “src” folder.

function myFunction(p1, p2) {
  return p1 * p2;
}

var person = {
  firstName:"John",
  lastName:"Doe",
  age:50,
  eyeColor:"blue"
};

test = myFunction(10, 10);

document.write('Hello World');
document.write(test);
document.write(person.firstName);
# upload example.js to src folder
$ scp example.js <user>@<host>:/var/lib/jenkins/workspace/JS-Lint-Example/src

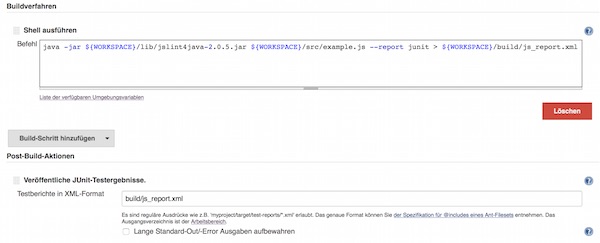
Now we change the “Execute Shell” command and add the “Post-Build-Action” – “Publish JUnit Test Results” with value “build/js_report.xml”.

Jslint Jenkins Configuration
java -jar ${WORKSPACE}/lib/jslint4java-2.0.5.jar ${WORKSPACE}/src/example.js --report junit > ${WORKSPACE}/build/js_report.xml

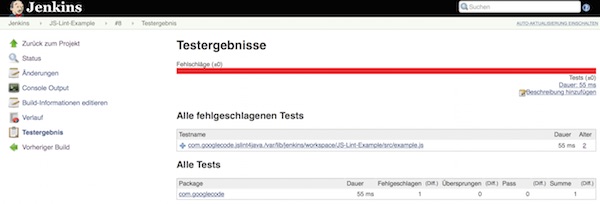
Ready,… after save and new build we can see the file “js_report.xml” into “build” folder and the jUnit  report into our project.

Jslint Jenkins jUnit Report

Robot Framework and Selenium-Grid 2.0

This small tutorial shows, how to run a generic Robot Framework test with Selenium Grid.

Preparation

Steps

Now we create a very simple test

*** Settings ***
Documentation         This is just a tutorial
...
Metadata              VERSION    0.1
Library               Selenium2Library
Suite Setup           Start Browser
Suite Teardown        Close Browser

*** Variables ***
${SERVER}             https://www.google.ch
${BROWSER}            firefox

*** Keywords ***
Start Browser
    [Documentation]   Start firefox browser on Selenium Grid
    Open Browser      ${SERVER}   ${BROWSER}   None    http://127.0.0.1:4444/wd/hub

*** Test Cases ***
Check something
    [Documentation]   Check the page title
    Title Should Be   Google

Now start the Selenium Grid (Hub and Node)

# start the hub (in terminal 1)
$ java -jar selenium-server-standalone-2.44.0.jar -role hub -port 4444 

# start the node (in terminal 2)
$ java -jar selenium-server-standalone-2.44.0.jar -role node -hub http://localhost:4444/grid/register

Note: The actual version for selenium-server-standalone may be different!

Open the browser http://localhost:4444/grid/console and check the node is registered. This step can be skipped, just to be sure.

In the last step we start the test. Open a 3rd terminal, browse to the folder and start the Robot Framework.

# run pybot
$ pybot tutorial.robot

If everything works well, the output should look like this:

================================================================
Tutorial :: This is just a tutorial
================================================================
Check something :: Check the page title                 | PASS |
----------------------------------------------------------------
Tutorial:: This is just a tutorial                      | PASS |
1 critical test, 1 passed, 0 failed
1 test total, 1 passed, 0 failed
================================================================
Output: /output.xml
Log: /log.html
Report: /report.html