Jenkins, InfluxDB and Grafana

Today an basic introduction to Jenkins, InfluxDB and Grafana. Docker is used to save some time. Okay,… let’s start.

Preparation

# create project and change directory
$ mkdir ~/Projects/JIG/influxdb && cd ~/Projects/JIG/

# download official jenkins image (latest)
$ docker pull jenkins

# download official influxdb image (latest)
$ docker pull influxdb

# download official grafana image (latest)
$ docker pull grafana/grafana

# list docker images
$ docker images
...
REPOSITORY          TAG                 IMAGE ID            CREATED             SIZE
jenkins             latest              59b08e8f6e37        4 days ago          704 MB
grafana/grafana     latest              2cdb407c0fa4        7 days ago          286 MB
influxdb            latest              fad81160f2de        13 days ago         224 MB
...

Jenkins preparation

# start Jenkins
$ docker run --name jenkins -p 8080:8080 jenkins

# copy password from cli
...
*************************************************************

Jenkins initial setup is required. An admin user has been created and a password generated.
Please use the following password to proceed to installation:

b49ffa5749724d61b43d3a159b181133
...

Now open your favorite browser with URL http://localhost:8080 and unlook Jenkins with following steps.
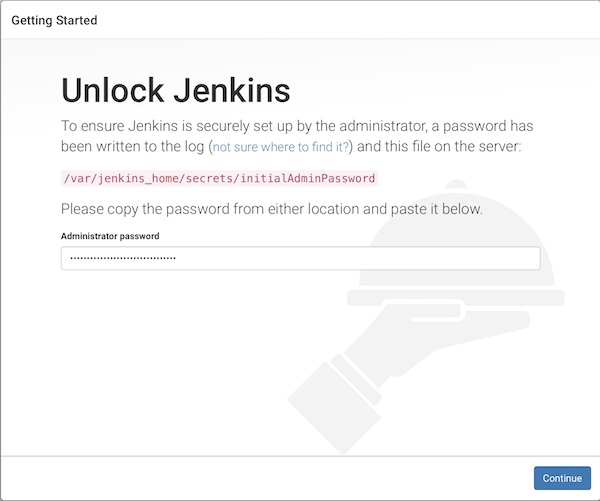
unlook jenkins

  1. unlook with password from cli
  2. install suggested plugins
  3. create your admin user
  4. start using jenkins

Next, the InfluxDB plug-in must be installed.

influxdb plugin jenkins

InfluxDB preparation

# start InfluxDB
$ docker run --name influxdb -p 8086:8086 -v $PWD/influxdb:/var/lib/influxdb influxdb

# check current configuration (optional)
$ docker exec -i influxdb influxd config

# create new user
$ curl -G http://localhost:8086/query --data-urlencode "q=CREATE USER jenkins WITH PASSWORD 'password123' WITH ALL PRIVILEGES"

# create database for jenkins
$ curl -G http://localhost:8086/query -u jenkins:password123 --data-urlencode "q=CREATE DATABASE jenkins_db"

# show users (optional)
$ curl -G http://localhost:8086/query -u jenkins:password123 --data-urlencode "q=SHOW USERS"
...
{"results":[{"statement_id":0,"series":[{"columns":["user","admin"],"values":[["jenkins",true]]}]}]}
...

# show databases (optional)
$ curl -G http://localhost:8086/query -u jenkins:password123 --data-urlencode "q=SHOW DATABASES"
...
{"results":[{"statement_id":0,"series":[{"name":"databases","columns":["name"],"values":[["_internal"],["jenkins_db"]]}]}]}
...

# show measurements
$ curl -G http://localhost:8086/query -u jenkins:password123 --data-urlencode "db=jenkins_db" --data-urlencode "q=SHOW MEASUREMENTS"
...
{"results":[{"statement_id":0}]}
...

Connect Jenkins with InfluxDB

# start jenkins container (if stopped)
$ docker start jenkins

# show ip of influxdb container
$ docker inspect --format '{{ .NetworkSettings.IPAddress }}' influxdb
...
172.17.0.2
...

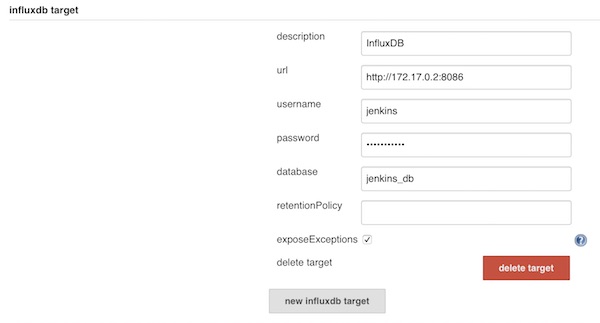
Add new InfluxDB target on Jenkins

jenkins influxdb settings

Save and create a new freestyle job. For example with following configuration.
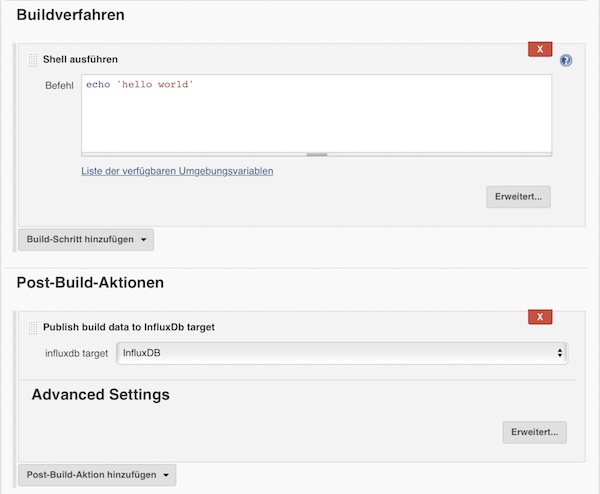
jenkins job influxdb

When you are done,Β run the job.

# show measurements
$ curl -G http://localhost:8086/query -u jenkins:password123 --data-urlencode "db=jenkins_db" --data-urlencode "q=SHOW MEASUREMENTS"
...
{"results":[{"statement_id":0,"series":[{"name":"measurements","columns":["name"],"values":[["jenkins_data"]]}]}]}
...

# run select statement (optional)
$ curl -G http://localhost:8086/query -u jenkins:password123 --data-urlencode "db=jenkins_db" --data-urlencode "q=SELECT * FROM jenkins_data"
...
{"results":[{"statement_id":0,"series":[{"name":"jenkins_data","columns":["time","build_number","build_result","build_result_ordinal","build_status_message","build_successful","build_time","last_stable_build","last_successful_build","project_build_health","project_name","project_name_1"],"values":[["2017-06-08T17:27:24.487Z",9,"SUCCESS",0,"stable",true,16,9,9,100,"test","test"]]}]}]}
...

Add Grafana

# start containers (if stopped)
$ docker start influxdb && docker start jenkins

# run grafana container
$ docker run --name grafana -i -p 3000:3000 grafana/grafana

Open you browser with URL http://localhost:3000, login with credentials (admin/admin) and add a new InfluxDB data source.
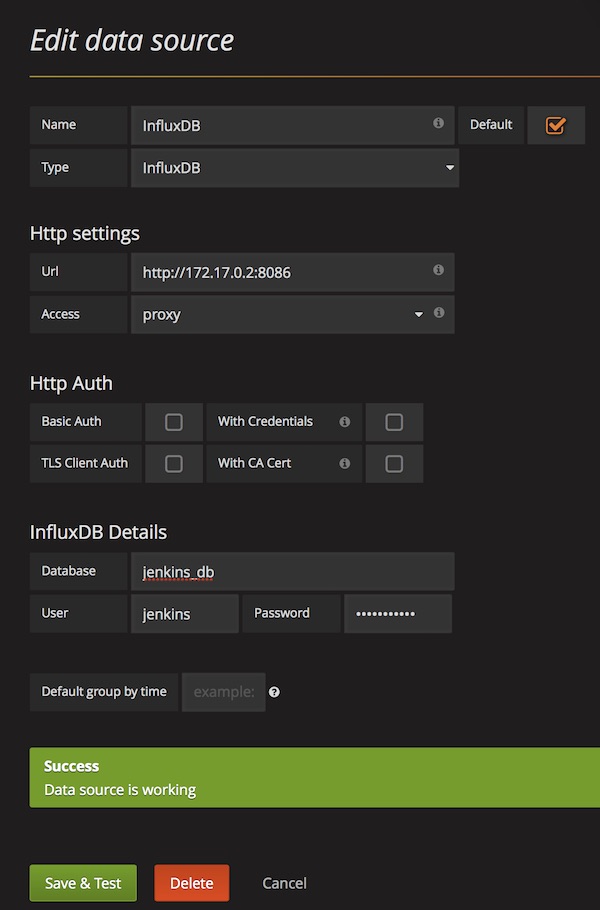
grafana data source

From now on, you can create and share dashboards in Grafana, which shows all Jenkins metrics.
Build notifications with CatLight

CatLight is the the perfect app if you would like to know the current status of your continuous delivery pipelines, tasks and bugs. Without looking on E-Mails or visit build servers you know when attention is needed. It’s available for Debian, Ubuntu, Windows and MacOS.

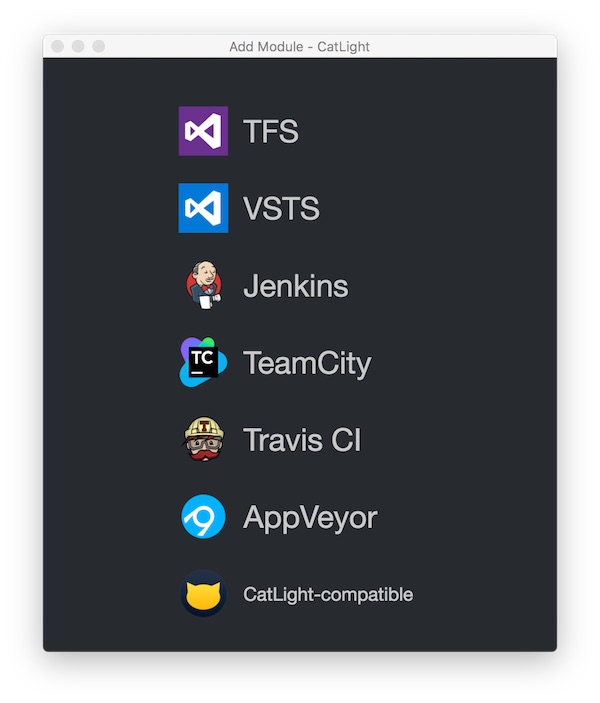
CatLight works with Jenkins, TFS, Travis CI and many more.

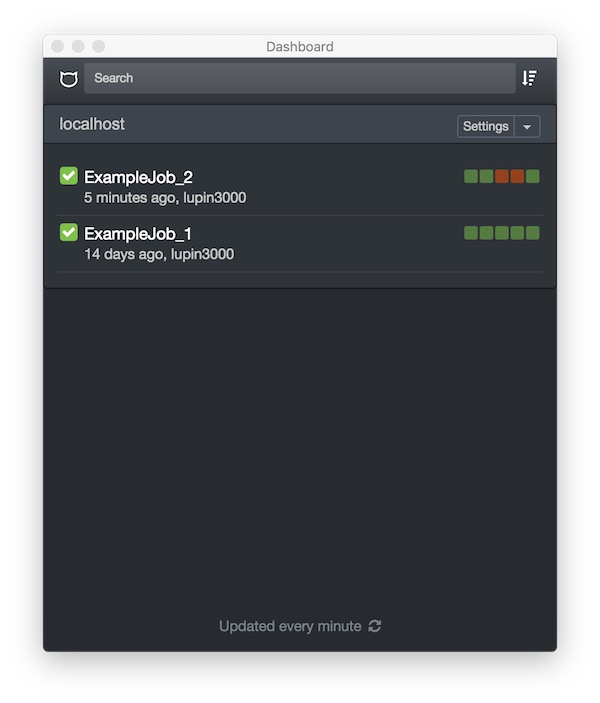
catlight setup

After successful installation and configuration, CatLight offers a lot of cool features.

catlight jobs

For personal usage it’s free, you only have to register.

Quick and dirty sync folders for Vagrant

Background

In our company we have different development teams working with same Vagrant boxes. As a challenge they need different sync folder locations – even inside teams. I’m just too lazy to provide and maintain all Vagrantfile templates for their needs. So i provide a quick and dirty solution for them.

Example

# -*- mode: ruby -*-
# vi: set ft=ruby :

Vagrant.configure("2") do |config|

  # box name
  config.vm.box = "lupin/centos7"

  # Disable replacing insecure key
  config.ssh.insert_key = false

  # Disable default synced folder
  config.vm.synced_folder ".", "/vagrant", disabled: true

  # Synced folder(s) by argument
  if !ENV['mount'].nil?

    loop do
      puts "local folder: "
      local_dir = STDIN.gets.chomp
      puts "target folder: "
      target_dir = STDIN.gets.chomp

      if local_dir.empty? || target_dir.empty?
        break
      end

      config.vm.synced_folder local_dir, target_dir
    end

  end

 # VirtualBox specific configuration
  config.vm.provider "virtualbox" do |vb|
    vb.gui = false
    vb.memory = "1024"
    vb.cpus = 1
    vb.name = "example_vm"
  end

end

Usage

# simple command
$ vagrant up

# check for synced folder(s)
$ vagrant ssh -c 'ls -la /'

# destroy environment
$ vagrant halt

# run with argument (mount)
$ mount=yes vagrant up
...
local folder:
src_a <ENTER>
target folder:
/vagrant_a <ENTER>
local folder:
src_b <ENTER>
target folder:
/vagrant_b <ENTER>
local folder:
<ENTER>
target folder:
<ENTER>
...

# show content
$ vagrant ssh -c 'cat /vagrant_a/SomeTestFile_a && cat /vagrant_b/SomeTestFile_b'
...
Hello world ... a
Hello world ... b
...

# destroy environment
$ vagrant destroy -f

πŸ˜‰

Test your infrastructure

Infrastructures can be very big. Luckily, there are provisioner like Chef, Salt, Ansible and etc. These provisioners can be very complex and possibly the developer has done something wrong. Therefore the infrastructure has to be tested! Tools like goss, Serverspec and Testinfra helps testers to validate. This tutorial show the first steps with Testinfra.

Testinfra is written in Python very small and easy to understand. Here is the GitHub repository.

Precondition

  • Vagrant (min. 1.9.3) installed
  • Python (min. 2.7) installed
  • pip (min. 9.0.1) and virtualenv (min. 15.1.0) installed
  • make (min. 3.81) installed

Project structure

To get used to it – i prepared some files for you. You only need to change the box name/url in Vagrantfile.

$ tree
.
β”œβ”€β”€ Makefile
β”œβ”€β”€ requirements.txt
β”œβ”€β”€ Vagrantfile
└── tests.py
ENV_DIR = .env
CURRENT_DIR := $(shell pwd)
INTERPRETER = $(CURRENT_DIR)/$(ENV_DIR)/bin/
PATH := ${PATH}:$(INTERPRETER)

help:
	@echo "run make <target> with:"
	@echo " > env       : create virtualenv directory $(ENV_DIR)"
	@echo " > deps      : install dependencies from requirements.txt"
	@echo " > clean_env : delete virtualenv directory $(ENV_DIR)"
	@echo " > up        : run vagrant up"
	@echo " > destroy   : run vagrant destroy"
	@echo " > test      : run testinfra on vagrant environment"
	@echo " > clean_all : delete all files and directories"

env:
	@echo "[RUN]: create virtualenv"
	virtualenv $(ENV_DIR) && \
	. $(ENV_DIR)/bin/activate && \
	make deps

deps:
	@echo "[RUN]: install dependencies"
	$(INTERPRETER)/pip install -r requirements.txt

up:
	@echo "[RUN]: vagrant up"
	vagrant up

destroy:
	@echo "[RUN]: vagrant destroy -f"
	vagrant destroy -f
	rm -fr $(CURRENT_DIR)/.vagrant

test:
	@echo "[RUN]: run testinfr on vagrant environment"
	vagrant ssh-config > $(CURRENT_DIR)/ssh-config
	$(INTERPRETER)/pytest -v --hosts=default --ssh-config=$(CURRENT_DIR)/ssh-config tests.py

clean_all:
	@echo "[RUN]: delete all files and directories"
	rm -fr $(CURRENT_DIR)/.cache $(CURRENT_DIR)/__pycache__
	rm -f $(CURRENT_DIR)/ssh-config
	make destroy
	make clean_env

clean_env:
	@echo "[RUN]: delete virtualenv"
	rm -fr $(ENV_DIR)
testinfra==1.5.4
paramiko==2.1.2
#!/usr/bin/env python

def test_system_type(SystemInfo):
    '''Check OS type'''
    type = SystemInfo.type
    assert type == 'linux'

def test_user_exists(User):
    '''Check user exists'''
    user = User('vagrant')
    assert user.exists

def test_firewalld_is_installed(Package):
    '''Check firewalld is installed'''
    package = Package('firewalld')
    assert package.is_installed

def test_firewalld_running_and_enabled(Service):
    '''Check firewalld service is running and enabled'''
    service = Service('firewalld')
    assert service.is_running
    assert service.is_enabled
# -*- mode: ruby -*-
# vi: set ft=ruby :

Vagrant.configure("2") do |config|

  # disable ssh key update
  config.ssh.insert_key = false

  # vagrant box name
  config.vm.box = ""

  # vagrant box url
  config.vm.box_url = ""

  # disable box update
  config.vm.box_check_update = false

  # disable synced_folder
  config.vm.synced_folder ".", "/vagrant", disabled: true

  # 2nd network interface (public)
  # config.vm.network "public_network"

  # virtualbox settings
  config.vm.provider "virtualbox" do |vb|
    vb.name = "example_vm"
    vb.cpus = "2"
    vb.memory = "2048"
    vb.gui = false
  end

end

Usage

# create virtualenv and install dependencies
$ make env

# create vagrant environment
$ make up

# run tests
$ make test

# delete all generated files and directories
$ make clean_all

Testinfra offers several connections backends for remote command execution and can be used with python standard unit test framework: unittest. So the integration with build servers is easily possible.

Kickstart Configurator

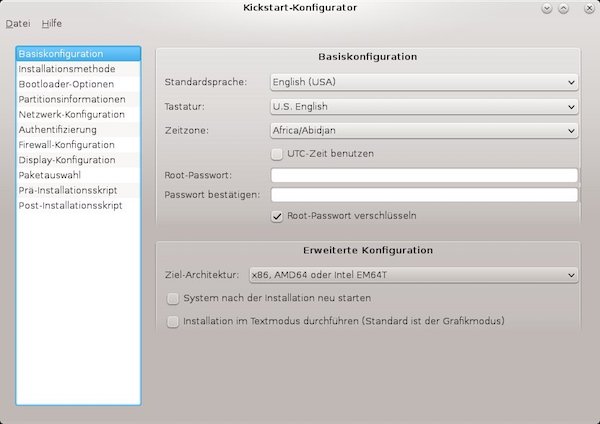
With kickstart configurator you don`t need to remember the correct syntax of kickstart files.Β An graphical user interface helps to create or to edit kickstart files on the fly.

Preparation

# install KDE
$ yum groupinstall -y "KDE Plasma Workspaces"

# install kickstart configurator
$ yum install -y system-config-kickstart

# start KDE
$ startx

Note: Of course you can also use Gnome, Cinnamon, MATE or Xfce!

Usage

To start the kickstart configurator search the application “Kickstart” [Applications => System Tools => Kickstart] or run terminal command:

# start kickstart configurator
$ system-config-kickstart
Kickstart-Konfigurator

Note: Via [File => Preview] you can review your current selections before saving.

Validation

After the creation, you should check the kickstart file!

# install pykickstart
$ yum install -y pykickstart

# start validate a kickstart file
$ ksvalidator </path/to/kickstart file>

Vagrant tipps and tricks

This time a few things which make life easier.

Check for Windows

There a quit some situations for Vagrant where you have platform specific steps to do. Here an example for Windows.

# -*- mode: ruby -*-
# vi: set ft=ruby :

Vagrant.configure("2") do |config|
  # some content

  if Vagrant::Util::Platform.windows? then
    # do something Windows specific
  else
    # do something not Windows specific
  end
end

Set a default provider

By default, VirtualBox is the default provider for Vagrant but sometimes it is needed to change.

# set provider via vagrant up command
$ vagrant up --provider vmware_fusion

It is possible to use environment variables in Vagrantfile. So the 2nd option is to set provider inside Vagrantfile!

# -*- mode: ruby -*-
# vi: set ft=ruby :

ENV['VAGRANT_DEFAULT_PROVIDER'] = 'vmware_fusion'

Vagrant.configure("2") do |config|
  # some content
end

Multiple Vagrantfiles in one directory

Sometimes it could happen that you have multiple Vagrantfiles in one directory. In such case environment variables helps.

# select specific Vagrantfile
$ VAGRANT_VAGRANTFILE=Vagrantfile_01 vagrant up

Create log files

To enable detailed logging use the VAGRANT_LOG environmental variable.

# run with info log level (Linux and Mac OS)
$ VAGRANT_LOG=info vagrant up

# run with info log level (Windows)
$ set VAGRANT_LOG=info
$ vagrant up

Level names can be “debug”, “info”, “warn” and “error”.

Jenkins log without colored output

For Jenkins log, the color output is superfluous! Here an simple example:

pipeline {
  agent any

  stages {
    stage('Build') {
      steps {
        // Make the output without color
        vagrant up --no-color
      }
    }
  }
}

Create Flask projects via Makefile

I’m not sure if there is something already! This tutorial should show you the value of Makefiles to make steps easier. The following Makefile can be used for creating new Flask projects.

CURRENT_DIR := $(shell pwd)

ifndef NAME
  NAME = Flaskproject
endif

VIRTUALENV_DIR = ${NAME}/.env
INTERPRETER = $(CURRENT_DIR)/$(VIRTUALENV_DIR)/bin/
PATH := ${PATH}:$(INTERPRETER)

help:
	@echo "Usage: $ make <target> [NAME=Flaskproject]"
	@echo " > create    : create flask project ${NAME}"
	@echo " > destroy   : destroy flask project ${NAME}"
	@echo " > deps      : install dependentcies via pip"

create:
	@echo "[RUN]: create flask project"
	@mkdir -p $(CURRENT_DIR)/${NAME}/app/{templates,static/{images,css,js,public},controllers}
	echo "Flask==0.11.1\nFlask-SQLAlchemy==2.1\nFlask-Script==2.0.5\nFlask-Assets==0.12\nFlask-Cache==0.13.1\nFlask-DebugToolbar==0.10.0\ncssmin==0.2.0\njsmin==2.2.1" \
	> $(CURRENT_DIR)/${NAME}/requirements.txt
	make env

destroy:
	@echo "[RUN]: destroy flask project"
	@rm -fr $(CURRENT_DIR)/${NAME}

env:
	@echo "[RUN]: create/activate virtualenv"
	@virtualenv $(VIRTUALENV_DIR) && \
	. $(VIRTUALENV_DIR)/bin/activate && \
	make deps

deps:
	@echo "[RUN]: install dependentcies"
	$(VIRTUALENV_DIR)/bin/pip install -r $(CURRENT_DIR)/${NAME}/requirements.txt

Usage

# create new project
$ make create

# create new project with own name
$ make create NAME=MyFlaskProject

# install python packages via pip (after adding to requirements.txt)
$ make deps

# delete specific project
$ make destroy NAME=MyFlaskProject


Command-line fake data generator

In my search for a command-line fake data generator I’ve found phony. What can I say, the tool does exactly what it should! After installation, you no longer need to leave the terminal.

Installation

# install go and git (Debian 8)
$ apt-get install -y golang git

# set GOPATH environment variable for workspace
$ mkdir ~/.go
$ echo "GOPATH=$HOME/.go" >> ~/.bashrc
$ echo "export GOPATH" >> ~/.bashrc
$ echo "PATH=\$PATH:\$GOPATH/bin" >> ~/.bashrc
$ source ~/.bashrc

# install phony
$ go get github.com/yields/phony

# verfiy installation
$ phony --version

Usage

# show help
$ phony --help

# list phony generators
$ phony --list

# generate 10 e-mails
$ echo '{{email}}' | phony --max 10

# generate 5 users (first name, last name)
$ echo 'User: {{name.first}} {{name.last}}' | phony --max 5

There is more! Look at the examples!