This tutorial should show, how easy it is to use the Robot Framework with PyCharm. After this small setup you can use PyCharm for your test automation with Robot Framework.
Preparation
Install PyCharm and the Robot Framework.
# check installed modules
$ pip list

# install Robot Framework (if not listed)
$ sudo pip install robotframework

# upgrade to the latest version
$ sudo pip install --upgrade robotframework

# verify installation
$ pybot --version
Configuration of PyCharm
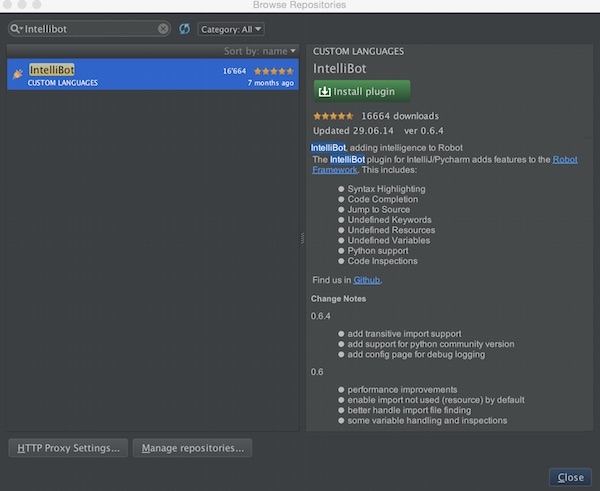
Now start PyCharm and open “Preferences” – “Plugins”. Press “Browse repositories…” button and search for “Intellibot”. Press “Install plugin” button and restart PyCharm.

Now create a new directory “testsuite” with new file named “example.robot” inside and insert the following content.
*** Test Cases ***

Example action log         this is a test
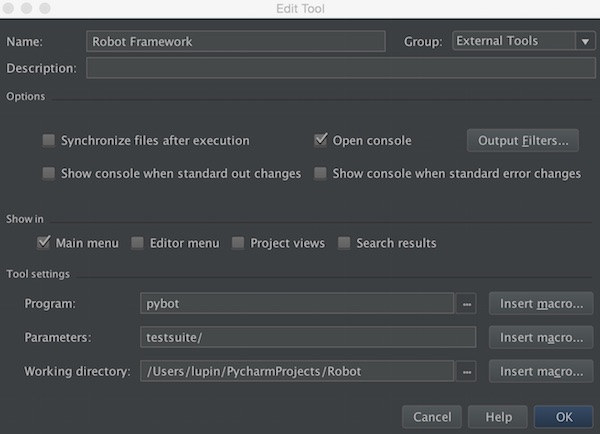
Open “Preferences” – “Tools” – “External Tools” and press “+” button. Insert a value for “Name”, enable checkbox “Open console”, insert “pybot” into Program, “test suite/” into Parameters and select you specific Working directory.

After press “OK” buttons, go to menu “Tools” – “External Tools” and select your given name. The output should show something like this:
/usr/local/bin/pybot testsuite/
=============================================================
Testsuite
=============================================================
Testsuite.Example
=============================================================
Example action                                       | PASS |
-------------------------------------------------------------
Testsuite.Example                                    | PASS |
1 critical test, 1 passed, 0 failed
1 test total, 1 passed, 0 failed
=============================================================
Testsuite                                            | PASS |
1 critical test, 1 passed, 0 failed
1 test total, 1 passed, 0 failed
=============================================================
Output: /output.xml
Log: /log.html
Report: /report.html

Process finished with exit code 0
Extended
In the next steps we create a first very simple test automation. For this we need to install the “selenium2library”.
# install package
$ sudo pip install robotframework-selenium2library
Now we create inside the “testsuite” directory a file called “1st_test.robot” with following content.
*** Settings ***
Documentation           This is a simple test with Robot Framework
Library                 Selenium2Library

*** Variables ***
${SERVER}               http://google.com
${BROWSER}              Firefox
${DELAY}                0

*** Keywords ***
Open Browser To Login Page
   Open Browser         ${SERVER}   ${BROWSER}
   Maximize Browser Window
   Set Selenium Speed   ${DELAY}

*** Test Cases ***
Valid Login Open Browser To Login Page
[Teardown].             Close Browser
After running the output should look like this:
/usr/local/bin/pybot testsuite/
=============================================================
Testsuite
=============================================================
Testsuite.1St Test :: This is a simple test with Robot Framework
=============================================================
Valid Login                                          | PASS |
-------------------------------------------------------------
Testsuite.1St Test :: This is a simple test with Robot Framework      | PASS |
1 critical test, 1 passed, 0 failed
1 test total, 1 passed, 0 failed
=============================================================
Testsuite.Example
=============================================================
Example action                                       | PASS |
-------------------------------------------------------------
Testsuite.Example                                    | PASS |
1 critical test, 1 passed, 0 failed
1 test total, 1 passed, 0 failed
=============================================================
Testsuite                                            | PASS |
2 critical tests, 2 passed, 0 failed
2 tests total, 2 passed, 0 failed
=============================================================
Output: /output.xml
Log: /log.html
Report: /report.html

Process finished with exit code 0