Ansible and PyCharm

Of course you can run Ansible within PyCharm via command-line, but it also works with the “Run” button.

Preparation

  • PyCharm project created (maybe with virtualenv)
  • YAML/Ansible support Plugin installed (optional)
  • BashSupport Plugin installed

Configuration

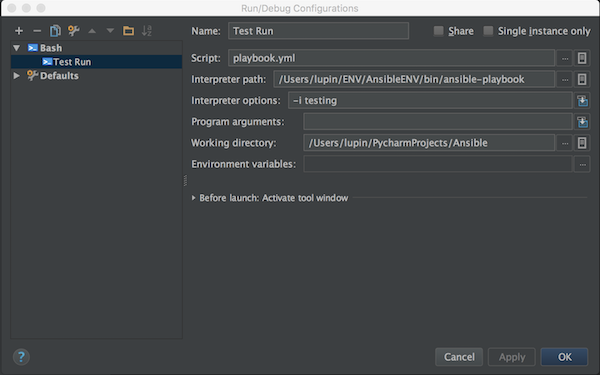
Open “Run/Debug Configurations” and add new Bash configuration. Give a name and Script value. The value should be the main Ansible playbook. As Interpreter path value select the ansible-playbook binary. For Interpreter option insert the Ansible inventory file. The last value is your current working directory. If you don’t set this value, the values for playbook and inventory need configured with absolute path!

PyCharm and Ansible

Now you can create different configurations and run Ansible via “Run” button.

pylint and lxml

If you use Python virtualenv, pylint and lxml together, you may see error messages in pylint test results. It`s because only trusted C extension resources (the standard library) should be used. Here is an opportunity to improve the pylint test results.

Generate a .pylintrc file

# generate .pylintrc file
$ pylint --generate-rcfile > .pylintrc

Open the .pylintrc file to edit

# open with vim editor
$ vim .pylintrc

Add lxml to extension-pkg-whitelist

# A comma-separated list of package or module names from where C extensions may
# be loaded. Extensions are loading into the active Python interpreter and may
# run arbitrary code
extension-pkg-whitelist=lxml

If you now perform the pylint test again, no error relating to lxml should appear.

JMeter and Taurus

Taurus from Blazemeter seems really to have a potential to be a star. There are new and easy ways to ease the workflow with JMeter. It allows, for example, configuration options and reports which JMeter does not offer by default.

Installation

# install via pip
$ sudo pip install bzt

On error look for installed libxml2 and libxslt libraries!

Usage

├── example.jmx
├── example.yml
└── requirements.txt
bzt==0.5.0

You don`t need jMeter or jMeter PlugIns installed! All will automatically downloaded in given path (see YAML).

---
modules:
  jmeter:
    path: ~/.bzt/jmeter-taurus/bin/jmeter
    download-link: http://apache.claz.org/jmeter/binaries/apache-jmeter-{version}.zip
    version: 2.13

execution:
  scenario:
    script: example.jmx
    variables:
      MY_TARGET_HOST: softwaretester.info

reporting:
  - module: console
  - module: final_stats
    summary: true
    percentiles: true
    test-duration: true
  - module: junit-xml
    filename: report/report.xml
    data-source: sample-labels

example.jmx

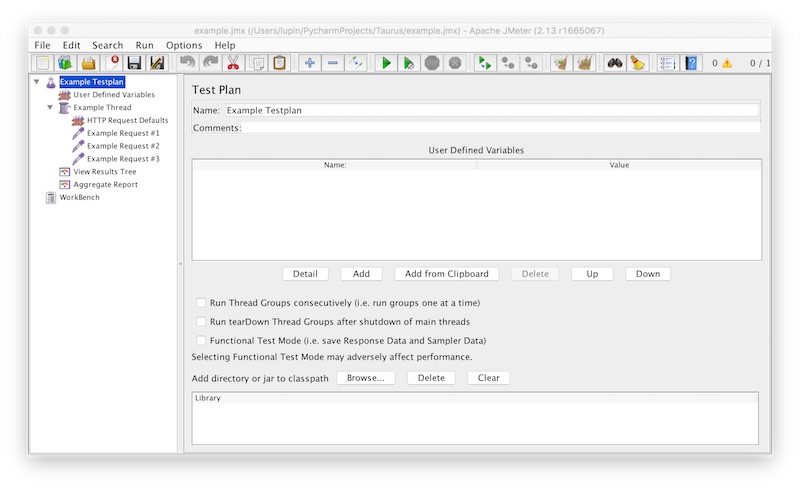
Create a JMeter testplan with “User Defined Variables”, one “Thread” with one “HTTP Request Defaults” and some “HTTP Requests”.

Taurus jMeter Example 1

On “User Defined Variables” – “Name” insert “MY_TARGET_HOST” this value will be set by Taurus YAML file.

Taurus jMeter Example 2

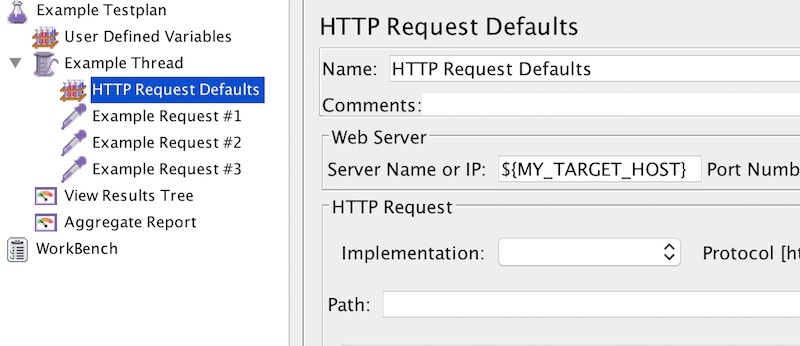
On “HTTP Request Defaults” – “WebServer” use the variable (MY_TARGET_HOST).

Taurus jMeter Example 3

Running JMeter test

# running headless by yaml file
$ bzt example.yml

# running headless by jmx file
$ bzt example.jmx

# running with JMeter GUI by yaml file
$ bzt example.yml -gui

# running with JMeter GUI by jmx file
$ bzt example.jmx -gui

Two folders will created on each test run. “report” (configured in YAML) and “Artifacts” (as Date/Time string). Attention – report.xml will replaced on each run!

Collecting Skype information with own python package

This time i will present 2 tutorials in one. One part describe how to create a simple Python package. The other part gives security testers a hint for sensible data. It is recommended to work with python virtualenv!

Preconditions

  • Python 2.7.x
  • pip, virtualenv, setuptools
  • Skype

Background

Skype stores sensible data, unencrypted, in a simple sqlite database (main.db). You would be surprised what information can be found there!

Example Locations

  • Mac OS – /Users/Library/Application Support/Skype/main.db
  • Windows – C:\Documents and Settings\Application Data\Skype\main.db

Python Package

.
├── MANIFEST.in
├── README.rst
├── SkypeSpy
│   └── __init__.py
└── setup.py
# -*- coding: utf-8 -*-
from setuptools import setup


def readme():
    with open('README.rst') as f:
        return f.read()

setup(
    name='SkypeSpy',
    version='1.0.0',
    description='Read values from Skype sqlite',
    long_description=readme(),
    url='<domain>',
    author='<author>',
    author_email='<email>',
    license='<license>',
    packages=['SkypeSpy'],
    include_package_data=True
)
SkypeSpy
--------

To use (with caution), simply do::

    >>> from SkypeSpy import SkypeInformation
    >>> SkypeInformation.set_db_path('path')
    >>> print SkypeInformation.get_accounts()
    >>> print SkypeInformation.get_contacts()
include README.rst
#!/usr/bin/env python
# -*- coding: utf-8 -*-
import sqlite3


class SkypeInformation(object):

    __DATABASE_PATH = str()

    @staticmethod
    def set_db_path(db_path):

        SkypeInformation.__DATABASE_PATH = str(db_path)

    @staticmethod
    def __read_from_db(sql_statement):
        """
        Read testsuite from sqlite file

        @type sql_statement: string
        @param sql_statement: sqlite select statement
        @return: list
        """

        db = sqlite3.connect(SkypeInformation.__DATABASE_PATH)
        statement = str(sql_statement)

        try:
            cursor = db.cursor()
            cursor.execute(statement)
            values = cursor.fetchall()
        except sqlite3.Error:
            values = list()
        finally:
            db.close()

        return values

    @staticmethod
    def get_accounts():

        statement = """SELECT DISTINCT
                       liveid_membername, skypename, fullname, gender,
                       languages, country, province, city, phone_home,
                       phone_office, phone_mobile, emails, homepage
                       FROM Accounts;"""

        return SkypeInformation.__read_from_db(statement)

    @staticmethod
    def get_contacts():

        statement = """SELECT DISTINCT
                       skypename, fullname, gender, languages, country,
                       province, city, phone_home, phone_office, phone_mobile,
                       emails, homepage
                       FROM Contacts;"""

        return SkypeInformation.__read_from_db(statement)

Install and execute

You can now create another environment (with virtualenv) and install the package.

# install via pip
$ pip install file:///path/to/SkypeSpy
#!/usr/bin/env python
import os
from SkypeSpy import SkypeInformation


def run():
    my_path = '/path/to/main.db'
    if os.path.exists(my_path):
        SkypeInformation.set_db_path(my_path)
        print SkypeInformation.get_contacts()
        print SkypeInformation.get_accounts()

if __name__ == '__main__':
    run()

More

There are other tables with information! Expand the package as desired.
Jenkins and Virtualenv

This guide is intended to show how you can use Jenkins/Hudson with Python virtualenv.

Precondition

Preparation

# install on Debian/Ubuntu/Mint
$ sudo aptitude update
$ sudo aptitude install python-pip python-virtualenv

# install on Mac OS
$ sudo easy_install pip
$ sudo pip install virtualenv

Example

Create (if necessary) a new “Freestyle Project” and configure as needed build-paramaters , VCS and etc. On section “Build” – “Execute Shell” insert following script.

# set variable
ExampleENV="${WORKSPACE}"/.ExampleENV

# delete folder and content if exists
if [ -d "$ExampleENV" ]; then
	rm -fr "$ExampleENV"
fi

# create new virtualenv
virtualenv --no-site-packages "$ExampleENV"

# activate virtualenv
. "$ExampleENV"/bin/activate

# CODE FOR VIRTUALENV...

Create screenshot with Python Selenium Webdriver

The following example show how easy you could make screenshots with Python Selenium Webdriver.

Precondition

Example

# -*- coding: utf-8 -*-

import unittest
from selenium import webdriver
from selenium.common.exceptions import NoSuchElementException

from MyLibrary import MyLibrary


class Example(unittest.TestCase):
    """Example class for screen shot"""

    def setUp(self):
        self.driver = webdriver.Firefox()
        self.driver.implicitly_wait(1)
        self.driver.get('http://softwaretester.info')

    def test_something(self):

        elem_id = 'is_not_there'

        try:
            elem = self.driver.find_element_by_id(elem_id)
            elem.click()
        except NoSuchElementException:
            MyLibrary.save_screenshot_picture(self.driver, elem_id)
            raise

    def tearDown(self):
        self.driver.close()

if __name__ == '__main__':
    unittest.main(verbosity=1)

The MyLibrary.py could be used on different places.

# -*- coding: utf-8 -*-

import os
import datetime
import time


class MyLibrary(object):
    """Simple screenshot class"""

    @staticmethod
    def get_date_time():
        """Return date_time"""
        dt_format = '%Y%m%d_%H%M%S'
        return datetime.datetime.fromtimestamp(time.time()).strftime(dt_format)

    @staticmethod
    def save_screenshot_picture(driver, file_name):
        """Make screenshot and save"""

        date_time = MyLibrary.get_date_time()
        current_location = os.getcwd()
        screenshot_folder = current_location + '/screenshot/'

        if not os.path.exists(screenshot_folder):
            os.mkdir(screenshot_folder)

        picture = screenshot_folder + file_name + ' ' + date_time + '.png'
        driver.save_screenshot(picture)

After running the test you should see the folder “/screenshot” with the picture.

JUnit report with Python Webdriver

To create JUnit reports, you just need the python library xmlrunner. This is needed for the integration with build server like Jenkins.

Installation

# example installation with pip
$ sudo pip install xmlrunner

Usage

Just replace for example:

unittest.TextTestRunner(verbosity=2).run(test_suite)

with

from xmlrunner import xmlrunner

""" code for test suite ... """

xmlrunner.XMLTestRunner(verbosity=2, output='reports').run(test_suite)

Jenkins

On Jenkins add a new “post-build” action and select the Publish JUnit test result report. Add now the string “reports/*.xml” into the “Test report XMLs” field.

DDT with Python Selenium

DDT (Data-driven Testing) with Python Selenium Webdriver is very easy! DDT becomes very useful if you have test cases that contains the same test steps. All values could outsourced into files or databases. This tutorial use CSV files.

Precondition

  • Python installed
  • selenium and ddt library installed

Example

The folder structure for this tutorial looks like:

├── data
│   └── scenario_a.csv
├── library
│   ├── GetData.py
│   └── __init__.py
├── scenarios
│   ├── __init__.py
│   └── scenario_a.py
└── testsuite.py

Into folder “data” we store the csv files. The packages “library” include a function to read the specific csv files and the package “scenarios” include the test cases. The test suite is on root folder.

#!/usr/bin/env python
# -*- coding: utf8 -*-

import unittest

from scenarios.scenario_a import TestScenarioA


# load test cases
scenario_a = unittest.TestLoader().loadTestsFromTestCase(TestScenarioA)

# create test suite
test_suite = unittest.TestSuite([scenario_a])

# execute test suite
unittest.TextTestRunner(verbosity=2).run(test_suite)

Into the “testsuite.py” we add all test cases provided by scenario package.

data folder

target_url,elem_name,search_value
http://softwaretester.info,s,python
http://softwaretester.info,s,selenium
http://softwaretester.info,s,webdriver
http://softwaretester.info,s,automation

The CSV stores the test data that we supplied to the @data decorator of test case.

library package

#!/usr/bin/env python
# -*- coding: utf8 -*-

__author__ = 'lupin'
#!/usr/bin/env python
# -*- coding: utf8 -*-

import csv


def get_csv_data(csv_path):
    """
    read test data from csv and return as list

    @type csv_path: string
    @param csv_path: some csv path string
    @return list
    """
    rows = []
    csv_data = open(str(csv_path), "rb")
    content = csv.reader(csv_data)

    # skip header line
    next(content, None)

    # add rows to list
    for row in content:
        rows.append(row)

    return rows

Just for read the csv and return the values as a list.

scenarios package

#!/usr/bin/env python
# -*- coding: utf8 -*-

__author__ = 'lupin'
#!/usr/bin/env python
# -*- coding: utf8 -*-

import unittest

from selenium import webdriver
from ddt import ddt, data, unpack

from library.GetData import get_csv_data


@ddt
class TestScenarioA(unittest.TestCase):
    """ inheriting the TestCase class"""

    @classmethod
    def setUpClass(cls):
        """test preparation"""
        cls.driver = webdriver.Firefox()
        cls.driver.implicitly_wait(3)
        cls.driver.set_window_size(450, 500)

    @data(*get_csv_data('./data/scenario_a.csv'))
    @unpack
    def test_search(self, target_url, elem_name, search_value):
        """test case for scenario a"""
        driver = self.driver
        driver.get(target_url)

        btn_elem = driver.find_element_by_id('search-toggle')
        btn_elem.click()

        input_elem = driver.find_element_by_name(elem_name)
        input_elem.clear()
        input_elem.send_keys(search_value)
        input_elem.submit()

    @classmethod
    def tearDownClass(cls):
        """clean up"""
        cls.driver.close()

Test case with @ddt (for classes), @data and @unpack (for methods) decorators.

  • @data take the arguments from csv file
  • @unpack unpacks tuples or lists into multiple arguments

The test_search() method accepts the arguments, which will be mapped to the tuple values by ddt.

Run

$ python -B testsuite.py