Create Alpine Linux VM with VirtualBox

Today a tutorial for creating a Alpine Linux VM with VirtualBox. The only limitation is that VirtualBox is already installed. Furthermore,  all of the steps are performed in the terminal (without VirtualBox-GUI).

Creation of VM

# change directory
$ cd VirtualBox\ VMs/

# download alpine iso
$ curl -o alpine-3.4.3-x86_64.iso http://dl-cdn.alpinelinux.org/alpine/v3.4/releases/x86_64/alpine-3.4.3-x86_64.iso

# checksum sha1 (optional)
$ openssl sha1 alpine-3.4.3-x86_64.iso

# create new directory
$ mkdir AlpineVM

# create storage medium for VM
$ VBoxManage createhd --filename ./AlpineVM/AlpineVM.vdi --size 8192

# list available OS types (just for fun and good to know)
$ VBoxManage list ostypes

# register new alpine VM
$ VBoxManage createvm --name "AlpineVM" --ostype Linux26_64 --register

# configure system settings of alpine VM
$ VBoxManage modifyvm "AlpineVM" --memory 1024 --cpus 1 --acpi on --pae off --hwvirtex on --nestedpaging on --rtcuseutc on --vram 16 --audio none --accelerate3d off --accelerate2dvideo off --usb on

# configure boot settings of VM
$ VBoxManage modifyvm "AlpineVM" --boot1 dvd --boot2 disk --boot3 none --boot4 none

# modify a storage controller (IDE)
$ VBoxManage storagectl "AlpineVM" --name "IDE" --add ide

# modify a storage controller (SATA)
$ VBoxManage storagectl "AlpineVM" --name "SATA" --add sata

# add storage medium to VM
$ VBoxManage storageattach "AlpineVM" --storagectl "SATA" --port 0 --device 0 --type hdd --medium ./AlpineVM/AlpineVM.vdi

# add alpine iso
$ VBoxManage storageattach "AlpineVM" --storagectl "IDE" --port 1 --device 0 --type dvddrive --medium alpine-3.4.3-x86_64.iso

# start alpine VM
$ VBoxManage startvm "AlpineVM"

Basic Alpine installation

# after login as user "root" (passwordless)

# run setup
$ setup-alpine

>>>
keyboard layout: "us"
keyboard variant: "us"
system hostname: "localhost"
initialise interface: "eth0, dhcp, no manual setup"
enter root password
timezone: "UTC"
HTTP/FTP proxy URL: "none"
Detect and add fastest mirror: "f"
SSH server: "openssh"
NTP client: "chrony"
install to disk: "sda"
install type: "sys"
erase & continue: "y"
<<<

# shutdown system
$ poweroff

Note: if you have an answers file you can do…

# download answers file
$ wget http://<uri>/<answers file>

# configuration via answers file
$ alpine-setup -f <path/to/answers file>

Remove medium (ISO)

# remove alpine iso
$ VBoxManage storageattach "AlpineVM" --storagectl "IDE" --port 1 --device 0 --type dvddrive --medium emptydrive

# start VM
$ VBoxManage startvm "AlpineVM"

Update Packages and install VirtualBox additions

# change directory
$ cd /etc

# enable repositories
$ vi apk/repositories

>>>
#/media/cdrom/apks
http://liskamm.alpinelinux.uk/v3.4/main
http://liskamm.alpinelinux.uk/v3.4/community
http://liskamm.alpinelinux.uk/edge/main
http://liskamm.alpinelinux.uk/edge/community
http://liskamm.alpinelinux.uk/edge/testing
<<<

# update and upgrade system
$ apk update && apk upgrade

# install virtualbox additions
$ apk add virtualbox-guest-modules-grsec virtualbox-additions-grsec

# reboot system
$ reboot

Optional steps

# install vim
$ apk add vim

# change directory
$ cd /etc

# modify sshd (manual) 
$ vim ssh/sshd_config

# restart sshd
$ init.d/sshd restart

# modify network interfaces (manual)
$ vim network/interfaces

# restart network
$ init.d/networking restart
Vagrant – Authentication failure

Depending on the vagrant version and how you build/package boxes, you may know the Authentication failure after command “$ vagrant up“. Here now two simple tips, how to prevent or fix it.

Prevention

If you build on an existing box you should not allow Vagrant to automatically insert a new key pair.

# -*- mode: ruby -*-
# vi: set ft=ruby :

Vagrant.configure('2') do |config|

  config.ssh.insert_key = false
  ...

end

Workaround

If the problem already exists…

# start VM (local)
$ vagrant up
...
default: Warning: Authentication failure. Retrying...
Timed out while waiting for the machine to boot...
...

# login via password authentication (local -> VM)
$ vagrant ssh

# start edit authorized_keys (VM)
[vagrant@acme ~]$ vim .ssh/authorized_keys

# add latest key from https://github.com/mitchellh/vagrant/blob/master/keys/vagrant.pub and save

# leave vm (VM -> local)
$ exit

# stop VM (local)
$ vagrant halt

On command “$ vagrant halt” Vagrant will automatically insert a new keypair.

Vagrant Plugin Recommendations

Today a few Vagrant Plugin Recommendations.

Preconditions

Preparation

Create a simple Vagrant BaseBox (as here) and if you like use the following Vagrantfile.

# -*- mode: ruby -*-
# vi: set ft=ruby :

Vagrant.configure(2) do |config|
  config.vm.box = "lupin/centos7"
  # config.vm.network "public_network"
  config.vm.synced_folder ".", "/vagrant", disabled: true
  # config.vm.synced_folder "./shared", "/vagrant"

  config.vm.provider "virtualbox" do |vb|
    vb.cpus = "2"
    vb.memory = "2048"
  end

  if Vagrant.has_plugin?("vagrant-hostsupdater")
    config.vm.network :private_network, ip: "10.0.0.10"
    config.hostsupdater.aliases = ["example.test"]
  end

  config.vm.provision "shell", inline: <<-SHELL
    sudo yum update -y
    sudo yum install -y vim docker
    sudo yum clean all
    sudo systemctl enable docker
    sudo systemctl start docker
    sudo setenforce 0
  SHELL

  config.vm.provision "docker" do |d|
    d.run "nginx", args: "-p 8080:80"
  end

  config.vm.provision "shell", inline: "sudo hostname -I"
end

1. vagrant-camera

# install camera plugin
$ vagrant plugin install vagrant-camera

# start VM via Vagrant
$ vagrant up

# do screenshot on current target folder
$ vagrant camera -s .

# show all pictures (Mac OS X)
$ open screenshot_default_*.png

2. vagrant-vbguest

# start VM via Vagrant
$ vagrant up

# ssh into VM (optional)
$ vagrant ssh

# check current version (optional)
$ VBoxControl --version
...
5.0.20r106931

# exit from VM (optional)
$ exit

# install vbguest plugin
$ vagrant plugin install vagrant-vbguest

# reload VM
$ vagrant reload

# ssh into VM (optional)
$ vagrant ssh

# list all downloaded (optional)
$ ls -l /opt
...
VBoxGuestAdditions-5.0.14
VBoxGuestAdditions-5.0.20

3. vagrant-hostsupdater

# install hostsupdater plugin
$ vagrant plugin install vagrant-hostsupdater

# check content of local hosts (optional)
$ cd /etc && cat hosts

# start VM
$ vagrant up

# or reload if already running
$ vagrant reload --provision

# check content of local hosts (optional)
$ cd /etc && cat hosts

# check status
$ vagrant ssh -c 'curl -v example.test:8080'

# stop VM
$ vagrant halt

# check content of local hosts (optional)
$ cd /etc && cat hosts


Vagrant and YAML

Ruby`s stdlib provides an YAML module for data serialization. By using this module, we can create only one Vagrantfile which reads the configuration from YAML files. If you are thinking of build servers – so only YAML files are needed for generating complete environments.

Preconditions

Preparation

# create new directory
$ mkdir ~/Projects/Tutorial && cd ~/Projects/Tutorial

# create new files
$ touch Vagrantfile && touch server-config.yml

# list available BaseBoxes (optional)
$ vagrant box list

# edit Vagrantfile
$ vim Vagrantfile

# edit server-config.yml
$ vim server-config.yml
# -*- mode: ruby -*-

require 'yaml'
servers = YAML.load_file('server-config.yml')
API_VERSION = "2"

Vagrant.configure(API_VERSION) do |config|

  servers.each do |servers|

    config.vm.define servers["name"] do |machine|

      machine.vm.box = servers["box"]
      machine.vm.network :forwarded_port, guest: 22, host: servers["ssh"], id: 'ssh'
      
      machine.vm.provider :virtualbox do |vb|
        vb.name = servers["name"]
        vb.memory = servers["memory"]
        vb.cpus = servers["cpus"]
      end

    end

  end

end
---
- name: box_centos7_a
  box: lupin/centos7
  ssh: 2221
  memory: 1024
  cpus: 2
- name: box_centos7_b
  box: lupin/centos7
  ssh: 2222
  memory: 1024
  cpus: 2

Usage

# start run
$ vagrant up

# check status
$ vagrant status

# SSH example
$ vagrant ssh [name]

Deploy with Vagrant on KVM/libvirt

In this tutorial i show, how to extend Vagrant, to convert BaseBoxes and deploy to KVM/libvirt.

Preconditions

  • Vagrant installed (min. version 1.5)

Install Vagrant-Mutate and Vagrant-Libvirt

# Ubuntu, Debian etc.
$ apt-get install qemu-utils libvirt-dev libxslt-dev libxml2-dev zlib1g-dev ruby-dev

# CentOS, Fedora, Red Hat etc.
$ yum install qemu-img libvirt-devel ruby-libvirt ruby-devel libxslt-devel libxml2-devel libguestfs-tools-c

# install Vagrant-Mutate
$ vagrant plugin install vagrant-mutate

# install Vagrant-libvirt
$ vagrant plugin install vagrant-libvirt

Convert existing VirtualBox BaseBox

# Syntax
$ vagrant mutate [box-name | url] [target provider]

# Example for libvirt
$ vagrant mutate lupin/centos7 libvirt

# Show boxes
$ vagrant box list

Supported conversions by Vagrant-mutate

  • VirtualBox to KVM
  • VirtualBox to libvirt
  • libvirt to KVM
  • KVM to libvirt

Vagrantfile example

# -*- mode: ruby -*-
ENV['VAGRANT_DEFAULT_PROVIDER'] = 'libvirt'

Vagrant.configure("2") do |config|

  config.vm.provider :libvirt do |libvirt|
    libvirt.host = '<target>'
    libvirt.username = '<user>'
    libvirt.id_ssh_key_file = '<key>'
    libvirt.connect_via_ssh = true
  end

  config.vm.define :my_vm do |machine|

    machine.vm.box = "trusty64"
    machine.vm.network :public_network, :dev => "br0", :mode => 'bridge'

    machine.vm.provider :libvirt do |setting|
      setting.memory = 1024
      setting.cpus = 1
      setting.random_hostname = true
    end

  end

end

Note: Read the documentation, there are many settings more available!

Usage

Common Vagrant commands like: up, destroy, suspend, resume, halt, ssh etc are available.

Easier work with docker-machine

Okay,… I think now everyone knows that i like it to work with docker-machine. This tutorial should give some hints – how to put local files and directories into a Docker container and change the default VM settings.

Preconditions

Let’s start local

# create new project (local)
$ mkdir -p ~/Projects/tutorial-project/config && cd ~/Projects/tutorial-project

# create some files and directory (local)
$ touch Dockerfile && touch .dockerignore && touch .git && touch config/file_{1..5}

# show content (local)
$ tree -a .
.
├── .dockerignore
├── .git
├── Dockerfile
└── config
    ├── file_1
    ├── file_2
    ├── file_3
    ├── file_4
    └── file_5

# edit Dockerfile (local)
$ echo -e "FROM centos:7\nRUN yum install -y tree\nCOPY . /home/docker-target" > Dockerfile

# edit .dockerignore (local)
$ echo -e ".*\nDockerfile\n*/file_5" > .dockerignore

Create new VM with specific settings

# create new VM (local)
$ docker-machine create -d virtualbox --virtualbox-cpu-count "2" --virtualbox-memory "2048" tutorial-vm

Note: there is a very well documented reference for all supported drivers!

Copy local stuff into vm

# copy local folder into VM (local)
$ docker-machine scp -r ~/Projects/tutorial-project tutorial-vm:tutorial-project

# ssh into VM (local)
$ docker-machine ssh tutorial-vm

# show content of directory (VM)
$ ls -la ~/tutorial-project/
$ ls -la ~/tutorial-project/config/

Create Docker image and container

# create Docker image from Dockerfile (VM)
$ docker build -t centos/tutorial ~/tutorial-project/

# create Docker container from image (VM)
$ docker run -ti --rm centos/tutorial

# show content of directory (Container)
$ tree -a /home/docker-target/
/home/docker-target/
`-- config
    |-- file_1
    |-- file_2
    |-- file_3
    `-- file_4

Bang… this is just one way… !

Create desktop environments on the fly

In this tutorial we will create desktop environments via docker on the fly. This environments could be used for development and/or testing purposes. For example you could expand it with Selenium-Grid nodes or provide manual testers all they need.

Preconditions

Steps

# create new VM
$ docker-machine create -d virtualbox xserver

# ssh into VM
$ docker-machine ssh xserver

# create Dockerfile
$ vi Dockerfile
FROM centos:centos7

MAINTAINER Lupin3000

RUN yum update -y
RUN yum install -y epel-release
RUN yum install -y x2goserver x2goserver-xsession
RUN yum groupinstall -y Xfce
RUN yum install -y firefox

RUN /usr/bin/ssh-keygen -t rsa -f /etc /ssh/ssh_host_rsa_key -N ''
RUN /usr/bin/ssh-keygen -t ecdsa -f /etc /ssh/ssh_host_ecdsa_key -N ''
RUN /usr/bin/ssh-keygen -t ed25519 -f /etc /ssh/ssh_host_ed25519_key -N ''

RUN adduser testuser
RUN echo 'testuser:test123' | chpasswd
RUN echo 'root:test123' | chpasswd

EXPOSE 22

CMD ["/usr/sbin/sshd", "-D"]

* Note: the space after etc is because of the security settings of my provider!

# build Docker image from Dockerfile
$ docker build -t centos7/xserver .

# run Docker container from image
$ docker run -p 2222:22 -d --name centos7-xserver centos7/xserver

Connect with x2go client

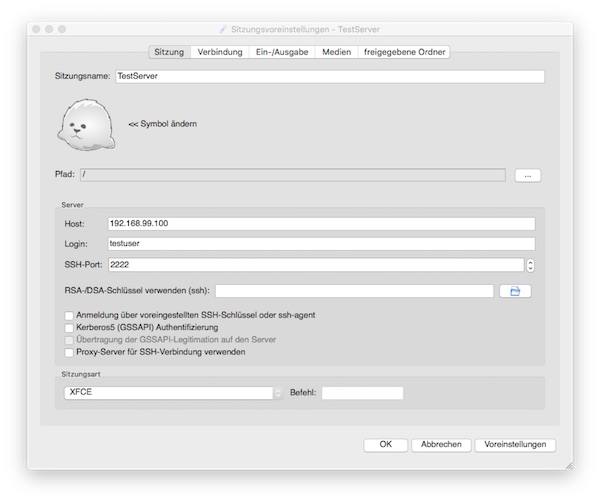
The following example shows the client configuration. Important are values ​​for host (192.168.99.100), port (2222) and session type (XFCE).

x2go client settings

Now it’s up to you to add more users, tools etc. – or to integrate everything into a build process.

docker-machine the easy way of administration

The docker-machine command offers very cool features in order to operate with Docker images/container. The first basic features I would like to present in this tutorial.

Preconditions

Preparation

# start VM
MBP:~ lupin$ docker-machine start apimock

# connect your shell to the machine
MBP:~ lupin$ docker-machine env apimock
MBP:~ lupin$ eval $(docker-machine env apimock)

# check status
MBP:~ lupin$ docker-machine ls

The output should now resemble the following example:

NAME      ACTIVE   DRIVER       STATE     URL                         SWARM   DOCKER    ERRORS
apimock   *        virtualbox   Running   tcp://192.168.99.100:2376           v1.11.0

Start and access Docker container

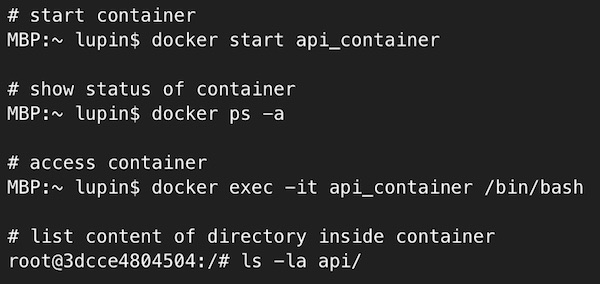
docker-machine access container

… a little hint …

docker-machine xterm

… leave container without stopping …

docker-machine leave container

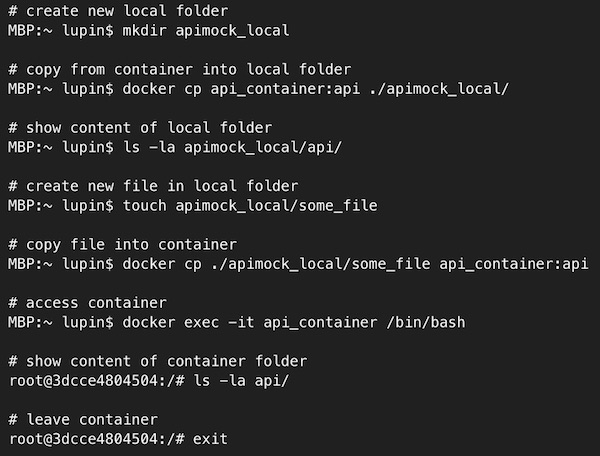
Copy files

docker-machine copy

How cool is that?